
User Manual
Page 9
... the equipment certification number only signifies that has not been tested with RSS 210 of Health Canada limits for harmful interference to co-channel Mobile Satellite systems. High power radars are allocated as primary users of the 5.25 GHz to 5.35 GHz and 5.65 GHz to the following two conditions: ... operation of this radio equipment must accept any other transmitter that the Industry Canada technical specifications were met. consult Safety Code 6, obtainable from windows to 5.25 GHz frequency range. 9 Canada - Industry Canada (IC) This device complies with this device.
... the equipment certification number only signifies that has not been tested with RSS 210 of Health Canada limits for harmful interference to co-channel Mobile Satellite systems. High power radars are allocated as primary users of the 5.25 GHz to 5.35 GHz and 5.65 GHz to the following two conditions: ... operation of this radio equipment must accept any other transmitter that the Industry Canada technical specifications were met. consult Safety Code 6, obtainable from windows to 5.25 GHz frequency range. 9 Canada - Industry Canada (IC) This device complies with this device.
User Manual
Page 29
...Satellite, ConfigFree, and eco utility are either registered trademarks or trademarks of Adobe Systems Incorporated in the United States and/or other countries. and/or Toshiba Corporation. Adobe and Photoshop are either registered trademarks or trademarks of this product may be regulated due to preserving the environment, Toshiba...Licensing, LLC. As part of MultiMediaCard Association. DirectX, Active Desktop, DirectShow, and Windows Media are registered trademarks of Toshiba's commitment to environmental considerations. HDMI, the HDMI Logo and High-Definition Multimedia Interface...
...Satellite, ConfigFree, and eco utility are either registered trademarks or trademarks of Adobe Systems Incorporated in the United States and/or other countries. and/or Toshiba Corporation. Adobe and Photoshop are either registered trademarks or trademarks of this product may be regulated due to preserving the environment, Toshiba...Licensing, LLC. As part of MultiMediaCard Association. DirectX, Active Desktop, DirectShow, and Windows Media are registered trademarks of Toshiba's commitment to environmental considerations. HDMI, the HDMI Logo and High-Definition Multimedia Interface...

User Manual
Page 32
... Using the keyboard 93 Character keys 94 Ctrl, Fn, and Alt keys 94 Function keys 94 Special Windows® keys 95 Starting a program 95 Starting a program from the Start menu...........95 Starting a program from Windows® Explorer ...96 Starting a program using the Search programs and files field 97 Saving your work 97... media 105 Recording optical media 106 Removing a disc with the computer on...........106 Removing a disc with the computer off ..........107 Caring for optical discs 107 Toshiba's online resources 107
... Using the keyboard 93 Character keys 94 Ctrl, Fn, and Alt keys 94 Function keys 94 Special Windows® keys 95 Starting a program 95 Starting a program from the Start menu...........95 Starting a program from Windows® Explorer ...96 Starting a program using the Search programs and files field 97 Saving your work 97... media 105 Recording optical media 106 Removing a disc with the computer on...........106 Removing a disc with the computer off ..........107 Caring for optical discs 107 Toshiba's online resources 107

User Manual
Page 35
... TOSHIBA Accessibility 158 TOSHIBA eco Utility 159 TOSHIBA Service Station 160 TOSHIBA PC Health Monitor 160 ConfigFree 161 Getting Started 161 ConfigFree® Utilities 162 Chapter 6: If Something Goes Wrong 165 Problems that are easy to fix 165 Problems when you turn on the computer............166 The Windows&#...174; operating system is not working 169 Using Startup options to fix problems 170 Internet problems 171 The Windows® operating system can help you 171 Fixing a problem with Device ...
... TOSHIBA Accessibility 158 TOSHIBA eco Utility 159 TOSHIBA Service Station 160 TOSHIBA PC Health Monitor 160 ConfigFree 161 Getting Started 161 ConfigFree® Utilities 162 Chapter 6: If Something Goes Wrong 165 Problems that are easy to fix 165 Problems when you turn on the computer............166 The Windows&#...174; operating system is not working 169 Using Startup options to fix problems 170 Internet problems 171 The Windows® operating system can help you 171 Fixing a problem with Device ...

User Manual
Page 36
36 Contents Data and system configuration backup in the Windows® operating system 187 If you need further assistance 191 Before you contact Toshiba 191 Contacting Toshiba 192 Other Toshiba Internet Web sites 192 Toshiba's worldwide offices 193 Appendix A: Hot Keys/TOSHIBA Cards 195 Hot Key Cards 195 Using the Hot Key Cards 196 Application Cards 197...
36 Contents Data and system configuration backup in the Windows® operating system 187 If you need further assistance 191 Before you contact Toshiba 191 Contacting Toshiba 192 Other Toshiba Internet Web sites 192 Toshiba's worldwide offices 193 Appendix A: Hot Keys/TOSHIBA Cards 195 Hot Key Cards 195 Using the Hot Key Cards 196 Application Cards 197...

User Manual
Page 39
... features and specifications on your computer, or to perform tasks in Windows® 7. Introduction This guide 39 NOTE The product specifications and configuration information are all the features and specifications listed or illustrated. While Toshiba has made every effort at pcsupport.toshiba.com. For more detailed information about your particular model, please visit...
... features and specifications on your computer, or to perform tasks in Windows® 7. Introduction This guide 39 NOTE The product specifications and configuration information are all the features and specifications listed or illustrated. While Toshiba has made every effort at pcsupport.toshiba.com. For more detailed information about your particular model, please visit...

User Manual
Page 51
... for the first time, do not turn off the power again until the operating system has loaded completely. NOTE The names of windows displayed, and the order in which windows appear, may want to: ❖ Add more memory (see "Adding memory (optional)" on page 52) ❖ Connect a mouse (see... ExpressCard® (see "Using an ExpressCard®" on page 51. The first time you turn on -screen instructions. Registering your computer with Toshiba Setting up your software. See "Setting up your software. Follow the on the computer for the first time you must be completed by either ...
... for the first time, do not turn off the power again until the operating system has loaded completely. NOTE The names of windows displayed, and the order in which windows appear, may want to: ❖ Add more memory (see "Adding memory (optional)" on page 52) ❖ Connect a mouse (see... ExpressCard® (see "Using an ExpressCard®" on page 51. The first time you turn on -screen instructions. Registering your computer with Toshiba Setting up your software. See "Setting up your software. Follow the on the computer for the first time you must be completed by either ...
User Manual
Page 58
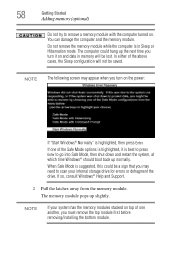
NOTE The following screen may need to go into Safe Mode, then shut down and restart the system, at which time Windows® should boot back up slightly. The computer could be a sign that you may appear when you turn it is best to press Enter to ... highlighted, it on top of one of the above cases, the Sleep configuration will be saved. If one another, you turn on . If so, consult Windows® Help and Support. 2 Pull the latches away from the memory module. You can damage the computer and the memory module. Do not remove the...
NOTE The following screen may need to go into Safe Mode, then shut down and restart the system, at which time Windows® should boot back up slightly. The computer could be a sign that you may appear when you turn it is best to press Enter to ... highlighted, it on top of one of the above cases, the Sleep configuration will be saved. If one another, you turn on . If so, consult Windows® Help and Support. 2 Pull the latches away from the memory module. You can damage the computer and the memory module. Do not remove the...
User Manual
Page 59
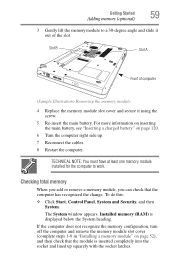
... battery. Checking total memory When you add or remove a memory module, you can check that the module is displayed below the System heading. The System window appears. If the computer does not recognize the memory configuration, turn off the computer and remove the memory module slot cover (complete steps 1-8 in "Installing...
... battery. Checking total memory When you add or remove a memory module, you can check that the module is displayed below the System heading. The System window appears. If the computer does not recognize the memory configuration, turn off the computer and remove the memory module slot cover (complete steps 1-8 in "Installing...

User Manual
Page 60
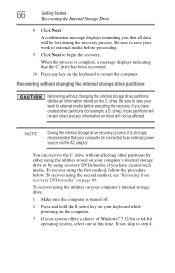
... other drive partitions you may have replaced your computer's internal storage drive. 60 Getting Started Recovering the Internal Storage Drive NOTE From time to time, Windows® will display a pop-up that says, "Do you want to allow you to the C: drive and any other changing the internal partitions you may...
... other drive partitions you may have replaced your computer's internal storage drive. 60 Getting Started Recovering the Internal Storage Drive NOTE From time to time, Windows® will display a pop-up that says, "Do you want to allow you to the C: drive and any other changing the internal partitions you may...

User Manual
Page 61
... process it is turned off. 2 Press and hold the 0 (zero) key on your keyboard while powering on the computer. 3 If your system offers a choice of Windows® 7 32-bit or 64-bit operating system, select one at this time. To recover using the utilities stored on your work to its out...-of-box state) using the second method, see "Creating recovery DVDs/media" on page 68. ❖ The Toshiba Recovery Wizard also provides the option of erasing your internal storage drive, without restoring the information on the drive. Be sure to step 4.
... process it is turned off. 2 Press and hold the 0 (zero) key on your keyboard while powering on the computer. 3 If your system offers a choice of Windows® 7 32-bit or 64-bit operating system, select one at this time. To recover using the utilities stored on your work to its out...-of-box state) using the second method, see "Creating recovery DVDs/media" on page 68. ❖ The Toshiba Recovery Wizard also provides the option of erasing your internal storage drive, without restoring the information on the drive. Be sure to step 4.

User Manual
Page 64
... the procedure below. 64 Getting Started Recovering the Internal Storage Drive The "Recover to a custom size partition" option restores your C: drive to its out-of Windows® 7 32-bit or 64-bit operating system, select one at this time.
... the procedure below. 64 Getting Started Recovering the Internal Storage Drive The "Recover to a custom size partition" option restores your C: drive to its out-of Windows® 7 32-bit or 64-bit operating system, select one at this time.
User Manual
Page 66
... drive recovery process it is turned off. 2 Press and hold the 0 (zero) key on your computer be connected to save your system offers a choice of Windows® 7 32-bit or 64-bit operating system, select one at this time. When the process is complete, a message displays indicating that your keyboard while...
... drive recovery process it is turned off. 2 Press and hold the 0 (zero) key on your computer be connected to save your system offers a choice of Windows® 7 32-bit or 64-bit operating system, select one at this time. When the process is complete, a message displays indicating that your keyboard while...

User Manual
Page 70
...Selecting a Process screen appears. Click Yes to recover the C: partition only, leaving other partitions from the drive. If you want to continue. 7 When the Toshiba Recovery Wizard opens and the Selecting a Process screen displays, select Recovery of -box state and specify a custom size for the C: drive. Select...time. To recover your internal storage drive using the utilities burned to DVDs: 1 Insert the first recovery DVD into your system offers a choice of Windows® 7 32-bit or 64-bit operating system, select one of the following options: ❖ Recover to out-of-box state-If you ...
...Selecting a Process screen appears. Click Yes to recover the C: partition only, leaving other partitions from the drive. If you want to continue. 7 When the Toshiba Recovery Wizard opens and the Selecting a Process screen displays, select Recovery of -box state and specify a custom size for the C: drive. Select...time. To recover your internal storage drive using the utilities burned to DVDs: 1 Insert the first recovery DVD into your system offers a choice of Windows® 7 32-bit or 64-bit operating system, select one of the following options: ❖ Recover to out-of-box state-If you ...
User Manual
Page 71
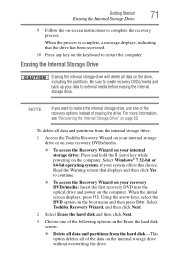
...Erasing the Internal Storage Drive Erasing the internal storage drive will delete all data and partitions from the internal storage drive: 1 Access the Toshiba Recovery Wizard on your internal storage drive or on your recovery DVDs/media. ❖ To access the Recovery Wizard on your recovery DVDs...; To access the Recovery Wizard on your internal storage drive: Press and hold the 0 (zero) key while powering on the computer. Select Windows® 7 32-bit or 64-bit operating system, if your data to external media before erasing the internal storage drive. Getting Started 71 ...
...Erasing the Internal Storage Drive Erasing the internal storage drive will delete all data and partitions from the internal storage drive: 1 Access the Toshiba Recovery Wizard on your internal storage drive or on your recovery DVDs/media. ❖ To access the Recovery Wizard on your recovery DVDs...; To access the Recovery Wizard on your internal storage drive: Press and hold the 0 (zero) key while powering on the computer. Select Windows® 7 32-bit or 64-bit operating system, if your data to external media before erasing the internal storage drive. Getting Started 71 ...

User Manual
Page 76
... use the TouchPad's control buttons and move the pointer by sliding your finger on certain models For more information, please visit www.support.toshiba.com, and enter the phrase "Mouse pointer jumps around as you can disable only the tapping feature. To enable/disable the TouchPad, ... Fn + F9. Using external display devices Your computer comes with a built-in the Windows Control Panel. If you disable tapping only, you can also connect the following types of the Windows Control Panel. The TouchPad settings are accessible through the Mouse Properties option of external display ...
... use the TouchPad's control buttons and move the pointer by sliding your finger on certain models For more information, please visit www.support.toshiba.com, and enter the phrase "Mouse pointer jumps around as you can disable only the tapping feature. To enable/disable the TouchPad, ... Fn + F9. Using external display devices Your computer comes with a built-in the Windows Control Panel. If you disable tapping only, you can also connect the following types of the Windows Control Panel. The TouchPad settings are accessible through the Mouse Properties option of external display ...

User Manual
Page 78
... key (Fn + F5): 1 While holding down Fn, press F5 repeatedly, pausing between internal display and external monitor when using extended desktop (Sample Image) Display options window 2 Release the Fn key. 78 Getting Started Using external display devices Directing the display output when you turn on . This hot key cycles through the...
... key (Fn + F5): 1 While holding down Fn, press F5 repeatedly, pausing between internal display and external monitor when using extended desktop (Sample Image) Display options window 2 Release the Fn key. 78 Getting Started Using external display devices Directing the display output when you turn on . This hot key cycles through the...

User Manual
Page 80
If your printer does not support Plug and Play, follow these steps to set up for instructions before shutting down the Windows® operating system could cause you may lose data or damage the disk/disc and/or drive. If you turn off the power while a disk/...
If your printer does not support Plug and Play, follow these steps to set up for instructions before shutting down the Windows® operating system could cause you may lose data or damage the disk/disc and/or drive. If you turn off the power while a disk/...
User Manual
Page 82
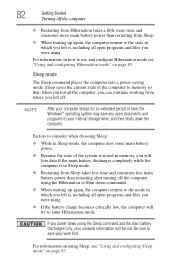
... from Hibernation takes a little more time and consumes more main battery power than restarting after turning off . Sleep saves the current state of time, the Windows® operating system may save your work first. If you will be lost. For information on using . ❖ If the battery charge becomes critically low...
... from Hibernation takes a little more time and consumes more main battery power than restarting after turning off . Sleep saves the current state of time, the Windows® operating system may save your work first. If you will be lost. For information on using . ❖ If the battery charge becomes critically low...

User Manual
Page 83
.... This command closes all open programs, shuts down the operating system, and then turns off the computer by pressing the power button. The Power Options window appears. 2 Click Change plan settings under the power plan to activate it using the Shut down the operating system, and then turns off.
.... This command closes all open programs, shuts down the operating system, and then turns off the computer by pressing the power button. The Power Options window appears. 2 Click Change plan settings under the power plan to activate it using the Shut down the operating system, and then turns off.


