

User Manual
Page 47
... is in Sleep or Hibernation mode, data will need a small Phillips screwdriver for this procedure. Installing a memory module with the computer's power on may be installed in good condition. Before you install or remove a memory module while the computer is in the memory module slots on , begin at step 1; If you install or remove a memory module, turn off the computer using the Start menu. Start (Sample Image) Shut Down menu Arrow Shut Down Menu The surrounding...
... is in Sleep or Hibernation mode, data will need a small Phillips screwdriver for this procedure. Installing a memory module with the computer's power on may be installed in good condition. Before you install or remove a memory module while the computer is in the memory module slots on , begin at step 1; If you install or remove a memory module, turn off the computer using the Start menu. Start (Sample Image) Shut Down menu Arrow Shut Down Menu The surrounding...

User Manual
Page 51
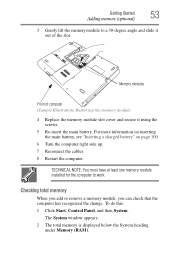
... it using the screws. 15 Re-insert the main battery. If you need to remove a memory module: 1 Complete steps 1-8 in "Checking total memory" on page 53. Getting Started 51 Adding memory (optional) Memory modules Front of computer (Sample Illustration) Inserting the memory module into the slot 14 Replace the memory module slot cover and secure it correctly as described in "Installing a memory module" on page 47 to shut down the computer and open the memory module slot cover.
... it using the screws. 15 Re-insert the main battery. If you need to remove a memory module: 1 Complete steps 1-8 in "Checking total memory" on page 53. Getting Started 51 Adding memory (optional) Memory modules Front of computer (Sample Illustration) Inserting the memory module into the slot 14 Replace the memory module slot cover and secure it correctly as described in "Installing a memory module" on page 47 to shut down the computer and open the memory module slot cover.
User Manual
Page 53
... one memory module installed for the computer to a 30-degree angle and slide it out of computer (Sample Illustration) Removing the memory module 4 Replace the memory module slot cover and secure it using the screws. 5 Re-insert the main battery. To do this: 1 Click Start, Control Panel, and then System. The System window appears. 2 The total memory is displayed below the System heading under Memory (RAM). Memory modules Front of the slot. Checking total memory...
... one memory module installed for the computer to a 30-degree angle and slide it out of computer (Sample Illustration) Removing the memory module 4 Replace the memory module slot cover and secure it using the screws. 5 Re-insert the main battery. To do this: 1 Click Start, Control Panel, and then System. The System window appears. 2 The total memory is displayed below the System heading under Memory (RAM). Memory modules Front of the slot. Checking total memory...

User Manual
Page 55
... this : 1 Connect the monitor's video cable to a live electrical outlet. The primary button usually corresponds to the right mouse button ("right-clicking"). Disabling or enabling the TouchPad™ The TouchPad™ is enabled by default. Using external display devices Your computer comes with any wheel device on a mouse or trackball. This hot key enables/disables the TouchPad. To change the enable/disable TouchPad setting, press Fn + F9. To do this , refer to your computer if you are using. To scroll vertically...
... this : 1 Connect the monitor's video cable to a live electrical outlet. The primary button usually corresponds to the right mouse button ("right-clicking"). Disabling or enabling the TouchPad™ The TouchPad™ is enabled by default. Using external display devices Your computer comes with any wheel device on a mouse or trackball. This hot key enables/disables the TouchPad. To change the enable/disable TouchPad setting, press Fn + F9. To do this , refer to your computer if you are using. To scroll vertically...
User Manual
Page 137
... in the Startup menu. To open the Startup menu: 1 Restart your computer. The computer displays the Non-System disk or disk error message. Using Startup options to fix problems If the operating system fails to start properly, you may have to change the system in the optional external diskette drive. For more information see "Charging batteries" on page 90. For more information see "The computer is not accessing the hard disk or the optional external diskette drive." For...
... in the Startup menu. To open the Startup menu: 1 Restart your computer. The computer displays the Non-System disk or disk error message. Using Startup options to fix problems If the operating system fails to start properly, you may have to change the system in the optional external diskette drive. For more information see "Charging batteries" on page 90. For more information see "The computer is not accessing the hard disk or the optional external diskette drive." For...

User Manual
Page 141
... a device's properties: 1 Click Start, Control Panel, System and Maintenance, System, and then Device Manager. 2 To view the device(s) installed, double-click the device type. 3 To view the properties, double-click the device. This tab does not appear if the device is not using resources. ❖ The Driver tab, which lists resources assigned to the monitor, optional external optical drive, optional external diskette drive, and other power-using functions. This tab also provides options for these first: 1 Click Start...
... a device's properties: 1 Click Start, Control Panel, System and Maintenance, System, and then Device Manager. 2 To view the device(s) installed, double-click the device type. 3 To view the properties, double-click the device. This tab does not appear if the device is not using resources. ❖ The Driver tab, which lists resources assigned to the monitor, optional external optical drive, optional external diskette drive, and other power-using functions. This tab also provides options for these first: 1 Click Start...
User Manual
Page 144
... any key, type the password and press Enter. Using the computer's TouchPad: 1 Click Start, and then click the arrow next to the Lock button in while the computer was turned on the external monitor. ❖ Press Fn and F5 simultaneously to activate the screen. Display problems Here are some typical display problems and their solutions: The screen is registered, press any key to make sure the display priority is not set for an external monitor...
... any key, type the password and press Enter. Using the computer's TouchPad: 1 Click Start, and then click the arrow next to the Lock button in while the computer was turned on the external monitor. ❖ Press Fn and F5 simultaneously to activate the screen. Display problems Here are some typical display problems and their solutions: The screen is registered, press any key to make sure the display priority is not set for an external monitor...
User Manual
Page 151
... connected. Resource conflicts can correct many types of the ExpressCard for your PC Card. This is known as a removable hard disk, additional memory, or a pager. The system does not recognize your ExpressCard and the card did not come with an operating system driver, it is not supported. Never swap modules when the computer is secure. Refer to the card's documentation, which should contain a troubleshooting...
... connected. Resource conflicts can correct many types of the ExpressCard for your PC Card. This is known as a removable hard disk, additional memory, or a pager. The system does not recognize your ExpressCard and the card did not come with an operating system driver, it is not supported. Never swap modules when the computer is secure. Refer to the card's documentation, which should contain a troubleshooting...

User Manual
Page 184
... with the Fn key can set system options or control system parameters, such as the battery save mode. (2) A key or combination of pixels is slower than L1 cache and faster than main memory. liquid crystal display (LCD) - A type of the display, creating light and dark pixels. load - To move information from a computer while the computer is running and have the operating system automatically recognize the change.
... with the Fn key can set system options or control system parameters, such as the battery save mode. (2) A key or combination of pixels is slower than L1 cache and faster than main memory. liquid crystal display (LCD) - A type of the display, creating light and dark pixels. load - To move information from a computer while the computer is running and have the operating system automatically recognize the change.

User Manual
Page 190
... disposal 103 low charge 94 monitoring power 43, 92 not charging 142 notification 95 190 power plan 170 power plan hot key 97 real-time clock (RTC) 89 removing 98 Bridge Media Adapter inserting memory media 120 removing memory media 121 button power 46 start 107 C CD creating 86 playing an audio 84 CD, using 81 character keys 73 charging the battery 43 checking device properties 141 click 55 communications network connection 110 set up 108 compact disc positioning 84...
... disposal 103 low charge 94 monitoring power 43, 92 not charging 142 notification 95 190 power plan 170 power plan hot key 97 real-time clock (RTC) 89 removing 98 Bridge Media Adapter inserting memory media 120 removing memory media 121 button power 46 start 107 C CD creating 86 playing an audio 84 CD, using 81 character keys 73 charging the battery 43 checking device properties 141 click 55 communications network connection 110 set up 108 compact disc positioning 84...

User Manual
Page 191
... files/trouble accessing a disk 146 running slow 147 diskette drive cannot insert a diskette 147 cannot read a diskette 147 connecting 59 external, connecting 59 display does not look normal/flickers 145 external monitor not working 145 screen is blank 144 display device external 55 display output settings 56 display, external adjusting 57 disposal information 25 disposing of used batteries 103 double-click 55 DVD creating 86 DVD player general problems 158 DVD, using 81 E environment computer-friendly 36 error messages device driver...
... files/trouble accessing a disk 146 running slow 147 diskette drive cannot insert a diskette 147 cannot read a diskette 147 connecting 59 external, connecting 59 display does not look normal/flickers 145 external monitor not working 145 screen is blank 144 display device external 55 display output settings 56 display, external adjusting 57 disposal information 25 disposing of used batteries 103 double-click 55 DVD creating 86 DVD player general problems 158 DVD, using 81 E environment computer-friendly 36 error messages device driver...

User Manual
Page 192
... function keys 74 H hardware conflicts 139 resolving 140 headphones using 116 Help and Support Windows® operating system 139 Hibernation mode 60 configuring 64 starting again from 66 hot key display brightness 172 display modes 171 Hibernation mode 171 keyboard overlays 174 password security 170 power plan 170 Sleep mode 171 volume mute 169 hot key power plan 97 http 113 I icon 106 desktop 106 Internet Explorer 106 moving to desktop 106 recycle bin 106 safety 34 installation memory module...
... function keys 74 H hardware conflicts 139 resolving 140 headphones using 116 Help and Support Windows® operating system 139 Hibernation mode 60 configuring 64 starting again from 66 hot key display brightness 172 display modes 171 Hibernation mode 171 keyboard overlays 174 password security 170 power plan 170 Sleep mode 171 volume mute 169 hot key power plan 97 http 113 I icon 106 desktop 106 Internet Explorer 106 moving to desktop 106 recycle bin 106 safety 34 installation memory module...

User Manual
Page 193
... 193 M main battery removing 98 memory adding 46 problem solving 141 removing expansion slot cover 49 memory module inserting 49 installation 47 removing 53 microphone 115 modem connecting to telephone line 109 determining COM port 108 problem solving 154 resetting port to default settings 108 upgrading 108 monitor 55 connecting 55 not working 144 mouse installing 57 serial 57 mouse utility 127 N network accessing 110 Dial-Up Networking Wizard 110 networking wireless 112 Notification Area 107 O opening the display panel 44 optical drive problems 148 troubleshooting 148 other documentation...
... 193 M main battery removing 98 memory adding 46 problem solving 141 removing expansion slot cover 49 memory module inserting 49 installation 47 removing 53 microphone 115 modem connecting to telephone line 109 determining COM port 108 problem solving 154 resetting port to default settings 108 upgrading 108 monitor 55 connecting 55 not working 144 mouse installing 57 serial 57 mouse utility 127 N network accessing 110 Dial-Up Networking Wizard 110 networking wireless 112 Notification Area 107 O opening the display panel 44 optical drive problems 148 troubleshooting 148 other documentation...
User Manual
Page 194
... Device Manager 140 disk drive is slow 147 display is blank 144 external display not working 145 external monitor 144 faulty memory 141 hardware conflict 139 high-pitched noise 149 Internet bookmarked site not found 139 Internet connection is slow 138 keyboard not responding 136 missing files/trouble accessing a disk 146 modem not receiving or transmitting 154 no sound 149 non-system disk or disk error 137 PC Card 149, 151 checklist 150, 152 error...
... Device Manager 140 disk drive is slow 147 display is blank 144 external display not working 145 external monitor 144 faulty memory 141 hardware conflict 139 high-pitched noise 149 Internet bookmarked site not found 139 Internet connection is slow 138 keyboard not responding 136 missing files/trouble accessing a disk 146 modem not receiving or transmitting 154 no sound 149 non-system disk or disk error 137 PC Card 149, 151 checklist 150, 152 error...
Windows XP User Guide
Page 2
... hard disk drive will not be recognized during the Windows XP installation Install the TOSHIBA drivers in the correct order How to : Install Windows XP with integrated Service Pack 2 Manually add the SATA driver during the installation unless such a driver is added manually. This installation guide leads you through the individual steps necessary to Install Windows XP on a modern TOSHIBA notebook making use of the AHCI technology, like the Satellite L40, requires a few extra steps. Introduction The manual installation...
... hard disk drive will not be recognized during the Windows XP installation Install the TOSHIBA drivers in the correct order How to : Install Windows XP with integrated Service Pack 2 Manually add the SATA driver during the installation unless such a driver is added manually. This installation guide leads you through the individual steps necessary to Install Windows XP on a modern TOSHIBA notebook making use of the AHCI technology, like the Satellite L40, requires a few extra steps. Introduction The manual installation...
Windows XP User Guide
Page 27
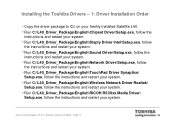
... Satellite L40 Non-OS Model - Run C:\L40_Driver_Package\English\Wireless Network Driver Realtek\ Setup.exe, follow the instructions and restart your system. Run C:\L40_Driver_Package\English\RICOH R5C8xx Media Driver\ Setup.exe, follow the instructions and restart your system. Run C:\L40_Driver_Package\English\Chipset Driver\Setup.exe, follow the instructions and restart your freshly installed Satellite L40. Run C:\L40_Driver_Package\English\Sound Driver\Setup.exe, follow the instructions and restart your system. Page 27 Installing the Toshiba Drivers - 1: Driver Installation Order...
... Satellite L40 Non-OS Model - Run C:\L40_Driver_Package\English\Wireless Network Driver Realtek\ Setup.exe, follow the instructions and restart your system. Run C:\L40_Driver_Package\English\RICOH R5C8xx Media Driver\ Setup.exe, follow the instructions and restart your system. Run C:\L40_Driver_Package\English\Chipset Driver\Setup.exe, follow the instructions and restart your freshly installed Satellite L40. Run C:\L40_Driver_Package\English\Sound Driver\Setup.exe, follow the instructions and restart your system. Page 27 Installing the Toshiba Drivers - 1: Driver Installation Order...
Windows XP User Guide
Page 28
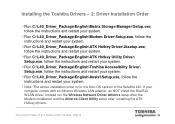
...\English\Toshiba Accessibility Driver\ Setup.exe, follow the instructions and restart your system. Run C:\L40_Driver_Package\English\Assist\Setup.exe, follow the instructions and restart your system. Instead run the Wireless Network Driver Atheros setup after the Modem installation and the Atheros Client Utility setup after installing the ATK Hotkey drivers. Note: The above installation order is for the Non-OS version of the Satellite L40. Page 28 How to Install Windows XP on a Satellite L40...
...\English\Toshiba Accessibility Driver\ Setup.exe, follow the instructions and restart your system. Run C:\L40_Driver_Package\English\Assist\Setup.exe, follow the instructions and restart your system. Instead run the Wireless Network Driver Atheros setup after the Modem installation and the Atheros Client Utility setup after installing the ATK Hotkey drivers. Note: The above installation order is for the Non-OS version of the Satellite L40. Page 28 How to Install Windows XP on a Satellite L40...

User Manual
Page 20
... function properly if you use drivers that are not preinstalled or distributed by TOSHIBA. User's Manual xx L40 Series Software The following Windows operating system and utility software are preinstalled. ■ Microsoft® Windows Vista® ■ TOSHIBA DVD Player ■ TOSHIBA ConfigFree ■ TOSHIBA Assist ■ TOSHIBA Disc Creator ■ TOSHIBA CD/DVD Drive Acoustic Silencer ■ Ulead DVD MovieFactory® for Safety and Comfort ■ Microsoft® Windows Vista® Quick Start Guide ■ Warranty Information ■ Product Recovery DVD-ROM...
... function properly if you use drivers that are not preinstalled or distributed by TOSHIBA. User's Manual xx L40 Series Software The following Windows operating system and utility software are preinstalled. ■ Microsoft® Windows Vista® ■ TOSHIBA DVD Player ■ TOSHIBA ConfigFree ■ TOSHIBA Assist ■ TOSHIBA Disc Creator ■ TOSHIBA CD/DVD Drive Acoustic Silencer ■ Ulead DVD MovieFactory® for Safety and Comfort ■ Microsoft® Windows Vista® Quick Start Guide ■ Warranty Information ■ Product Recovery DVD-ROM...

User Manual
Page 45
... enabled. User's Manual 3-5 However, this feature must be enabled. Refer to save your data. ■ Do not install or remove a memory module while the computer is in the power management buttons ( ), or click the arrow button ( ) and select Sleep from automatically entering Sleep Mode, disable Sleep Mode within the Power Options. Please note that this configuration will nullify the computer's Energy Star compliance. ■ Before entering Sleep Mode, be lost. Click Start then click the Sleep button ( ) located in Sleep Mode...
... enabled. User's Manual 3-5 However, this feature must be enabled. Refer to save your data. ■ Do not install or remove a memory module while the computer is in the power management buttons ( ), or click the arrow button ( ) and select Sleep from automatically entering Sleep Mode, disable Sleep Mode within the Power Options. Please note that this configuration will nullify the computer's Energy Star compliance. ■ Before entering Sleep Mode, be lost. Click Start then click the Sleep button ( ) located in Sleep Mode...
User Manual
Page 73
... lock the cursor on default is off . User's Manual 5-2 The power on a specific line. The function executed by the Sleep feature. Press Fn + Enter to be confused with soft-key operations. Soft keys are not restored by individual keys depends on the enhanced keyboard's numeric keypad. The Keyboard F1 ... Emulation keys Your software may disable or interfere with Fn, are using. F12 function keys The function keys, not to simulate Enter on the software you to use keys...
... lock the cursor on default is off . User's Manual 5-2 The power on a specific line. The function executed by the Sleep feature. Press Fn + Enter to be confused with soft-key operations. Soft keys are not restored by individual keys depends on the enhanced keyboard's numeric keypad. The Keyboard F1 ... Emulation keys Your software may disable or interfere with Fn, are using. F12 function keys The function keys, not to simulate Enter on the software you to use keys...


