User Guide
Page 30
30 Contents Chapter 2: Learning the Basics 78 Computing tips 78 Using the keyboard 80 Character keys 80 Ctrl, Fn, and Alt keys 80 Function keys 81 Special Windows® keys 81 Starting a program 81 Starting a program from the Start menu...........82 Starting a program from Windows® Explorer ...82...disc with the computer on 92 Removing a disc with the computer off 92 Caring for optical discs 93 Toshiba's online resources 93 Chapter 3: Mobile Computing 94 Toshiba's energy-saver design 94 Running the computer on battery power 94 Battery Notice 95 Power management 96 Using ...
30 Contents Chapter 2: Learning the Basics 78 Computing tips 78 Using the keyboard 80 Character keys 80 Ctrl, Fn, and Alt keys 80 Function keys 81 Special Windows® keys 81 Starting a program 81 Starting a program from the Start menu...........82 Starting a program from Windows® Explorer ...82...disc with the computer on 92 Removing a disc with the computer off 92 Caring for optical discs 93 Toshiba's online resources 93 Chapter 3: Mobile Computing 94 Toshiba's energy-saver design 94 Running the computer on battery power 94 Battery Notice 95 Power management 96 Using ...

User Guide
Page 31
... power 99 What to do when the main battery runs low ...100 Setting battery notifications 100 Conserving battery power 101 Power Plans 102 Using a hot key to set the Power Plan 103 Changing the main battery 104 Removing the battery from the computer .......104 Inserting a charged battery 106 Taking care of...
... power 99 What to do when the main battery runs low ...100 Setting battery notifications 100 Conserving battery power 101 Power Plans 102 Using a hot key to set the Power Plan 103 Changing the main battery 104 Removing the battery from the computer .......104 Inserting a charged battery 106 Taking care of...
User Guide
Page 33
... the Windows® operating system 171 If you need further assistance 175 Before you contact Toshiba 175 Contacting Toshiba 175 Other Toshiba Internet Web sites 176 Toshiba's worldwide offices 176 Appendix A: Hot Keys/TOSHIBA Cards 178 Hot Key Cards 178 Using the Hot Key Cards 179 Application Cards 180 Using the Application Cards 181 Card Case 181 Hot...
... the Windows® operating system 171 If you need further assistance 175 Before you contact Toshiba 175 Contacting Toshiba 175 Other Toshiba Internet Web sites 176 Toshiba's worldwide offices 176 Appendix A: Hot Keys/TOSHIBA Cards 178 Hot Key Cards 178 Using the Hot Key Cards 179 Application Cards 180 Using the Application Cards 181 Card Case 181 Hot...

User Guide
Page 34
34 Contents Sleep mode 185 Hibernation mode 186 Output (Display switch 187 Display brightness 188 Disabling or enabling wireless devices............189 Disabling or enabling the TouchPad 190 Zoom (Display resolution 191 Keyboard hot key functions 192 Appendix B: Power Cord/Cable Connectors 193 Glossary 194 Index 208
34 Contents Sleep mode 185 Hibernation mode 186 Output (Display switch 187 Display brightness 188 Disabling or enabling wireless devices............189 Disabling or enabling the TouchPad 190 Zoom (Display resolution 191 Keyboard hot key functions 192 Appendix B: Power Cord/Cable Connectors 193 Glossary 194 Index 208

User Guide
Page 55
... into the memory slot's socket at approximately a 30-degree angle (to be installed in the socket. Slot B is the bottom slot. notch latch connector latch key (Sample Illustration) Aligning the memory module with the socket 12 Firmly press the memory module into the socket NOTE For this model Slot A is the... before removing/installing the bottom module. Position the module toward the socket, aligning the connector's notch with its sides, avoiding any contact with the matching key in Slot A. 11 Pick up the memory module by its connector.
... into the memory slot's socket at approximately a 30-degree angle (to be installed in the socket. Slot B is the bottom slot. notch latch connector latch key (Sample Illustration) Aligning the memory module with the socket 12 Firmly press the memory module into the socket NOTE For this model Slot A is the... before removing/installing the bottom module. Position the module toward the socket, aligning the connector's notch with its sides, avoiding any contact with the matching key in Slot A. 11 Pick up the memory module by its connector.
User Guide
Page 61
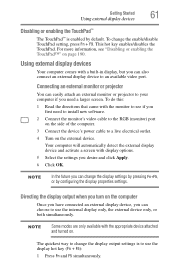
... display devices Your computer comes with display options. 5 Select the settings you can also connect an external display device to use the display hot key (Fn + F5): 1 Press Fn and F5 simultaneously. Your computer will automatically detect the external display device and activate a screen with a ... 4 Turn on the computer Once you have connected an external display device, you can choose to an available video port. This hot key enables/disables the TouchPad. Directing the display output when you first need a larger screen. NOTE Some modes are only available with the monitor...
... display devices Your computer comes with display options. 5 Select the settings you can also connect an external display device to use the display hot key (Fn + F5): 1 Press Fn and F5 simultaneously. Your computer will automatically detect the external display device and activate a screen with a ... 4 Turn on the computer Once you have connected an external display device, you can choose to an available video port. This hot key enables/disables the TouchPad. Directing the display output when you first need a larger screen. NOTE Some modes are only available with the monitor...

User Guide
Page 62
See the video device documentation for the display to adjust the video settings. This hot key cycles through the settings in the following order (the last two options are available if an external monitor... Getting Started Using external display devices 2 While holding down Fn, press F5 repeatedly until the setting you press the F5 key to allow time for additional configuration steps. Adjusting the quality of the external display To obtain the best picture quality from ... display and external monitor when using extended desktop (Sample Image) Display options window 3 Release the Fn key.
See the video device documentation for the display to adjust the video settings. This hot key cycles through the settings in the following order (the last two options are available if an external monitor... Getting Started Using external display devices 2 While holding down Fn, press F5 repeatedly until the setting you press the F5 key to allow time for additional configuration steps. Adjusting the quality of the external display To obtain the best picture quality from ... display and external monitor when using extended desktop (Sample Image) Display options window 3 Release the Fn key.

User Guide
Page 80
... the Basics Using the keyboard Using the keyboard Your computer's keyboard contains character keys, control keys, function keys, and special Windows® keys. (Sample Illustration) Keyboard Character keys Typing with the character keys is very much like typing on the program you are not interchangeable. For more... information, see your program documentation. Ctrl, Fn, and Alt keys (Sample Illustration) Ctrl, Fn, and Alt keys The Ctrl, Fn, and Alt keys do different things depending on a typewriter, except that: ❖ The space bar creates a...
... the Basics Using the keyboard Using the keyboard Your computer's keyboard contains character keys, control keys, function keys, and special Windows® keys. (Sample Illustration) Keyboard Character keys Typing with the character keys is very much like typing on the program you are not interchangeable. For more... information, see your program documentation. Ctrl, Fn, and Alt keys (Sample Illustration) Ctrl, Fn, and Alt keys The Ctrl, Fn, and Alt keys do different things depending on a typewriter, except that: ❖ The space bar creates a...

User Guide
Page 81
...the Start menu, Windows® Explorer and the Start Search field. For example, Fn+F9 turns off the TouchPad. For more information, see "Hot key functions" on the computer. You can: ❖ Double-click the icon for the program on your desktop ❖ Use the Start menu ❖... a program The easiest way to start a program is to double-click the name of the keyboard. (Sample Illustration) Function keys F1 through F12 are called function keys because they execute programmed functions when pressed. To find the file, use the Start menu or Windows® Explorer. If you...
...the Start menu, Windows® Explorer and the Start Search field. For example, Fn+F9 turns off the TouchPad. For more information, see "Hot key functions" on the computer. You can: ❖ Double-click the icon for the program on your desktop ❖ Use the Start menu ❖... a program The easiest way to start a program is to double-click the name of the keyboard. (Sample Illustration) Function keys F1 through F12 are called function keys because they execute programmed functions when pressed. To find the file, use the Start menu or Windows® Explorer. If you...

User Guide
Page 103
... the Power Plan: 1 Press Fn and F2 simultaneously to set the Power Plan You may use a hot key to display the Power Plan hot key card. (Sample Image) Power Plan hot key card The Power Saver plan is a compromise between battery time and performance. The High Performance plan will give ...you to change basic settings. 5 Click Change Advanced Settings to edit. Using a hot key to set the Power Plan. By default the three power plans Balanced, Power Saver, and High Performance are available for each item. 6 Click Save...
... the Power Plan: 1 Press Fn and F2 simultaneously to set the Power Plan You may use a hot key to display the Power Plan hot key card. (Sample Image) Power Plan hot key card The Power Saver plan is a compromise between battery time and performance. The High Performance plan will give ...you to change basic settings. 5 Click Change Advanced Settings to edit. Using a hot key to set the Power Plan. By default the three power plans Balanced, Power Saver, and High Performance are available for each item. 6 Click Save...

User Guide
Page 104
... you have two options: plug in the AC adaptor or install a charged main battery. You are : Balanced, Power Saver, and High Performance. 3 Release the Fn key. The battery pack's internal protective device could also damage the battery pack and computer. ❖ Never expose a battery pack to the instructions in the selected.... 3 Unplug and remove any data, save your files and then either accidentally or intentionally bringing the battery terminals in death or serious injury. The hot key card disappears.
... you have two options: plug in the AC adaptor or install a charged main battery. You are : Balanced, Power Saver, and High Performance. 3 Release the Fn key. The battery pack's internal protective device could also damage the battery pack and computer. ❖ Never expose a battery pack to the instructions in the selected.... 3 Unplug and remove any data, save your files and then either accidentally or intentionally bringing the battery terminals in death or serious injury. The hot key card disappears.
User Guide
Page 116
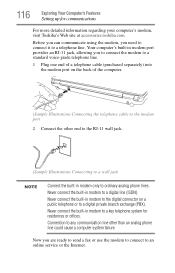
... to the digital connector on the back of the computer. (Sample Illustration) Connecting the telephone cable to a key telephone system for communications For more detailed information regarding your computer's modem, visit Toshiba's Web site at accessories.toshiba.com. Never connect the built-in modem only to a digital private branch exchange (PBX). 116 Exploring...
... to the digital connector on the back of the computer. (Sample Illustration) Connecting the telephone cable to a key telephone system for communications For more detailed information regarding your computer's modem, visit Toshiba's Web site at accessories.toshiba.com. Never connect the built-in modem only to a digital private branch exchange (PBX). 116 Exploring...
User Guide
Page 131
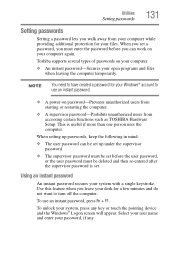
...enter the password before the user password, or the user password must be set before you walk away from accessing certain functions such as TOSHIBA Hardware Setup. When setting up under the supervisor password. ❖ The supervisor password must be deleted and then re-entered after the..., keep the following in mind: ❖ The user password can work on your computer again. Select your user name and enter your files. Toshiba supports several types of passwords on your computer: ❖ An instant password-Secures your system with a single keystroke. NOTE You need to have ...
...enter the password before the user password, or the user password must be set before you walk away from accessing certain functions such as TOSHIBA Hardware Setup. When setting up under the supervisor password. ❖ The supervisor password must be deleted and then re-entered after the..., keep the following in mind: ❖ The user password can work on your computer again. Select your user name and enter your files. Toshiba supports several types of passwords on your computer: ❖ An instant password-Secures your system with a single keystroke. NOTE You need to have ...
User Guide
Page 137
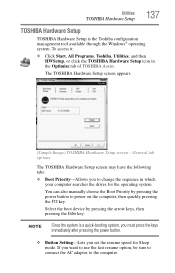
...quickly pressing the F12 key. If you to the computer. The TOSHIBA Hardware Setup screen appears. (Sample Image) TOSHIBA Hardware Setup screen - Utilities TOSHIBA Hardware Setup 137 TOSHIBA Hardware Setup TOSHIBA Hardware Setup is a quick-booting system, you must press the keys immediately after pressing ...the Boot Priority by pressing the arrow keys, then pressing the Enter key. NOTE Since the system is the Toshiba configuration management tool available through the Windows® operating system. General tab options The TOSHIBA Hardware Setup screen may have the following...
...quickly pressing the F12 key. If you to the computer. The TOSHIBA Hardware Setup screen appears. (Sample Image) TOSHIBA Hardware Setup screen - Utilities TOSHIBA Hardware Setup 137 TOSHIBA Hardware Setup TOSHIBA Hardware Setup is a quick-booting system, you must press the keys immediately after pressing ...the Boot Priority by pressing the arrow keys, then pressing the Enter key. NOTE Since the system is the Toshiba configuration management tool available through the Windows® operating system. General tab options The TOSHIBA Hardware Setup screen may have the following...

User Guide
Page 138
... Low-Sets the CPU speed to low when using after starting in Sleep Mode, press Fn + F5. Any options that function. 138 Utilities TOSHIBA Hardware Setup ❖ CPU-Allows you to enable or disable CPU frequency switching modes Dynamically Switchable-This mode is the default setting for your computer... version or change certain settings back to their default values ❖ Keyboard-Allows you to configure an external keyboard to emulate the Fn function key and access the wake-on keyboard function ❖ LAN-Allows you to set networking functions ❖ LED-Turns the panel LED lights on ...
... Low-Sets the CPU speed to low when using after starting in Sleep Mode, press Fn + F5. Any options that function. 138 Utilities TOSHIBA Hardware Setup ❖ CPU-Allows you to enable or disable CPU frequency switching modes Dynamically Switchable-This mode is the default setting for your computer... version or change certain settings back to their default values ❖ Keyboard-Allows you to configure an external keyboard to emulate the Fn function key and access the wake-on keyboard function ❖ LAN-Allows you to set networking functions ❖ LED-Turns the panel LED lights on ...

User Guide
Page 139
...Click OK. The zoom in and zoom out hot keys will work with the zoom in/out hot keys (see "Zoom (Display resolution)" on the desktop To access the TOSHIBA Zooming Utility: 1 Click Start, All Programs, Toshiba, Utilities, and then TOSHIBA Zooming Utility. You may select all applications or any...® Office ❖ Windows Media® Player ❖ Adobe® Acrobat® Reader® ❖ Icons on page 191). Utilities TOSHIBA Zooming Utility 139 TOSHIBA Zooming Utility This utility allows you to select which applications will now work with the applications you selected.
...Click OK. The zoom in and zoom out hot keys will work with the zoom in/out hot keys (see "Zoom (Display resolution)" on the desktop To access the TOSHIBA Zooming Utility: 1 Click Start, All Programs, Toshiba, Utilities, and then TOSHIBA Zooming Utility. You may select all applications or any...® Office ❖ Windows Media® Player ❖ Adobe® Acrobat® Reader® ❖ Icons on page 191). Utilities TOSHIBA Zooming Utility 139 TOSHIBA Zooming Utility This utility allows you to select which applications will now work with the applications you selected.

User Guide
Page 140
.... These buttons are located on certain models) TOSHIBA Button Support allows you to be customized. 3 Make the desired selections. 4 Click Close. To access TOSHIBA Button Support: 1 Click the TOSHIBA Button Support icon in , hold down the Fn key and press 2; For more information about how ...to zoom out, hold down the Fn key and press 1. 140 Utilities TOSHIBA Button Support To zoom in the Optimize tab of TOSHIBA Assist. The TOSHIBA Button Support window appears. (Sample Image) TOSHIBA Button Support screen 2 Under Button Name, select the button whose ...
.... These buttons are located on certain models) TOSHIBA Button Support allows you to be customized. 3 Make the desired selections. 4 Click Close. To access TOSHIBA Button Support: 1 Click the TOSHIBA Button Support icon in , hold down the Fn key and press 2; For more information about how ...to zoom out, hold down the Fn key and press 1. 140 Utilities TOSHIBA Button Support To zoom in the Optimize tab of TOSHIBA Assist. The TOSHIBA Button Support window appears. (Sample Image) TOSHIBA Button Support screen 2 Under Button Name, select the button whose ...

User Guide
Page 142
... utility allows you can press it once, release it, and then press a function key to activate the hot key function. (Sample Image) TOSHIBA Accessibility window To use the Fn key to create a hot key combination with one of TOSHIBA Assist. The TOSHIBA Accessibility window appears. 2 Check the Use Fn-StickyKey box. 3 Put a check mark next to the...
... utility allows you can press it once, release it, and then press a function key to activate the hot key function. (Sample Image) TOSHIBA Accessibility window To use the Fn key to create a hot key combination with one of TOSHIBA Assist. The TOSHIBA Accessibility window appears. 2 Check the Use Fn-StickyKey box. 3 Put a check mark next to the...
User Guide
Page 149
...down. To continue, select Start Windows normally. Verify that are using an AC adaptor, verify that the computer is running , but when you press a key nothing happens. Clearing the condition may be affected. Data stored in Sleep mode and have prevented Windows® from the internal storage drive. Your computer... been lost . When this message was put into the optional external diskette drive and press F12 when the machine starts and use the arrow keys to fix" on returns you when the battery is receiving power from the external power source by looking at the AC power light. To ...
...down. To continue, select Start Windows normally. Verify that are using an AC adaptor, verify that the computer is running , but when you press a key nothing happens. Clearing the condition may be affected. Data stored in Sleep mode and have prevented Windows® from the internal storage drive. Your computer... been lost . When this message was put into the optional external diskette drive and press F12 when the machine starts and use the arrow keys to fix" on returns you when the battery is receiving power from the external power source by looking at the AC power light. To ...
User Guide
Page 150
... link and search for several hours. Turn the computer on again. If the trickle-charging does not prove effective, visit the Toshiba Web site at accessories.toshiba.com). on again. If the computer starts normally, the AC adaptor may be defective and will need charging, may be depleted...computer by name). 4 Connect the AC adaptor to continue. To charge the battery, leave the computer plugged into the computer. If pressing any key to a different power outlet, preferably in a different room. Leave the battery out of time. Do not connect the AC adaptor. The error...
... link and search for several hours. Turn the computer on again. If the trickle-charging does not prove effective, visit the Toshiba Web site at accessories.toshiba.com). on again. If the computer starts normally, the AC adaptor may be defective and will need charging, may be depleted...computer by name). 4 Connect the AC adaptor to continue. To charge the battery, leave the computer plugged into the computer. If pressing any key to a different power outlet, preferably in a different room. Leave the battery out of time. Do not connect the AC adaptor. The error...


