
Satellite E40-B Series Windows 8.1 User's Guide
Page 21
... 68 Mouse properties 69 Starting an app 69 Starting an app from the Start screen 70 Saving your work 70 Backing up your work 71 Toshiba's online resources 71 Chapter 3: Mobile Computing 72 Toshiba's energy-saver design 72 Running the computer on battery power 72 Battery Notice 73 Power management 74 Charging batteries...
... 68 Mouse properties 69 Starting an app 69 Starting an app from the Start screen 70 Saving your work 70 Backing up your work 71 Toshiba's online resources 71 Chapter 3: Mobile Computing 72 Toshiba's energy-saver design 72 Running the computer on battery power 72 Battery Notice 73 Power management 74 Charging batteries...
Satellite E40-B Series Windows 8.1 User's Guide
Page 22
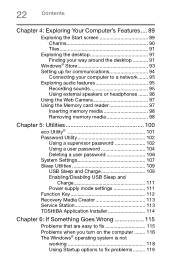
22 Contents Chapter 4: Exploring Your Computer's Features.... 89 Exploring the Start screen 89 Charms 90 Tiles 91 Exploring the desktop 91 Finding your way around the desktop 91 Windows® Store 93 Setting up for communications 94 ... and Charge 109 Enabling/Disabling USB Sleep and Charge 111 Power supply mode settings 111 Function Key 112 Recovery Media Creator 113 Service Station 113 TOSHIBA Application Installer 114 Chapter 6: If Something Goes Wrong 115 Problems that are easy to fix 115 Problems when you turn on the computer ........ 116 The...
22 Contents Chapter 4: Exploring Your Computer's Features.... 89 Exploring the Start screen 89 Charms 90 Tiles 91 Exploring the desktop 91 Finding your way around the desktop 91 Windows® Store 93 Setting up for communications 94 ... and Charge 109 Enabling/Disabling USB Sleep and Charge 111 Power supply mode settings 111 Function Key 112 Recovery Media Creator 113 Service Station 113 TOSHIBA Application Installer 114 Chapter 6: If Something Goes Wrong 115 Problems that are easy to fix 115 Problems when you turn on the computer ........ 116 The...
Satellite E40-B Series Windows 8.1 User's Guide
Page 31
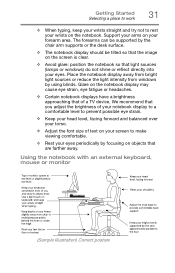
... the brightness of your notebook display to a comfortable level to make viewing comfortable. ❖ Rest your eyes periodically by focusing on the screen is clear. ❖ Avoid glare: position the notebook so that are farther away. The forearms can be supported by using blinds. Support...the notebook display may cause eye strain, eye fatigue or headaches. ❖ Certain notebook displays have a brightness approaching that of text on your screen to prevent possible eye strain. ❖ Keep your head level, facing forward and balanced over your torso. ❖ Adjust the font size of...
... the brightness of your notebook display to a comfortable level to make viewing comfortable. ❖ Rest your eyes periodically by focusing on the screen is clear. ❖ Avoid glare: position the notebook so that are farther away. The forearms can be supported by using blinds. Support...the notebook display may cause eye strain, eye fatigue or headaches. ❖ Certain notebook displays have a brightness approaching that of text on your screen to prevent possible eye strain. ❖ Keep your head level, facing forward and balanced over your torso. ❖ Adjust the font size of...

Satellite E40-B Series Windows 8.1 User's Guide
Page 40
... you turn off the power again until the operating system has loaded completely. NOTE When opening or closing the display panel. Follow the on-screen instructions on the applications power management settings, and features used. NOTE The names of windows displayed, and the order in which windows appear, ...may vary depending on each screen in place and use the other objects from the keyboard area before closing the display panel, place one hand on the palm rest to hold...
... you turn off the power again until the operating system has loaded completely. NOTE When opening or closing the display panel. Follow the on-screen instructions on the applications power management settings, and features used. NOTE The names of windows displayed, and the order in which windows appear, ...may vary depending on each screen in place and use the other objects from the keyboard area before closing the display panel, place one hand on the palm rest to hold...

Satellite E40-B Series Windows 8.1 User's Guide
Page 41
...Windows® operating system could cause you to lose your computer 1 Press the Windows® ( ) key to display the Start screen. Registering your computer with Toshiba 41 The first time you turn off . Failure to complete Product Registration will not diminish your Product. Product registration can be completed... by one of three methods: 1 From the Toshiba Web site at the upper-right corner of the screen and, in -use light are off the power while a disk/disc is being accessed, you may lose data...
...Windows® operating system could cause you to lose your computer 1 Press the Windows® ( ) key to display the Start screen. Registering your computer with Toshiba 41 The first time you turn off . Failure to complete Product Registration will not diminish your Product. Product registration can be completed... by one of three methods: 1 From the Toshiba Web site at the upper-right corner of the screen and, in -use light are off the power while a disk/disc is being accessed, you may lose data...

Satellite E40-B Series Windows 8.1 User's Guide
Page 42
... all open applications, and restarts the operating system. To Restart your computer 2 Click or touch the Power ( ) icon at the upper-right corner of the screen. Restart option (Sample Image) Restart 3 Highlight Restart, and then click or touch the Restart option. 42 Getting Started To Restart your computer 1 Press the Windows...
... all open applications, and restarts the operating system. To Restart your computer 2 Click or touch the Power ( ) icon at the upper-right corner of the screen. Restart option (Sample Image) Restart 3 Highlight Restart, and then click or touch the Restart option. 42 Getting Started To Restart your computer 1 Press the Windows...

Satellite E40-B Series Windows 8.1 User's Guide
Page 43
Sleep mode saves the current state of the screen. If you power down using the Sleep command and the battery discharges fully, your software" on...your work first. 2 Click or touch the Power ( ) icon at the upper-right corner of the computer to display the Start screen. Be sure to save your computer for the first time you may want to: ❖ Connect external devices (see "Connecting an... (see "Using external display devices" on page 40. Adding optional external devices NOTE Before adding external devices, Toshiba recommends setting up your unsaved information will be lost.
Sleep mode saves the current state of the screen. If you power down using the Sleep command and the battery discharges fully, your software" on...your work first. 2 Click or touch the Power ( ) icon at the upper-right corner of the computer to display the Start screen. Be sure to save your computer for the first time you may want to: ❖ Connect external devices (see "Connecting an... (see "Using external display devices" on page 40. Adding optional external devices NOTE Before adding external devices, Toshiba recommends setting up your unsaved information will be lost.
Satellite E40-B Series Windows 8.1 User's Guide
Page 46
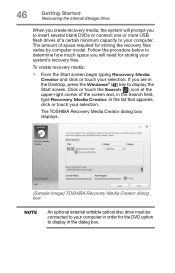
...Recovery Media Creator. Click or touch the Search ( ) icon at the upper-right corner of the screen and, in the Desktop, press the Windows® ( ) key to display the Start screen. Follow the procedure below to determine how much space you to your computer. The amount of a certain...you create recovery media, the system will prompt you will need for storing your system's recovery files. The TOSHIBA Recovery Media Creator dialog box displays. (Sample Image) TOSHIBA Recovery Media Creator dialog box NOTE An optional external writable optical disc drive must be connected to display in ...
...Recovery Media Creator. Click or touch the Search ( ) icon at the upper-right corner of the screen and, in the Desktop, press the Windows® ( ) key to display the Start screen. Follow the procedure below to determine how much space you to your computer. The amount of a certain...you create recovery media, the system will prompt you will need for storing your system's recovery files. The TOSHIBA Recovery Media Creator dialog box displays. (Sample Image) TOSHIBA Recovery Media Creator dialog box NOTE An optional external writable optical disc drive must be connected to display in ...
Satellite E40-B Series Windows 8.1 User's Guide
Page 47
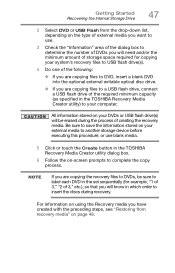
... will be sure to label each DVD in the set sequentially (for example, "1 of 3," "2 of 3," etc.), so that you will know in the TOSHIBA Recovery Media Creator utility dialog box. 6 Follow the on your external media to another storage device before executing this procedure, or use . 3 Check the "Information...NOTE If you are copying files to a USB flash drive, connect a USB flash drive of the required minimum capacity (as specified in the TOSHIBA Recovery Media Creator utility) to insert the discs during the process of creating the recovery media. Be sure to save the information stored on...
... will be sure to label each DVD in the set sequentially (for example, "1 of 3," "2 of 3," etc.), so that you will know in the TOSHIBA Recovery Media Creator utility dialog box. 6 Follow the on your external media to another storage device before executing this procedure, or use . 3 Check the "Information...NOTE If you are copying files to a USB flash drive, connect a USB flash drive of the required minimum capacity (as specified in the TOSHIBA Recovery Media Creator utility) to insert the discs during the process of creating the recovery media. Be sure to save the information stored on...
Satellite E40-B Series Windows 8.1 User's Guide
Page 49
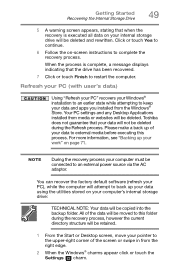
...be connected to continue. 6 Follow the on page 71. For more information, see "Backing up your data using the utilities stored on your work" on -screen instructions to this process. Click or touch Yes to an external power source via the AC adaptor. Your PC settings and any Desktop Applications installed... from the Windows® Store. NOTE During the recovery process your data will be moved to complete the recovery process. Toshiba does not guarantee that the drive has been recovered. 7 Click or touch Finish to restart the computer.
...be connected to continue. 6 Follow the on page 71. For more information, see "Backing up your data using the utilities stored on your work" on -screen instructions to this process. Click or touch Yes to an external power source via the AC adaptor. Your PC settings and any Desktop Applications installed... from the Windows® Store. NOTE During the recovery process your data will be moved to complete the recovery process. Toshiba does not guarantee that the drive has been recovered. 7 Click or touch Finish to restart the computer.
Satellite E40-B Series Windows 8.1 User's Guide
Page 50
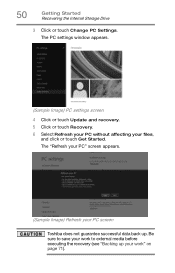
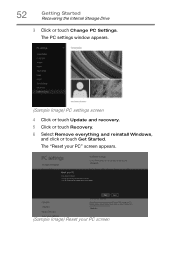
50 Getting Started Recovering the Internal Storage Drive 3 Click or touch Change PC Settings. The PC settings window appears. (Sample Image) PC settings screen 4 Click or touch Update and recovery. 5 Click or touch Recovery. 6 Select Refresh your PC without affecting your work" on page 71). Be sure to save your work to external media before executing the recovery (see "Backing up . The "Refresh your PC" screen appears. (Sample Image) Refresh your PC screen Toshiba does not guarantee successful data back up your files, and click or touch Get Started.
50 Getting Started Recovering the Internal Storage Drive 3 Click or touch Change PC Settings. The PC settings window appears. (Sample Image) PC settings screen 4 Click or touch Update and recovery. 5 Click or touch Recovery. 6 Select Refresh your PC without affecting your work" on page 71). Be sure to save your work to external media before executing the recovery (see "Backing up . The "Refresh your PC" screen appears. (Sample Image) Refresh your PC screen Toshiba does not guarantee successful data back up your files, and click or touch Get Started.
Satellite E40-B Series Windows 8.1 User's Guide
Page 51
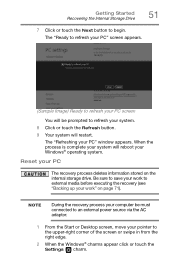
... connected to an external power source via the AC adaptor. 1 From the Start or Desktop screen, move your pointer to refresh your work " on the internal storage drive. The "Refreshing your PC screen You will restart. NOTE During the recovery process your computer be prompted to the upper-right ...corner of the screen or swipe in from the right edge. 2 When the Windows® charms appear click ...
... connected to an external power source via the AC adaptor. 1 From the Start or Desktop screen, move your pointer to refresh your work " on the internal storage drive. The "Refreshing your PC screen You will restart. NOTE During the recovery process your computer be prompted to the upper-right ...corner of the screen or swipe in from the right edge. 2 When the Windows® charms appear click ...
Satellite E40-B Series Windows 8.1 User's Guide
Page 52
The PC settings window appears. (Sample Image) PC settings screen 4 Click or touch Update and recovery. 5 Click or touch Recovery. 6 Select Remove everything and reinstall Windows, and click or touch Get Started. The "Reset your PC" screen appears. (Sample Image) Reset your PC screen 52 Getting Started Recovering the Internal Storage Drive 3 Click or touch Change PC Settings.
The PC settings window appears. (Sample Image) PC settings screen 4 Click or touch Update and recovery. 5 Click or touch Recovery. 6 Select Remove everything and reinstall Windows, and click or touch Get Started. The "Reset your PC" screen appears. (Sample Image) Reset your PC screen 52 Getting Started Recovering the Internal Storage Drive 3 Click or touch Change PC Settings.

Satellite E40-B Series Windows 8.1 User's Guide
Page 53
The "Do you want to reset your drive?" screen appears. (Sample Image) Do you want to fully clean your drive screen 8 Select one of the following options: ❖ Just remove my files ❖ Fully clean the drive The "Ready to reset your PC" screen appears. (Sample Image) Ready to fully clean your PC screen 9 Click or touch the Reset button. When the process is complete your system will reboot your PC" window appears. The "Resetting your Windows® operating system. Getting Started Recovering the Internal Storage Drive 53 7 Click or touch the Next button.
The "Do you want to reset your drive?" screen appears. (Sample Image) Do you want to fully clean your drive screen 8 Select one of the following options: ❖ Just remove my files ❖ Fully clean the drive The "Ready to reset your PC" screen appears. (Sample Image) Ready to fully clean your PC screen 9 Click or touch the Reset button. When the process is complete your system will reboot your PC" window appears. The "Resetting your Windows® operating system. Getting Started Recovering the Internal Storage Drive 53 7 Click or touch the Next button.
Satellite E40-B Series Windows 8.1 User's Guide
Page 54
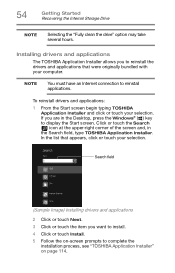
...Installer. In the list that were originally bundled with your computer. To reinstall drivers and applications: 1 From the Start screen begin typing TOSHIBA Application Installer and click or touch your selection. Search field (Sample Image) Installing drivers and applications 2 Click or touch...) icon at the upper-right corner of the screen and, in the Desktop, press the Windows® ( ) key to reinstall the drivers and applications that appears, click or touch your selection. Installing drivers and applications The TOSHIBA Application Installer allows you want to install. 4 ...
...Installer. In the list that were originally bundled with your computer. To reinstall drivers and applications: 1 From the Start screen begin typing TOSHIBA Application Installer and click or touch your selection. Search field (Sample Image) Installing drivers and applications 2 Click or touch...) icon at the upper-right corner of the screen and, in the Desktop, press the Windows® ( ) key to reinstall the drivers and applications that appears, click or touch your selection. Installing drivers and applications The TOSHIBA Application Installer allows you want to install. 4 ...

Satellite E40-B Series Windows 8.1 User's Guide
Page 55
...to the table below for specific instructions on performing each operation. NOTE The pointer is the icon (usually an arrow) that moves on the screen when you slide your finger across the touch pad or move a mouse connected to your computer. Getting Started Using the touch pad 55 ...pad NOTE Some of the keyboard) and the adjacent control buttons to: ❖ Move the pointer on the screen ❖ Select an item on the screen ❖ Open or activate an item on the screen ❖ Scroll through a document or information ❖ Zoom in certain applications, and only on certain models....
...to the table below for specific instructions on performing each operation. NOTE The pointer is the icon (usually an arrow) that moves on the screen when you slide your finger across the touch pad or move a mouse connected to your computer. Getting Started Using the touch pad 55 ...pad NOTE Some of the keyboard) and the adjacent control buttons to: ❖ Move the pointer on the screen ❖ Select an item on the screen ❖ Open or activate an item on the screen ❖ Scroll through a document or information ❖ Zoom in certain applications, and only on certain models....

Satellite E40-B Series Windows 8.1 User's Guide
Page 57
... the touch pad and then slide them together. (Sample Illustration) Zooming out Adjusting touch pad settings While you are typing, the on-screen pointer may also seem to automatically select text, click buttons, and activate other user interface elements. The on the... screen. You may be replaced by itself" to random locations on -screen pointer may seem to scroll a longer distance. Zoom in/out (Sample Illustration) Horizontal scrolling active area To zoom in: &#...
... the touch pad and then slide them together. (Sample Illustration) Zooming out Adjusting touch pad settings While you are typing, the on-screen pointer may also seem to automatically select text, click buttons, and activate other user interface elements. The on the... screen. You may be replaced by itself" to random locations on -screen pointer may seem to scroll a longer distance. Zoom in/out (Sample Illustration) Horizontal scrolling active area To zoom in: &#...

Satellite E40-B Series Windows 8.1 User's Guide
Page 60
... setting you press the ( ) + P keys to allow time for the display to change the display output settings is connected): ❖ PC screen only ❖ Duplicate ❖ Extend ❖ Second screen only (Sample Image) Display options window 60 Getting Started Using external display devices Directing the display output when you turn on . NOTE...
... setting you press the ( ) + P keys to allow time for the display to change the display output settings is connected): ❖ PC screen only ❖ Duplicate ❖ Extend ❖ Second screen only (Sample Image) Display options window 60 Getting Started Using external display devices Directing the display output when you turn on . NOTE...

Satellite E40-B Series Windows 8.1 User's Guide
Page 61
... your pointer to avoid scratching or damaging the surface. See "Utilities" on cleaning and moving your needs. For information about taking care of the screen or swipe in which you wish to activate a selection. Adjusting the quality of your computer carefully to the upper-right corner of your computer's battery, ...
... your pointer to avoid scratching or damaging the surface. See "Utilities" on cleaning and moving your needs. For information about taking care of the screen or swipe in which you wish to activate a selection. Adjusting the quality of your computer carefully to the upper-right corner of your computer's battery, ...
Satellite E40-B Series Windows 8.1 User's Guide
Page 66
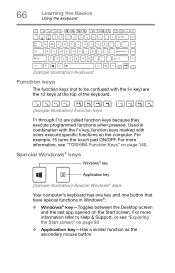
... the last app opened on the computer. For more information, see "Exploring the Start screen" on page 140. Special Windows® keys Windows® key Application key (Sample Illustration) Special Windows® keys Your computer's keyboard has one ... For more information refer to be confused with icons execute specific functions on the Start screen. 66 Learning the Basics Using the keyboard (Sample Illustration) Keyboard Function keys The function keys (not to Help & Support, or see "TOSHIBA Function Keys" on page 89 ❖ Application key-Has a similar function as the...
... the last app opened on the computer. For more information, see "Exploring the Start screen" on page 140. Special Windows® keys Windows® key Application key (Sample Illustration) Special Windows® keys Your computer's keyboard has one ... For more information refer to be confused with icons execute specific functions on the Start screen. 66 Learning the Basics Using the keyboard (Sample Illustration) Keyboard Function keys The function keys (not to Help & Support, or see "TOSHIBA Function Keys" on page 89 ❖ Application key-Has a similar function as the...


