User Manual
Page 48
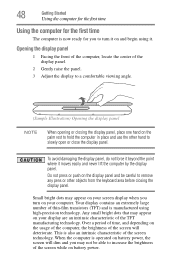
... is also an intrinsic characteristic of the TFT manufacturing technology. Opening the display panel 1 Facing the front of the computer, locate the center of the screen while on battery power. Any small bright dots that may not be careful to remove any pens or other objects from the keyboard area before... panel. To avoid damaging the display panel, do not force it beyond the point where it . When the computer is operated on battery power, the screen will deteriorate. 48 Getting Started Using the computer for the first time Using the computer for the first time The computer is now ready for...
... is also an intrinsic characteristic of the TFT manufacturing technology. Opening the display panel 1 Facing the front of the computer, locate the center of the screen while on battery power. Any small bright dots that may not be careful to remove any pens or other objects from the keyboard area before... panel. To avoid damaging the display panel, do not force it beyond the point where it . When the computer is operated on battery power, the screen will deteriorate. 48 Getting Started Using the computer for the first time Using the computer for the first time The computer is now ready for...
User Manual
Page 49
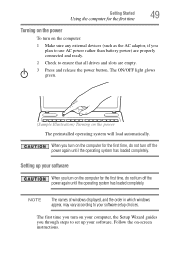
... computer, the Setup Wizard guides you through steps to set up your software setup choices. The ON/OFF light glows green. (Sample Illustration) Turning on -screen instructions. Setting up your software. NOTE The names of windows displayed, and the order in which windows appear, may vary according to ensure that all...
... computer, the Setup Wizard guides you through steps to set up your software setup choices. The ON/OFF light glows green. (Sample Illustration) Turning on -screen instructions. Setting up your software. NOTE The names of windows displayed, and the order in which windows appear, may vary according to ensure that all...
User Manual
Page 57
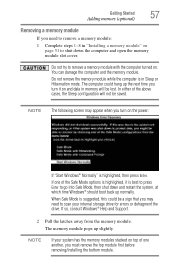
... slightly. NOTE If your internal storage drive for errors or defragment the drive. When Safe Mode is in Sleep or Hibernation mode. NOTE The following screen may need to remove a memory module: 1 Complete steps 1-8 in "Installing a memory module" on page 51 to shut down and restart the system, at which time...
... slightly. NOTE If your internal storage drive for errors or defragment the drive. When Safe Mode is in Sleep or Hibernation mode. NOTE The following screen may need to remove a memory module: 1 Complete steps 1-8 in "Installing a memory module" on page 51 to shut down and restart the system, at which time...
User Manual
Page 61
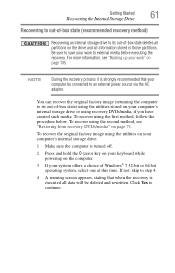
... hold the 0 (zero) key on your keyboard while powering on the computer. 3 If your computer be deleted and rewritten. If not, skip to step 4. 4 A warning screen appears, stating that your system offers a choice of Windows® 7 32-bit or 64-bit operating system, select one at this time. To recover using...
... hold the 0 (zero) key on your keyboard while powering on the computer. 3 If your computer be deleted and rewritten. If not, skip to step 4. 4 A warning screen appears, stating that your system offers a choice of Windows® 7 32-bit or 64-bit operating system, select one at this time. To recover using...
User Manual
Page 62
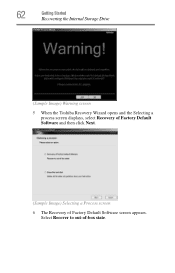
62 Getting Started Recovering the Internal Storage Drive (Sample Image) Warning screen 5 When the Toshiba Recovery Wizard opens and the Selecting a process screen displays, select Recovery of Factory Default Software and then click Next. (Sample Image) Selecting a Process screen 6 The Recovery of -box state. Select Recover to out-of Factory Default Software screen appears.
62 Getting Started Recovering the Internal Storage Drive (Sample Image) Warning screen 5 When the Toshiba Recovery Wizard opens and the Selecting a process screen displays, select Recovery of Factory Default Software and then click Next. (Sample Image) Selecting a Process screen 6 The Recovery of -box state. Select Recover to out-of Factory Default Software screen appears.
User Manual
Page 63
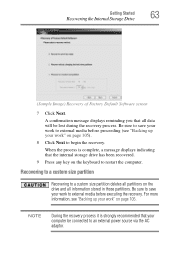
... partitions on page 105). 8 Click Next to restart the computer. Getting Started Recovering the Internal Storage Drive 63 (Sample Image) Recovery of Factory Default Software screen 7 Click Next. Be sure to save your work " on the keyboard to begin the recovery. A confirmation message displays reminding you that all information stored in...
... partitions on page 105). 8 Click Next to restart the computer. Getting Started Recovering the Internal Storage Drive 63 (Sample Image) Recovery of Factory Default Software screen 7 Click Next. Be sure to save your work " on the keyboard to begin the recovery. A confirmation message displays reminding you that all information stored in...
User Manual
Page 64
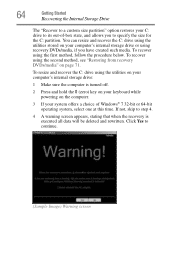
... your system offers a choice of -box state, and allows you have created such media. If not, skip to continue. (Sample Image) Warning screen Click Yes to step 4. 4 A warning screen appears, stating that when the recovery is turned off. 2 Press and hold the 0 (zero) key on your keyboard while powering on page 71...
... your system offers a choice of -box state, and allows you have created such media. If not, skip to continue. (Sample Image) Warning screen Click Yes to step 4. 4 A warning screen appears, stating that when the recovery is turned off. 2 Press and hold the 0 (zero) key on your keyboard while powering on page 71...
User Manual
Page 65
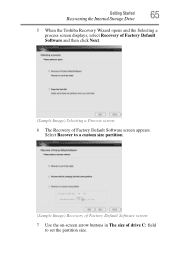
Select Recover to set the partition size. Getting Started Recovering the Internal Storage Drive 65 5 When the Toshiba Recovery Wizard opens and the Selecting a process screen displays, select Recovery of Factory Default Software and then click Next. (Sample Image) Selecting a Process screen 6 The Recovery of drive C: field to a custom size partition. (Sample Image) Recovery of Factory Default Software screen 7 Use the on-screen arrow buttons in The size of Factory Default Software screen appears.
Select Recover to set the partition size. Getting Started Recovering the Internal Storage Drive 65 5 When the Toshiba Recovery Wizard opens and the Selecting a process screen displays, select Recovery of Factory Default Software and then click Next. (Sample Image) Selecting a Process screen 6 The Recovery of drive C: field to a custom size partition. (Sample Image) Recovery of Factory Default Software screen 7 Use the on-screen arrow buttons in The size of Factory Default Software screen appears.
User Manual
Page 67
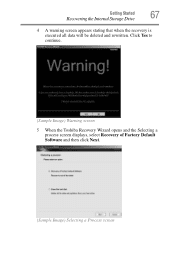
Getting Started Recovering the Internal Storage Drive 67 4 A warning screen appears stating that when the recovery is executed all data will be deleted and rewritten. Click Yes to continue. (Sample Image) Warning screen 5 When the Toshiba Recovery Wizard opens and the Selecting a process screen displays, select Recovery of Factory Default Software and then click Next. (Sample Image) Selecting a Process screen
Getting Started Recovering the Internal Storage Drive 67 4 A warning screen appears stating that when the recovery is executed all data will be deleted and rewritten. Click Yes to continue. (Sample Image) Warning screen 5 When the Toshiba Recovery Wizard opens and the Selecting a process screen displays, select Recovery of Factory Default Software and then click Next. (Sample Image) Selecting a Process screen
User Manual
Page 68
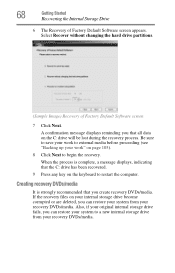
Select Recover without changing the hard drive partitions. (Sample Image) Recovery of Factory Default Software screen appears. A confirmation message displays reminding you create recovery DVDs/media. Be sure to save your work " on the C: drive will be lost during the recovery ... before proceeding (see "Backing up your system to restart the computer. 68 Getting Started Recovering the Internal Storage Drive 6 The Recovery of Factory Default Software screen 7 Click Next.
Select Recover without changing the hard drive partitions. (Sample Image) Recovery of Factory Default Software screen appears. A confirmation message displays reminding you create recovery DVDs/media. Be sure to save your work " on the C: drive will be lost during the recovery ... before proceeding (see "Backing up your system to restart the computer. 68 Getting Started Recovering the Internal Storage Drive 6 The Recovery of Factory Default Software screen 7 Click Next.
User Manual
Page 70
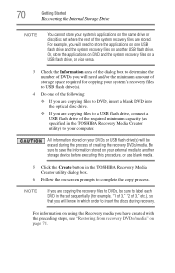
...'s applications on the same drive or disc/disc set sequentially (for example, "1 of 3," "2 of the required minimum capacity (as specified in the TOSHIBA Recovery Media Creator utility) to your external media to another USB flash drive. For example, you have created with the preceding steps, see "Restoring from...space required for copying your system's recovery files to USB flash drive(s). 4 Do one USB flash drive and the system recovery files on -screen prompts to label each DVD in the set where the rest of creating the recovery DVDs/media. Be sure to save the information stored ...
...'s applications on the same drive or disc/disc set sequentially (for example, "1 of 3," "2 of the required minimum capacity (as specified in the TOSHIBA Recovery Media Creator utility) to your external media to another USB flash drive. For example, you have created with the preceding steps, see "Restoring from...space required for copying your system's recovery files to USB flash drive(s). 4 Do one USB flash drive and the system recovery files on -screen prompts to label each DVD in the set where the rest of creating the recovery DVDs/media. Be sure to save the information stored ...
User Manual
Page 72
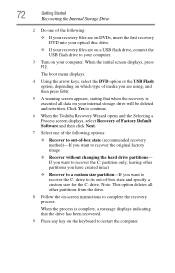
... the first recovery DVD into your optical disc drive. ❖ If your recovery files are using, and then press Enter. 5 A warning screen appears, stating that when the recovery is complete, a message displays indicating that the drive has been recovered. 9 Press any key on your ... partitions you have created intact ❖ Recover to a custom size partition-If you want to continue. 6 When the Toshiba Recovery Wizard opens and the Selecting a Process screen displays, select Recovery of Factory Default Software and then click Next. 7 Select one of the following options: ❖ ...
... the first recovery DVD into your optical disc drive. ❖ If your recovery files are using, and then press Enter. 5 A warning screen appears, stating that when the recovery is complete, a message displays indicating that the drive has been recovered. 9 Press any key on your ... partitions you have created intact ❖ Recover to a custom size partition-If you want to continue. 6 When the Toshiba Recovery Wizard opens and the Selecting a Process screen displays, select Recovery of Factory Default Software and then click Next. 7 Select one of the following options: ❖ ...
User Manual
Page 73
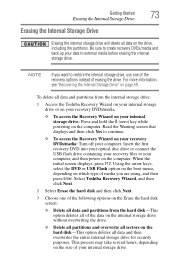
...the hard disk-This option deletes all of the following options on the Erase the hard disk screen: ❖ Delete all data and partitions from the internal storage drive: 1 Access the Toshiba Recovery Wizard on your internal storage drive or on your recovery DVDs/media. ❖ To access... the Recovery Wizard on the computer. Read the Warning screen that displays and then click Yes to restore the internal storage ...
...the hard disk-This option deletes all of the following options on the Erase the hard disk screen: ❖ Delete all data and partitions from the internal storage drive: 1 Access the Toshiba Recovery Wizard on your internal storage drive or on your recovery DVDs/media. ❖ To access... the Recovery Wizard on the computer. Read the Warning screen that displays and then click Yes to restore the internal storage ...
User Manual
Page 74
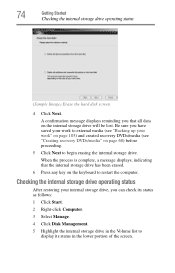
... Computer. 3 Select Manage. 4 Click Disk Management. 5 Highlight the internal storage drive in the Volume list to display its status in the lower portion of the screen. Be sure you that the internal storage drive has been erased. 6 Press any key on the internal storage drive will be lost. When the process... 68) before proceeding. 5 Click Next to restart the computer. 74 Getting Started Checking the internal storage drive operating status (Sample Image) Erase the hard disk screen 4 Click Next.
... Computer. 3 Select Manage. 4 Click Disk Management. 5 Highlight the internal storage drive in the Volume list to display its status in the lower portion of the screen. Be sure you that the internal storage drive has been erased. 6 Press any key on the internal storage drive will be lost. When the process... 68) before proceeding. 5 Click Next to restart the computer. 74 Getting Started Checking the internal storage drive operating status (Sample Image) Erase the hard disk screen 4 Click Next.
User Manual
Page 75
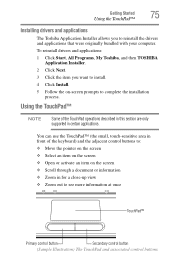
... that were originally bundled with your computer. Getting Started Using the TouchPad™ 75 Installing drivers and applications The Toshiba Application Installer allows you want to install. 4 Click Install. 5 Follow the on the screen ❖ Scroll through a document or information ❖ Zoom in certain applications. Using the TouchPad™ NOTE Some of...
... that were originally bundled with your computer. Getting Started Using the TouchPad™ 75 Installing drivers and applications The Toshiba Application Installer allows you want to install. 4 Click Install. 5 Follow the on the screen ❖ Scroll through a document or information ❖ Zoom in certain applications. Using the TouchPad™ NOTE Some of...
User Manual
Page 76
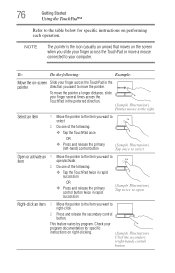
... you want to right-click. 2 Press and release the secondary control button. Check your program documentation for specific instructions on the screen when you slide your finger across the TouchPad or move a mouse connected to your computer. NOTE The pointer is the icon (usually... arrow) that moves on performing each operation. 76 Getting Started Using the TouchPad™ Refer to the table below for specific instructions on -screen Slide your finger across the TouchPad in rapid succession (Sample Illustration) Tap twice to open /activate. 2 Do one of the following: ...
... you want to right-click. 2 Press and release the secondary control button. Check your program documentation for specific instructions on the screen when you slide your finger across the TouchPad or move a mouse connected to your computer. NOTE The pointer is the icon (usually... arrow) that moves on performing each operation. 76 Getting Started Using the TouchPad™ Refer to the table below for specific instructions on -screen Slide your finger across the TouchPad in rapid succession (Sample Illustration) Tap twice to open /activate. 2 Do one of the following: ...
User Manual
Page 78
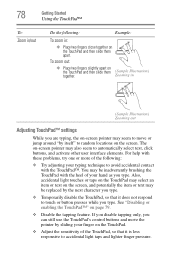
...or button presses while you type. Also, accidental light touches or taps on the TouchPad may select an item or text on the screen, and potentially the item or text may be inadvertently brushing the TouchPad with the heel of your typing technique to avoid accidental contact ... Zooming out Adjusting TouchPad™ settings While you are typing, the on-screen pointer may seem to move the pointer by itself" to random locations on the screen. See "Disabling or enabling the TouchPad™" on -screen pointer may also seem to automatically select text, click buttons, and activate other...
...or button presses while you type. Also, accidental light touches or taps on the TouchPad may select an item or text on the screen, and potentially the item or text may be inadvertently brushing the TouchPad with the heel of your typing technique to avoid accidental contact ... Zooming out Adjusting TouchPad™ settings While you are typing, the on-screen pointer may seem to move the pointer by itself" to random locations on the screen. See "Disabling or enabling the TouchPad™" on -screen pointer may also seem to automatically select text, click buttons, and activate other...
User Manual
Page 79
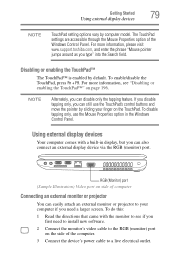
...need to install new software. 2 Connect the monitor's video cable to your finger on page 196. For more information, please visit www.support.toshiba.com, and enter the phrase "Mouse pointer jumps around as you can easily attach an external monitor or projector to the RGB (monitor) port... the TouchPad™" on the TouchPad. NOTE Alternately, you type" into the Search field. If you disable tapping only, you first need a larger screen. Disabling or enabling the TouchPad™ The TouchPad™ is enabled by computer model. To do this: 1 Read the directions that came with a...
...need to install new software. 2 Connect the monitor's video cable to your finger on page 196. For more information, please visit www.support.toshiba.com, and enter the phrase "Mouse pointer jumps around as you can easily attach an external monitor or projector to the RGB (monitor) port... the TouchPad™" on the TouchPad. NOTE Alternately, you type" into the Search field. If you disable tapping only, you first need a larger screen. Disabling or enabling the TouchPad™ The TouchPad™ is enabled by computer model. To do this: 1 Read the directions that came with a...
User Manual
Page 82
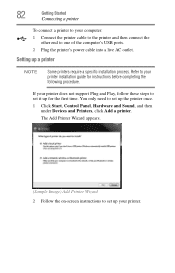
... only need to set up for instructions before completing the following procedure. The Add Printer Wizard appears. (Sample Image) Add Printer Wizard 2 Follow the on-screen instructions to set up a printer NOTE Some printers require a specific installation process. 82 Getting Started Connecting a printer To connect a printer to your computer: 1 Connect the...
... only need to set up for instructions before completing the following procedure. The Add Printer Wizard appears. (Sample Image) Add Printer Wizard 2 Follow the on-screen instructions to set up a printer NOTE Some printers require a specific installation process. 82 Getting Started Connecting a printer To connect a printer to your computer: 1 Connect the...
User Manual
Page 86
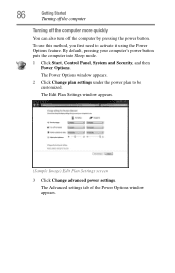
... into Sleep mode. 1 Click Start, Control Panel, System and Security, and then Power Options. The Edit Plan Settings window appears. (Sample Image) Edit Plan Settings screen 3 Click Change advanced power settings.
... into Sleep mode. 1 Click Start, Control Panel, System and Security, and then Power Options. The Edit Plan Settings window appears. (Sample Image) Edit Plan Settings screen 3 Click Change advanced power settings.


