

Users Manual Canada; English
Page 2
... a trademark of Eastman Kodak. All rights reserved. TOSHIBA Satellite C650/Satellite C650D/Satellite Pro C650/Satellite Pro C650D Series Portable Personal Computer User's Manual First edition April 2010 Copyright authority for personal use or use beyond that stipulated above (including conversion to digital format, alteration, transfer of copied material and distribution on a network) without the permission of the copyright owner is a violation of Intel Corporation or its...
... a trademark of Eastman Kodak. All rights reserved. TOSHIBA Satellite C650/Satellite C650D/Satellite Pro C650/Satellite Pro C650D Series Portable Personal Computer User's Manual First edition April 2010 Copyright authority for personal use or use beyond that stipulated above (including conversion to digital format, alteration, transfer of copied material and distribution on a network) without the permission of the copyright owner is a violation of Intel Corporation or its...
Users Manual Canada; English
Page 16
... 3-6 Security 3-6 Software 3-6 Special Features 3-7 TOSHIBA Value Added Package 3-9 Utilities and Applications 3-10 Options 3-12 Optional Devices 3-12 Cards/Memory 3-12 Power Devices 3-13 Peripheral Devices 3-13 Other 3-13 Bridge Media Slot 3-13 Memory Media 3-14 Media Care 3-15 Inserting a Memory Media 3-16 Removing a Memory Media 3-16 Memory Expansion 3-17 Installing Memory Module 3-17 Removing Memory Module 3-20 Additional Battery Pack (3 Cell and 6 Cell 3-21 Additional AC Adaptor 3-21 USB FDD Kit 3-21 External Monitor 3-21 Security Lock 3-22 User's Manual xv
... 3-6 Security 3-6 Software 3-6 Special Features 3-7 TOSHIBA Value Added Package 3-9 Utilities and Applications 3-10 Options 3-12 Optional Devices 3-12 Cards/Memory 3-12 Power Devices 3-13 Peripheral Devices 3-13 Other 3-13 Bridge Media Slot 3-13 Memory Media 3-14 Media Care 3-15 Inserting a Memory Media 3-16 Removing a Memory Media 3-16 Memory Expansion 3-17 Installing Memory Module 3-17 Removing Memory Module 3-20 Additional Battery Pack (3 Cell and 6 Cell 3-21 Additional AC Adaptor 3-21 USB FDD Kit 3-21 External Monitor 3-21 Security Lock 3-22 User's Manual xv

Users Manual Canada; English
Page 18
... IN/Battery Indicator 6-2 Power Indicator 6-3 Battery Types 6-3 Battery 6-3 Real Time Clock Battery 6-4 Care and Use of The Battery Pack 6-4 Safety Precautions 6-4 Charging The Batteries 6-7 Monitoring Battery Capacity 6-8 Maximizing Battery Operating Time 6-9 Retaining Data with Power off 6-9 Extending Battery Life 6-10 Replacing The Battery Pack 6-10 Removing The Battery Pack 6-11 Installing The Battery Pack 6-12 Starting The Computer by Password 6-13 Power-up Modes 6-13 Windows Utilities 6-13 Hot Keys 6-13 Panel Power On/Off 6-14 System Auto Off 6-14 Chapter 7 HW Setup...
... IN/Battery Indicator 6-2 Power Indicator 6-3 Battery Types 6-3 Battery 6-3 Real Time Clock Battery 6-4 Care and Use of The Battery Pack 6-4 Safety Precautions 6-4 Charging The Batteries 6-7 Monitoring Battery Capacity 6-8 Maximizing Battery Operating Time 6-9 Retaining Data with Power off 6-9 Extending Battery Life 6-10 Replacing The Battery Pack 6-10 Removing The Battery Pack 6-11 Installing The Battery Pack 6-12 Starting The Computer by Password 6-13 Power-up Modes 6-13 Windows Utilities 6-13 Hot Keys 6-13 Panel Power On/Off 6-14 System Auto Off 6-14 Chapter 7 HW Setup...
Users Manual Canada; English
Page 20
... going to install memory cards or connect external devices such as a printer, be sure to learn how this manual by -step instructions on setting up and begin operating your computer. If you are a new user of computers or if you how to begin using optional devices and troubleshooting. Chapter 3, Hardware, Utilities and Options, provides a quick overview of the computer and on using the touchpad,optical disc drive, Audio/Video controls, the web camera, the microphone, wireless communication and LAN. Chapter 4, Operating Basics...
... going to install memory cards or connect external devices such as a printer, be sure to learn how this manual by -step instructions on setting up and begin operating your computer. If you are a new user of computers or if you how to begin using optional devices and troubleshooting. Chapter 3, Hardware, Utilities and Options, provides a quick overview of the computer and on using the touchpad,optical disc drive, Audio/Video controls, the web camera, the microphone, wireless communication and LAN. Chapter 4, Operating Basics...
Users Manual Canada; English
Page 33
... function. Make sure all disk/disc activity has stopped before removing the CD/DVD or floppy diskette. ■ Make sure the Optical Disc Drive indicator is running. User's Manual 1-8 If you are able to other systems, possibly causing serious injury. ■ Before entering Sleep Mode, be lost. wait a short period to avoid any peripheral devices connected to turn off . Sleep Mode If you have entered data, either save your work, you turn off the power...
... function. Make sure all disk/disc activity has stopped before removing the CD/DVD or floppy diskette. ■ Make sure the Optical Disc Drive indicator is running. User's Manual 1-8 If you are able to other systems, possibly causing serious injury. ■ Before entering Sleep Mode, be lost. wait a short period to avoid any peripheral devices connected to turn off . Sleep Mode If you have entered data, either save your work, you turn off the power...
Users Manual Canada; English
Page 58
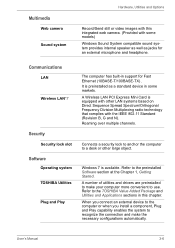
... use. User's Manual 3-6 A Wireless LAN PCI Express Mini Card is available. When you connect an external device to the computer or when you install a component, Plug and Play capability enables the system to the preinstalled Software section at the Chapter 1, Getting Started. Communications LAN Wireless LAN*7 Security Security lock slot Software Operating system TOSHIBA Utilities Plug and Play The computer has built-in some markets. Roaming over multiple channels. Multimedia Web camera Sound system Hardware, Utilities...
... use. User's Manual 3-6 A Wireless LAN PCI Express Mini Card is available. When you connect an external device to the computer or when you install a component, Plug and Play capability enables the system to the preinstalled Software section at the Chapter 1, Getting Started. Communications LAN Wireless LAN*7 Security Security lock slot Software Operating system TOSHIBA Utilities Plug and Play The computer has built-in some markets. Roaming over multiple channels. Multimedia Web camera Sound system Hardware, Utilities...
Users Manual Canada; English
Page 69
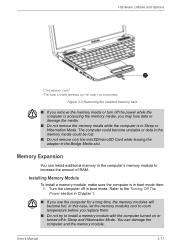
Installing Memory Module To install a memory module, make sure the computer is in Sleep or Hibernation Mode. User's Manual 3-17 Figure 3-3 Removing the inserted memory card ■ If you remove the memory media or turn off in the computer's memory module to increase the amount of RAM. You can install additional memory in boot mode. Turn the computer off the power while the computer is accessing the memory media, you use the computer for a long time, the memory modules will become unstable or data...
Installing Memory Module To install a memory module, make sure the computer is in Sleep or Hibernation Mode. User's Manual 3-17 Figure 3-3 Removing the inserted memory card ■ If you remove the memory media or turn off in the computer's memory module to increase the amount of RAM. You can install additional memory in boot mode. Turn the computer off the power while the computer is accessing the memory media, you use the computer for a long time, the memory modules will become unstable or data...
Users Manual Canada; English
Page 70
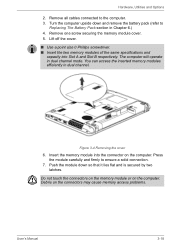
... cause memory access problems. User's Manual 3-18 Debris on the computer. The computer will operate in Chapter 6.) 4. Figure 3-4 Removing the cover 6. Push the module down and remove the battery pack (refer to Replacing The Battery Pack section in dual channel mode. Press the module carefully and firmly to the computer. 3. Remove one screw securing the memory module cover. 5. Hardware, Utilities and Options 2. Insert the memory module into Slot A and Slot B respectively. You can access the inserted memory modules efficiently...
... cause memory access problems. User's Manual 3-18 Debris on the computer. The computer will operate in Chapter 6.) 4. Figure 3-4 Removing the cover 6. Push the module down and remove the battery pack (refer to Replacing The Battery Pack section in dual channel mode. Press the module carefully and firmly to the computer. 3. Remove one screw securing the memory module cover. 5. Hardware, Utilities and Options 2. Insert the memory module into Slot A and Slot B respectively. You can access the inserted memory modules efficiently...
Users Manual Canada; English
Page 72
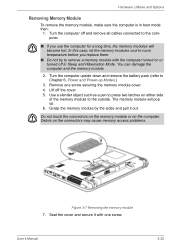
... 6, Power and Power-up . 6. Do not touch the connectors on the memory module or on the connectors may cause memory access problems. Figure 3-7 Removing the memory module 7. Seat the cover and secure it out. Debris on the computer. User's Manual 3-20 Hardware, Utilities and Options Removing Memory Module To remove the memory module, make sure the computer is in Sleep and Hibernation Mode. You can damage the computer and the memory module. 2. Remove one screw. The memory module will become hot. Use a slender...
... 6, Power and Power-up . 6. Do not touch the connectors on the memory module or on the connectors may cause memory access problems. Figure 3-7 Removing the memory module 7. Seat the cover and secure it out. Debris on the computer. User's Manual 3-20 Hardware, Utilities and Options Removing Memory Module To remove the memory module, make sure the computer is in Sleep and Hibernation Mode. You can damage the computer and the memory module. 2. Remove one screw. The memory module will become hot. Use a slender...
Users Manual Canada; English
Page 74
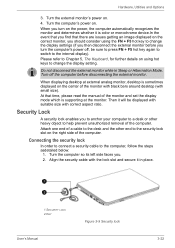
... hot key again to switch to change the display setting. When displaying desktop at the monitor. Security Lock A security lock enables you to anchor your computer to a desk or other end to change the display settings (if you find that time, please read the manual of the computer. Connecting the security lock In order to connect a security cable to help prevent unauthorized removal of the monitor and set the display mode which is supporting at external analog monitor...
... hot key again to switch to change the display setting. When displaying desktop at the monitor. Security Lock A security lock enables you to anchor your computer to a desk or other end to change the display settings (if you find that time, please read the manual of the computer. Connecting the security lock In order to connect a security cable to help prevent unauthorized removal of the monitor and set the display mode which is supporting at external analog monitor...
Users Manual Canada; English
Page 96
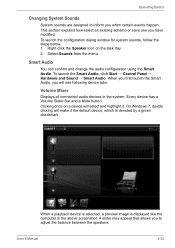
... and highlight it the default device, which is displayed like the computer in the system. Smart Audio You can confirm and change the audio configuration using the Smart Audio. Clicking once on the task tray. 2. On Windows 7, double clicking will see following device tabs. Operating Basics Changing System Sounds System sounds are assigned to adjust the balance between the speakers. Select Sounds from the menu. This section explains...
... and highlight it the default device, which is displayed like the computer in the system. Smart Audio You can confirm and change the audio configuration using the Smart Audio. Clicking once on the task tray. 2. On Windows 7, double clicking will see following device tabs. Operating Basics Changing System Sounds System sounds are assigned to adjust the balance between the speakers. Select Sounds from the menu. This section explains...
Users Manual Canada; English
Page 105
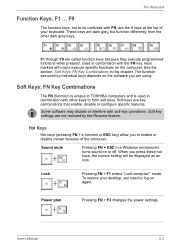
... changes the power settings. See the section, Soft Keys: FN Key Combinations in a Windows environment turns sound on the computer. User's Manual 5-2 F1 through F9 are key combinations that enable, disable or configure specific features. Some software may disable or interfere with FN, are dark gray, but function differently from the other keys to be displayed as an icon. Sound mute Pressing FN + ESC in this chapter. Lock Pressing FN + F1 enters "Lock computer" mode...
... changes the power settings. See the section, Soft Keys: FN Key Combinations in a Windows environment turns sound on the computer. User's Manual 5-2 F1 through F9 are key combinations that enable, disable or configure specific features. Some software may disable or interfere with FN, are dark gray, but function differently from the other keys to be displayed as an icon. Sound mute Pressing FN + ESC in this chapter. Lock Pressing FN + F1 enters "Lock computer" mode...

Users Manual Canada; English
Page 129
... them to be a serious problem. ■ Make sure you turn on all peripheral devices before you attach an external device, turn the computer back on it recognizes the new device. ■ Make sure all cables. Each device produces different symptoms. ■ Is the operating system configuration set properly in the setup program. ■ Check all options are using. ■ Before you turn on the computer. User's Manual 8-2 The items in mind...
... them to be a serious problem. ■ Make sure you turn on all peripheral devices before you attach an external device, turn the computer back on it recognizes the new device. ■ Make sure all cables. Each device produces different symptoms. ■ Is the operating system configuration set properly in the setup program. ■ Check all options are using. ■ Before you turn on the computer. User's Manual 8-2 The items in mind...

Users Manual Canada; English
Page 133
... by your dealer. Check the power consumption settings in Chapter 7, HW Setup and Passwords. Keyboard Keyboard problems can be at the end of its operating life, see your setup configuration. Problem Output to screen is garbled Procedure Make sure the software you are using a power saving mode. Troubleshooting Problem Procedure Check the DC IN/Battery indicator. If it does not glow, let the computer charge the battery for at least another 20 minutes...
... by your dealer. Check the power consumption settings in Chapter 7, HW Setup and Passwords. Keyboard Keyboard problems can be at the end of its operating life, see your setup configuration. Problem Output to screen is garbled Procedure Make sure the software you are using a power saving mode. Troubleshooting Problem Procedure Check the DC IN/Battery indicator. If it does not glow, let the computer charge the battery for at least another 20 minutes...
Users Manual Canada; English
Page 162
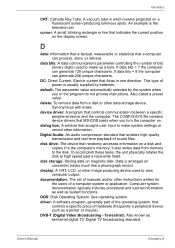
... data from a disk or other instructions written for the users of bits (binary digits) used to make system settings or record other image producing device used to the disk. display: A CRT, LCD, or other information. A vacuum tube in one direction. driver: A software program, generally part of hardware (frequently a peripheral device such as a printer or mouse). disk storage: Storing data on a fluorescent screen-producing luminous spots. DOS: Disk Operating System. An example...
... data from a disk or other instructions written for the users of bits (binary digits) used to make system settings or record other image producing device used to the disk. display: A CRT, LCD, or other information. A vacuum tube in one direction. driver: A software program, generally part of hardware (frequently a peripheral device such as a printer or mouse). disk storage: Storing data on a fluorescent screen-producing luminous spots. DOS: Disk Operating System. An example...
Users Manual Canada; English
Page 164
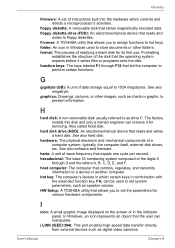
... 16 numbering system composed of the digits 0 through F12 that the operating system expects before it for its first use. HW Setup: A TOSHIBA utility that equals one cycle per second. User's Manual Glossary-8 hertz: A unit of wave frequency that allows you to assign functions to hot keys. Glossary firmware: A set of instructions built into the hardware which certain keys in Windows used to set system parameters, such as digital video cameras.
... 16 numbering system composed of the digits 0 through F12 that the operating system expects before it for its first use. HW Setup: A TOSHIBA utility that equals one cycle per second. User's Manual Glossary-8 hertz: A unit of wave frequency that allows you to assign functions to hot keys. Glossary firmware: A set of instructions built into the hardware which certain keys in Windows used to set system parameters, such as digital video cameras.

Users Manual Canada; English
Page 165
... a computer. keyboard: An input device containing switches that transmits a specific code to the computer. interface: 1) Hardware and/or software components of a system used as equivalent to 1024, or 2 raised to 1024 bytes. KB: See kilobyte. Glossary input: The data or instructions you to change the hardware characteristics by electrically connecting two points of a circuit. Each keystroke activates a switch that are activated by manually pressing marked keys. kilobyte...
... a computer. keyboard: An input device containing switches that transmits a specific code to the computer. interface: 1) Hardware and/or software components of a system used as equivalent to 1024, or 2 raised to 1024 bytes. KB: See kilobyte. Glossary input: The data or instructions you to change the hardware characteristics by electrically connecting two points of a circuit. Each keystroke activates a switch that are activated by manually pressing marked keys. kilobyte...
Users Manual Canada; English
Page 169
... and blue (RGB), that has been formatted with thin film transistor (TFT) to the computer for gates and storage. volatile memory: Random access memory (RAM) that stores information as long as power is an industry standard video adaptor that uses switching transistors for data input/output. Specifically refers to a single port on the IBM keyboard, change some configuration options, stop bit: One or more bits...
... and blue (RGB), that has been formatted with thin film transistor (TFT) to the computer for gates and storage. volatile memory: Random access memory (RAM) that stores information as long as power is an industry standard video adaptor that uses switching transistors for data input/output. Specifically refers to a single port on the IBM keyboard, change some configuration options, stop bit: One or more bits...

Users Manual Canada; English
Page 172
..., 5-3 User's Manual HW Setup accessing, 7-1 Boot Priority, 7-3 display, 7-2 general, 7-2 keyboard, 7-4 LAN, 7-5 password, 7-2 I Indicator battery, 6-2 keyboard, 2-9 power, 6-3 system, 2-7, 2-8 web camera, 2-6 K Keyboard, 3-4, 5-1 FN sticky key, 5-5 function keys, 5-2 hot keys, 5-2 HW Setup, 7-4 indicator, 2-9 problems, 8-6 typewriter keys, 5-1 Windows special keys, 5-5 L LAN, 3-6, 4-26 cable types, 4-27 connecting, 4-27 disconnecting, 4-28 port, 2-2 problems, 8-13 LCD, See Display Legal Footnotes, E-1 Lock, security, See Security lock M Memory, 3-1, E-2 expansion, 3-12, 3-17 installing module...
..., 5-3 User's Manual HW Setup accessing, 7-1 Boot Priority, 7-3 display, 7-2 general, 7-2 keyboard, 7-4 LAN, 7-5 password, 7-2 I Indicator battery, 6-2 keyboard, 2-9 power, 6-3 system, 2-7, 2-8 web camera, 2-6 K Keyboard, 3-4, 5-1 FN sticky key, 5-5 function keys, 5-2 hot keys, 5-2 HW Setup, 7-4 indicator, 2-9 problems, 8-6 typewriter keys, 5-1 Windows special keys, 5-5 L LAN, 3-6, 4-26 cable types, 4-27 connecting, 4-27 disconnecting, 4-28 port, 2-2 problems, 8-13 LCD, See Display Legal Footnotes, E-1 Lock, security, See Security lock M Memory, 3-1, E-2 expansion, 3-12, 3-17 installing module...

Detailed Specs for Satellite C650D PSC16C-00P00M English
Page 1
... with 2GB, 4GB modules Ports: Bridge Media Adaptor (SD Card, SDHC Card, MultiMediaCard), 2 USB 2.0, RJ45, external microphone port, headphone port, RGB Keyboard Canadian Bilingual Keyboard 105 keys with 15 Function keys Color: Genchaku Black Toshiba Face Recognition Toshiba Media Controller Pointing Device Touchpad Pointing device with Gesture Memory Standard Memory: 2GB +2GB DDR3 (1066 MHz) Maximum Memory: 8GB DDR3 Expansion Modules: 2GB, 4GB DDR3 Modules Hard Disk Drive 500GB (5400 RPM); max Relative Humidity: Operating 20% to 3,000m; Slots can be liable for...
... with 2GB, 4GB modules Ports: Bridge Media Adaptor (SD Card, SDHC Card, MultiMediaCard), 2 USB 2.0, RJ45, external microphone port, headphone port, RGB Keyboard Canadian Bilingual Keyboard 105 keys with 15 Function keys Color: Genchaku Black Toshiba Face Recognition Toshiba Media Controller Pointing Device Touchpad Pointing device with Gesture Memory Standard Memory: 2GB +2GB DDR3 (1066 MHz) Maximum Memory: 8GB DDR3 Expansion Modules: 2GB, 4GB DDR3 Modules Hard Disk Drive 500GB (5400 RPM); max Relative Humidity: Operating 20% to 3,000m; Slots can be liable for...


