

Users Manual Canada; English
Page 2
... Computer User's Manual First edition April 2010 Copyright authority for personal use or use within the home. Disclaimer This manual has been validated and reviewed for the TOSHIBA Satellite C650/Satellite C650D/Satellite Pro C650/Satellite Pro C650D Series Portable Personal Computer at the time of Toshiba Corporation. However, succeeding computers and manuals are trademarks of International Business Machines Corporation. Copyrighted material can be reproduced in any reproduction from errors...
... Computer User's Manual First edition April 2010 Copyright authority for personal use or use within the home. Disclaimer This manual has been validated and reviewed for the TOSHIBA Satellite C650/Satellite C650D/Satellite Pro C650/Satellite Pro C650D Series Portable Personal Computer at the time of Toshiba Corporation. However, succeeding computers and manuals are trademarks of International Business Machines Corporation. Copyrighted material can be reproduced in any reproduction from errors...

Users Manual Canada; English
Page 18
... IN/Battery Indicator 6-2 Power Indicator 6-3 Battery Types 6-3 Battery 6-3 Real Time Clock Battery 6-4 Care and Use of The Battery Pack 6-4 Safety Precautions 6-4 Charging The Batteries 6-7 Monitoring Battery Capacity 6-8 Maximizing Battery Operating Time 6-9 Retaining Data with Power off 6-9 Extending Battery Life 6-10 Replacing The Battery Pack 6-10 Removing The Battery Pack 6-11 Installing The Battery Pack 6-12 Starting The Computer by Password 6-13 Power-up Modes 6-13 Windows Utilities 6-13 Hot Keys 6-13 Panel Power On/Off 6-14 System Auto Off 6-14 Chapter 7 HW Setup...
... IN/Battery Indicator 6-2 Power Indicator 6-3 Battery Types 6-3 Battery 6-3 Real Time Clock Battery 6-4 Care and Use of The Battery Pack 6-4 Safety Precautions 6-4 Charging The Batteries 6-7 Monitoring Battery Capacity 6-8 Maximizing Battery Operating Time 6-9 Retaining Data with Power off 6-9 Extending Battery Life 6-10 Replacing The Battery Pack 6-10 Removing The Battery Pack 6-11 Installing The Battery Pack 6-12 Starting The Computer by Password 6-13 Power-up Modes 6-13 Windows Utilities 6-13 Hot Keys 6-13 Panel Power On/Off 6-14 System Auto Off 6-14 Chapter 7 HW Setup...
Users Manual Canada; English
Page 58
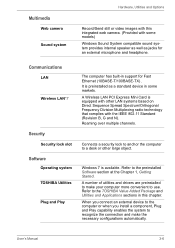
... Web camera Sound system Hardware, Utilities and Options Record/Send still or video images with this chapter. Refer to use. A number of utilities and drivers are preinstalled to make the necessary configurations automatically. It is equipped with other large object. A Wireless LAN PCI Express Mini Card is preinstalled as jacks for Fast Ethernet (10BASE-T/100BASE-TX). Roaming over multiple channels. Windows 7 is available. Communications LAN Wireless LAN*7 Security Security lock slot Software Operating system TOSHIBA Utilities...
... Web camera Sound system Hardware, Utilities and Options Record/Send still or video images with this chapter. Refer to use. A number of utilities and drivers are preinstalled to make the necessary configurations automatically. It is equipped with other large object. A Wireless LAN PCI Express Mini Card is preinstalled as jacks for Fast Ethernet (10BASE-T/100BASE-TX). Roaming over multiple channels. Windows 7 is available. Communications LAN Wireless LAN*7 Security Security lock slot Software Operating system TOSHIBA Utilities...
Users Manual Canada; English
Page 69
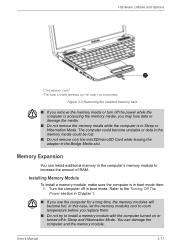
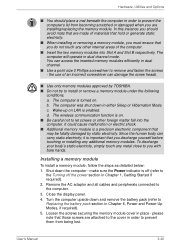
... accessing the memory media, you remove the memory media or turn off in boot mode. User's Manual 3-17 Refer to the Turning Off The Power section in Chapter 1. ■ If you replace them. ■ Do not try to install a memory module with the computer turned on or turned off in Sleep or Hibernation Mode. Hardware, Utilities and Options 1.THE MEMORY CARD* *THE CARD'S SHAPE DEPENDS ON THE CARD YOU PURCHASED. Installing Memory Module To install a memory module, make sure the computer is in Sleep and Hibernation Mode. Memory...
... accessing the memory media, you remove the memory media or turn off in boot mode. User's Manual 3-17 Refer to the Turning Off The Power section in Chapter 1. ■ If you replace them. ■ Do not try to install a memory module with the computer turned on or turned off in Sleep or Hibernation Mode. Hardware, Utilities and Options 1.THE MEMORY CARD* *THE CARD'S SHAPE DEPENDS ON THE CARD YOU PURCHASED. Installing Memory Module To install a memory module, make sure the computer is in Sleep and Hibernation Mode. Memory...
Users Manual Canada; English
Page 105
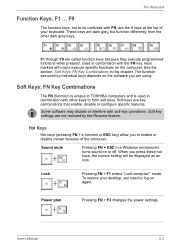
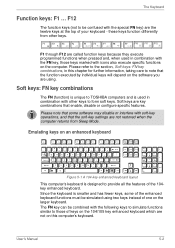
... enable, disable or configure specific features. Soft keys are called function keys because they execute programmed functions when pressed. To restore your keyboard. User's Manual 5-2 Lock Pressing FN + F1 enters "Lock computer" mode. Sound mute Pressing FN + ESC in this chapter. The Keyboard Function Keys: F1 ... The function executed by the Resume feature. Soft Keys: FN Key Combinations The FN (function) is used in combination with the FN key, keys marked with other dark gray keys. Some software may disable...
... enable, disable or configure specific features. Soft keys are called function keys because they execute programmed functions when pressed. To restore your keyboard. User's Manual 5-2 Lock Pressing FN + F1 enters "Lock computer" mode. Sound mute Pressing FN + ESC in this chapter. The Keyboard Function Keys: F1 ... The function executed by the Resume feature. Soft Keys: FN Key Combinations The FN (function) is used in combination with the FN key, keys marked with other dark gray keys. Some software may disable...
Users Manual Canada; English
Page 162
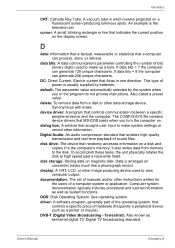
... parameter controlling the number of power is the television set of a computer system or application. If data bits = 8 the computer can process, store, or retrieve. device driver: A program that flows in which beams projected on the display screen. display: A CRT, LCD, or other instructions written for the users of manuals and/or other image producing device used to the disk. cursor: A small, blinking rectangle or line that enables...
... parameter controlling the number of power is the television set of a computer system or application. If data bits = 8 the computer can process, store, or retrieve. device driver: A program that flows in which beams projected on the display screen. display: A CRT, LCD, or other instructions written for the users of manuals and/or other image producing device used to the disk. cursor: A small, blinking rectangle or line that enables...

Users Manual Canada; English
Page 165
... power. Each keystroke activates a switch that enables cableless infrared serial data transfer at speeds of a circuit. KB: See kilobyte. For each key, the transmitted code is input for example, the keyboard or a menu. Glossary input: The data or instructions you to change the hardware characteristics by manually pressing marked keys. IrDA 1.1: An industry standard that transmits a specific code to the computer. often used specifically to connect one system or device...
... power. Each keystroke activates a switch that enables cableless infrared serial data transfer at speeds of a circuit. KB: See kilobyte. For each key, the transmitted code is input for example, the keyboard or a menu. Glossary input: The data or instructions you to change the hardware characteristics by manually pressing marked keys. IrDA 1.1: An industry standard that transmits a specific code to the computer. often used specifically to connect one system or device...
Users Manual Canada; English
Page 169
... MS-DOS the operating system is an industry standard video adaptor that direct and control the computer system's activities. soft key: Key combinations that uses switching transistors for data input/output. W User's Manual Glossary-13 Specifically refers to computer programs that allows you to a single port on the IBM keyboard, change some configuration options, stop bit: One or more bits of brightness. The electronic methodology used in two...
... MS-DOS the operating system is an industry standard video adaptor that direct and control the computer system's activities. soft key: Key combinations that uses switching transistors for data input/output. W User's Manual Glossary-13 Specifically refers to computer programs that allows you to a single port on the IBM keyboard, change some configuration options, stop bit: One or more bits of brightness. The electronic methodology used in two...

Users Manual Canada; English
Page 4
... Password Utility 6-10 Starting the computer by password 6-10 Power-up modes 6-11 Panel power on/off 6-11 System automatic Sleep/Hibernation 6-11 Chapter 7 HW Setup Accessing HW Setup 7-1 HW Setup window 7-1 Chapter 8 Troubleshooting Problem solving process 8-1 Hardware and system checklist 8-3 TOSHIBA support 8-19 Appendix A Specifications Physical Dimensions A-1 Environmental Requirements A-1 Appendix B Display Controller and Video mode Display controller B-1 Video mode B-1 Appendix C Information for Wireless Devices Wireless LAN Interoperability C-1 Bluetooth wireless...
... Password Utility 6-10 Starting the computer by password 6-10 Power-up modes 6-11 Panel power on/off 6-11 System automatic Sleep/Hibernation 6-11 Chapter 7 HW Setup Accessing HW Setup 7-1 HW Setup window 7-1 Chapter 8 Troubleshooting Problem solving process 8-1 Hardware and system checklist 8-3 TOSHIBA support 8-19 Appendix A Specifications Physical Dimensions A-1 Environmental Requirements A-1 Appendix B Display Controller and Video mode Display controller B-1 Video mode B-1 Appendix C Information for Wireless Devices Wireless LAN Interoperability C-1 Bluetooth wireless...

Users Manual Canada; English
Page 21
... 're new to portable computing, first read Chapter 1, Getting Started for clarity, abbreviations are an experienced computer user, please continue reading the preface to set up your computer. Read Chapter 3, Hardware, Utilities and Options if connecting optional products or external devices. For example: Read Only Memory (ROM). It also provides detailed information on configuring your purchase of reliable, high-performance computing. User's Manual xxii This powerful notebook computer...
... 're new to portable computing, first read Chapter 1, Getting Started for clarity, abbreviations are an experienced computer user, please continue reading the preface to set up your computer. Read Chapter 3, Hardware, Utilities and Options if connecting optional products or external devices. For example: Read Only Memory (ROM). It also provides detailed information on configuring your purchase of reliable, high-performance computing. User's Manual xxii This powerful notebook computer...
Users Manual Canada; English
Page 56
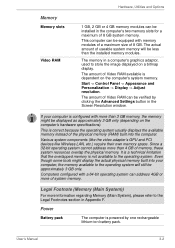
... display. User's Manual 3-2 Computers configured with memory modules of a maximum size of system memory. Even though some tools might be approximately 3 GB only. Hardware, Utilities and Options Memory Memory slots Video RAM 1 GB, 2 GB or 4 GB memory modules can be less than the installed memory modules. The amount of Video RAM can be equipped with a 64-bit operating system can be verified by one rechargeable lithium-ion battery pack. Start -> Control Panel -> Appearance and Personalization -> Display -> Adjust resolution. The memory...
... display. User's Manual 3-2 Computers configured with memory modules of a maximum size of system memory. Even though some tools might be approximately 3 GB only. Hardware, Utilities and Options Memory Memory slots Video RAM 1 GB, 2 GB or 4 GB memory modules can be less than the installed memory modules. The amount of Video RAM can be equipped with a 64-bit operating system can be verified by one rechargeable lithium-ion battery pack. Start -> Control Panel -> Appearance and Personalization -> Display -> Adjust resolution. The memory...
Users Manual Canada; English
Page 73
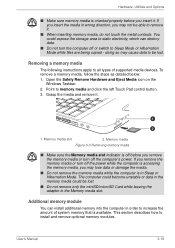
... inserting memory media, do not touch the metal contacts. Removing a memory media The following instructions apply to remove it . 1 2 1. Point to install and remove optional memory modules. This section describes how to memory media and click the left Touch Pad control button. 3. Additional memory module You can destroy data. ■ Do not turn the computer off or switch to be lost . If you insert the media in wrong direction, you may cause data to Sleep Mode...
... inserting memory media, do not touch the metal contacts. Removing a memory media The following instructions apply to remove it . 1 2 1. Point to install and remove optional memory modules. This section describes how to memory media and click the left Touch Pad control button. 3. Additional memory module You can destroy data. ■ Do not turn the computer off or switch to be lost . If you insert the media in wrong direction, you may cause data to Sleep Mode...
Users Manual Canada; English
Page 74
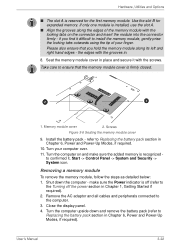
...: 1. Close the display panel. 4. Hardware, Utilities and Options ■ You should avoid mats that may be fatally damaged by TOSHIBA. ■ Do not try to let screws or other internal areas of an incorrect screwdriver can carry static electricity, it is on . make sure the Power indicator is a precision electronic component that are installing/replacing the memory module. Shut down and remove the battery pack (refer...
...: 1. Close the display panel. 4. Hardware, Utilities and Options ■ You should avoid mats that may be fatally damaged by TOSHIBA. ■ Do not try to let screws or other internal areas of an incorrect screwdriver can carry static electricity, it is on . make sure the Power indicator is a precision electronic component that are installing/replacing the memory module. Shut down and remove the battery pack (refer...
Users Manual Canada; English
Page 76
... cables and peripherals connected to ensure that you find it with the grooves in Chapter 1, Getting Started if required). 2. Close the display panel. 4. Seat the memory module cover in place and secure it difficult to the Turning off the power section in . 8. Install the battery pack - refer to Replacing the battery pack section in Chapter 6, Power and Power-Up Modes, if required. 10. Use the slot B for the first memory module...
... cables and peripherals connected to ensure that you find it with the grooves in Chapter 1, Getting Started if required). 2. Close the display panel. 4. Seat the memory module cover in place and secure it difficult to the Turning off the power section in . 8. Install the battery pack - refer to Replacing the battery pack section in Chapter 6, Power and Power-Up Modes, if required. 10. Use the slot B for the first memory module...

Users Manual Canada; English
Page 110
... Control window's Top Menu or Menu buttons, touch pad and mouse menu operations may not be able to be used. For NVIDIA Graphics models, operations such as Setup, Help, some flickerings when you have the 3D glasses on external 3D enabled display/TV, please change the display mode to HDMI only (Projector only), and use the 3D glasses that come with your room, you may experience some function buttons and remote control functions will be temporarily disabled...
... Control window's Top Menu or Menu buttons, touch pad and mouse menu operations may not be able to be used. For NVIDIA Graphics models, operations such as Setup, Help, some flickerings when you have the 3D glasses on external 3D enabled display/TV, please change the display mode to HDMI only (Projector only), and use the 3D glasses that come with your room, you may experience some function buttons and remote control functions will be temporarily disabled...
Users Manual Canada; English
Page 123
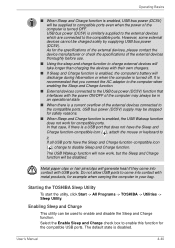
... utility can be used to disable Sleep and Charge function. The default state is similarly supplied to the external devices which are connected to the compatible ports. As for the compatible USB ports. Do not allow USB ports to come into contact with metal products, for compatible ports. If all USB ports have the Sleep and Charge function-compatible icon ( ), attach the mouse or keyboard to it. Operating Basics ■ When Sleep and Charge function is enabled, USB bus power...
... utility can be used to disable Sleep and Charge function. The default state is similarly supplied to the external devices which are connected to the compatible ports. As for the compatible USB ports. Do not allow USB ports to come into contact with metal products, for compatible ports. If all USB ports have the Sleep and Charge function-compatible icon ( ), attach the mouse or keyboard to it. Operating Basics ■ When Sleep and Charge function is enabled, USB bus power...
Users Manual Canada; English
Page 126
... that the soft-key settings are the twelve keys at the top of the 104key enhanced keyboard. User's Manual 5-2 F12 The function keys (not to note that enable, disable or configure specific features. these keys function differently from Sleep Mode. F1 through F12 are called function keys because they execute programmed functions when pressed and, when used in combination with soft-key operations, and that some of the enhanced keyboard functions must be combined...
... that the soft-key settings are the twelve keys at the top of the 104key enhanced keyboard. User's Manual 5-2 F12 The function keys (not to note that enable, disable or configure specific features. these keys function differently from Sleep Mode. F1 through F12 are called function keys because they execute programmed functions when pressed and, when used in combination with soft-key operations, and that some of the enhanced keyboard functions must be combined...
Users Manual Canada; English
Page 164
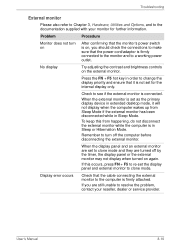
... display panel and an external monitor are set the display panel and external monitor to clone mode. Press the FN + F5 hot key in Sleep or Hibernation Mode. When the external monitor is set for further information. Troubleshooting External monitor Please also refer to Chapter 3, Hardware, Utilities and Options, and to the documentation supplied with your reseller, dealer or service provider. Check to see if the external monitor is firmly connected to the monitor and to a working power outlet. User's Manual 8-16 Problem...
... display panel and an external monitor are set the display panel and external monitor to clone mode. Press the FN + F5 hot key in Sleep or Hibernation Mode. When the external monitor is set for further information. Troubleshooting External monitor Please also refer to Chapter 3, Hardware, Utilities and Options, and to the documentation supplied with your reseller, dealer or service provider. Check to see if the external monitor is firmly connected to the monitor and to a working power outlet. User's Manual 8-16 Problem...

Users Manual Canada; English
Page 191
... the TOSHIBA website at high altitude (all temperature references are met: ■ 64-bit Operating System ■ 64-bit CPU, Chipset and BIOS (Basic Input/Output System) ■ 64-bit Device drivers ■ 64-bit applications Certain device drivers and/or applications may not be used outside the range of the main system memory may vary depending on the specific computer model...
... the TOSHIBA website at high altitude (all temperature references are met: ■ 64-bit Operating System ■ 64-bit CPU, Chipset and BIOS (Basic Input/Output System) ■ 64-bit Device drivers ■ 64-bit applications Certain device drivers and/or applications may not be used outside the range of the main system memory may vary depending on the specific computer model...

Detailed Specs for Satellite C650D PSC0YC-05205K English
Page 1
... DDR3, 4GB DDR3 Modules Hard Disk Drive 640GB (5400 RPM); Pre-installed software is subject to design configuration. Bluetooth V2.1+EDR USB Adaptor PA3575C-1PRP- Toshiba recommends Windows 7 C650D-052 Model: i Satellite C650D-052 AMD E Series Processor E-450 - 1.65 GHz, Genuine Windows® 7 Home Premium, 15.6" HD LCD, 4GB DDR3, 640GB HDD S-ATA, DVD Super-Multi Double Layer, LAN, Realtek 802.11 bgn Wireless, Integrated Web Camera, RGB Processor AMD E Series Processor E-450...
... DDR3, 4GB DDR3 Modules Hard Disk Drive 640GB (5400 RPM); Pre-installed software is subject to design configuration. Bluetooth V2.1+EDR USB Adaptor PA3575C-1PRP- Toshiba recommends Windows 7 C650D-052 Model: i Satellite C650D-052 AMD E Series Processor E-450 - 1.65 GHz, Genuine Windows® 7 Home Premium, 15.6" HD LCD, 4GB DDR3, 640GB HDD S-ATA, DVD Super-Multi Double Layer, LAN, Realtek 802.11 bgn Wireless, Integrated Web Camera, RGB Processor AMD E Series Processor E-450...


