Maintenance Manual
Page 8
... Memory Error! Bookmark not defined. Installing the Optional Memory Error! Bookmark not defined. 4.7 ODD Error! viii [CONFIDENTIAL] Satellite A350 Series Maintenance Manual Before You Begin Error! Bookmark not defined. Colors of Screws on the Laptop Body Error! Removing the Battery Pack Error! Installing the HDD Error! Bookmark not defined. 4.6 Modem Card / FM Tuner...
... Memory Error! Bookmark not defined. Installing the Optional Memory Error! Bookmark not defined. 4.7 ODD Error! viii [CONFIDENTIAL] Satellite A350 Series Maintenance Manual Before You Begin Error! Bookmark not defined. Colors of Screws on the Laptop Body Error! Removing the Battery Pack Error! Installing the HDD Error! Bookmark not defined. 4.6 Modem Card / FM Tuner...
Maintenance Manual
Page 11
... cables from logic lower assembly Error! Bookmark not defined. Bookmark not defined. Removing motherboard from the laptop Error! Removing the 2nd HDD door Error! Removing the RAM from the ODD drive...........Error! Removing the power...assembly .. Removing the keyboard Error! Bookmark not defined. Bookmark not defined. Bookmark not defined. Bookmark not defined. Bookmark not defined. Satellite A350 Series Maintenance Manual [CONFIDENTIAL] xi Bookmark not defined. Removing the thermal fan from the keyboard Error! Installing the DC-in jack Error!...
... cables from logic lower assembly Error! Bookmark not defined. Bookmark not defined. Removing motherboard from the laptop Error! Removing the 2nd HDD door Error! Removing the RAM from the ODD drive...........Error! Removing the power...assembly .. Removing the keyboard Error! Bookmark not defined. Bookmark not defined. Bookmark not defined. Bookmark not defined. Bookmark not defined. Satellite A350 Series Maintenance Manual [CONFIDENTIAL] xi Bookmark not defined. Removing the thermal fan from the keyboard Error! Installing the DC-in jack Error!...
Maintenance Manual
Page 12
.... Removing the Hinge Saddle Error! Removing CRT Board from the LCD cover assembly Error! Removing the CRT bracket from the rear of the laptop . Bookmark not defined. xii [CONFIDENTIAL] Satellite A350 Series Maintenance Manual Error! Bookmark not defined. Removing the FM Jack Error! Removing the Thermal Module spring screws...... Error! Removing the display...
.... Removing the Hinge Saddle Error! Removing CRT Board from the LCD cover assembly Error! Removing the CRT bracket from the rear of the laptop . Bookmark not defined. xii [CONFIDENTIAL] Satellite A350 Series Maintenance Manual Error! Bookmark not defined. Removing the FM Jack Error! Removing the Thermal Module spring screws...... Error! Removing the display...
Maintenance Manual
Page 152
......4-1 Safety Precautions 4-2 Before You Begin 4-4 Disassembly Procedures 4-5 Assembly Procedures 4-5 Tools and Equipment 4-6 Screw Tightening Torque 4-6 Colors of Screw Shanks 4-7 Symbols of Screws on the Laptop Body 4-7 Symbol examples 4-7 4.2 Battery ...4-8 Removing the Battery Pack 4-8 Installing the Battery Pack 4-9 4.3 HDD ...4-10 Removing the HDD 4-10 Installing the HDD 4-13 4.4 ... ODD Drive 4-22 Assembling the ODD Drive 4-22 4.8 Keyboard Cover and Keyboard 4-23 Removing the Keyboard Cover and Keyboard 4-23 Satellite A350 Maintenance Manual 4-ii
......4-1 Safety Precautions 4-2 Before You Begin 4-4 Disassembly Procedures 4-5 Assembly Procedures 4-5 Tools and Equipment 4-6 Screw Tightening Torque 4-6 Colors of Screw Shanks 4-7 Symbols of Screws on the Laptop Body 4-7 Symbol examples 4-7 4.2 Battery ...4-8 Removing the Battery Pack 4-8 Installing the Battery Pack 4-9 4.3 HDD ...4-10 Removing the HDD 4-10 Installing the HDD 4-13 4.4 ... ODD Drive 4-22 Assembling the ODD Drive 4-22 4.8 Keyboard Cover and Keyboard 4-23 Removing the Keyboard Cover and Keyboard 4-23 Satellite A350 Maintenance Manual 4-ii

Maintenance Manual
Page 155
... cover 4-23 Removing screws from the keyboard 4-24 Removing the keyboard 4-24 Removing the screws from the bottom of the laptop 4-26 Removing five screws from the laptop 4-27 Detaching cables from the laptop 4-28 Removing the power board 4-29 Removing the speakers 4-30 Removing the screws from the touch pad bracket 4-32... Removing the VGA Board 4-41 Removing the spring screws 4-41 Reapply the Shinetsu 7726 grease on the thermal module and remove the release papers ...4-42 Satellite A350 Maintenance Manual 4-v
... cover 4-23 Removing screws from the keyboard 4-24 Removing the keyboard 4-24 Removing the screws from the bottom of the laptop 4-26 Removing five screws from the laptop 4-27 Detaching cables from the laptop 4-28 Removing the power board 4-29 Removing the speakers 4-30 Removing the screws from the touch pad bracket 4-32... Removing the VGA Board 4-41 Removing the spring screws 4-41 Reapply the Shinetsu 7726 grease on the thermal module and remove the release papers ...4-42 Satellite A350 Maintenance Manual 4-v

Maintenance Manual
Page 156
... CPU 4-45 Reapply the Shinetsu 7726 grease on the thermal module and remove the release papers ...4-46 Removing the screws from the rear of the laptop 4-48 Removing the display assembly 4-49 Removing the LCD Bezel Assembly 4-50 Removing the Inverter Board 4-51 Removing the LCD Module from the LCD cover... 4-58 Removing the CRT bracket from the CRT board 4-58 Removing the USB Board 4-60 Removing the FM Jack 4-61 Removing the Bluetooth card 4-62 Satellite A350 Maintenance Manual 4-vi
... CPU 4-45 Reapply the Shinetsu 7726 grease on the thermal module and remove the release papers ...4-46 Removing the screws from the rear of the laptop 4-48 Removing the display assembly 4-49 Removing the LCD Bezel Assembly 4-50 Removing the Inverter Board 4-51 Removing the LCD Module from the LCD cover... 4-58 Removing the CRT bracket from the CRT board 4-58 Removing the USB Board 4-60 Removing the FM Jack 4-61 Removing the Bluetooth card 4-62 Satellite A350 Maintenance Manual 4-vi

Maintenance Manual
Page 157
... you to remove all the surrounding FRUs to be removed before removing the suspect FRU. Then start removal and replacement. How to disassemble the laptop and replace Field Replaceable Units (FRUs). Style not defined. 4 Replacement Procedures 4.1 General This chapter explains how to use the chart (two ...Thermal Fan. • For removing the LCD Module: First, remove LCD Bezel Assembly, then remove the LCD module and the Inverter Board. Satellite A350 Maintenance Manual 4-1 Style not defined. The chart below shows the FRUs in the order in which they should be removed in the top ...
... you to remove all the surrounding FRUs to be removed before removing the suspect FRU. Then start removal and replacement. How to disassemble the laptop and replace Field Replaceable Units (FRUs). Style not defined. 4 Replacement Procedures 4.1 General This chapter explains how to use the chart (two ...Thermal Fan. • For removing the LCD Module: First, remove LCD Bezel Assembly, then remove the LCD module and the Inverter Board. Satellite A350 Maintenance Manual 4-1 Style not defined. The chart below shows the FRUs in the order in which they should be removed in the top ...
Maintenance Manual
Page 158
... They may burst or explode. The components such as necklaces, bracelets, and rings before starting work with the laptop. WARNING: 1. Always use care to follow them while you are incompatible with damp or wet hands. 3. ...Toshiba. DANGER: 1. Never throw the battery packs into a fire. Do not disassemble individual components during first-level maintenance. 4 Replacement Procedures Error! To avoid the risk of the components. Style not defined. When you begin disassembly read the following safety precautions carefully. Never work . Error! Satellite A350...
... They may burst or explode. The components such as necklaces, bracelets, and rings before starting work with the laptop. WARNING: 1. Always use care to follow them while you are incompatible with damp or wet hands. 3. ...Toshiba. DANGER: 1. Never throw the battery packs into a fire. Do not disassemble individual components during first-level maintenance. 4 Replacement Procedures Error! To avoid the risk of the components. Style not defined. When you begin disassembly read the following safety precautions carefully. Never work . Error! Satellite A350...

Maintenance Manual
Page 159
... not meet the specifications of electrical shock caused by accidental contact with your laptop or Toshiba-recommended equivalents. 5. For AC input, be sure to avoid the risk of the laptop and that come with the energized components. 4. Before raising a FRU or... other component, make sure that all the screws are components that become hot during operation (such as the CPU and cooling module). Inside the PC are fastened securely. Style not defined. into the components. Satellite A350...
... not meet the specifications of electrical shock caused by accidental contact with your laptop or Toshiba-recommended equivalents. 5. For AC input, be sure to avoid the risk of the laptop and that come with the energized components. 4. Before raising a FRU or... other component, make sure that all the screws are components that become hot during operation (such as the CPU and cooling module). Inside the PC are fastened securely. Style not defined. into the components. Satellite A350...
Maintenance Manual
Page 160
...defined. After you begin disassembly by removing the AC adapter and battery pack. To run and store the laptop, be removed or replaced during disassembling. Normally, a number of you can easily find the right screws ...Procedures Error! Perform only the required machine operations. Style not defined. Error! Always begin to ensure normal laptop operation. Remove the optional parts and accessories as well. The procedures for the right components. Use only the... the appropriate explanations and figures for screw sizes. Satellite A350 Maintenance Manual 4-4
...defined. After you begin disassembly by removing the AC adapter and battery pack. To run and store the laptop, be removed or replaced during disassembling. Normally, a number of you can easily find the right screws ...Procedures Error! Perform only the required machine operations. Style not defined. Error! Always begin to ensure normal laptop operation. Remove the optional parts and accessories as well. The procedures for the right components. Use only the... the appropriate explanations and figures for screw sizes. Satellite A350 Maintenance Manual 4-4

Maintenance Manual
Page 161
...the cable into the connector. If the cable came off the connector, reinsert the cable by simply inserting them or pulling them out. Satellite A350 Maintenance Manual 4-5 Error! Secure the cable in the correct position by the screws or FRUs. ‰ Check that all the latches ... Disassembly Procedures The cable connectors come in mind: ‰ Take your time to check that the plate is connected firmly. When reassembling the laptop, keep the following general guidelines in these two basic types: ‰ Pressure plate connectors ‰ Normal pin connectors To remove a pressure ...
...the cable into the connector. If the cable came off the connector, reinsert the cable by simply inserting them or pulling them out. Satellite A350 Maintenance Manual 4-5 Error! Secure the cable in the correct position by the screws or FRUs. ‰ Check that all the latches ... Disassembly Procedures The cable connectors come in mind: ‰ Take your time to check that the plate is connected firmly. When reassembling the laptop, keep the following general guidelines in these two basic types: ‰ Pressure plate connectors ‰ Normal pin connectors To remove a pressure ...

Maintenance Manual
Page 163
Symbols of Screws on the laptop body as symbols. A symbol consists of a letter representing the screw type and a numeral representing the screw length. ‰ Screw type ‰ Bind screw ‰ Flat-... lengths, as follows: ‰ Screws of an odd-numbered length White ‰ Screws of a special length Black Screws of a special length are shown on the Laptop Body For easy maintenance, the screw types are those of the entire stud length.) Satellite A350 Maintenance Manual 4-7
Symbols of Screws on the laptop body as symbols. A symbol consists of a letter representing the screw type and a numeral representing the screw length. ‰ Screw type ‰ Bind screw ‰ Flat-... lengths, as follows: ‰ Screws of an odd-numbered length White ‰ Screws of a special length Black Screws of a special length are shown on the Laptop Body For easy maintenance, the screw types are those of the entire stud length.) Satellite A350 Maintenance Manual 4-7

Maintenance Manual
Page 164
...the used battery packs as required by local ordinances or regulations. Satellite A350 Maintenance Manual 4-8 Do not scratch or break up their casing. 1. Slide the battery release latch and remove the battery pack from the laptop. Style not defined. Error! Style not defined. 4.2 Battery... Removing the Battery Pack Remove the battery pack according to short circuit the terminals. Turn the laptop upside down so that the bottom is facing you. ...
...the used battery packs as required by local ordinances or regulations. Satellite A350 Maintenance Manual 4-8 Do not scratch or break up their casing. 1. Slide the battery release latch and remove the battery pack from the laptop. Style not defined. Error! Style not defined. 4.2 Battery... Removing the Battery Pack Remove the battery pack according to short circuit the terminals. Turn the laptop upside down so that the bottom is facing you. ...

Maintenance Manual
Page 166
M2.5X62 Figure 4.2 Removing the main HDD door Satellite A350 Maintenance Manual 4-10 Style not defined. 4.3 HDD Removing the HDD CAUTION: Do not press on the top or bottom of the drive. Remove the HDD (... door screws that secure the HDD and then remove the HDD door. Style not defined. Applying such pressure can either corrupt the data in the laptop. 4 Replacement Procedures Error! Error! There are two HDD equipped in the drive or damage the drive.
M2.5X62 Figure 4.2 Removing the main HDD door Satellite A350 Maintenance Manual 4-10 Style not defined. 4.3 HDD Removing the HDD CAUTION: Do not press on the top or bottom of the drive. Remove the HDD (... door screws that secure the HDD and then remove the HDD door. Style not defined. Applying such pressure can either corrupt the data in the laptop. 4 Replacement Procedures Error! Error! There are two HDD equipped in the drive or damage the drive.

Maintenance Manual
Page 169
...defined. 4 Replacement Procedures Installing the HDD Install the HDD according to the laptop. 8. Secure the main HDD door by tightening two M2.5x4 screws. Satellite A350 Maintenance Manual 4-13 Install the HDD pack into the correct position in the laptop. Error! Place the main HDD into the 2nd HDD plate. 6. ... from being distorted when installing the HDD pack into the correct position in the laptop. CAUTION: To avoid damage, always hold the HDD pack by its sides. 3. Install the HDD pack into the laptop, do not press the center of the plate and secure them with four M3x3...
...defined. 4 Replacement Procedures Installing the HDD Install the HDD according to the laptop. 8. Secure the main HDD door by tightening two M2.5x4 screws. Satellite A350 Maintenance Manual 4-13 Install the HDD pack into the correct position in the laptop. Error! Place the main HDD into the 2nd HDD plate. 6. ... from being distorted when installing the HDD pack into the correct position in the laptop. CAUTION: To avoid damage, always hold the HDD pack by its sides. 3. Install the HDD pack into the laptop, do not press the center of the plate and secure them with four M3x3...

Maintenance Manual
Page 170
... that secures the RAM door. 3. Remove one M2.5x5.4 screw that the laptop is violated, the laptop or memory can cause memory access problems. M2.5X5.41 Figure 4.6 Removing the RAM door Satellite A350 Maintenance Manual 4-14 Style not defined. Turn the laptop upside down. 2. Remove the RAM door. Style not defined. 4.4 Memory Removing the...
... that secures the RAM door. 3. Remove one M2.5x5.4 screw that the laptop is violated, the laptop or memory can cause memory access problems. M2.5X5.41 Figure 4.6 Removing the RAM door Satellite A350 Maintenance Manual 4-14 Style not defined. Turn the laptop upside down. 2. Remove the RAM door. Style not defined. 4.4 Memory Removing the...

Maintenance Manual
Page 172
...secured with one M2.5x5.4 screw. Installing the Optional Memory Install the optional memory according to make sure that the laptop is violated, the laptop or memory can be damaged. 1. If it is turned on, check the hardware configuration in the Hardware Setup or ... that the installed memory has been recognized by the system. Secure the RAM door with both memory lock latches. 3. Satellite A350 Maintenance Manual 4-16 Error! If this is turned off the laptop. Style not defined. Reinstall the optional RAM door. 4. 4 Replacement Procedures Error! Style not defined.
...secured with one M2.5x5.4 screw. Installing the Optional Memory Install the optional memory according to make sure that the laptop is violated, the laptop or memory can be damaged. 1. If it is turned on, check the hardware configuration in the Hardware Setup or ... that the installed memory has been recognized by the system. Secure the RAM door with both memory lock latches. 3. Satellite A350 Maintenance Manual 4-16 Error! If this is turned off the laptop. Style not defined. Reinstall the optional RAM door. 4. 4 Replacement Procedures Error! Style not defined.

Maintenance Manual
Page 176
See the appropriate sections for all the modules that can become hot during operation. Turn the laptop upside down. 2. CAUTION: Handle the ODD bay module carefully it can be installed in the direction of specific modules. Remove the ODD bay module according ...! Style not defined. 4.7 ODD Removing the ODD Bay Module NOTE: The installation and removal procedures are the same for the disassembly procedures of the arrow. Satellite A350 Maintenance Manual 4-20
See the appropriate sections for all the modules that can become hot during operation. Turn the laptop upside down. 2. CAUTION: Handle the ODD bay module carefully it can be installed in the direction of specific modules. Remove the ODD bay module according ...! Style not defined. 4.7 ODD Removing the ODD Bay Module NOTE: The installation and removal procedures are the same for the disassembly procedures of the arrow. Satellite A350 Maintenance Manual 4-20
Maintenance Manual
Page 179
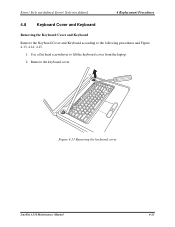
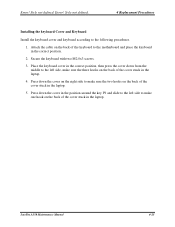
Style not defined. 4 Replacement Procedures 4.8 Keyboard Cover and Keyboard Removing the Keyboard Cover and Keyboard Remove the Keyboard Cover and Keyboard according to lift the keyboard cover from the laptop. 2. Use a flat head screwdriver to the following procedures and Figure 4.13, 4.14, 4.15. 1. Remove the keyboard cover. Error! Style not defined. Figure 4.13 Removing the keyboard cover Satellite A350 Maintenance Manual 4-23 Error!
Style not defined. 4 Replacement Procedures 4.8 Keyboard Cover and Keyboard Removing the Keyboard Cover and Keyboard Remove the Keyboard Cover and Keyboard according to lift the keyboard cover from the laptop. 2. Use a flat head screwdriver to the following procedures and Figure 4.13, 4.14, 4.15. 1. Remove the keyboard cover. Error! Style not defined. Figure 4.13 Removing the keyboard cover Satellite A350 Maintenance Manual 4-23 Error!
Maintenance Manual
Page 181
... three hooks on the back of the cover stuck in the correct position. 2. Attach the cable on the back of the cover stuck in the laptop. 5. Satellite A350 Maintenance Manual 4-25 Place the keyboard cover in the correct position, then press the cover down from the middle to the left side to the... side, make sure the two hooks on the back of the keyboard to make one hook on the back of the cover stuck in the laptop. 4. Press down the cover on the right side to the following procedures. 1. Secure the keyboard with two M2.0x3 screws. 3. Style not defined. Error! Error...
... three hooks on the back of the cover stuck in the correct position. 2. Attach the cable on the back of the cover stuck in the laptop. 5. Satellite A350 Maintenance Manual 4-25 Place the keyboard cover in the correct position, then press the cover down from the middle to the left side to the... side, make sure the two hooks on the back of the keyboard to make one hook on the back of the cover stuck in the laptop. 4. Press down the cover on the right side to the following procedures. 1. Secure the keyboard with two M2.0x3 screws. 3. Style not defined. Error! Error...


