
User Guide
Page 27
... Keeping yourself comfortable 49 Precautions 52 Setting up your computer 54 Setting up your software 54 Registering your computer with Toshiba ......... 55 Adding external devices 55 Using external display devices 56 Connecting an external monitor 56 Directing the display output ... panel 62 Turning on the power 62 Using the TouchPad 63 Control buttons 64 Disabling or enabling the TouchPad 64 Installing additional memory (optional 65 Removing a memory module 70 Connecting a mouse 72 Connecting a printer 72 Connecting a USB printer 72 Connecting a parallel printer 72 Setting up ...
... Keeping yourself comfortable 49 Precautions 52 Setting up your computer 54 Setting up your software 54 Registering your computer with Toshiba ......... 55 Adding external devices 55 Using external display devices 56 Connecting an external monitor 56 Directing the display output ... panel 62 Turning on the power 62 Using the TouchPad 63 Control buttons 64 Disabling or enabling the TouchPad 64 Installing additional memory (optional 65 Removing a memory module 70 Connecting a mouse 72 Connecting a printer 72 Connecting a USB printer 72 Connecting a parallel printer 72 Setting up ...
User Guide
Page 32
... conflict 185 A plan of action 185 Resolving hardware conflicts on your own .... 186 Fixing a problem with Device Manager .......... 188 Memory module problems 190 Power and the batteries 191 Keyboard problems 192 Display problems 193 Disk drive problems 195 DVD-ROM or multi-function ...204 Modem problems 205 Develop good computing habits 205 If you need further assistance 207 Before you call 207 Contacting Toshiba 207 Other Toshiba Internet Web sites 209 Toshiba's worldwide offices 209 Appendix A: Hot Keys 212 Volume Mute 212 Instant password security 213 Without a password 213...
... conflict 185 A plan of action 185 Resolving hardware conflicts on your own .... 186 Fixing a problem with Device Manager .......... 188 Memory module problems 190 Power and the batteries 191 Keyboard problems 192 Display problems 193 Disk drive problems 195 DVD-ROM or multi-function ...204 Modem problems 205 Develop good computing habits 205 If you need further assistance 207 Before you call 207 Contacting Toshiba 207 Other Toshiba Internet Web sites 209 Toshiba's worldwide offices 209 Appendix A: Hot Keys 212 Volume Mute 212 Instant password security 213 Without a password 213...
User Guide
Page 46
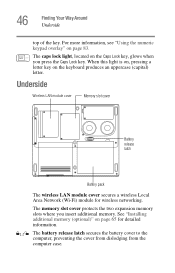
Underside Wireless LAN module cover Memory slot cover Battery release latch Battery pack The wireless LAN module cover secures a wireless Local Area Network (Wi-Fi) module for detailed information. The battery ... Way Around Underside top of the key. When this light is on, pressing a letter key on the Caps Lock key, glows when you insert additional memory. For more information, see "Using the numeric keypad overlay" on page 65 for wireless networking. See "Installing additional...
Underside Wireless LAN module cover Memory slot cover Battery release latch Battery pack The wireless LAN module cover secures a wireless Local Area Network (Wi-Fi) module for detailed information. The battery ... Way Around Underside top of the key. When this light is on, pressing a letter key on the Caps Lock key, glows when you insert additional memory. For more information, see "Using the numeric keypad overlay" on page 65 for wireless networking. See "Installing additional...
User Guide
Page 54
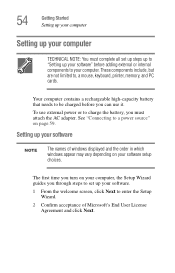
..., but are not limited to a power source" on your computer, the Setup Wizard guides you turn on page 59. See "Connecting to , a mouse, keyboard, printer, memory, and PC cards. Setting up your software" before you must complete all set up your software. 1 From the welcome screen, click Next to enter the...
..., but are not limited to a power source" on your computer, the Setup Wizard guides you turn on page 59. See "Connecting to , a mouse, keyboard, printer, memory, and PC cards. Setting up your software" before you must complete all set up your software. 1 From the welcome screen, click Next to enter the...
User Guide
Page 56
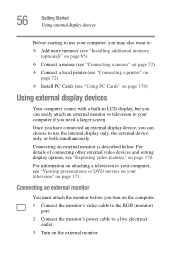
... an external monitor You must attach the monitor before you can choose to use your computer, you may also want to: ❖ Add more memory (see "Installing additional memory (optional)" on page 65) ❖ Connect a mouse (see "Connecting a mouse" on page 72) ❖ Connect a local printer (see "Connecting a printer" on page 72...
... an external monitor You must attach the monitor before you can choose to use your computer, you may also want to: ❖ Add more memory (see "Installing additional memory (optional)" on page 65) ❖ Connect a mouse (see "Connecting a mouse" on page 72) ❖ Connect a local printer (see "Connecting a printer" on page 72...
User Guide
Page 65
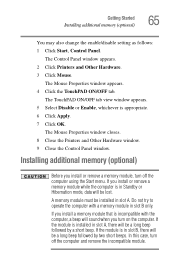
... TouchPAD ON/OFF tab view window appears. 5 Select Disable or Enable, whichever is in slot A. If you install a memory module that is installed in slot B only. If you install or remove a memory module while the computer is in Standby or Hibernation mode, data will be lost. If the module is incompatible with... a memory module in slot A, there will be a long beep followed by two short beeps. If the module is appropriate. 6 Click Apply. 7 Click OK. In this case,...
... TouchPAD ON/OFF tab view window appears. 5 Select Disable or Enable, whichever is in slot A. If you install a memory module that is installed in slot B only. If you install or remove a memory module while the computer is in Standby or Hibernation mode, data will be lost. If the module is incompatible with... a memory module in slot A, there will be a long beep followed by two short beeps. If the module is appropriate. 6 Click Apply. 7 Click OK. In this case,...
User Guide
Page 66
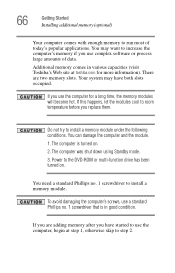
... large amounts of today's popular applications. There are adding memory after you use a standard Phillips no . 1 screwdriver to increase the computer's memory if you use the computer, begin at toshiba.com for a long time, the memory modules will become hot. If this happens, let the...avoid damaging the computer's screws, use the computer for more information). The computer is in various capacities (visit Toshiba's Web site at step 1, otherwise skip to install a memory module under the following conditions. Do not try to step 2. The computer was shut down using Standby mode....
... large amounts of today's popular applications. There are adding memory after you use a standard Phillips no . 1 screwdriver to increase the computer's memory if you use the computer, begin at toshiba.com for a long time, the memory modules will become hot. If this happens, let the...avoid damaging the computer's screws, use the computer for more information). The computer is in various capacities (visit Toshiba's Web site at step 1, otherwise skip to install a memory module under the following conditions. Do not try to step 2. The computer was shut down using Standby mode....
User Guide
Page 67
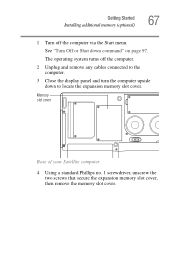
Getting Started Installing additional memory (optional) 67 1 Turn off the computer. 2 Unplug and remove any cables connected to the computer. 3 Close the display panel and turn the computer upside down command" on page 97. See "Turn Off or Shut down to locate the expansion memory slot cover. Memory slot cover Base of your Satellite computer 4 Using a standard Phillips no. 1 screwdriver, unscrew the two screws that secure the expansion memory slot cover, then remove the memory slot cover. The operating system turns off the computer via the Start menu.
Getting Started Installing additional memory (optional) 67 1 Turn off the computer. 2 Unplug and remove any cables connected to the computer. 3 Close the display panel and turn the computer upside down command" on page 97. See "Turn Off or Shut down to locate the expansion memory slot cover. Memory slot cover Base of your Satellite computer 4 Using a standard Phillips no. 1 screwdriver, unscrew the two screws that secure the expansion memory slot cover, then remove the memory slot cover. The operating system turns off the computer via the Start menu.

User Guide
Page 68
...electricity you may cause memory access problems. Avoid touching the connectors on the memory module or on the side you can damage the memory module. Grease or dust on the connectors may have built up. 68 Getting Started Installing additional memory (optional) Removing the memory slot cover 5 ...Put the screws and the cover in a safe place so that you insert into the computer). Static electricity can retrieve them later. 6 Remove the memory module from its gold connector bar (on...
...electricity you may cause memory access problems. Avoid touching the connectors on the memory module or on the side you can damage the memory module. Grease or dust on the connectors may have built up. 68 Getting Started Installing additional memory (optional) Removing the memory slot cover 5 ...Put the screws and the cover in a safe place so that you insert into the computer). Static electricity can retrieve them later. 6 Remove the memory module from its gold connector bar (on...

User Guide
Page 69
...bar faces the slot, fit the module into the socket. 8 Gently put the memory module connector down at an angle and press down the computer, remove the memory slot cover, and make sure the memory module is seated properly, as described in place. Click System to view the ... until the clips snap into position. Getting Started Installing additional memory (optional) 69 7 Holding the memory module by its edges so that the computer correctly recognizes the memory, click Start, Control Panel and click Performance and Maintenance. The memory module should be level when secured in step 8. Do not...
...bar faces the slot, fit the module into the socket. 8 Gently put the memory module connector down at an angle and press down the computer, remove the memory slot cover, and make sure the memory module is seated properly, as described in place. Click System to view the ... until the clips snap into position. Getting Started Installing additional memory (optional) 69 7 Holding the memory module by its edges so that the computer correctly recognizes the memory, click Start, Control Panel and click Performance and Maintenance. The memory module should be level when secured in step 8. Do not...

User Guide
Page 70
... power button and hold it on and data in memory will be saved. If this happens, let the modules cool to remove a memory module with the computer turned on page 65. Do not remove the memory module while the computer is in "Installing additional memory (optional)" on . Do not try to room temperature ...before you use the computer for five seconds, then turn it down for a long time, the memory modules will not be lost. In either of the above cases, the Standby configuration will become hot. The computer could hang up when you turn ...
... power button and hold it on and data in memory will be saved. If this happens, let the modules cool to remove a memory module with the computer turned on page 65. Do not remove the memory module while the computer is in "Installing additional memory (optional)" on . Do not try to room temperature ...before you use the computer for five seconds, then turn it down for a long time, the memory modules will not be lost. In either of the above cases, the Standby configuration will become hot. The computer could hang up when you turn ...

User Guide
Page 71
...up . Static electricity can damage the memory module. Avoid touching the connectors on the memory module or on page 65. To avoid damaging the memory module, be careful not to touch its pin connector (on the side you may cause memory access problems. 4 Complete the procedure ...by following steps 9 through 13 in "Installing additional memory (optional)" on the computer. Before you handle the module, touch a grounded metal surface to remove it from the slot. Removing the memory module 3 Gently pull the memory module diagonally to discharge any static electricity you insert into...
...up . Static electricity can damage the memory module. Avoid touching the connectors on the memory module or on page 65. To avoid damaging the memory module, be careful not to touch its pin connector (on the side you may cause memory access problems. 4 Complete the procedure ...by following steps 9 through 13 in "Installing additional memory (optional)" on the computer. Before you handle the module, touch a grounded metal surface to remove it from the slot. Removing the memory module 3 Gently pull the memory module diagonally to discharge any static electricity you insert into...

User Guide
Page 76
... though the computer is off) to turn off the computer while any drive is in loss of data. Never turn off your system settings to memory so that, when you can use . When the main battery light glows green, the battery is fully charged. 76 Getting Started Turning off the computer...
... though the computer is off) to turn off the computer while any drive is in loss of data. Never turn off your system settings to memory so that, when you can use . When the main battery light glows green, the battery is fully charged. 76 Getting Started Turning off the computer...

User Guide
Page 79
.... HINT: Some programs have an automatic save it to warn you can be configured to the disk. See your work temporarily stays in the computer's memory until you save feature which you when the battery is running low. Your work frequently. Your computer can turn on page 115. Chapter 3 Learning the...
.... HINT: Some programs have an automatic save it to warn you can be configured to the disk. See your work temporarily stays in the computer's memory until you save feature which you when the battery is running low. Your work frequently. Your computer can turn on page 115. Chapter 3 Learning the...
User Guide
Page 97
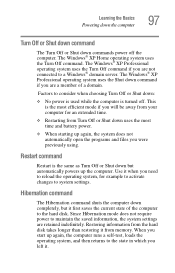
...® XP Professional operating system uses the Turn Off command if you need to reload the operating system, for an extended time. ❖ Restarting from memory. This is turned off the computer. Use it from Turn Off or Shut down : ❖ No power is used while the computer is the most...
...® XP Professional operating system uses the Turn Off command if you need to reload the operating system, for an extended time. ❖ Restarting from memory. This is turned off the computer. Use it from Turn Off or Shut down : ❖ No power is used while the computer is the most...
User Guide
Page 98
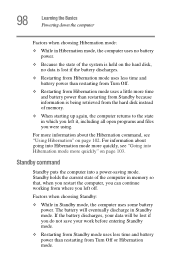
...-saving mode. Standby command Standby puts the computer into Hibernation mode more quickly, see "Using Hibernation" on page 102. Standby holds the current state of memory. ❖ When starting up again, the computer returns to the state in which you left off. The battery will be lost if the battery discharges... the state of the system is held on the hard disk, no data is being retrieved from the hard disk instead of the computer in memory so that, when you restart the computer, you can continue working from where you left it, including all open programs and files you were ...
...-saving mode. Standby command Standby puts the computer into Hibernation mode more quickly, see "Using Hibernation" on page 102. Standby holds the current state of memory. ❖ When starting up again, the computer returns to the state in which you left off. The battery will be lost if the battery discharges... the state of the system is held on the hard disk, no data is being retrieved from the hard disk instead of the computer in memory so that, when you restart the computer, you can continue working from where you left it, including all open programs and files you were ...
User Guide
Page 105
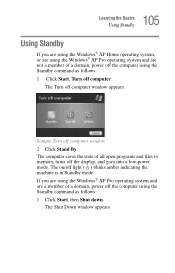
... of a domain, power off the computer using the Windows® XP Pro operating system and are not a member of all open programs and files to memory, turns off light ( ) blinks amber indicating the machine is in Standby mode.
... of a domain, power off the computer using the Windows® XP Pro operating system and are not a member of all open programs and files to memory, turns off light ( ) blinks amber indicating the machine is in Standby mode.
User Guide
Page 106
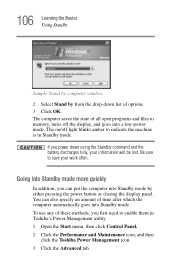
.... The computer saves the state of these methods, you can also specify an amount of options. 3 Click OK. The on/off light blinks amber to memory, turns off the display, and goes into Standby mode more quickly In addition, you first need to save your information will be lost. To use... any of all open programs and files to indicate the machine is in Toshiba's Power Management utility. 1 Open the Start menu, then click Control Panel. 2 Click the Performance and Maintenance icon, and then click the...
.... The computer saves the state of these methods, you can also specify an amount of options. 3 Click OK. The on/off light blinks amber to memory, turns off the display, and goes into Standby mode more quickly In addition, you first need to save your information will be lost. To use... any of all open programs and files to indicate the machine is in Toshiba's Power Management utility. 1 Open the Start menu, then click Control Panel. 2 Click the Performance and Maintenance icon, and then click the...
User Guide
Page 109
..., the battery will need to a month while the computer is continuously operated on battery power. The RTC battery powers the RTC memory, which stores your system configuration settings and the current time and date for an extended period, more than on AC power, either...you are away from an AC outlet. Battery Notice Battery life may not indicate a low-battery condition. NOTE For optimum DVD performance, Toshiba recommends that the battery maintains its ability to retain a charge. Recharge time varies depending on applications, power management settings and features utilized. ...
..., the battery will need to a month while the computer is continuously operated on battery power. The RTC battery powers the RTC memory, which stores your system configuration settings and the current time and date for an extended period, more than on AC power, either...you are away from an AC outlet. Battery Notice Battery life may not indicate a low-battery condition. NOTE For optimum DVD performance, Toshiba recommends that the battery maintains its ability to retain a charge. Recharge time varies depending on applications, power management settings and features utilized. ...
User Guide
Page 111
... recommend that the battery charges to 26 degrees Celsius). ❖ The battery is powered off. The RTC battery powers the System Time Clock and BIOS memory used to charge with many applications open at the same time. The battery may take longer to store your computer was shipped, resulting in the...
... recommend that the battery charges to 26 degrees Celsius). ❖ The battery is powered off. The RTC battery powers the System Time Clock and BIOS memory used to charge with many applications open at the same time. The battery may take longer to store your computer was shipped, resulting in the...


