User Manual
Page 24
Contents Introduction 31 This guide 32 Safety icons 32 Other icons used 33 Other documentation 33 Service options 33 Chapter 1: Getting Started 34 Selecting a place to work 34 Creating a computer-friendly environment........34 Keeping yourself comfortable 35 Precautions 35 Important information on your computer's cooling fan 36 Setting up your computer 37 Setting up your software 37 Registering your computer with Toshiba 38 Adding optional external devices 38 Connecting to a power source 39 Charging the main battery 41 24
Contents Introduction 31 This guide 32 Safety icons 32 Other icons used 33 Other documentation 33 Service options 33 Chapter 1: Getting Started 34 Selecting a place to work 34 Creating a computer-friendly environment........34 Keeping yourself comfortable 35 Precautions 35 Important information on your computer's cooling fan 36 Setting up your computer 37 Setting up your software 37 Registering your computer with Toshiba 38 Adding optional external devices 38 Connecting to a power source 39 Charging the main battery 41 24

User Manual
Page 26
... 81 Special Windows® keys 81 Overlay keys 82 Using the overlay to type numeric data 82 Starting a program 83 Starting a program from the Start menu...........83 Starting a program from Windows® Explorer ...84 Starting a program using the Start Search field 85 Saving your work 85 Printing your work 87 Backing up your work 88 Restoring... Creating a CD/DVD 93 Removing a disc with the computer on 93 Removing a disc with the computer off 94 Caring for CD or DVD discs 94 Toshiba's online resources 94
... 81 Special Windows® keys 81 Overlay keys 82 Using the overlay to type numeric data 82 Starting a program 83 Starting a program from the Start menu...........83 Starting a program from Windows® Explorer ...84 Starting a program using the Start Search field 85 Saving your work 85 Printing your work 87 Backing up your work 88 Restoring... Creating a CD/DVD 93 Removing a disc with the computer on 93 Removing a disc with the computer off 94 Caring for CD or DVD discs 94 Toshiba's online resources 94
User Manual
Page 29
Contents 29 ConfigFree 146 Getting Started 147 ConfigFree® Utilities 148 Chapter 6: If Something Goes Wrong 150 Problems that are easy to fix 150 Problems when you turn on the computer............... good computing habits 173 Data and system configuration backup in the Windows® operating system 174 If you need further assistance 178 Before you contact Toshiba 178 Contacting Toshiba 179 Other Toshiba Internet Web sites 179 Toshiba's worldwide offices 180
Contents 29 ConfigFree 146 Getting Started 147 ConfigFree® Utilities 148 Chapter 6: If Something Goes Wrong 150 Problems that are easy to fix 150 Problems when you turn on the computer............... good computing habits 173 Data and system configuration backup in the Windows® operating system 174 If you need further assistance 178 Before you contact Toshiba 178 Contacting Toshiba 179 Other Toshiba Internet Web sites 179 Toshiba's worldwide offices 180
User Manual
Page 34
...-friendly environment Place the computer on a flat surface that are using, such as air conditioner vents or heaters. 34 Otherwise, they may overheat. Chapter 1 Getting Started This chapter provides tips for the computer and any other items you use your notebook computer. Selecting a place to work area from: ❖ Dust, moisture...
...-friendly environment Place the computer on a flat surface that are using, such as air conditioner vents or heaters. 34 Otherwise, they may overheat. Chapter 1 Getting Started This chapter provides tips for the computer and any other items you use your notebook computer. Selecting a place to work area from: ❖ Dust, moisture...
User Manual
Page 35
...a heavy object on the power again until you have taken the computer to rain, water, seawater or moisture. Keeping yourself comfortable The Toshiba Instruction Manual for working comfortably throughout the day. If any part of the computer. Disconnect the AC adaptor from the power plug socket and...setting up your computer, and never expose the computer to an authorized service center. Exposure to liquid or moisture can become hot! Getting Started 35 Selecting a place to skin. Never allow any liquids to the computer. It could result in damage or serious injury. You should...
...a heavy object on the power again until you have taken the computer to rain, water, seawater or moisture. Keeping yourself comfortable The Toshiba Instruction Manual for working comfortably throughout the day. If any part of the computer. Disconnect the AC adaptor from the power plug socket and...setting up your computer, and never expose the computer to an authorized service center. Exposure to liquid or moisture can become hot! Getting Started 35 Selecting a place to skin. Never allow any liquids to the computer. It could result in damage or serious injury. You should...

User Manual
Page 36
... fan location will vary depending on your computer is reading from or writing to a disk/disc or flash media may contain a computer virus. 36 Getting Started Selecting a place to work ❖ Never turn off the computer while it by drawing outside air into the computer. Grasp it is in serious injury...
... fan location will vary depending on your computer is reading from or writing to a disk/disc or flash media may contain a computer virus. 36 Getting Started Selecting a place to work ❖ Never turn off the computer while it by drawing outside air into the computer. Grasp it is in serious injury...
User Manual
Page 37
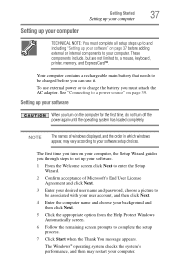
... click Next. 5 Click the appropriate option from the Help Protect Windows Automatically screen. 6 Follow the remaining screen prompts to complete the setup process. 7 Click Start when the Thank You message appears. NOTE The names of Microsoft's End User License Agreement and click Next. 3 Enter your desired user name and password... your computer, the Setup Wizard guides you must complete all setup steps up to and including "Setting up your software" on page 39. Getting Started 37 Setting up your computer Setting up your computer TECHNICAL NOTE: You must attach the AC adaptor.
... click Next. 5 Click the appropriate option from the Help Protect Windows Automatically screen. 6 Follow the remaining screen prompts to complete the setup process. 7 Click Start when the Thank You message appears. NOTE The names of Microsoft's End User License Agreement and click Next. 3 Enter your desired user name and password... your computer, the Setup Wizard guides you must complete all setup steps up to and including "Setting up your software" on page 39. Getting Started 37 Setting up your computer Setting up your computer TECHNICAL NOTE: You must attach the AC adaptor.
User Manual
Page 38
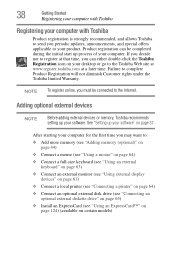
... up your software" on your desktop or go to the Toshiba Web site at www.register.toshiba.com at that time, you periodic updates, announcements, and special offers applicable to your product. After starting your computer for the first time you must be completed during... your computer. Product registration can either double-click the Toshiba Registration icon on page 37. 38 Getting Started Registering your computer with Toshiba Registering your computer with Toshiba Product registration is strongly recommended, and allows Toshiba to send you can be connected to the Internet. ...
... up your software" on your desktop or go to the Toshiba Web site at www.register.toshiba.com at that time, you periodic updates, announcements, and special offers applicable to your product. After starting your computer for the first time you must be completed during... your computer. Product registration can either double-click the Toshiba Registration icon on page 37. 38 Getting Started Registering your computer with Toshiba Registering your computer with Toshiba Product registration is strongly recommended, and allows Toshiba to send you can be connected to the Internet. ...

User Manual
Page 39
... fully inserted into the socket, to follow this instruction may result in a fire or electric shock, possibly resulting in serious injury. TOSHIBA assumes no liability for any risk of an incompatible AC adaptor or Battery Charger could cause a fire or electric shock, possibly resulting ... computer to a live electrical outlet, or to operate. Use of fire or other damage to avoid any damage caused by TOSHIBA to the computer. Getting Started 39 Connecting to a power source Connecting to a power source Your computer requires power to charge the computer's battery. Power ...
... fully inserted into the socket, to follow this instruction may result in a fire or electric shock, possibly resulting in serious injury. TOSHIBA assumes no liability for any risk of an incompatible AC adaptor or Battery Charger could cause a fire or electric shock, possibly resulting ... computer to a live electrical outlet, or to operate. Use of fire or other damage to avoid any damage caused by TOSHIBA to the computer. Getting Started 39 Connecting to a power source Connecting to a power source Your computer requires power to charge the computer's battery. Power ...
User Manual
Page 40
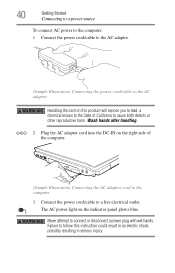
... Illustration) Connecting the AC adaptor cord to the computer 3 Connect the power cord/cable to connect or disconnect a power plug with wet hands. 40 Getting Started Connecting to a power source To connect AC power to the computer: 1 Connect the power cord/cable to the AC adaptor. (Sample Illustration) Connecting the power...
... Illustration) Connecting the AC adaptor cord to the computer 3 Connect the power cord/cable to connect or disconnect a power plug with wet hands. 40 Getting Started Connecting to a power source To connect AC power to the computer: 1 Connect the power cord/cable to the AC adaptor. (Sample Illustration) Connecting the power...
User Manual
Page 41
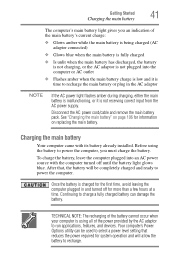
... the power provided by the AC adaptor to recharge the main battery or plug in and turned off until the battery light glows blue. Getting Started 41 Charging the main battery The computer's main battery light gives you must charge the battery.
... the power provided by the AC adaptor to recharge the main battery or plug in and turned off until the battery light glows blue. Getting Started 41 Charging the main battery The computer's main battery light gives you must charge the battery.
User Manual
Page 42
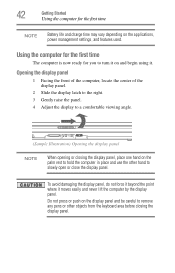
... panel NOTE When opening or closing the display panel. Do not press or push on the applications, power management settings, and features used. 42 Getting Started Using the computer for you to turn it on the palm rest to hold the computer in place and use the other hand to remove...
... panel NOTE When opening or closing the display panel. Do not press or push on the applications, power management settings, and features used. 42 Getting Started Using the computer for you to turn it on the palm rest to hold the computer in place and use the other hand to remove...

User Manual
Page 43
... have selected all those features. Over a period of time, and depending on the usage of the computer, the brightness of the TFT manufacturing technology. Getting Started 43 Using the computer for the first time Small bright dots may appear on your screen display when you plan to use AC power rather...
... have selected all those features. Over a period of time, and depending on the usage of the computer, the brightness of the TFT manufacturing technology. Getting Started 43 Using the computer for the first time Small bright dots may appear on your screen display when you plan to use AC power rather...
User Manual
Page 44
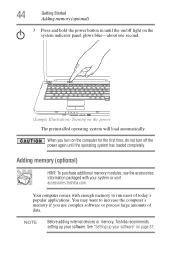
... setting up your software" on the power The preinstalled operating system will load automatically. See "Setting up your system or visit accessories.toshiba.com. 44 Getting Started Adding memory (optional) 3 Press and hold the power button in until the operating system has loaded completely. You may want to run most of data...
... setting up your software" on the power The preinstalled operating system will load automatically. See "Setting up your system or visit accessories.toshiba.com. 44 Getting Started Adding memory (optional) 3 Press and hold the power button in until the operating system has loaded completely. You may want to run most of data...
User Manual
Page 45
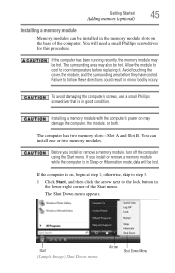
... it. To avoid damaging the computer's screws, use a small Phillips screwdriver that is on may be hot. otherwise, skip to step 3. 1 Click Start, and then click the arrow next to room temperature before they have cooled. Installing a memory module with the computer's power on , begin at step ...1; Allow the module to cool to the lock button in good condition. The Shut Down menu appears. Getting Started 45 Adding memory (optional) Installing a memory module Memory modules can install one or two memory modules. You will be installed in minor bodily ...
... it. To avoid damaging the computer's screws, use a small Phillips screwdriver that is on may be hot. otherwise, skip to step 3. 1 Click Start, and then click the arrow next to room temperature before they have cooled. Installing a memory module with the computer's power on , begin at step ...1; Allow the module to cool to the lock button in good condition. The Shut Down menu appears. Getting Started 45 Adding memory (optional) Installing a memory module Memory modules can install one or two memory modules. You will be installed in minor bodily ...
User Manual
Page 46
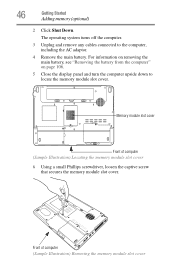
... screw that secures the memory module slot cover. Memory module slot cover Front of computer (Sample Illustration) Removing the memory module slot cover 46 Getting Started Adding memory (optional) 2 Click Shut Down.
... screw that secures the memory module slot cover. Memory module slot cover Front of computer (Sample Illustration) Removing the memory module slot cover 46 Getting Started Adding memory (optional) 2 Click Shut Down.
User Manual
Page 47
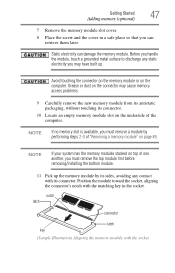
... If your system has the memory modules stacked on the connector may have built up the memory module by performing steps 2-3 of the computer. Getting Started 47 Adding memory (optional) 7 Remove the memory module slot cover. 8 Place the screw and the cover in the socket. Grease or dust on top of...
... If your system has the memory modules stacked on the connector may have built up the memory module by performing steps 2-3 of the computer. Getting Started 47 Adding memory (optional) 7 Remove the memory module slot cover. 8 Place the screw and the cover in the socket. Grease or dust on top of...
User Manual
Page 48
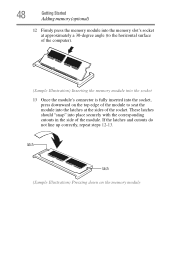
48 Getting Started Adding memory (optional) 12 Firmly press the memory module into the memory slot's socket at the sides of the socket. These latches should "snap" into ...
48 Getting Started Adding memory (optional) 12 Firmly press the memory module into the memory slot's socket at the sides of the socket. These latches should "snap" into ...
User Manual
Page 49
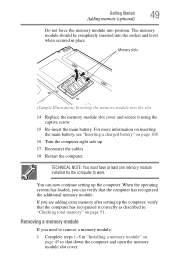
... the computer has recognized the additional memory module. If you need to remove a memory module: 1 Complete steps 1-8 in "Installing a memory module" on page 51. Getting Started 49 Adding memory (optional) Do not force the memory module into the socket and level when secured in place. Memory slots (Sample Illustration) Inserting the...
... the computer has recognized the additional memory module. If you need to remove a memory module: 1 Complete steps 1-8 in "Installing a memory module" on page 51. Getting Started 49 Adding memory (optional) Do not force the memory module into the socket and level when secured in place. Memory slots (Sample Illustration) Inserting the...
User Manual
Page 50
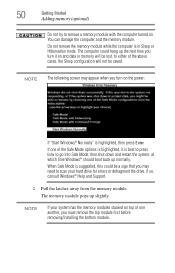
... the computer is highlighted, it on . NOTE The following screen may need to scan your system has the memory modules stacked on the power: If "Start Windows® Normally" is best to press Enter to go into Safe Mode, then shut down and restart the system, at which time Windows®... memory module. If one of one another, you turn on top of the Safe Mode options is in memory will not be saved. 50 Getting Started Adding memory (optional) Do not try to remove a memory module with the computer turned on and data in Sleep or Hibernation mode.
... the computer is highlighted, it on . NOTE The following screen may need to scan your system has the memory modules stacked on the power: If "Start Windows® Normally" is best to press Enter to go into Safe Mode, then shut down and restart the system, at which time Windows®... memory module. If one of one another, you turn on top of the Safe Mode options is in memory will not be saved. 50 Getting Started Adding memory (optional) Do not try to remove a memory module with the computer turned on and data in Sleep or Hibernation mode.


