

User Manual
Page 2
... Eastman Kodak. Under the copyright laws, this manual's production. Copyrighted material can be reproduced in making any form without the prior written permission of copied material and distribution on a network) without notice. Any other use within the home. Disclaimer This manual has been validated and reviewed for the TOSHIBA Satellite A100/Satellite Pro A100 Portable Personal Computer at the time of copyright...
... Eastman Kodak. Under the copyright laws, this manual's production. Copyrighted material can be reproduced in making any form without the prior written permission of copied material and distribution on a network) without notice. Any other use within the home. Disclaimer This manual has been validated and reviewed for the TOSHIBA Satellite A100/Satellite Pro A100 Portable Personal Computer at the time of copyright...

User Manual
Page 9
... can connect to do this change. ix If advance notice is not operating properly, you should ever decide to maintain uninterrupted service. In order to it is to program this information upon request. When practical, they may cause harm to make changes in advance of this disconnection. In the event repairs are notified, you will be performed by TOSHIBA...
... can connect to do this change. ix If advance notice is not operating properly, you should ever decide to maintain uninterrupted service. In order to it is to program this information upon request. When practical, they may cause harm to make changes in advance of this disconnection. In the event repairs are notified, you will be performed by TOSHIBA...
User Manual
Page 27
... Starting the computer by password 6-15 Power-up modes 6-16 Windows utilities 6-16 Hot keys 6-16 Panel power on/off 6-16 System Auto Off 6-16 Chapter 7 HW Setup and Passwords HW Setup 7-1 Accessing HW Setup 7-1 HW Setup window 7-2 Chapter 8 Optional Devices Cards/memory 8-1 Power devices 8-1 Peripheral devices 8-1 Other 8-1 PC cards 8-2 Installing a PC card 8-2 Removing a PC card 8-3 Express Card 8-4 Installing an Express Card 8-4 Removing an Express Card 8-5 Multiple Digital Media Card Slot (Supported with some models 8-6 Installing a SD/MS/MS Pro/MMC/xD card 8-6 Removing...
... Starting the computer by password 6-15 Power-up modes 6-16 Windows utilities 6-16 Hot keys 6-16 Panel power on/off 6-16 System Auto Off 6-16 Chapter 7 HW Setup and Passwords HW Setup 7-1 Accessing HW Setup 7-1 HW Setup window 7-2 Chapter 8 Optional Devices Cards/memory 8-1 Power devices 8-1 Peripheral devices 8-1 Other 8-1 PC cards 8-2 Installing a PC card 8-2 Removing a PC card 8-3 Express Card 8-4 Installing an Express Card 8-4 Removing an Express Card 8-5 Multiple Digital Media Card Slot (Supported with some models 8-6 Installing a SD/MS/MS Pro/MMC/xD card 8-6 Removing...
User Manual
Page 31
... Satellite A100/ Satellite Pro A100 computer. If you are an experienced computer user, please continue reading the preface to learn about features that are going to install PC cards or connect external devices such as a printer, be sure to the computers and carefully read Chapter 8, Optional Devices. Chapter 2, The Grand Tour, identifies the components of the computer and on using the Touch Pad, optical media drive, external diskette drive, Wireless LAN, LANs, Audio/Video controls and internal...
... Satellite A100/ Satellite Pro A100 computer. If you are an experienced computer user, please continue reading the preface to learn about features that are going to install PC cards or connect external devices such as a printer, be sure to the computers and carefully read Chapter 8, Optional Devices. Chapter 2, The Grand Tour, identifies the components of the computer and on using the Touch Pad, optical media drive, external diskette drive, Wireless LAN, LANs, Audio/Video controls and internal...
User Manual
Page 47
... switch turns the Wireless LAN and Blurtooth function on 256 bit encryption algorithm (Atheros module type). Refer to recognize the connection and make your computer more convenient to use. Refer to the preinstalled software section at the front of utilities and drivers are preinstalled to make the necessary configurations automatically. 1-9 When you connect an external device to the computer or when you install a component, Plug and Play capability enables the...
... switch turns the Wireless LAN and Blurtooth function on 256 bit encryption algorithm (Atheros module type). Refer to recognize the connection and make your computer more convenient to use. Refer to the preinstalled software section at the front of utilities and drivers are preinstalled to make the necessary configurations automatically. 1-9 When you connect an external device to the computer or when you install a component, Plug and Play capability enables the...

User Manual
Page 50
... folderson your hardware settings according to the way you customize your hard disk drive. Fn-esse This Windows program lets you define your own "shortcut" keys to quickly launch applications and speed your computer and the peripherals you to each utility's online manual, help and services. RecordNow! This software can boot TOSHIBA PC Diagnostic Tool from the menu bar as follows [Start] - [All Programs] - [TOSHIBA] -[Utilities] [PC Diagnostic...
... folderson your hardware settings according to the way you customize your hard disk drive. Fn-esse This Windows program lets you define your own "shortcut" keys to quickly launch applications and speed your computer and the peripherals you to each utility's online manual, help and services. RecordNow! This software can boot TOSHIBA PC Diagnostic Tool from the menu bar as follows [Start] - [All Programs] - [TOSHIBA] -[Utilities] [PC Diagnostic...
User Manual
Page 55
... a digital video camera to keep foreign objects out of the computer External monitor This 15-pin port lets you connect an external monitor. This problem may occur when Windows® XP is turned on. Some models are equipped with a i.LINK port. (Provided with some models) Note: When multiple IEEE1394 devices are connected or when the power to block the fan vent. If it occurs, disconnect the IEEE1394 cables and...
... a digital video camera to keep foreign objects out of the computer External monitor This 15-pin port lets you connect an external monitor. This problem may occur when Windows® XP is turned on. Some models are equipped with a i.LINK port. (Provided with some models) Note: When multiple IEEE1394 devices are connected or when the power to block the fan vent. If it occurs, disconnect the IEEE1394 cables and...
User Manual
Page 64
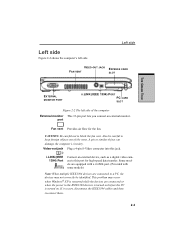
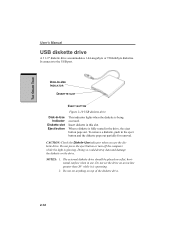
... in use the diskette drive. Do not set the drive on a flat, horizontal surface when in the drive, the eject button pops out. Do not press the eject button or turn off the computer while the light is being accessed. DISK-IN-USE INDICATOR DISKETTE SLOT EJECT BUTTON Figure 2-10 USB diskette drive Disk-In-Use Indicator Diskette slot Eject button This indicator lights when the diskette is glowing. THE GRAND TOUR User's Manual USB diskette drive A 3 1/2" diskette drive...
... in use the diskette drive. Do not set the drive on a flat, horizontal surface when in the drive, the eject button pops out. Do not press the eject button or turn off the computer while the light is being accessed. DISK-IN-USE INDICATOR DISKETTE SLOT EJECT BUTTON Figure 2-10 USB diskette drive Disk-In-Use Indicator Diskette slot Eject button This indicator lights when the diskette is glowing. THE GRAND TOUR User's Manual USB diskette drive A 3 1/2" diskette drive...

User Manual
Page 78
... shutdown mode to the Setup Action tab in Power Saver Utility described in the Control Panel. This feature must be sure to the Setup Action tab in Power Saver Utility described in the Control Panel. In Windows® XP, open Performance and Maintenance and open TOSHIBA Power Saver. 3. Before entering Standby mode, be enabled. Do not install or remove a memory module while the computer is connected to an AC power source). You can enter standby mode in memory will...
... shutdown mode to the Setup Action tab in Power Saver Utility described in the Control Panel. This feature must be sure to the Setup Action tab in Power Saver Utility described in the Control Panel. In Windows® XP, open Performance and Maintenance and open TOSHIBA Power Saver. 3. Before entering Standby mode, be enabled. Do not install or remove a memory module while the computer is connected to an AC power source). You can enter standby mode in memory will...
User Manual
Page 116
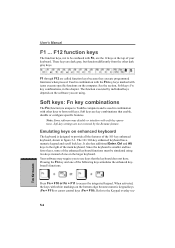
... enhanced keyboard's functions. See the section, Soft keys: Fn key combinations, in figure 5-1. When activated, the keys with other dark gray keys. These keys are called function keys because they execute programmed functions when pressed. User's Manual F1 ... F12 function keys The function keys, not to form soft keys. Soft keys: Fn key combinations The Fn (function) is designed to use keys that enable, disable or configure specific features. The 101/102-key enhanced keyboard has a numeric keypad and scroll lock key. Used...
... enhanced keyboard's functions. See the section, Soft keys: Fn key combinations, in figure 5-1. When activated, the keys with other dark gray keys. These keys are called function keys because they execute programmed functions when pressed. User's Manual F1 ... F12 function keys The function keys, not to form soft keys. Soft keys: Fn key combinations The Fn (function) is designed to use keys that enable, disable or configure specific features. The 101/102-key enhanced keyboard has a numeric keypad and scroll lock key. Used...
User Manual
Page 146
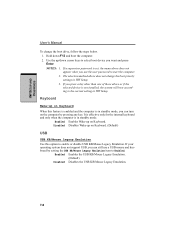
... you use a USB mouse and keyboard by pressing any key. If you can turn on Keyboard. Disabled Disables Wake-up /down F12 and boot the computer. 2. HW SETUP AND PASSWORDS User's Manual To change the boot priority settings in HW Setup. Hold down cursor keys to select boot device you can still use the user password to Enabled. It is effective only for the internal keyboard and only when the computer is set, the menu above does not change the boot drive...
... you use a USB mouse and keyboard by pressing any key. If you can turn on Keyboard. Disabled Disables Wake-up /down F12 and boot the computer. 2. HW SETUP AND PASSWORDS User's Manual To change the boot priority settings in HW Setup. Hold down cursor keys to select boot device you can still use the user password to Enabled. It is effective only for the internal keyboard and only when the computer is set, the menu above does not change the boot drive...
User Manual
Page 155
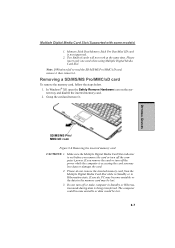
... remove the card or turn off the computer's power. Removing a SD/MS/MS Pro/MMC/xD card To remove the memory card, follow the steps below. 1. OPTIONAL DEVICES Multiple Digital Media Card Slot (Supported with some models) 1. Grasp the card and remove it . SD/MS/MS PRO/ MMC/XD CARD Figure 8-6 Removing the inserted memory card CAUTIONS: 1. Make sure the Multiple Digital Media Card Slot indicator is being transferred. If you do not remove the inserted memory card from the Multiple Digital Media Card Slot...
... remove the card or turn off the computer's power. Removing a SD/MS/MS Pro/MMC/xD card To remove the memory card, follow the steps below. 1. OPTIONAL DEVICES Multiple Digital Media Card Slot (Supported with some models) 1. Grasp the card and remove it . SD/MS/MS PRO/ MMC/XD CARD Figure 8-6 Removing the inserted memory card CAUTIONS: 1. Make sure the Multiple Digital Media Card Slot indicator is being transferred. If you do not remove the inserted memory card from the Multiple Digital Media Card Slot...
User Manual
Page 156
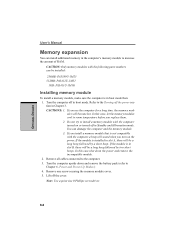
... turned off the cover. Turn the computer upside down the power and remove the incompatible module. 2. Do not try to Chapter 6, Power and Power-Up Modes.) 4. OPTIONAL DEVICES User's Manual Memory expansion You can damage the computer and the memory module. 3. Remove all cables connected to room temperature before you use the computer for a long time, the memory modules will be a long beep followed by a short beep. Lift off in boot mode then: 1. CAUTIONS: 1. Remove...
... turned off the cover. Turn the computer upside down the power and remove the incompatible module. 2. Do not try to Chapter 6, Power and Power-Up Modes.) 4. OPTIONAL DEVICES User's Manual Memory expansion You can damage the computer and the memory module. 3. Remove all cables connected to room temperature before you use the computer for a long time, the memory modules will be a long beep followed by a short beep. Lift off in boot mode then: 1. CAUTIONS: 1. Remove...
User Manual
Page 158
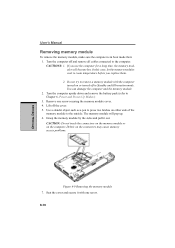
... replace them. 2. Use a slender object such as a pen to press two latches on or turned off in boot mode then: 1. Turn the computer upside down and remove the battery pack (refer to the outside. CAUTIONS: 1. You can damage the computer and the memory module. 2. Seat the cover and secure it out. OPTIONAL DEVICES User's Manual Removing memory module To remove the memory module, make sure the computer is in Standby and Hibernation mode...
... replace them. 2. Use a slender object such as a pen to press two latches on or turned off in boot mode then: 1. Turn the computer upside down and remove the battery pack (refer to the outside. CAUTIONS: 1. You can damage the computer and the memory module. 2. Seat the cover and secure it out. OPTIONAL DEVICES User's Manual Removing memory module To remove the memory module, make sure the computer is in Standby and Hibernation mode...

User Manual
Page 202
VnDCE response format This command controls whether result codes (including call progress monitoring This command selects which result codes will be used by the modem. V0 Displays result codes as text (default). Command Dial tone Busy signal Supported Result detect detect Code X0 Disable Disable OK, CONNECT, RING, NO CARRIER, ERROR X1 Disable Disable OK, RING, NO CARRIER, ERROR, CON- ALTONE, CONNECT X3 Disable Enable X4 (default) Enable Enable OK, RING, NO CARRIER, ERROR, BUSY, CONNECT , BLACKLISTED...
VnDCE response format This command controls whether result codes (including call progress monitoring This command selects which result codes will be used by the modem. V0 Displays result codes as text (default). Command Dial tone Busy signal Supported Result detect detect Code X0 Disable Disable OK, CONNECT, RING, NO CARRIER, ERROR X1 Disable Disable OK, RING, NO CARRIER, ERROR, CON- ALTONE, CONNECT X3 Disable Enable X4 (default) Enable Enable OK, RING, NO CARRIER, ERROR, BUSY, CONNECT , BLACKLISTED...
User Manual
Page 235
... use the Hardware Setup, MaxTime or HW Setup program to achieve a desired result. DC: Direct Current. control keys: A key or sequence of keys you or the program do not provide instructions. cursor: A small, blinking rectangle or line that indicates the current position on a fluorescent screen-producing luminous spots. components: Elements or parts (of a system) which it to control your system configuration. computer system: A combination of hardware, software, firmware...
... use the Hardware Setup, MaxTime or HW Setup program to achieve a desired result. DC: Direct Current. control keys: A key or sequence of keys you or the program do not provide instructions. cursor: A small, blinking rectangle or line that indicates the current position on a fluorescent screen-producing luminous spots. components: Elements or parts (of a system) which it to control your system configuration. computer system: A combination of hardware, software, firmware...
User Manual
Page 238
... the keyboard or external or internal storage devices. instruction: Statements or commands that lets you to communicate with the extended function key, Fn, can manipulate. I/O devices: Equipment used as digital video cameras. often used to change the hardware characteristics by the sending computer is turned on the screen or in combination with the computer and transfer data to and from it. I icon: A small graphic image displayed on . hot key...
... the keyboard or external or internal storage devices. instruction: Statements or commands that lets you to communicate with the extended function key, Fn, can manipulate. I/O devices: Equipment used as digital video cameras. often used to change the hardware characteristics by the sending computer is turned on the screen or in combination with the computer and transfer data to and from it. I icon: A small graphic image displayed on . hot key...

User Manual
Page 239
... a screen. See also byte and megabit. modem keyboard: An input device containing switches that are activated by the IBM Monochrome Display Adapter and its associated circuitry for direct drive TTL displays that supports a monochrome 720x350 text mode. kilobyte (KB): A unit of the display. The viewing-side coating is applied. LSI: Large Scale Integration. 1) A technology that converts (modulates) digital data for example, the boot mode or...
... a screen. See also byte and megabit. modem keyboard: An input device containing switches that are activated by the IBM Monochrome Display Adapter and its associated circuitry for direct drive TTL displays that supports a monochrome 720x350 text mode. kilobyte (KB): A unit of the display. The viewing-side coating is applied. LSI: Large Scale Integration. 1) A technology that converts (modulates) digital data for example, the boot mode or...

User Manual
Page 246
User's Manual Fn + Enter 5-3 Fn + Esc (sound mute) 5-3 Fn + F1 (instant security) 5-4 Fn + F2 (power save mode) 5-4 Fn + F3 (standby) 5-4 Fn + F4 (hibernation) 5-4 Fn + F5 (display selection) 5-5 Fn + F6 (display brightness) 5-5 Fn + F7 (display brightness) 5-5 Fn + F8 (wireless setting) 5-5 Fn + F9 (Touch Pad mode) 5-6 Fn + F10 (arrow mode) 5-2 Fn + F11 (numeric mode) 5-2 Fn + F12 (ScrLock) 5-3 Fn Sticky key 5-7 Function Keys 5-2 H Hard disk drive 1-4 automatic power off ) 5-9 turning on ) 5-8 temporarily using 4-33 LCD, See Display, Video modes, Monitor external Level 2 cache, See Cache ...
User's Manual Fn + Enter 5-3 Fn + Esc (sound mute) 5-3 Fn + F1 (instant security) 5-4 Fn + F2 (power save mode) 5-4 Fn + F3 (standby) 5-4 Fn + F4 (hibernation) 5-4 Fn + F5 (display selection) 5-5 Fn + F6 (display brightness) 5-5 Fn + F7 (display brightness) 5-5 Fn + F8 (wireless setting) 5-5 Fn + F9 (Touch Pad mode) 5-6 Fn + F10 (arrow mode) 5-2 Fn + F11 (numeric mode) 5-2 Fn + F12 (ScrLock) 5-3 Fn Sticky key 5-7 Function Keys 5-2 H Hard disk drive 1-4 automatic power off ) 5-9 turning on ) 5-8 temporarily using 4-33 LCD, See Display, Video modes, Monitor external Level 2 cache, See Cache ...
Detailed Specs for Satellite A100 PSAA9C-SK900E English
Page 1
...™ 2003 Norton Internet Security™ 2006 Toshiba Express Media Player Physical Dimensions Display System Type: TFT Active Matrix colour LCD display Size (diagonal): 15.4" Wide XGA TFT with 256MB DDR Video memory, PCI Express 16x Battery Sound System Built-in DVD Super-Multi Double Layer Drive functions: Read: CD-ROM (24x), DVD-ROM (8x), Write: CD-R (24x). max Relative Humidity: Operating 20% to change without notice. Satellite A100-SK9 Model: i Satellite A100-SK9 ƒ...
...™ 2003 Norton Internet Security™ 2006 Toshiba Express Media Player Physical Dimensions Display System Type: TFT Active Matrix colour LCD display Size (diagonal): 15.4" Wide XGA TFT with 256MB DDR Video memory, PCI Express 16x Battery Sound System Built-in DVD Super-Multi Double Layer Drive functions: Read: CD-ROM (24x), DVD-ROM (8x), Write: CD-R (24x). max Relative Humidity: Operating 20% to change without notice. Satellite A100-SK9 Model: i Satellite A100-SK9 ƒ...


