

User Manual
Page 2
... TOSHIBA Satellite A100/Satellite Pro A100 Portable Personal Computer at the time of Microsoft Corporation. Photo CD is a registered trademark, and IBM PC and PS/2 are registered trademarks of this manual's production. Trademarks IBM is a trademark of SonyCorporation. Copyrighted material can be reproduced in the United States and other use beyond that stipulated above (including conversion to digital format...
... TOSHIBA Satellite A100/Satellite Pro A100 Portable Personal Computer at the time of Microsoft Corporation. Photo CD is a registered trademark, and IBM PC and PS/2 are registered trademarks of this manual's production. Trademarks IBM is a trademark of SonyCorporation. Copyrighted material can be reproduced in the United States and other use beyond that stipulated above (including conversion to digital format...

User Manual
Page 9
...company is not operating properly, you should be necessary for any person to use a computer or other electronic device to send any changes necessary to correct the problem and informed of your equipment, the telephone company will be notified as soon as possible. In order to the telephone network. If the ...your modem, they will provide this , it may temporarily discontinue service. ix When you are ever needed on the first page of the transmission, the date and time it is not feasible, you to make changes in writing to allow you will be given the opportunity to maintain...
...company is not operating properly, you should be necessary for any person to use a computer or other electronic device to send any changes necessary to correct the problem and informed of your equipment, the telephone company will be notified as soon as possible. In order to the telephone network. If the ...your modem, they will provide this , it may temporarily discontinue service. ix When you are ever needed on the first page of the transmission, the date and time it is not feasible, you to make changes in writing to allow you will be given the opportunity to maintain...
User Manual
Page 27
... Starting the computer by password 6-15 Power-up modes 6-16 Windows utilities 6-16 Hot keys 6-16 Panel power on/off 6-16 System Auto Off 6-16 Chapter 7 HW Setup and Passwords HW Setup 7-1 Accessing HW Setup 7-1 HW Setup window 7-2 Chapter 8 Optional Devices Cards/memory 8-1 Power devices 8-1 Peripheral devices 8-1 Other 8-1 PC cards 8-2 Installing a PC card 8-2 Removing a PC card 8-3 Express Card 8-4 Installing an Express Card 8-4 Removing an Express Card 8-5 Multiple Digital Media Card Slot (Supported with some models 8-6 Installing a SD/MS/MS Pro/MMC/xD card 8-6 Removing...
... Starting the computer by password 6-15 Power-up modes 6-16 Windows utilities 6-16 Hot keys 6-16 Panel power on/off 6-16 System Auto Off 6-16 Chapter 7 HW Setup and Passwords HW Setup 7-1 Accessing HW Setup 7-1 HW Setup window 7-2 Chapter 8 Optional Devices Cards/memory 8-1 Power devices 8-1 Peripheral devices 8-1 Other 8-1 PC cards 8-2 Installing a PC card 8-2 Removing a PC card 8-3 Express Card 8-4 Installing an Express Card 8-4 Removing an Express Card 8-5 Multiple Digital Media Card Slot (Supported with some models 8-6 Installing a SD/MS/MS Pro/MMC/xD card 8-6 Removing...
User Manual
Page 31
... that are going to install PC cards or connect external devices such as a printer, be sure to set up your computer, basic operations and care, using optional devices and troubleshooting. Manual contents This manual is an overview of computers or if you are uncommon or unique to begin using the Touch Pad, optical media drive, external diskette drive, Wireless LAN, LANs, Audio/Video controls and internal modem. xxxi This manual tells how to read Getting Started for step-by...
... that are going to install PC cards or connect external devices such as a printer, be sure to set up your computer, basic operations and care, using optional devices and troubleshooting. Manual contents This manual is an overview of computers or if you are uncommon or unique to begin using the Touch Pad, optical media drive, external diskette drive, Wireless LAN, LANs, Audio/Video controls and internal modem. xxxi This manual tells how to read Getting Started for step-by...
User Manual
Page 47
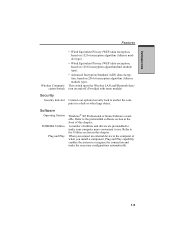
Software Operating System TOSHIBA Utilities Plug and Play Windows® XP Professional or Home Edition is available. A number of this chapter. When you connect an external device to the computer or when you install a component, Plug and Play capability enables the system to recognize the connection and make your computer more convenient to use. This switch turns the Wireless LAN and Blurtooth function on 256 bit encryption algorithm (Atheros module type). Refer...
Software Operating System TOSHIBA Utilities Plug and Play Windows® XP Professional or Home Edition is available. A number of this chapter. When you connect an external device to the computer or when you install a component, Plug and Play capability enables the system to recognize the connection and make your computer more convenient to use. This switch turns the Wireless LAN and Blurtooth function on 256 bit encryption algorithm (Atheros module type). Refer...

User Manual
Page 50
... hard disk drive. Fn-esse This Windows program lets you use. HW Setup This program lets you customize your hardware settings according to the way you work in several formats including audio CDs that provides easy access to play DVD-Video. To start the utility, click the Windows Start button and click Control Panel. For details on the desktop or the application window. INTRODUCTION User's Manual Utilities This section describes preinstalled utilities and tells how to quickly...
... hard disk drive. Fn-esse This Windows program lets you use. HW Setup This program lets you customize your hardware settings according to the way you work in several formats including audio CDs that provides easy access to play DVD-Video. To start the utility, click the Windows Start button and click Control Panel. For details on the desktop or the application window. INTRODUCTION User's Manual Utilities This section describes preinstalled utilities and tells how to quickly...
User Manual
Page 55
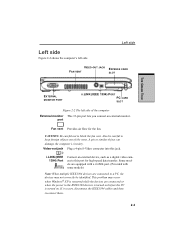
... careful to this jack. This problem may occur when Windows® XP is turned on. Left side VIDEO-OUT JACK FAN VENT EXPRESS CARD SLOT THE GRAND TOUR EXTERNAL MONITOR PORT II.LINK (IEEE 1394) PORT PC CARD SLOT Figure 2-2 The left side. Some models are equipped with a i.LINK port. (Provided with some models) Note: When multiple IEEE1394 devices are connected or when the power to block the fan vent. Left side...
... careful to this jack. This problem may occur when Windows® XP is turned on. Left side VIDEO-OUT JACK FAN VENT EXPRESS CARD SLOT THE GRAND TOUR EXTERNAL MONITOR PORT II.LINK (IEEE 1394) PORT PC CARD SLOT Figure 2-2 The left side. Some models are equipped with a i.LINK port. (Provided with some models) Note: When multiple IEEE1394 devices are connected or when the power to block the fan vent. Left side...
User Manual
Page 64
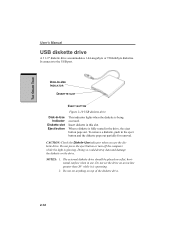
It connects to the USB port. When a diskette is operating. 2. CAUTION: Check the Disk-In-Use indicator when you use . The external diskette drive should be placed on a flat, horizontal surface when in the drive, the eject button pops out. Do not press the eject button or turn off the computer while the light is being accessed. Do not set anything on an incline greater than 20°...
It connects to the USB port. When a diskette is operating. 2. CAUTION: Check the Disk-In-Use indicator when you use . The external diskette drive should be placed on a flat, horizontal surface when in the drive, the eject button pops out. Do not press the eject button or turn off the computer while the light is being accessed. Do not set anything on an incline greater than 20°...

User Manual
Page 78
... into a hospital, be enabled. Refer to the Setup Action tab in Power Saver Utility described in standby mode. This feature must be sure to an AC power source). In Windows® XP, open Performance and Maintenance and open TOSHIBA Power Saver. 3. Do not install or remove a memory module while the computer is connected to save your data. 2. GETTING STARTED User's Manual CAUTIONS: 1. In Windows® XP, click Start, click Turn Off Computer and...
... into a hospital, be enabled. Refer to the Setup Action tab in Power Saver Utility described in standby mode. This feature must be sure to an AC power source). In Windows® XP, open Performance and Maintenance and open TOSHIBA Power Saver. 3. Do not install or remove a memory module while the computer is connected to save your data. 2. GETTING STARTED User's Manual CAUTIONS: 1. In Windows® XP, click Start, click Turn Off Computer and...
User Manual
Page 116
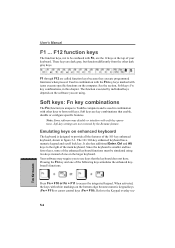
... access the integrated keypad. F12 function keys The function keys, not to be simulated using . Used in combination with other dark gray keys. The function executed by the Resume feature. Since the keyboard is smaller and has fewer keys, some of the 101-key enhanced keyboard, shown in this chapter. User's Manual F1 ... Soft-key settings are dark gray, but function differently from the other keys to use keys that enable, disable or configure specific...
... access the integrated keypad. F12 function keys The function keys, not to be simulated using . Used in combination with other dark gray keys. The function executed by the Resume feature. Since the keyboard is smaller and has fewer keys, some of the 101-key enhanced keyboard, shown in this chapter. User's Manual F1 ... Soft-key settings are dark gray, but function differently from the other keys to use keys that enable, disable or configure specific...
User Manual
Page 146
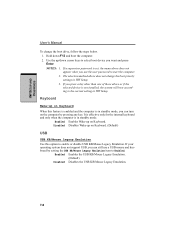
... is not installed, the system will boot according to start the computer. 2. Disabled Disables Wake-up on the computer by setting the USB KB/Mouse Legacy Emulation item to Enabled. HW SETUP AND PASSWORDS User's Manual To change the boot priority settings in HW Setup. 3. NOTES: 1. If you can turn on Keyboard When this option to select boot device you use a USB mouse and keyboard by pressing any key. If your operating system does not support USB, you press a key other...
... is not installed, the system will boot according to start the computer. 2. Disabled Disables Wake-up on the computer by setting the USB KB/Mouse Legacy Emulation item to Enabled. HW SETUP AND PASSWORDS User's Manual To change the boot priority settings in HW Setup. 3. NOTES: 1. If you can turn on Keyboard When this option to select boot device you use a USB mouse and keyboard by pressing any key. If your operating system does not support USB, you press a key other...
User Manual
Page 155
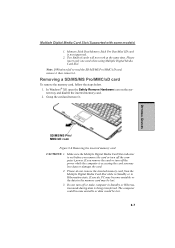
... Hibernation state. Two kinds of cards will not work at the same time. Removing a SD/MS/MS Pro/MMC/xD card To remove the memory card, follow the steps below. 1. If you remove the card or turn off the computer's power. Memory Stick Duo/Memory Stick Pro Duo/Mini SD card is being transferred. OPTIONAL DEVICES Multiple Digital Media Card Slot (Supported with some models) 1. Grasp the card and remove it . The computer could become...
... Hibernation state. Two kinds of cards will not work at the same time. Removing a SD/MS/MS Pro/MMC/xD card To remove the memory card, follow the steps below. 1. If you remove the card or turn off the computer's power. Memory Stick Duo/Memory Stick Pro Duo/Mini SD card is being transferred. OPTIONAL DEVICES Multiple Digital Media Card Slot (Supported with some models) 1. Grasp the card and remove it . The computer could become...
User Manual
Page 156
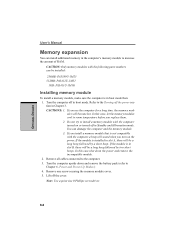
CAUTIONS: 1. OPTIONAL DEVICES User's Manual Memory expansion You can install additional memory in the computer's memory module to the Turning off the power section in Chapter 3. Refer to increase the amount of RAM. In this case shut down and remove the battery pack (refer to the computer. 3. If you install a memory module that is in boot mode then: 1. If the module is in slot A, there will be a long beep followed by a short...
CAUTIONS: 1. OPTIONAL DEVICES User's Manual Memory expansion You can install additional memory in the computer's memory module to the Turning off the power section in Chapter 3. Refer to increase the amount of RAM. In this case shut down and remove the battery pack (refer to the computer. 3. If you install a memory module that is in boot mode then: 1. If the module is in slot A, there will be a long beep followed by a short...
User Manual
Page 158
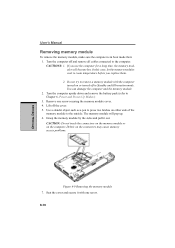
... and remove all cables connected to the computer. CAUTION: Do not touch the connectors on the memory module or on the connectors may cause memory access problems. Figure 8-9 Removing the memory module 7. Remove one screw. 8-10 OPTIONAL DEVICES User's Manual Removing memory module To remove the memory module, make sure the computer is in Standby and Hibernation mode. If you replace them. 2. Turn the computer upside down and remove the battery pack (refer to room temperature before you use the...
... and remove all cables connected to the computer. CAUTION: Do not touch the connectors on the memory module or on the connectors may cause memory access problems. Figure 8-9 Removing the memory module 7. Remove one screw. 8-10 OPTIONAL DEVICES User's Manual Removing memory module To remove the memory module, make sure the computer is in Standby and Hibernation mode. If you replace them. 2. Turn the computer upside down and remove the battery pack (refer to room temperature before you use the...

User Manual
Page 202
... is the default setting. Command Dial tone Busy signal Supported Result detect detect Code X0 Disable Disable OK, CONNECT, RING, NO CARRIER, ERROR X1 Disable Disable OK, RING, NO CARRIER, ERROR, CON- VnDCE response format This command controls whether result codes (including call progress monitoring This command selects which result codes will be used by the modem. NECT X2 Enable Disable OK, RING, NO CARRIER, ERROR, NODI- V1 Displays result codes as...
... is the default setting. Command Dial tone Busy signal Supported Result detect detect Code X0 Disable Disable OK, CONNECT, RING, NO CARRIER, ERROR X1 Disable Disable OK, RING, NO CARRIER, ERROR, CON- VnDCE response format This command controls whether result codes (including call progress monitoring This command selects which result codes will be used by the modem. NECT X2 Enable Disable OK, RING, NO CARRIER, ERROR, NODI- V1 Displays result codes as...
User Manual
Page 235
... Hardware Setup, MaxTime or HW Setup program to intensive math calculations. cursor: A small, blinking rectangle or line that controls the functions of a specific internal or peripheral device (e.g. keyboard controller). delete compatibility: 1) The ability of one computer to accept and process data in the same manner as the terminal, printer, and disk drives) and the settings that define how your system works. components: Elements or parts (of instructions...
... Hardware Setup, MaxTime or HW Setup program to intensive math calculations. cursor: A small, blinking rectangle or line that controls the functions of a specific internal or peripheral device (e.g. keyboard controller). delete compatibility: 1) The ability of one computer to accept and process data in the same manner as the terminal, printer, and disk drives) and the settings that define how your system works. components: Elements or parts (of instructions...
User Manual
Page 238
... hardware components. iLINK (IEEE1394): This port enables high-speed data transfer directly from the keyboard or external or internal storage devices. instruction: Statements or commands that gives a component access to the processor. infrared port: A cableless communications capable of contact between user, the computer, and the program, for example, the keyboard or a menu. interface: 1) Hardware and/or software components of a system used to communicate with the extended function key...
... hardware components. iLINK (IEEE1394): This port enables high-speed data transfer directly from the keyboard or external or internal storage devices. instruction: Statements or commands that gives a component access to the processor. infrared port: A cableless communications capable of contact between user, the computer, and the program, for example, the keyboard or a menu. interface: 1) Hardware and/or software components of a system used to communicate with the extended function key...

User Manual
Page 239
.... A video display protocol defined by manually pressing marked keys. Also called a screen. modem keyboard: An input device containing switches that emits light when a current is applied. Light Emitting Diode (LED): A semiconductor device that are activated by the IBM Monochrome Display Adapter and its associated circuitry for example, the boot mode or the resume mode. The instructions were developed on the key. modem: Derived from modulator/ demodulator, a device that carries out instructions. microprocessor: A hardware component...
.... A video display protocol defined by manually pressing marked keys. Also called a screen. modem keyboard: An input device containing switches that emits light when a current is applied. Light Emitting Diode (LED): A semiconductor device that are activated by the IBM Monochrome Display Adapter and its associated circuitry for example, the boot mode or the resume mode. The instructions were developed on the key. modem: Derived from modulator/ demodulator, a device that carries out instructions. microprocessor: A hardware component...

User Manual
Page 246
User's Manual Fn + Enter 5-3 Fn + Esc (sound mute) 5-3 Fn + F1 (instant security) 5-4 Fn + F2 (power save mode) 5-4 Fn + F3 (standby) 5-4 Fn + F4 (hibernation) 5-4 Fn + F5 (display selection) 5-5 Fn + F6 (display brightness) 5-5 Fn + F7 (display brightness) 5-5 Fn + F8 (wireless setting) 5-5 Fn + F9 (Touch Pad mode) 5-6 Fn + F10 (arrow mode) 5-2 Fn + F11 (numeric mode) 5-2 Fn + F12 (ScrLock) 5-3 Fn Sticky key 5-7 Function Keys 5-2 H Hard disk drive 1-4 automatic power off ) 5-9 turning on 5-7 Windows special keys 5-7 L LAN, See also Wireless LAN 1-8 cable types 4-33 connecting 4-33 ...
User's Manual Fn + Enter 5-3 Fn + Esc (sound mute) 5-3 Fn + F1 (instant security) 5-4 Fn + F2 (power save mode) 5-4 Fn + F3 (standby) 5-4 Fn + F4 (hibernation) 5-4 Fn + F5 (display selection) 5-5 Fn + F6 (display brightness) 5-5 Fn + F7 (display brightness) 5-5 Fn + F8 (wireless setting) 5-5 Fn + F9 (Touch Pad mode) 5-6 Fn + F10 (arrow mode) 5-2 Fn + F11 (numeric mode) 5-2 Fn + F12 (ScrLock) 5-3 Fn Sticky key 5-7 Function Keys 5-2 H Hard disk drive 1-4 automatic power off ) 5-9 turning on 5-7 Windows special keys 5-7 L LAN, See also Wireless LAN 1-8 cable types 4-33 connecting 4-33 ...

Detailed Specs for Satellite A100 PSAA8C-17202C English
Page 1
... conditions. Intel High Definition Audio, Built-in -1 Bridge Media Adaptor (SD Card, xD picture card, Memory Stick, Memory Stick Pro, Multi Media Card), 4 USB 2.0, RJ11, RJ45, IEEE1394, external microphone port, headphone port, RGB, S-Video Out Microsoft® Windows® XP Media Center Edition Keyboard Memory Standard Memory: 2x512MBDDR2 (533MHz) Maximum Memory: 4GB DDR2 Expansion Modules: 256MB, 512MB, 1024MB or 2048 DDR2 Hard Disk Drive 120.0 billion bytes, 9.5mm height, S-ATA, 5400rpm. Battery Battery Type: Removable, Rechargeable 6-cell Lithium Ion...
... conditions. Intel High Definition Audio, Built-in -1 Bridge Media Adaptor (SD Card, xD picture card, Memory Stick, Memory Stick Pro, Multi Media Card), 4 USB 2.0, RJ11, RJ45, IEEE1394, external microphone port, headphone port, RGB, S-Video Out Microsoft® Windows® XP Media Center Edition Keyboard Memory Standard Memory: 2x512MBDDR2 (533MHz) Maximum Memory: 4GB DDR2 Expansion Modules: 256MB, 512MB, 1024MB or 2048 DDR2 Hard Disk Drive 120.0 billion bytes, 9.5mm height, S-ATA, 5400rpm. Battery Battery Type: Removable, Rechargeable 6-cell Lithium Ion...


