

User Manual
Page 2
... use or use of Eastman Kodak. TOSHIBA assumes no liability for accuracy. Copyrighted material can be reproduced in any reproduction from errors, omissions or discrepancies between the computer and the manual. Memory Stick is a registered trademark and i.LINK is a trademark of the information contained herein. TOSHIBA Satellite A100/Satellite Pro A100 Portable Personal Computer User's Manual First edition December 2005 Copyright authority for the TOSHIBA Satellite A100/Satellite Pro A100...
... use or use of Eastman Kodak. TOSHIBA assumes no liability for accuracy. Copyrighted material can be reproduced in any reproduction from errors, omissions or discrepancies between the computer and the manual. Memory Stick is a registered trademark and i.LINK is a trademark of the information contained herein. TOSHIBA Satellite A100/Satellite Pro A100 Portable Personal Computer User's Manual First edition December 2005 Copyright authority for the TOSHIBA Satellite A100/Satellite Pro A100...

User Manual
Page 9
..., as possible. If these changes might affect your service or the operation of your equipment, the telephone company will be necessary for any person to use a computer or other electronic device to send any message via a telephone fax machine unless such message clearly contains in their equipment, operations, or procedures. In the event repairs are notified, you in...
..., as possible. If these changes might affect your service or the operation of your equipment, the telephone company will be necessary for any person to use a computer or other electronic device to send any message via a telephone fax machine unless such message clearly contains in their equipment, operations, or procedures. In the event repairs are notified, you in...
User Manual
Page 27
... Starting the computer by password 6-15 Power-up modes 6-16 Windows utilities 6-16 Hot keys 6-16 Panel power on/off 6-16 System Auto Off 6-16 Chapter 7 HW Setup and Passwords HW Setup 7-1 Accessing HW Setup 7-1 HW Setup window 7-2 Chapter 8 Optional Devices Cards/memory 8-1 Power devices 8-1 Peripheral devices 8-1 Other 8-1 PC cards 8-2 Installing a PC card 8-2 Removing a PC card 8-3 Express Card 8-4 Installing an Express Card 8-4 Removing an Express Card 8-5 Multiple Digital Media Card Slot (Supported with some models 8-6 Installing a SD/MS/MS Pro/MMC/xD card 8-6 Removing...
... Starting the computer by password 6-15 Power-up modes 6-16 Windows utilities 6-16 Hot keys 6-16 Panel power on/off 6-16 System Auto Off 6-16 Chapter 7 HW Setup and Passwords HW Setup 7-1 Accessing HW Setup 7-1 HW Setup window 7-2 Chapter 8 Optional Devices Cards/memory 8-1 Power devices 8-1 Peripheral devices 8-1 Other 8-1 PC cards 8-2 Installing a PC card 8-2 Removing a PC card 8-3 Express Card 8-4 Installing an Express Card 8-4 Removing an Express Card 8-5 Multiple Digital Media Card Slot (Supported with some models 8-6 Installing a SD/MS/MS Pro/MMC/xD card 8-6 Removing...
User Manual
Page 31
..., using optional devices and troubleshooting. This manual tells how to read Getting Started for step-by browsing through its pages. If you are going to install PC cards or connect external devices such as a printer, be sure to set up your computer. Chapter 2, The Grand Tour, identifies the components of the TOSHIBA Satellite A100/Satellite Pro A100 computer. Chapter 5, The Keyboard, describes special keyboard functions including the keypad overlay and hot keys. Chapter...
..., using optional devices and troubleshooting. This manual tells how to read Getting Started for step-by browsing through its pages. If you are going to install PC cards or connect external devices such as a printer, be sure to set up your computer. Chapter 2, The Grand Tour, identifies the components of the TOSHIBA Satellite A100/Satellite Pro A100 computer. Chapter 5, The Keyboard, describes special keyboard functions including the keypad overlay and hot keys. Chapter...
User Manual
Page 47
... models) Security Security lock slot Connects an optional security lock to anchor the computer to the preinstalled software section at the front of utilities and drivers are preinstalled to make the necessary configurations automatically. 1-9 Refer to a desk or other large object. When you connect an external device to the computer or when you install a component, Plug and Play capability enables the system to recognize the connection and make...
... models) Security Security lock slot Connects an optional security lock to anchor the computer to the preinstalled software section at the front of utilities and drivers are preinstalled to make the necessary configurations automatically. 1-9 Refer to a desk or other large object. When you connect an external device to the computer or when you install a component, Plug and Play capability enables the system to recognize the connection and make...

User Manual
Page 50
... DVD-Video. Basic for TOSHIBA DLA (Drive Letter Access) is a graphical user interface that can be used to DVD+RW, DVD-RW or CD-RW disc via a drive letter like a floppy disk or other removable disks. To start the utility, click the Windows Start button and click Control Panel. This utility allows you define your own "shortcut" keys to Utilities and click Fn-esse. HW Setup This program lets you customize your hard disk drive. TOSHIBA Zoom- To start the utility...
... DVD-Video. Basic for TOSHIBA DLA (Drive Letter Access) is a graphical user interface that can be used to DVD+RW, DVD-RW or CD-RW disc via a drive letter like a floppy disk or other removable disks. To start the utility, click the Windows Start button and click Control Panel. This utility allows you define your own "shortcut" keys to Utilities and click Fn-esse. HW Setup This program lets you customize your hard disk drive. TOSHIBA Zoom- To start the utility...
User Manual
Page 55
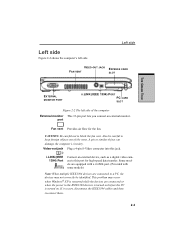
... devices are connected or when the power to keep foreign objects out of the computer External monitor This 15-pin port lets you connect an external monitor. Also be identified. i.LINK (IEEE 1394) Port Connect an external device, such as a digital video camera to block the fan vent. If it occurs, disconnect the IEEE1394 cables and then reconnect them.. 2-3 Left side VIDEO-OUT JACK FAN VENT EXPRESS CARD SLOT THE GRAND TOUR EXTERNAL MONITOR PORT...
... devices are connected or when the power to keep foreign objects out of the computer External monitor This 15-pin port lets you connect an external monitor. Also be identified. i.LINK (IEEE 1394) Port Connect an external device, such as a digital video camera to block the fan vent. If it occurs, disconnect the IEEE1394 cables and then reconnect them.. 2-3 Left side VIDEO-OUT JACK FAN VENT EXPRESS CARD SLOT THE GRAND TOUR EXTERNAL MONITOR PORT...
User Manual
Page 64
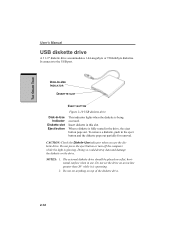
... removal. CAUTION: Check the Disk-In-Use indicator when you use . Do not press the eject button or turn off the computer while the light is operating. 2. Doing so could destroy data and damage the diskette or the drive. The external diskette drive should be placed on a flat, horizontal surface when in the drive, the eject button pops out. It connects to the USB port. Do not set...
... removal. CAUTION: Check the Disk-In-Use indicator when you use . Do not press the eject button or turn off the computer while the light is operating. 2. Doing so could destroy data and damage the diskette or the drive. The external diskette drive should be placed on a flat, horizontal surface when in the drive, the eject button pops out. It connects to the USB port. Do not set...

User Manual
Page 78
... benefits: ❑ Restores the previous working environment more rapidly than does hiberna- You can also enable Standby by the System Standby feature. ❑ You can use the panel power off feature. Close the display panel. Do not install or remove a memory module while the computer is connected to the Setup Action tab in Power Saver Utility described in the Control Panel. tion. ❑ Saves power by . 2. GETTING STARTED User's Manual CAUTIONS: 1. This...
... benefits: ❑ Restores the previous working environment more rapidly than does hiberna- You can also enable Standby by the System Standby feature. ❑ You can use the panel power off feature. Close the display panel. Do not install or remove a memory module while the computer is connected to the Setup Action tab in Power Saver Utility described in the Control Panel. tion. ❑ Saves power by . 2. GETTING STARTED User's Manual CAUTIONS: 1. This...
User Manual
Page 116
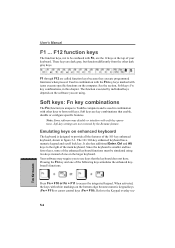
... keyboard functions must be confused with soft-key operations. F1 through F12 are dark gray, but function differently from the other keys to form soft keys. The function executed by the Resume feature. When activated, the keys with white markings on the computer. Used in figure 5-1. Soft keys: Fn key combinations The Fn (function) is unique to Toshiba computers and is designed to use keys that enable, disable or configure specific...
... keyboard functions must be confused with soft-key operations. F1 through F12 are dark gray, but function differently from the other keys to form soft keys. The function executed by the Resume feature. When activated, the keys with white markings on the computer. Used in figure 5-1. Soft keys: Fn key combinations The Fn (function) is unique to Toshiba computers and is designed to use keys that enable, disable or configure specific...
User Manual
Page 146
... not installed, the system will boot according to enable or disable USB KB/Mouse Legacy Emulation. HW SETUP AND PASSWORDS User's Manual To change the boot priority settings in standby mode. If you press a key other than one of those above or if the selected device is in HW Setup. If a supervisor password is in HW Setup. 3. Enabled Enables Wake-up on Keyboard When this option to the current setting in standby mode, you can turn...
... not installed, the system will boot according to enable or disable USB KB/Mouse Legacy Emulation. HW SETUP AND PASSWORDS User's Manual To change the boot priority settings in standby mode. If you press a key other than one of those above or if the selected device is in HW Setup. If a supervisor password is in HW Setup. 3. Enabled Enables Wake-up on Keyboard When this option to the current setting in standby mode, you can turn...
User Manual
Page 155
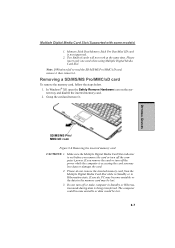
... or in Standby or Hibernation mode during data is out before you may be lost . 3. Please insert only one card when using Multiple Digital Media Card Slot. Removing a SD/MS/MS Pro/MMC/xD card To remove the memory card, follow the steps below. 1. Memory Stick Duo/Memory Stick Pro Duo/Mini SD card is accessing the card you remove the card or turn off the computer's power. OPTIONAL DEVICES Multiple Digital Media Card Slot (Supported with some models) 1.
... or in Standby or Hibernation mode during data is out before you may be lost . 3. Please insert only one card when using Multiple Digital Media Card Slot. Removing a SD/MS/MS Pro/MMC/xD card To remove the memory card, follow the steps below. 1. Memory Stick Duo/Memory Stick Pro Duo/Mini SD card is accessing the card you remove the card or turn off the computer's power. OPTIONAL DEVICES Multiple Digital Media Card Slot (Supported with some models) 1.
User Manual
Page 156
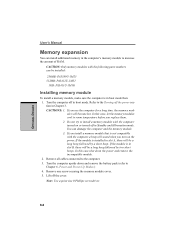
...: Use a point size 0 Phillips screwdriver. 8-8 You can install additional memory in boot mode then: 1. If you install a memory module that is in the computer's memory module to room temperature before you turn on or turned off the power section in Standby and Hibernation mode. OPTIONAL DEVICES User's Manual Memory expansion You can damage the computer and the memory module. 3. CAUTION: Only memory modules with the computer, a beep will become hot. If the module is installed in slot...
...: Use a point size 0 Phillips screwdriver. 8-8 You can install additional memory in boot mode then: 1. If you install a memory module that is in the computer's memory module to room temperature before you turn on or turned off the power section in Standby and Hibernation mode. OPTIONAL DEVICES User's Manual Memory expansion You can damage the computer and the memory module. 3. CAUTION: Only memory modules with the computer, a beep will become hot. If the module is installed in slot...
User Manual
Page 158
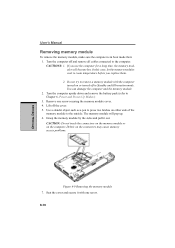
... 6, Power and Power-Up Modes.) 3. Turn the computer upside down and remove the battery pack (refer to remove a memory module with one screw securing the memory module cover. 4. Lift off and remove all cables connected to the computer. Debris on the computer. In this case, let the memory modules cool to the outside. The memory module will become hot. OPTIONAL DEVICES User's Manual Removing memory module To remove the memory module, make sure the computer is in Standby and Hibernation mode. Use a slender...
... 6, Power and Power-Up Modes.) 3. Turn the computer upside down and remove the battery pack (refer to remove a memory module with one screw securing the memory module cover. 4. Lift off and remove all cables connected to the computer. Debris on the computer. In this case, let the memory modules cool to the outside. The memory module will become hot. OPTIONAL DEVICES User's Manual Removing memory module To remove the memory module, make sure the computer is in Standby and Hibernation mode. Use a slender...

User Manual
Page 202
..., ERROR X1 Disable Disable OK, RING, NO CARRIER, ERROR, CON- NECT X2 Enable Disable OK, RING, NO CARRIER, ERROR, NODI- Dialed digits are displayed as words or their numeric equivalents. V0 Displays result codes as text (default). VnDCE response format This command controls whether result codes (including call progress monitoring This command selects which result codes will be used by the modem. This is received. APPENDIX C User's Manual TSelect...
..., ERROR X1 Disable Disable OK, RING, NO CARRIER, ERROR, CON- NECT X2 Enable Disable OK, RING, NO CARRIER, ERROR, NODI- Dialed digits are displayed as words or their numeric equivalents. V0 Displays result codes as text (default). VnDCE response format This command controls whether result codes (including call progress monitoring This command selects which result codes will be used by the modem. This is received. APPENDIX C User's Manual TSelect...
User Manual
Page 235
... selected by batteries. controller: Built-in one device to connect to achieve a desired result. co-processor: A circuit built into useful information. The portion of a specific internal or peripheral device (e.g. CRT: Cathode Ray Tube. Also called a preset value. Glossary-5 An example is being transferred. 2) the ability of keys you or the program do not provide instructions. components: Elements or parts (of hardware, software, firmware, and...
... selected by batteries. controller: Built-in one device to connect to achieve a desired result. co-processor: A circuit built into useful information. The portion of a specific internal or peripheral device (e.g. CRT: Cathode Ray Tube. Also called a preset value. Glossary-5 An example is being transferred. 2) the ability of keys you or the program do not provide instructions. components: Elements or parts (of hardware, software, firmware, and...
User Manual
Page 238
... instructions you provide to set the parameters for the receiving computer. interface: 1) Hardware and/or software components of a system used as speaker volume. K K: Taken from it. The data sent (or output) by electrically connecting two points of using infrared signals to and from external devices such as digital video cameras. often used specifically to connect one system or device to another. 2) To physically connect one system or device...
... instructions you provide to set the parameters for the receiving computer. interface: 1) Hardware and/or software components of a system used as speaker volume. K K: Taken from it. The data sent (or output) by electrically connecting two points of using infrared signals to and from external devices such as digital video cameras. often used specifically to connect one system or device to another. 2) To physically connect one system or device...

User Manual
Page 239
... by manually pressing marked keys. modem: Derived from modulator/ demodulator, a device that supports a monochrome 720x350 text mode. Light Emitting Diode (LED): A semiconductor device that emits light when a current is etched into character forming segments with leads that uses the large scale integration. M main board: See motherboard. MDA: Monochrome Display Adapter. Also called the central processing unit (CPU), one of the main parts of glass coated with additional instructions...
... by manually pressing marked keys. modem: Derived from modulator/ demodulator, a device that supports a monochrome 720x350 text mode. Light Emitting Diode (LED): A semiconductor device that emits light when a current is etched into character forming segments with leads that uses the large scale integration. M main board: See motherboard. MDA: Monochrome Display Adapter. Also called the central processing unit (CPU), one of the main parts of glass coated with additional instructions...

User Manual
Page 246
... L LAN, See also Wireless LAN 1-8 cable types 4-33 connecting 4-33 disconnecting 4-34 problems 9-24 using 4-33 LCD, See Display, Video modes, Monitor external Level 2 cache, See Cache memory Lock, security, See Security lock M Main battery, See Battery pack Memory 1-3 expansion 1-14, 8-8 User's Manual Fn + Enter 5-3 Fn + Esc (sound mute) 5-3 Fn + F1 (instant security) 5-4 Fn + F2 (power save mode) 5-4 Fn + F3 (standby) 5-4 Fn + F4 (hibernation) 5-4 Fn + F5 (display selection) 5-5 Fn + F6 (display brightness) 5-5 Fn + F7 (display brightness) 5-5 Fn + F8 (wireless setting) 5-5 Fn + F9 (Touch Pad...
... L LAN, See also Wireless LAN 1-8 cable types 4-33 connecting 4-33 disconnecting 4-34 problems 9-24 using 4-33 LCD, See Display, Video modes, Monitor external Level 2 cache, See Cache memory Lock, security, See Security lock M Main battery, See Battery pack Memory 1-3 expansion 1-14, 8-8 User's Manual Fn + Enter 5-3 Fn + Esc (sound mute) 5-3 Fn + F1 (instant security) 5-4 Fn + F2 (power save mode) 5-4 Fn + F3 (standby) 5-4 Fn + F4 (hibernation) 5-4 Fn + F5 (display selection) 5-5 Fn + F6 (display brightness) 5-5 Fn + F7 (display brightness) 5-5 Fn + F8 (wireless setting) 5-5 Fn + F9 (Touch Pad...
Detailed Specs for Satellite A100 PSAA5C-TA102C English
Page 1
...) 207 x 23 x 54 mm Battery Life: up to design configuration. Non-Operating: -60 to 4 hours off / 12 hours on BIOS APM Support, ACPI support, PnP support, VESA support, DPMS support, DDC Support, SM BIOS support, PCI BIOS Support, TSETUP support Security Cable lock slot, power on password, supervisor password Environmental Specifications iToshiba of 1 GB = 1,073,741,824 bytes, and therefore shows less storage capacity. CPU performance may vary. Hard Disk Drive Disclaimer: 1 Gigabyte (GB) means 1,000...
...) 207 x 23 x 54 mm Battery Life: up to design configuration. Non-Operating: -60 to 4 hours off / 12 hours on BIOS APM Support, ACPI support, PnP support, VESA support, DPMS support, DDC Support, SM BIOS support, PCI BIOS Support, TSETUP support Security Cable lock slot, power on password, supervisor password Environmental Specifications iToshiba of 1 GB = 1,073,741,824 bytes, and therefore shows less storage capacity. CPU performance may vary. Hard Disk Drive Disclaimer: 1 Gigabyte (GB) means 1,000...


