
User Guide
Page 2
...product may not function properly and you may include a Compact DiskReWritable (CD-RW), one of the data. YOU AGREE THAT TOSHIBA, ITS AFFILIATES AND SUPPLIERS SHALL HAVE NO RESPONSIBILITY FOR DAMAGE TO OR...TO ANY TROUBLE, FAILURE OR MALFUNCTION OF THE HARD DISK DRIVE OR OTHER STORAGE DEVICES AND THE DATA CANNOT BE RECOVERED, TOSHIBA SHALL NOT BE LIABLE FOR ANY DAMAGE OR LOSS OF ... manuals enclosed. ACCORDINGLY, TOSHIBA, ITS AFFILIATES AND SUPPLIERS DISCLAIM ANY AND ALL LIABILITY ARISING OUT OF THE USE OF THE COMPUTER PRODUCTS IN 2 Model: Satellite ® 5005 Series Compact Disk-ReWritable ...
...product may not function properly and you may include a Compact DiskReWritable (CD-RW), one of the data. YOU AGREE THAT TOSHIBA, ITS AFFILIATES AND SUPPLIERS SHALL HAVE NO RESPONSIBILITY FOR DAMAGE TO OR...TO ANY TROUBLE, FAILURE OR MALFUNCTION OF THE HARD DISK DRIVE OR OTHER STORAGE DEVICES AND THE DATA CANNOT BE RECOVERED, TOSHIBA SHALL NOT BE LIABLE FOR ANY DAMAGE OR LOSS OF ... manuals enclosed. ACCORDINGLY, TOSHIBA, ITS AFFILIATES AND SUPPLIERS DISCLAIM ANY AND ALL LIABILITY ARISING OUT OF THE USE OF THE COMPUTER PRODUCTS IN 2 Model: Satellite ® 5005 Series Compact Disk-ReWritable ...

User Guide
Page 9
... Greece Iceland Ireland Italy Japan Luxembourg Mexico Netherlands New Zealand Norway Poland Portugal Spain Sweden Switzerland UK USA CD-ROM, DVD-ROM, and DVD-ROM/CD-RW Safety Instructions The CD-ROM, DVD-ROM, and DVD-ROM/CD-RW drives employ a laser system. To ensure proper use This equipment is approved to open the enclosure.
... Greece Iceland Ireland Italy Japan Luxembourg Mexico Netherlands New Zealand Norway Poland Portugal Spain Sweden Switzerland UK USA CD-ROM, DVD-ROM, and DVD-ROM/CD-RW Safety Instructions The CD-ROM, DVD-ROM, and DVD-ROM/CD-RW drives employ a laser system. To ensure proper use This equipment is approved to open the enclosure.

User Guide
Page 15
...Contents Ctrl, Fn, and Alt keys 69 Function keys 69 Windows® special keys 70 Overlay keys 70 Emulating a full-size keyboard 72 TOSHIBA Console button 72 Starting a program 73 Saving your work 73 Printing your work 74 Using diskettes 75 Inserting and removing diskettes 76 Caring for...DVD 87 Removing a disc with the computer on 87 Removing a disc with the computer off 88 Caring for CDs and DVDs 88 Using the DVD-ROM or DVD-ROM/CD-RW multifunction drive 89 Setting up for communications 89 Connecting the modem 90 Connecting your computer to a network .......... 90 Powering down...
...Contents Ctrl, Fn, and Alt keys 69 Function keys 69 Windows® special keys 70 Overlay keys 70 Emulating a full-size keyboard 72 TOSHIBA Console button 72 Starting a program 73 Saving your work 73 Printing your work 74 Using diskettes 75 Inserting and removing diskettes 76 Caring for...DVD 87 Removing a disc with the computer on 87 Removing a disc with the computer off 88 Caring for CDs and DVDs 88 Using the DVD-ROM or DVD-ROM/CD-RW multifunction drive 89 Setting up for communications 89 Connecting the modem 90 Connecting your computer to a network .......... 90 Powering down...

User Guide
Page 21
... Display problems 221 Disk drive problems 223 DVD-ROM or DVD-ROM/CD-RW drive problems 225 Sound system problems 233 PC Card problems 233 Printer problems 236 Modem problems 237 Develop good computing habits 238 If you need further assistance 239 Before you call 239 Contacting Toshiba 239 Other Toshiba Internet Web sites 241...
... Display problems 221 Disk drive problems 223 DVD-ROM or DVD-ROM/CD-RW drive problems 225 Sound system problems 233 PC Card problems 233 Printer problems 236 Modem problems 237 Develop good computing habits 238 If you need further assistance 239 Before you call 239 Contacting Toshiba 239 Other Toshiba Internet Web sites 241...

User Guide
Page 25
...icons highlight other programs that may come preinstalled on your computer and for additional programs on your Recovery CDs. ❖ Toshiba Accessories Information, which lists accessories available from Toshiba and explains how to order them. ❖ The Microsoft® Windows® XP documentation, which... explains the features of the user's guide. Introduction Other documentation 25 Other icons used in the DOCS folder on the C: drive. ❖ Guides...
...icons highlight other programs that may come preinstalled on your computer and for additional programs on your Recovery CDs. ❖ Toshiba Accessories Information, which lists accessories available from Toshiba and explains how to order them. ❖ The Microsoft® Windows® XP documentation, which... explains the features of the user's guide. Introduction Other documentation 25 Other icons used in the DOCS folder on the C: drive. ❖ Guides...

User Guide
Page 30
...a pencil to press the manual eject button. Right side DVD-ROM or DVD-ROM/CD-RW drive Manual eject button Volume control dial Eject button Microphone in jack S/PDIF Digital Optical out The DVD-ROM ...or DVD-ROM/CD-RW drive enables you connect the computer to a local area Ether network using a 10/100 Ethernet link... can break off . CAUTION: To prevent possible overheating of the CPU, make sure you to open the drive tray when the computer is off inside the computer and damage it can continue to perform at up to ...
...a pencil to press the manual eject button. Right side DVD-ROM or DVD-ROM/CD-RW drive Manual eject button Volume control dial Eject button Microphone in jack S/PDIF Digital Optical out The DVD-ROM ...or DVD-ROM/CD-RW drive enables you connect the computer to a local area Ether network using a 10/100 Ethernet link... can break off . CAUTION: To prevent possible overheating of the CPU, make sure you to open the drive tray when the computer is off inside the computer and damage it can continue to perform at up to ...

User Guide
Page 36
...glow if the external power source is disconnected or if the battery is being accessed. CAUTION: Never turn off light Battery light Hard disk drive light Disc/disk activity light The AC power light glows green when the computer is in loss of data. For more information on determining ...on /off light glows green when the computer is being accessed. The disc/disk activity light flashes green when the diskette drive, the DVD-ROM or the DVD-ROM/CD-RW drive is on. On The on page 105. The light glows amber when the computer is connected to an external power source....
...glow if the external power source is disconnected or if the battery is being accessed. CAUTION: Never turn off light Battery light Hard disk drive light Disc/disk activity light The AC power light glows green when the computer is in loss of data. For more information on determining ...on /off light glows green when the computer is being accessed. The disc/disk activity light flashes green when the diskette drive, the DVD-ROM or the DVD-ROM/CD-RW drive is on. On The on page 105. The light glows amber when the computer is connected to an external power source....

User Guide
Page 78
... angles, and interactive menus. The computer can play high-resolution video at the front edge of the computer. Drive components and control buttons The DVD-ROM or DVD-ROM/CD-RW drive is turned off. Digital versatile discs (DVDs) provide a significant increase in data storage and support features that can... clicking 3 1/2 Floppy (A:). HINT: You can read both DVD-ROM and CD-ROM discs. NOTE: For optimum DVD performance, it is closed or open. Playing a CD or DVD Your computer has a DVD-ROM or DVD-ROM/CD-RW drive that are located at up a file to 30 frames per second. For...
... angles, and interactive menus. The computer can play high-resolution video at the front edge of the computer. Drive components and control buttons The DVD-ROM or DVD-ROM/CD-RW drive is turned off. Digital versatile discs (DVDs) provide a significant increase in data storage and support features that can... clicking 3 1/2 Floppy (A:). HINT: You can read both DVD-ROM and CD-ROM discs. NOTE: For optimum DVD performance, it is closed or open. Playing a CD or DVD Your computer has a DVD-ROM or DVD-ROM/CD-RW drive that are located at up a file to 30 frames per second. For...

User Guide
Page 79
The manual eject button allows you to manually open the disc tray when power to the computer and the drive is off and the DVD-ROM or DVD-ROM/ CD-RW drive is on, press the stop/eject control button to press the manual eject button. HINT: When the computer is glowing. CAUTION: Never...tray. CAUTION: Never use a slim object such as a straightened paper clip. Instead, use a pencil to eject a disc. Doing so could damage the disc or the drive. Components Learning the Basics Playing a CD or DVD 79 DVD-ROM or DVD-ROM/CD-RW drive Eject button Manual eject button DVD-ROM or DVD-ROM...
The manual eject button allows you to manually open the disc tray when power to the computer and the drive is off and the DVD-ROM or DVD-ROM/ CD-RW drive is on, press the stop/eject control button to press the manual eject button. HINT: When the computer is glowing. CAUTION: Never...tray. CAUTION: Never use a slim object such as a straightened paper clip. Instead, use a pencil to eject a disc. Doing so could damage the disc or the drive. Components Learning the Basics Playing a CD or DVD 79 DVD-ROM or DVD-ROM/CD-RW drive Eject button Manual eject button DVD-ROM or DVD-ROM...

User Guide
Page 82
...the DVD player starts. If a CD is in the drive, the The operating system and you system enters CD player starts, the TOSHIBA press Play/ mode and operates as a MEDIA PLAYER starts Pause stand-alone CD player. 82 Learning the Basics Playing a CD or DVD CD /DVD control Digital Audio Control ... Do not install or remove a memory module while the DVD-ROM drive power is in the drive, the TOSHIBA MEDIA ning and Windows MediaTM Player PLAYER starts and Digi- CD player mode and you press starts and the CD begins to tal Audio Data begins to Play/Pause play . you press...
...the DVD player starts. If a CD is in the drive, the The operating system and you system enters CD player starts, the TOSHIBA press Play/ mode and operates as a MEDIA PLAYER starts Pause stand-alone CD player. 82 Learning the Basics Playing a CD or DVD CD /DVD control Digital Audio Control ... Do not install or remove a memory module while the DVD-ROM drive power is in the drive, the TOSHIBA MEDIA ning and Windows MediaTM Player PLAYER starts and Digi- CD player mode and you press starts and the CD begins to tal Audio Data begins to Play/Pause play . you press...

User Guide
Page 83
... All Programs, Accessories, Entertainment, Volume Control). 1 If the computer is turned on, press the eject button on the DVD-ROM or DVD-ROM/CD-RW drive. Grasp it is clean and free of the disc. Pressing the eject button The disc tray partially opens. CAUTION: Handle discs carefully. CAUTION: To... Hold the disc by its edges and check that it by its center hole and edge. Learning the Basics Playing a CD or DVD 83 Inserting a disc WARNING: Before playing an audio CD or a DVD, turn the volume down . If you handle the disc incorrectly, you could damage your ears. Avoid ...
... All Programs, Accessories, Entertainment, Volume Control). 1 If the computer is turned on, press the eject button on the DVD-ROM or DVD-ROM/CD-RW drive. Grasp it is clean and free of the disc. Pressing the eject button The disc tray partially opens. CAUTION: Handle discs carefully. CAUTION: To... Hold the disc by its edges and check that it by its center hole and edge. Learning the Basics Playing a CD or DVD 83 Inserting a disc WARNING: Before playing an audio CD or a DVD, turn the volume down . If you handle the disc incorrectly, you could damage your ears. Avoid ...

User Guide
Page 84
... CAUTION: Make sure the disc is properly positioned on the spindle. Doing so could cause the drive to touch the drive's lens (located underneath the drive's spindle) or the area around it. 84 Learning the Basics Playing a CD or DVD 4 Carefully place the disc in the empty tray with its label facing up. Inserting...
... CAUTION: Make sure the disc is properly positioned on the spindle. Doing so could cause the drive to touch the drive's lens (located underneath the drive's spindle) or the area around it. 84 Learning the Basics Playing a CD or DVD 4 Carefully place the disc in the empty tray with its label facing up. Inserting...

User Guide
Page 87
...disk activity light on the center of the tray until it clicks indicating that require a lot of any CD or DVD. Wait for the disc to turn off before removing it is accessing the drive. CDs are often used to view the contents of space, such as photographs and large presentation files. The... disc tray partially opens. 2 Grasp the sides of a CD or DVD CDs and DVDs contain files just like diskettes and the hard disk...
...disk activity light on the center of the tray until it clicks indicating that require a lot of any CD or DVD. Wait for the disc to turn off before removing it is accessing the drive. CDs are often used to view the contents of space, such as photographs and large presentation files. The... disc tray partially opens. 2 Grasp the sides of a CD or DVD CDs and DVDs contain files just like diskettes and the hard disk...

User Guide
Page 88
... open, remove the disc and place it . ❖ Hold a disc by its protective cover. 3 Push the tray in to close the drive. Caring for CDs and DVDs ❖ Store your discs in their original containers to protect them from reading the data properly. ❖ Avoid exposing discs to press... the manual eject button. Pencil lead can prevent the drive from scratches and keep them clean. ❖ Never bend a disc or place heavy...
... open, remove the disc and place it . ❖ Hold a disc by its protective cover. 3 Push the tray in to close the drive. Caring for CDs and DVDs ❖ Store your discs in their original containers to protect them from reading the data properly. ❖ Avoid exposing discs to press... the manual eject button. Pencil lead can prevent the drive from scratches and keep them clean. ❖ Never bend a disc or place heavy...

User Guide
Page 89
...❖ The computer's modem ❖ A telephone line ❖ A communications program To connect to a CDRecordable (CD-R) or CD-ReWritable (CD-RW) disc. Doing so could damage the CD, DVD or drive. CAUTION: Check the disc/disk activity light when you connect through the modem. Learning the Basics Using the DVD-ROM... or DVD-ROM/CD-RW multifunction drive 89 Using the DVD-ROM or DVD-ROM/CD-RW multifunction drive Your computer may come with another computer, you need a Web browser, such as Microsoft®...
...❖ The computer's modem ❖ A telephone line ❖ A communications program To connect to a CDRecordable (CD-R) or CD-ReWritable (CD-RW) disc. Doing so could damage the CD, DVD or drive. CAUTION: Check the disc/disk activity light when you connect through the modem. Learning the Basics Using the DVD-ROM... or DVD-ROM/CD-RW multifunction drive 89 Using the DVD-ROM or DVD-ROM/CD-RW multifunction drive Your computer may come with another computer, you need a Web browser, such as Microsoft®...

User Guide
Page 178
... and disconnect devices while the computer is that transfer high levels of data at a guaranteed rate. Playing DVDs 1 Open the DVD-ROM or DVD-ROM/CD-RW tray. 2 Place the DVD in real-time, such as video devices. the delivery of data in the DVD-ROM or DVD-ROM.../CD-RW drive. 3 Launch WinDVD 2000 and press the Play button. The main difference between the i.LINK port and your USB ports, the i.LINK port supports hot swapping (...
... and disconnect devices while the computer is that transfer high levels of data at a guaranteed rate. Playing DVDs 1 Open the DVD-ROM or DVD-ROM/CD-RW tray. 2 Place the DVD in real-time, such as video devices. the delivery of data in the DVD-ROM or DVD-ROM.../CD-RW drive. 3 Launch WinDVD 2000 and press the Play button. The main difference between the i.LINK port and your USB ports, the i.LINK port supports hot swapping (...

User Guide
Page 188
WinDVD is connected to -use, full-featured multimedia control center that helps you can use InterVideo WinDVD to use this program. If your computer is an easy-to AC power. For systems with a DVD-ROM or DVD-ROM/CD-RW multifunctional drive, you get the most out of the exciting world of DVD technology. This chapter explains how to play DVDs. Playing DVDs TECHNICAL NOTE: For optimum DVD performance, Toshiba recommends playing DVDs while your computer has 188 Chapter 8 WinDVD 2000 WinDVDTM is a software program for playing back CDs and DVDs.
WinDVD is connected to -use, full-featured multimedia control center that helps you can use InterVideo WinDVD to use this program. If your computer is an easy-to AC power. For systems with a DVD-ROM or DVD-ROM/CD-RW multifunctional drive, you get the most out of the exciting world of DVD technology. This chapter explains how to play DVDs. Playing DVDs TECHNICAL NOTE: For optimum DVD performance, Toshiba recommends playing DVDs while your computer has 188 Chapter 8 WinDVD 2000 WinDVDTM is a software program for playing back CDs and DVDs.

User Guide
Page 189
...: 1 Click Start, and point to All Programs. 2 Point to locate the volume control buttons. 189 WinDVD 2000 Playing DVDs a DVD-ROM or DVD-ROM/CD-RW multifunctional drive, your ears. WARNING: Before playing a DVD, turn down the volume. See "Using the control panel playback buttons" on page 192 to InterVideo WinDVD, then...
...: 1 Click Start, and point to All Programs. 2 Point to locate the volume control buttons. 189 WinDVD 2000 Playing DVDs a DVD-ROM or DVD-ROM/CD-RW multifunctional drive, your ears. WARNING: Before playing a DVD, turn down the volume. See "Using the control panel playback buttons" on page 192 to InterVideo WinDVD, then...
User Guide
Page 197
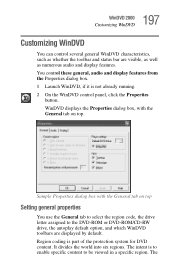
Sample Properties dialog box with the General tab on top Setting general properties You use the General tab to select the region code, the drive letter assigned to be viewed in a specific region. The Region coding is not already running. 2 On the WinDVD control panel, click the Properties button....General tab on top. It divides the world into six regions. The intent is to enable specific content to the DVD-ROM or DVD-ROM/CD-RW drive, the autoplay default option, and which WinDVD toolbars are visible, as well as numerous audio and display features. 197 WinDVD 2000 Customizing WinDVD ...
Sample Properties dialog box with the General tab on top Setting general properties You use the General tab to select the region code, the drive letter assigned to be viewed in a specific region. The Region coding is not already running. 2 On the WinDVD control panel, click the Properties button....General tab on top. It divides the world into six regions. The intent is to enable specific content to the DVD-ROM or DVD-ROM/CD-RW drive, the autoplay default option, and which WinDVD toolbars are visible, as well as numerous audio and display features. 197 WinDVD 2000 Customizing WinDVD ...

User Guide
Page 198
NOTE: Most DVD-ROM or DVD-ROM/CD-RW drives let you change the region code, select the desired option in your computer is Region ...box on the General properties tab. 1 To change the region code, usually between one and five times. Once a drive has reached the limit, the region code cannot be changed again. Clear the check box to the Remaining times until ... installed in the Current regions list. Status bar is the bar that is inserted in the DVDROM or DVD-ROM/CD-RW drive. 4 In the View box, select the items you can change the current region before the setting becomes permanent....
NOTE: Most DVD-ROM or DVD-ROM/CD-RW drives let you change the region code, select the desired option in your computer is Region ...box on the General properties tab. 1 To change the region code, usually between one and five times. Once a drive has reached the limit, the region code cannot be changed again. Clear the check box to the Remaining times until ... installed in the Current regions list. Status bar is the bar that is inserted in the DVDROM or DVD-ROM/CD-RW drive. 4 In the View box, select the items you can change the current region before the setting becomes permanent....


