User Guide
Page 14
14 Contents Keeping yourself comfortable 40 Precautions 43 Setting up your computer 44 Installing additional memory (optional 45 Removing a memory module 48 Connecting a mouse 48 Connecting a printer 48 Connecting the AC adapter 49 Installing a device in the Modular Bay 51 Charging the battery 51 Using ...
14 Contents Keeping yourself comfortable 40 Precautions 43 Setting up your computer 44 Installing additional memory (optional 45 Removing a memory module 48 Connecting a mouse 48 Connecting a printer 48 Connecting the AC adapter 49 Installing a device in the Modular Bay 51 Charging the battery 51 Using ...

User Guide
Page 20
...hardware conflict 197 A plan of action 197 Resolving hardware conflicts on your own .... 198 Fixing a problem with Device Manager .......... 200 Memory card problems 201 Power and the batteries 202 Keyboard problems 203 Display problems 204 Disk drive problems 206 CD-ROM or DVD-ROM ...Modem problems 221 Develop good computing habits 222 Using VirtualTech 223 If you need further assistance 224 Before you call 224 Contacting Toshiba 224 Other Toshiba Internet Web sites 226 Appendix A: Hot Keys 231 Instant password security 231 Sound 232 Display modes 232 Keyboard hot keys 232...
...hardware conflict 197 A plan of action 197 Resolving hardware conflicts on your own .... 198 Fixing a problem with Device Manager .......... 200 Memory card problems 201 Power and the batteries 202 Keyboard problems 203 Display problems 204 Disk drive problems 206 CD-ROM or DVD-ROM ...Modem problems 221 Develop good computing habits 222 Using VirtualTech 223 If you need further assistance 224 Before you call 224 Contacting Toshiba 224 Other Toshiba Internet Web sites 226 Appendix A: Hot Keys 231 Instant password security 231 Sound 232 Display modes 232 Keyboard hot keys 232...
User Guide
Page 29
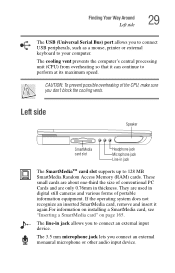
... up to connect an external input device. The line-in thickness. They are only 0.76mm in jack allows you to 128 MB SmartMedia Random Access Memory (RAM) cards. CAUTION: To prevent possible overheating of portable information equipment. If the operating system does not recognize an inserted SmartMedia card, remove and insert...
... up to connect an external input device. The line-in thickness. They are only 0.76mm in jack allows you to 128 MB SmartMedia Random Access Memory (RAM) cards. CAUTION: To prevent possible overheating of portable information equipment. If the operating system does not recognize an inserted SmartMedia card, remove and insert...
User Guide
Page 37
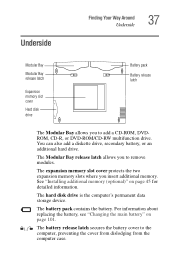
...Changing the main battery" on page 45 for detailed information. The expansion memory slot cover protects the two expansion memory slots where you to remove modules. The Modular Bay release latch allows you insert additional memory. You can also add a diskette drive, secondary battery, or an ...is the computer's permanent data storage device. Underside Finding Your Way Around Underside 37 Modular Bay Modular Bay release latch Expansion memory slot cover Hard disk drive Battery pack Battery release latch The Modular Bay allows you to the computer, preventing the cover from...
...Changing the main battery" on page 45 for detailed information. The expansion memory slot cover protects the two expansion memory slots where you to remove modules. The Modular Bay release latch allows you insert additional memory. You can also add a diskette drive, secondary battery, or an ...is the computer's permanent data storage device. Underside Finding Your Way Around Underside 37 Modular Bay Modular Bay release latch Expansion memory slot cover Hard disk drive Battery pack Battery release latch The Modular Bay allows you to the computer, preventing the cover from...
User Guide
Page 45
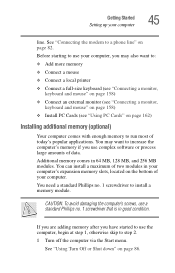
...also want to use your computer, you use complex software or process large amounts of your computer 45 line. Before starting to : ❖ Add more memory ❖ Connect a mouse ❖ Connect a local printer ❖ Connect a full-size keyboard (see "Connecting a monitor, keyboard and mouse" on ... PC Cards (see "Using PC Cards" on the bottom of data. See "Using Turn Off or Shut down" on page 82. Additional memory comes in good condition. You can install a maximum of today's popular applications. CAUTION: To avoid damaging the computer's screws, use the computer...
...also want to use your computer, you use complex software or process large amounts of your computer 45 line. Before starting to : ❖ Add more memory ❖ Connect a mouse ❖ Connect a local printer ❖ Connect a full-size keyboard (see "Connecting a monitor, keyboard and mouse" on ... PC Cards (see "Using PC Cards" on the bottom of data. See "Using Turn Off or Shut down" on page 82. Additional memory comes in good condition. You can install a maximum of today's popular applications. CAUTION: To avoid damaging the computer's screws, use the computer...
User Guide
Page 46
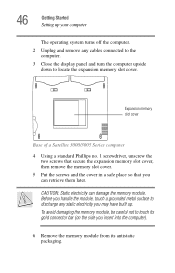
...its gold connector bar (on the side you can damage the memory module. To avoid damaging the memory module, be careful not to locate the expansion memory slot cover. Expansion memory slot cover Base of a Satellite 3000/3005 Series computer 4 Using a standard Phillips no. 1 screwdriver, ...unscrew the two screws that secure the expansion memory slot cover, then remove the memory slot cover. 5 Put the screws and...
...its gold connector bar (on the side you can damage the memory module. To avoid damaging the memory module, be careful not to locate the expansion memory slot cover. Expansion memory slot cover Base of a Satellite 3000/3005 Series computer 4 Using a standard Phillips no. 1 screwdriver, ...unscrew the two screws that secure the expansion memory slot cover, then remove the memory slot cover. 5 Put the screws and...
User Guide
Page 47
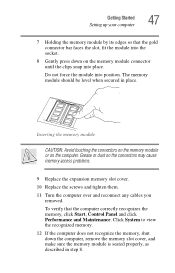
...cables you removed. Getting Started Setting up your computer 47 7 Holding the memory module by its edges so that the computer correctly recognizes the memory, click Start, Control Panel and click Performance and Maintenance. The memory module should be level when secured in step 8. To verify that the ...gold connector bar faces the slot, fit the module into the socket. 8 Gently press down the computer, remove the memory slot cover, and make sure the memory module is seated properly, as described in place. Grease or dust on the computer. Click System to view the recognized...
...cables you removed. Getting Started Setting up your computer 47 7 Holding the memory module by its edges so that the computer correctly recognizes the memory, click Start, Control Panel and click Performance and Maintenance. The memory module should be level when secured in step 8. To verify that the ...gold connector bar faces the slot, fit the module into the socket. 8 Gently press down the computer, remove the memory slot cover, and make sure the memory module is seated properly, as described in place. Grease or dust on the computer. Click System to view the recognized...
User Guide
Page 48
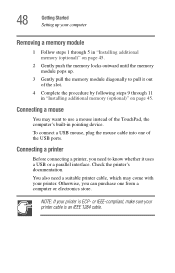
...printer. NOTE: If your printer is an IEEE 1284 cable. Check the printer's documentation. 48 Getting Started Setting up your computer Removing a memory module 1 Follow steps 1 through 11 in pointing device. Connecting a printer Before connecting a printer, you can purchase one of the USB ... know whether it out of the TouchPad, the computer's built-in "Installing additional memory (optional)" on page 45. 2 Gently push the memory locks outward until the memory module pops up. 3 Gently pull the memory module diagonally to pull it uses a USB or a parallel interface. To connect...
...printer. NOTE: If your printer is an IEEE 1284 cable. Check the printer's documentation. 48 Getting Started Setting up your computer Removing a memory module 1 Follow steps 1 through 11 in pointing device. Connecting a printer Before connecting a printer, you can purchase one of the USB ... know whether it out of the TouchPad, the computer's built-in "Installing additional memory (optional)" on page 45. 2 Gently push the memory locks outward until the memory module pops up. 3 Gently pull the memory module diagonally to pull it uses a USB or a parallel interface. To connect...
User Guide
Page 60
Guidelines for turning off the computer: ❖ If you can use the operating system Stand by command to save your system settings to memory so that, when you turn off the power while a drive-in progress and are using the computer for the first time, leave the computer plugged ...
Guidelines for turning off the computer: ❖ If you can use the operating system Stand by command to save your system settings to memory so that, when you turn off the power while a drive-in progress and are using the computer for the first time, leave the computer plugged ...
User Guide
Page 63
... configured to the hard disk at preset intervals. Your work , if, for details. 63 You will lose all unsaved work temporarily stays in the computer's memory until you save feature which you when the battery is running low. See "Power management" on .
... configured to the hard disk at preset intervals. Your work , if, for details. 63 You will lose all unsaved work temporarily stays in the computer's memory until you save feature which you when the battery is running low. See "Power management" on .
User Guide
Page 85
...files you do not save your data will eventually discharge in Hibernation mode, the computer uses no battery power. ❖ Because the state of memory. ❖ When starting up again, the computer runs a self-test, loads the operating system, and then returns to the hard disk. Factors... using. Learning the Basics Powering down . ❖ Restarting from Hibernation mode uses a little more time and battery power than restoring it from memory. Factors when choosing Stand by: ❖ While in which you left off. Since Hibernation mode does not require power to the state in...
...files you do not save your data will eventually discharge in Hibernation mode, the computer uses no battery power. ❖ Because the state of memory. ❖ When starting up again, the computer runs a self-test, loads the operating system, and then returns to the hard disk. Factors... using. Learning the Basics Powering down . ❖ Restarting from Hibernation mode uses a little more time and battery power than restoring it from memory. Factors when choosing Stand by: ❖ While in which you left off. Since Hibernation mode does not require power to the state in...
User Guide
Page 90
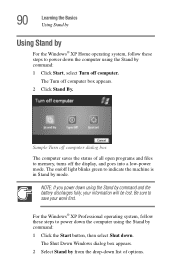
... off light blinks green to indicate the machine is in Stand by mode. For the Windows® XP Professional operating system, follow these steps to memory, turns off computer box appears. 2 Click Stand By. The Shut Down Windows dialog box appears. 2 Select Stand by from the drop-down list of all...
... off light blinks green to indicate the machine is in Stand by mode. For the Windows® XP Professional operating system, follow these steps to memory, turns off computer box appears. 2 Click Stand By. The Shut Down Windows dialog box appears. 2 Select Stand by from the drop-down list of all...

User Guide
Page 91
The computer saves the status of all open programs and files to memory, turns off light blinks green to indicate the machine is in Stand by command and the battery discharges fully, your work first. Starting again from Stand by To start the computer from Stand by 91 3 Click OK. Be sure to the screen you power down using . Learning the Basics Using Stand by mode, press the power button. The computer returns to save your information will be lost. NOTE: If you were using the Stand by mode. The on/off the display, and goes into a low-power mode.
The computer saves the status of all open programs and files to memory, turns off light blinks green to indicate the machine is in Stand by command and the battery discharges fully, your work first. Starting again from Stand by To start the computer from Stand by 91 3 Click OK. Be sure to the screen you power down using . Learning the Basics Using Stand by mode, press the power button. The computer returns to save your information will be lost. NOTE: If you were using the Stand by mode. The on/off the display, and goes into a low-power mode.
User Guide
Page 94
... spend a lot of the battery with your system configuration settings and the current time and date for many times. The RTC battery powers the RTC memory, which you can recharge it , causing the release of toxic fumes. ❖ Avoid touching the metal terminals of time traveling and need to the battery...
... spend a lot of the battery with your system configuration settings and the current time and date for many times. The RTC battery powers the RTC memory, which you can recharge it , causing the release of toxic fumes. ❖ Avoid touching the metal terminals of time traveling and need to the battery...
User Guide
Page 162
... your data and turn off the computer before inserting the PC Card. Other cards may work with the PC Card to the PCMCIA (Personal Computer Memory Card International Association) standard.
... your data and turn off the computer before inserting the PC Card. Other cards may work with the PC Card to the PCMCIA (Personal Computer Memory Card International Association) standard.
User Guide
Page 164
Using SmartMedia cards SmartMedia cards are super compact memory cards that are used to go out. To locate the SmartMedia card slot, see "Left side" on page 163. Do not remove a SmartMedia card while ...
Using SmartMedia cards SmartMedia cards are super compact memory cards that are used to go out. To locate the SmartMedia card slot, see "Left side" on page 163. Do not remove a SmartMedia card while ...
User Guide
Page 194
... system is one, remove it and press any key does not work routine, you to restart the computer. The computer was placed in the computer's memory has been lost. If pressing any key to continue. For more information, see "Power and the batteries" on returns you can easily detect if the...
... system is one, remove it and press any key does not work routine, you to restart the computer. The computer was placed in the computer's memory has been lost. If pressing any key to continue. For more information, see "Power and the batteries" on returns you can easily detect if the...
User Guide
Page 198
...data required by the device is normal. Resolving hardware conflicts on your own Computer components need resources to bypass the microprocessor and access memory directly. Some IRQs have multiple devices. The device most likely to be time-consuming and frustrating. The DMA provides a dedicated ...works. This may cause a hardware conflict. That may cause a hardware conflict. Interrupt Request Channel The channel to the CPU is called the Direct Memory Access (DMA). A device, such as a disk drive or a modem, needs a channel to store information as system resources. If two or...
...data required by the device is normal. Resolving hardware conflicts on your own Computer components need resources to bypass the microprocessor and access memory directly. Some IRQs have multiple devices. The device most likely to be time-consuming and frustrating. The DMA provides a dedicated ...works. This may cause a hardware conflict. That may cause a hardware conflict. Interrupt Request Channel The channel to the CPU is called the Direct Memory Access (DMA). A device, such as a disk drive or a modem, needs a channel to store information as system resources. If two or...
User Guide
Page 201
... problems Incorrectly connected or faulty memory modules may cause errors that device appears. For more information about the device. ❖ The Resource tab, which lists resources assigned to the monitor, DVD-..., double-click the device. It is also present. A Help and Support window for these first: 1 Turn off the computer via the Start menu. 2 Remove the memory module. The operating system displays the Device Properties dialog box, which displays the drivers being used by the device. A Troubleshooting button is worthwhile checking for...
... problems Incorrectly connected or faulty memory modules may cause errors that device appears. For more information about the device. ❖ The Resource tab, which lists resources assigned to the monitor, DVD-..., double-click the device. It is also present. A Help and Support window for these first: 1 Turn off the computer via the Start menu. 2 Remove the memory module. The operating system displays the Device Properties dialog box, which displays the drivers being used by the device. A Troubleshooting button is worthwhile checking for...
User Guide
Page 202
... and check for the error again. The main battery may be inserted correctly in a lamp or other appliance. If the error recurs without the memory module installed, the error is consuming full power. Try turning off the computer, remove and replace the battery. Here are some typical problems and... how to solve them: The AC power light does not come on page 45, and making sure it is working properly by the memory module. The AC adapter and power cable work correctly, but the battery will neither power the computer nor recharge the batteries. The battery doesn...
... and check for the error again. The main battery may be inserted correctly in a lamp or other appliance. If the error recurs without the memory module installed, the error is consuming full power. Try turning off the computer, remove and replace the battery. Here are some typical problems and... how to solve them: The AC power light does not come on page 45, and making sure it is working properly by the memory module. The AC adapter and power cable work correctly, but the battery will neither power the computer nor recharge the batteries. The battery doesn...


