

User Guide
Page 14
...Keeping yourself comfortable 40 Precautions 43 Setting up your computer 44 Setting up your software 45 Registering your computer with Toshiba ......... 46 Adding external devices 46 Installing additional memory (optional 47 Connecting a mouse 53 Connecting a printer 53 Connecting a USB printer 54 Connecting a parallel printer ...the power 63 Activating the power-on password 65 Using the TouchPad 65 Primary and secondary control buttons........... 66 Toshiba Scroller 67 Disabling or enabling the TouchPad 67 Setting up a printer 69 Setting up the fax function 72 Powering off ...
...Keeping yourself comfortable 40 Precautions 43 Setting up your computer 44 Setting up your software 45 Registering your computer with Toshiba ......... 46 Adding external devices 46 Installing additional memory (optional 47 Connecting a mouse 53 Connecting a printer 53 Connecting a USB printer 54 Connecting a parallel printer ...the power 63 Activating the power-on password 65 Using the TouchPad 65 Primary and secondary control buttons........... 66 Toshiba Scroller 67 Disabling or enabling the TouchPad 67 Setting up a printer 69 Setting up the fax function 72 Powering off ...
User Guide
Page 21
21 Contents Resolving hardware conflicts on your own .... 228 Fixing a problem with Device Manager .......... 230 Memory module problems 232 Power and the batteries 232 Keyboard problems 234 Display problems 234 Disk drive problems 236 DVD-ROM or DVD-... Printer problems 251 Modem problems 252 Develop good computing habits 252 If you need further assistance 254 Before you call 254 Contacting Toshiba 254 Other Toshiba Internet Web sites 256 Toshiba's worldwide offices 256 Appendix A: Hot Keys 259 Volume Mute 259 Instant password security 260 Without a password 260 With a password...
21 Contents Resolving hardware conflicts on your own .... 228 Fixing a problem with Device Manager .......... 230 Memory module problems 232 Power and the batteries 232 Keyboard problems 234 Display problems 234 Disk drive problems 236 DVD-ROM or DVD-... Printer problems 251 Modem problems 252 Develop good computing habits 252 If you need further assistance 254 Before you call 254 Contacting Toshiba 254 Other Toshiba Internet Web sites 256 Toshiba's worldwide offices 256 Appendix A: Hot Keys 259 Volume Mute 259 Instant password security 260 Without a password 260 With a password...
User Guide
Page 32
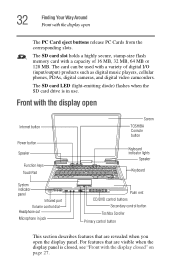
.... For features that are visible when the display panel is in jack Screen TOSHIBA Console button Keyboard indicator lights Speaker Keyboard Palm rest CD/DVD control buttons Secondary control button Toshiba Scroller Primary control button This section describes features that are revealed when you open...flashes when the SD card drive is closed " on page 27. The SD card slot holds a highly secure, stamp-size flash memory card with the display open Internet button Power button Speaker Function keys TouchPad System indicator panel Infrared port Volume control dial Headphone out ...
.... For features that are visible when the display panel is in jack Screen TOSHIBA Console button Keyboard indicator lights Speaker Keyboard Palm rest CD/DVD control buttons Secondary control button Toshiba Scroller Primary control button This section describes features that are revealed when you open...flashes when the SD card drive is closed " on page 27. The SD card slot holds a highly secure, stamp-size flash memory card with the display open Internet button Power button Speaker Function keys TouchPad System indicator panel Infrared port Volume control dial Headphone out ...

User Guide
Page 37
... logging onto your system, your computer will start up and you will need to log on the disc. Underside *Wi-Fi Mini PCI cover Expansion memory slot cover Modem cover Hard disk drive cover *For systems with Wi-Fi Battery cover Battery release latch Finding Your Way Around Underside 37 The...
... logging onto your system, your computer will start up and you will need to log on the disc. Underside *Wi-Fi Mini PCI cover Expansion memory slot cover Modem cover Hard disk drive cover *For systems with Wi-Fi Battery cover Battery release latch Finding Your Way Around Underside 37 The...

User Guide
Page 38
...your computer when a standard electrical outlet is not available. The hard disk drive cover protects the computer's hard disk drive. See "Installing additional memory (optional)" on page 171. For information about replacing the battery, see "Changing the main battery" on page 126. The modem cover protects... the built-in modem. The battery release latch secures the battery cover to the battery module, which lets you insert additional memory. The expansion memory slot cover protects the slots where you use your system tray" on page 47 for systems with Wi-Fi). The battery ...
...your computer when a standard electrical outlet is not available. The hard disk drive cover protects the computer's hard disk drive. See "Installing additional memory (optional)" on page 171. For information about replacing the battery, see "Changing the main battery" on page 126. The modem cover protects... the built-in modem. The battery release latch secures the battery cover to the battery module, which lets you insert additional memory. The expansion memory slot cover protects the slots where you use your system tray" on page 47 for systems with Wi-Fi). The battery ...
User Guide
Page 46
... that may also want to you may ship with information about new products and upgrades, and also extends your Toshiba warranty worldwide at no charge to : ❖ Add more memory (see "Installing additional memory (optional)" on page 47) ❖ Connect a mouse (see "Connecting a mouse" on page 53) ❖ Connect a full-size keyboard (see...
... that may also want to you may ship with information about new products and upgrades, and also extends your Toshiba warranty worldwide at no charge to : ❖ Add more memory (see "Installing additional memory (optional)" on page 47) ❖ Connect a mouse (see "Connecting a mouse" on page 53) ❖ Connect a full-size keyboard (see...

User Guide
Page 47
... while the computer is in 128 MB, 256 MB and 512 MB modules. There are two memory slots. Getting Started Installing additional memory (optional) 47 ❖ Connect an external monitor (see "Using external display devices" on page 54) ❖ Connect a local printer (see "Connecting a... an SD card (see "Using SD cards" on page 184) Installing additional memory (optional) CAUTION: Before you use the computer for a long time, the memory modules will be lost. Your computer comes with enough memory to room temperature before you use complex software or process large amounts of today...
... while the computer is in 128 MB, 256 MB and 512 MB modules. There are two memory slots. Getting Started Installing additional memory (optional) 47 ❖ Connect an external monitor (see "Using external display devices" on page 54) ❖ Connect a local printer (see "Connecting a... an SD card (see "Using SD cards" on page 184) Installing additional memory (optional) CAUTION: Before you use the computer for a long time, the memory modules will be lost. Your computer comes with enough memory to room temperature before you use complex software or process large amounts of today...
User Guide
Page 48
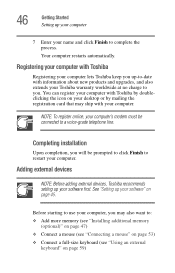
Power to install a memory module under the following conditions. The computer is on, turn the computer upside down. See "Turn Off or Shut down using Standby mode. 3. You can ..." on page 99. 2 Unplug and remove any cables connected to the computer. 3 Close the display panel and turn it off. 48 Getting Started Installing additional memory (optional) CAUTION: Do not try to the DVD-ROM drive has been turned on. CAUTION: Do not install or remove...
Power to install a memory module under the following conditions. The computer is on, turn the computer upside down. See "Turn Off or Shut down using Standby mode. 3. You can ..." on page 99. 2 Unplug and remove any cables connected to the computer. 3 Close the display panel and turn it off. 48 Getting Started Installing additional memory (optional) CAUTION: Do not try to the DVD-ROM drive has been turned on. CAUTION: Do not install or remove...

User Guide
Page 49
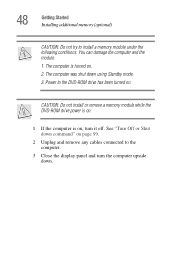
Getting Started Installing additional memory (optional) 49 Expansion memory slot cover Underside of the computer NOTE: Use a point size 0 Phillips screwdriver. 4 Locate the expansion memory slot cover and remove the screw that secures the cover. Removing the expansion memory slot cover screw
Getting Started Installing additional memory (optional) 49 Expansion memory slot cover Underside of the computer NOTE: Use a point size 0 Phillips screwdriver. 4 Locate the expansion memory slot cover and remove the screw that secures the cover. Removing the expansion memory slot cover screw
User Guide
Page 50
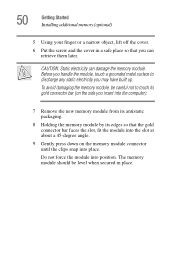
...press down on the side you insert into the computer). 7 Remove the new memory module from its antistatic packaging. 8 Holding the memory module by its edges so that you can damage the memory module. The memory module should be careful not to discharge any static electricity you handle the module,... touch a grounded metal surface to touch its gold connector bar (on the memory module connector until the clips snap into place. 50 Getting Started Installing additional memory (optional) 5 Using your finger or a narrow object, lift off the cover. 6 Put the ...
...press down on the side you insert into the computer). 7 Remove the new memory module from its antistatic packaging. 8 Holding the memory module by its edges so that you can damage the memory module. The memory module should be careful not to discharge any static electricity you handle the module,... touch a grounded metal surface to touch its gold connector bar (on the memory module connector until the clips snap into place. 50 Getting Started Installing additional memory (optional) 5 Using your finger or a narrow object, lift off the cover. 6 Put the ...
User Guide
Page 51
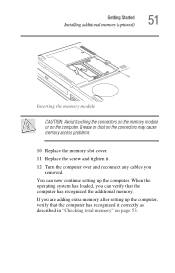
... or on page 53. Grease or dust on the connectors may cause memory access problems. 10 Replace the memory slot cover. 11 Replace the screw and tighten it correctly as described in "Checking total memory" on the computer. You can now continue setting up the computer, verify that the ...computer has recognized it . 12 Turn the computer over and reconnect any cables you can verify that the computer has recognized the additional memory. When the operating system has...
... or on page 53. Grease or dust on the connectors may cause memory access problems. 10 Replace the memory slot cover. 11 Replace the screw and tighten it correctly as described in "Checking total memory" on the computer. You can now continue setting up the computer, verify that the ...computer has recognized it . 12 Turn the computer over and reconnect any cables you can verify that the computer has recognized the additional memory. When the operating system has...
User Guide
Page 52
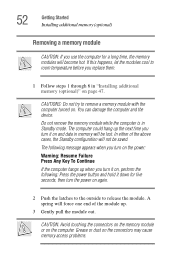
... to release the module. CAUTION: Avoid touching the connectors on the memory module or on again. 2 Push the latches to the outside to remove a memory module with the computer turned on the connectors may cause memory access problems. A spring will not be lost. The following message appears...will be saved. You can damage the computer and the device. Do not remove the memory module while the computer is in Standby mode. 52 Getting Started Installing additional memory (optional) Removing a memory module CAUTION: If you use the computer for five seconds, then turn it on, perform...
... to release the module. CAUTION: Avoid touching the connectors on the memory module or on again. 2 Push the latches to the outside to remove a memory module with the computer turned on the connectors may cause memory access problems. A spring will not be lost. The following message appears...will be saved. You can damage the computer and the device. Do not remove the memory module while the computer is in Standby mode. 52 Getting Started Installing additional memory (optional) Removing a memory module CAUTION: If you use the computer for five seconds, then turn it on, perform...
User Guide
Page 53
...on the computer. To connect a mouse, plug the mouse cable into one of the TouchPad, the computer's built-in "Installing additional memory (optional)" on the computer. You can connect a USB printer after you turn on page 47. The mouse and TouchPad can connect a... Maintenance. 3 Click System. 4 The General tab view automatically appears and shows the recognized memory. 5 If the computer does not recognize the memory configuration, turn on page 47. Checking total memory When you add or remove memory, you can be used at the same time. The operating system automatically detects the mouse...
...on the computer. To connect a mouse, plug the mouse cable into one of the TouchPad, the computer's built-in "Installing additional memory (optional)" on the computer. You can connect a USB printer after you turn on page 47. The mouse and TouchPad can connect a... Maintenance. 3 Click System. 4 The General tab view automatically appears and shows the recognized memory. 5 If the computer does not recognize the memory configuration, turn on page 47. Checking total memory When you add or remove memory, you can be used at the same time. The operating system automatically detects the mouse...
User Guide
Page 76
... of charge while you save feature that you when the battery is running low. Computing tips ❖ Save your work stays in the computer's temporary memory until you are working. You will lose all unsaved work, if, for details. 76 See "Setting battery alarms" on . HINT: Some programs have an automatic...
... of charge while you save feature that you when the battery is running low. Computing tips ❖ Save your work stays in the computer's temporary memory until you are working. You will lose all unsaved work, if, for details. 76 See "Setting battery alarms" on . HINT: Some programs have an automatic...
User Guide
Page 91
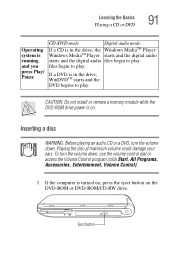
CAUTION: Do not install or remove a memory module while the DVD-ROM drive power is in the drive, the Windows MediaTM Player Windows MediaTM Player starts and the digital audio starts and ...
CAUTION: Do not install or remove a memory module while the DVD-ROM drive power is in the drive, the Windows MediaTM Player Windows MediaTM Player starts and the digital audio starts and ...
User Guide
Page 99
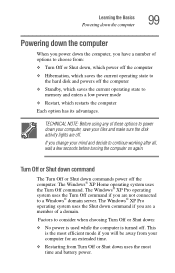
...; Hibernation, which saves the current operating state to the hard disk and powers off the computer ❖ Standby, which saves the current operating state to memory and enters a low power mode ❖ Restart, which restarts the computer Each option has its advantages. TECHNICAL NOTE: Before using any of these options to...
...; Hibernation, which saves the current operating state to the hard disk and powers off the computer ❖ Standby, which saves the current operating state to memory and enters a low power mode ❖ Restart, which restarts the computer Each option has its advantages. TECHNICAL NOTE: Before using any of these options to...

User Guide
Page 100
...require power to start up than the Standby mode, because information is the same as Turn Off or Shut down option. Restoring information from memory. ❖ On restarting, the computer returns to system settings. Restart command Restart is being retrieved from the hard disk instead of the ... 100 Learning the Basics Powering down the computer ❖ When starting up again, this choice uses less time and battery power than restoring it from memory. When you restart the computer, the computer runs a self-test, loads the operating system, and then returns to the hard disk. But it...
...require power to start up than the Standby mode, because information is the same as Turn Off or Shut down option. Restoring information from memory. ❖ On restarting, the computer returns to system settings. Restart command Restart is being retrieved from the hard disk instead of the ... 100 Learning the Basics Powering down the computer ❖ When starting up again, this choice uses less time and battery power than restoring it from memory. When you restart the computer, the computer runs a self-test, loads the operating system, and then returns to the hard disk. But it...
User Guide
Page 101
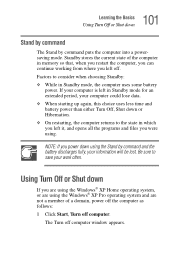
... by command The Stand by command and the battery discharges fully, your information will be lost. The Turn off computer. Factors to the state in memory so that, when you restart the computer, you can continue working from where you are using the Windows® XP Home operating system, or are...
... by command The Stand by command and the battery discharges fully, your information will be lost. The Turn off computer. Factors to the state in memory so that, when you restart the computer, you can continue working from where you are using the Windows® XP Home operating system, or are...
User Guide
Page 112
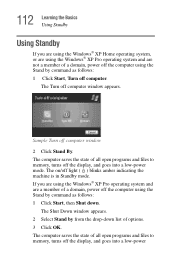
...a domain, power off the computer using the Stand by command as follows: 1 Click Start, then Shut down list of all open programs and files to memory, turns off the display, and goes into a low-power mode. The computer saves the state of a domain, power off the computer using the Stand by...® XP Home operating system, or are using the Windows® XP Pro operating system and are a member of all open programs and files to memory, turns off computer window 2 Click Stand By. Sample Turn off the display, and goes into a low-power The computer saves the state of options. 3 ...
...a domain, power off the computer using the Stand by command as follows: 1 Click Start, then Shut down list of all open programs and files to memory, turns off the display, and goes into a low-power mode. The computer saves the state of a domain, power off the computer using the Stand by...® XP Home operating system, or are using the Windows® XP Pro operating system and are a member of all open programs and files to memory, turns off computer window 2 Click Stand By. Sample Turn off the display, and goes into a low-power The computer saves the state of options. 3 ...
User Guide
Page 118
Please see "Maximizing battery life" on battery power until the battery is fully discharged. The RTC battery powers the RTC memory, which stores your system configuration settings and the current time and date for up to the battery or the computer. Short-circuiting the battery can ...
Please see "Maximizing battery life" on battery power until the battery is fully discharged. The RTC battery powers the RTC memory, which stores your system configuration settings and the current time and date for up to the battery or the computer. Short-circuiting the battery can ...


