

User Guide
Page 28
Contents Introduction 35 This guide 36 Safety icons 37 Other icons used 38 Other documentation 38 Service options 39 Chapter 1: Getting Started 40 Selecting a place to work 40 Creating a computer-friendly environment 40 Keeping yourself comfortable 41 Other precautions 45 Setting up your computer 46 Connecting the AC adapter 47 Charging the battery 50 Turning on the computer 51 Opening the display panel 51 Turning on the power 52 Setting up your software 53 Registering your computer with Toshiba 54 Setting up other devices 54 28
Contents Introduction 35 This guide 36 Safety icons 37 Other icons used 38 Other documentation 38 Service options 39 Chapter 1: Getting Started 40 Selecting a place to work 40 Creating a computer-friendly environment 40 Keeping yourself comfortable 41 Other precautions 45 Setting up your computer 46 Connecting the AC adapter 47 Charging the battery 50 Turning on the computer 51 Opening the display panel 51 Turning on the power 52 Setting up your software 53 Registering your computer with Toshiba 54 Setting up other devices 54 28

User Guide
Page 31
... Chapter 4: Mobile Computing 121 Toshiba's energy-saver design 121 Running the computer on battery power 122 Battery Notice 122 Charging the main battery 123 Charging the RTC battery 124 Monitoring battery power 125 What to do when the battery alarm sounds 128 Changing batteries 129 Taking care of your battery 131 Safety precautions 131 Maximizing battery life 132 Disposing of...
... Chapter 4: Mobile Computing 121 Toshiba's energy-saver design 121 Running the computer on battery power 122 Battery Notice 122 Charging the main battery 123 Charging the RTC battery 124 Monitoring battery power 125 What to do when the battery alarm sounds 128 Changing batteries 129 Taking care of your battery 131 Safety precautions 131 Maximizing battery life 132 Disposing of...

User Guide
Page 34
... 197 Resolving hardware conflicts on your own ........198 Fixing a problem with Device Manager 199 Memory problems 201 Power and the batteries 202 Keyboard problems 203 Display problems 204 Disk drive problems 206 DVD-ROM or multi-function drive problems......208 Sound system problems... Modem problems 214 Develop good computing habits 214 If you need further assistance 215 Before you call 216 Contacting Toshiba 216 Other Toshiba Internet Web sites 217 Toshiba's worldwide offices 218 Appendix A: Hot Keys 220 Appendix B: Power Cord/Cable Connectors 227 Appendix C: Using ConfigFree...
... 197 Resolving hardware conflicts on your own ........198 Fixing a problem with Device Manager 199 Memory problems 201 Power and the batteries 202 Keyboard problems 203 Display problems 204 Disk drive problems 206 DVD-ROM or multi-function drive problems......208 Sound system problems... Modem problems 214 Develop good computing habits 214 If you need further assistance 215 Before you call 216 Contacting Toshiba 216 Other Toshiba Internet Web sites 217 Toshiba's worldwide offices 218 Appendix A: Hot Keys 220 Appendix B: Power Cord/Cable Connectors 227 Appendix C: Using ConfigFree...
User Guide
Page 46
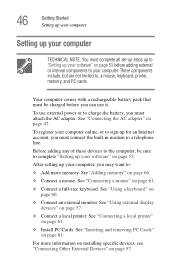
... 66. ❖ Connect a mouse. To register your computer online, or to sign up your computer, you can use external power or to charge the battery, you must connect the built-in modem to a telephone line. See "Adding memory" on page 57. ❖ Connect a local printer. See "Connecting... a local printer" on page 81. Your computer comes with a rechargeable battery pack that must be sure to complete "Setting up your software" on page 53 before you may want to: ❖ Add more information on installing...
... 66. ❖ Connect a mouse. To register your computer online, or to sign up your computer, you can use external power or to charge the battery, you must connect the built-in modem to a telephone line. See "Adding memory" on page 57. ❖ Connect a local printer. See "Connecting... a local printer" on page 81. Your computer comes with a rechargeable battery pack that must be sure to complete "Setting up your software" on page 53 before you may want to: ❖ Add more information on installing...

User Guide
Page 47
... when you connect the AC adapter to operate. Use the power cord/ cable and AC adapter cord to connect the computer to charge the computer's battery. As a general safety precaution, avoid touching any metal parts.
... when you connect the AC adapter to operate. Use the power cord/ cable and AC adapter cord to connect the computer to charge the computer's battery. As a general safety precaution, avoid touching any metal parts.
User Guide
Page 49
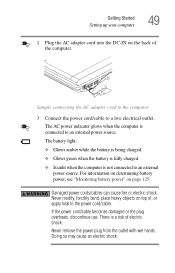
... being charged. ❖ Glows green when the battery is fully charged. ❖ Is unlit when the computer is not connected to a live electrical outlet. There is connected to the power cord/cable. Doing ... power source. Getting Started Setting up your computer 49 2 Plug the AC adapter cord into the DC-IN on page 125. For information on determining battery power, see "Monitoring battery power" on the back of electric shock. Damaged power cords/cables can cause fire or electric shock.
... being charged. ❖ Glows green when the battery is fully charged. ❖ Is unlit when the computer is not connected to a live electrical outlet. There is connected to the power cord/cable. Doing ... power source. Getting Started Setting up your computer 49 2 Plug the AC adapter cord into the DC-IN on page 125. For information on determining battery power, see "Monitoring battery power" on the back of electric shock. Damaged power cords/cables can cause fire or electric shock.
User Guide
Page 50
...panel's AC power light ( ) glows green and the battery light ( ) glows amber. If you must charge it. When the battery light turns green, the battery is completely charged and ready to power the computer, you are also charging a secondary battery housed in about three hours. TECHNICAL NOTE: When your computer...electrical outlet using all of the power provided by the AC Adaptor to run applications, features, and devices, the recharging of the battery can use the battery to power the computer. If the computer is off for system operation and will be used . If the computer is on ...
...panel's AC power light ( ) glows green and the battery light ( ) glows amber. If you must charge it. When the battery light turns green, the battery is completely charged and ready to power the computer, you are also charging a secondary battery housed in about three hours. TECHNICAL NOTE: When your computer...electrical outlet using all of the power provided by the AC Adaptor to run applications, features, and devices, the recharging of the battery can use the battery to power the computer. If the computer is off for system operation and will be used . If the computer is on ...
User Guide
Page 51
Turning on the computer The computer is operated on battery power and you turn it on your display are an intrinsic characteristic of the TFT manufacturing technology. Your display contains an extremely large number of ... brightness of thin-film transistors (TFT) and is an intrinsic characteristic of the screen. Getting Started Turning on the computer 51 For more information on battery use, see "Running the computer on battery power" on your computer. Small bright dots may appear on page 122.
Turning on the computer The computer is operated on battery power and you turn it on your display are an intrinsic characteristic of the TFT manufacturing technology. Your display contains an extremely large number of ... brightness of thin-film transistors (TFT) and is an intrinsic characteristic of the screen. Getting Started Turning on the computer 51 For more information on battery use, see "Running the computer on battery power" on your computer. Small bright dots may appear on page 122.
User Guide
Page 52
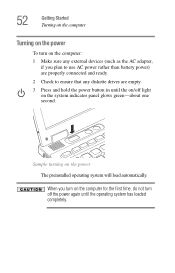
When you plan to use AC power rather than battery power) are properly connected and ready. 2 Check to ensure that any external devices (such as the AC adapter, if you turn on the power The ...
When you plan to use AC power rather than battery power) are properly connected and ready. 2 Check to ensure that any external devices (such as the AC adapter, if you turn on the power The ...
User Guide
Page 55
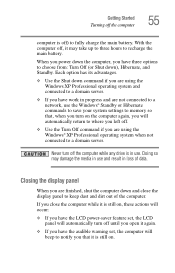
Never turn off ) to fully charge the main battery. If you close the display panel to a domain server. When you power down ), Hibernate, and Standby. Getting Started Turning off the computer 55 computer is ... the computer. Doing so may take up to three hours to a network, use and result in progress and are not connected to recharge the main battery.
Never turn off ) to fully charge the main battery. If you close the display panel to a domain server. When you power down ), Hibernate, and Standby. Getting Started Turning off the computer 55 computer is ... the computer. Doing so may take up to three hours to a network, use and result in progress and are not connected to recharge the main battery.

User Guide
Page 67
...on, begin at step 1; otherwise, skip to step 2. 1 Save your work, then shut down your Toshiba sales representative for a service professional to complete this procedure. Toshiba recommends installing a memory module in the secondary slot prior to removing and installing a memory module in the... primary slot, due to the unlocked position. Installing a memory module with this, please contact your computer completely using the Shut down . 5 If the battery ...
...on, begin at step 1; otherwise, skip to step 2. 1 Save your work, then shut down your Toshiba sales representative for a service professional to complete this procedure. Toshiba recommends installing a memory module in the secondary slot prior to removing and installing a memory module in the... primary slot, due to the unlocked position. Installing a memory module with this, please contact your computer completely using the Shut down . 5 If the battery ...
User Guide
Page 68
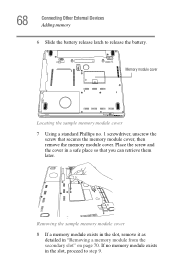
... it as detailed in "Removing a memory module from the secondary slot" on page 70. 68 Connecting Other External Devices Adding memory 6 Slide the battery release latch to release the battery. 2 1 Memory module cover Locating the sample memory module cover 7 Using a standard Phillips no memory module exists in the slot, proceed to step...
... it as detailed in "Removing a memory module from the secondary slot" on page 70. 68 Connecting Other External Devices Adding memory 6 Slide the battery release latch to release the battery. 2 1 Memory module cover Locating the sample memory module cover 7 Using a standard Phillips no memory module exists in the slot, proceed to step...
User Guide
Page 72
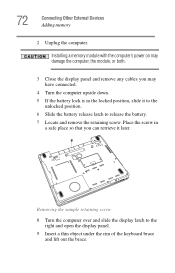
... panel and remove any cables you may have connected. 4 Turn the computer upside down. 5 If the battery lock is in a safe place so that you can retrieve it to the unlocked position. 6 Slide the battery release latch to the right and open the display panel. 9 Insert a thin object under the rim of... screw in the locked position, slide it later. 1 2 Removing the sample retaining screw 8 Turn the computer over and slide the display latch to release the battery. 7 Locate and remove the retaining screw.
... panel and remove any cables you may have connected. 4 Turn the computer upside down. 5 If the battery lock is in a safe place so that you can retrieve it to the unlocked position. 6 Slide the battery release latch to the right and open the display panel. 9 Insert a thin object under the rim of... screw in the locked position, slide it later. 1 2 Removing the sample retaining screw 8 Turn the computer over and slide the display latch to release the battery. 7 Locate and remove the retaining screw.
User Guide
Page 75
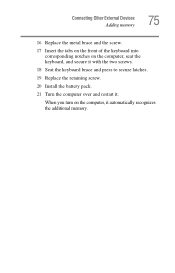
When you turn on the computer, seat the keyboard, and secure it with the two screws. 18 Seat the keyboard brace and press to secure latches. 19 Replace the retaining screw. 20 Install the battery pack. 21 Turn the computer over and restart it automatically recognizes the additional memory. Connecting Other External Devices Adding memory 75 16 Replace the metal brace and the screw. 17 Insert the tabs on the front of the keyboard into corresponding notches on the computer, it .
When you turn on the computer, seat the keyboard, and secure it with the two screws. 18 Seat the keyboard brace and press to secure latches. 19 Replace the retaining screw. 20 Install the battery pack. 21 Turn the computer over and restart it automatically recognizes the additional memory. Connecting Other External Devices Adding memory 75 16 Replace the metal brace and the screw. 17 Insert the tabs on the front of the keyboard into corresponding notches on the computer, it .
User Guide
Page 76
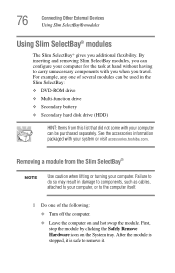
... your computer. Failure to do so may result in the Slim SelectBay: ❖ DVD-ROM drive ❖ Multi-function drive ❖ Secondary battery ❖ Secondary hard disk drive (HDD) HINT: Items from the Slim SelectBay® NOTE Use caution when lifting or turning your system or ...visit accessories.toshiba.com. By inserting and removing Slim SelectBay modules, you can configure your computer can be purchased separately. For example, any one of ...
... your computer. Failure to do so may result in the Slim SelectBay: ❖ DVD-ROM drive ❖ Multi-function drive ❖ Secondary battery ❖ Secondary hard disk drive (HDD) HINT: Items from the Slim SelectBay® NOTE Use caution when lifting or turning your system or ...visit accessories.toshiba.com. By inserting and removing Slim SelectBay modules, you can configure your computer can be purchased separately. For example, any one of ...

User Guide
Page 78
... can add additional hard drive space by changing the internal drive, or you may wish to release the battery. 7 Remove the screw on page 54. 2 Unplug the computer. See "Changing batteries" on page 129. 3 Close the display panel and remove any cables you can use hard drives with...upon the original hard drive installed in your computer completely using the Shut down . 5 If the battery lock is in the locked position, slide it to the unlocked position. 6 Slide the battery release latch to increase storage capacity by inserting a drive into the select bay module. Removing the sample...
... can add additional hard drive space by changing the internal drive, or you may wish to release the battery. 7 Remove the screw on page 54. 2 Unplug the computer. See "Changing batteries" on page 129. 3 Close the display panel and remove any cables you can use hard drives with...upon the original hard drive installed in your computer completely using the Shut down . 5 If the battery lock is in the locked position, slide it to the unlocked position. 6 Slide the battery release latch to increase storage capacity by inserting a drive into the select bay module. Removing the sample...
User Guide
Page 87
... media) on a regular basis. HINT: Some programs have an automatic-save feature that you can turn on page 99 for details. ❖ Back up your battery runs out of using goes down and you save it to reconnect, or your files to the hard disk at preset intervals. Label the backup...
... media) on a regular basis. HINT: Some programs have an automatic-save feature that you can turn on page 99 for details. ❖ Back up your battery runs out of using goes down and you save it to reconnect, or your files to the hard disk at preset intervals. Label the backup...
User Guide
Page 99
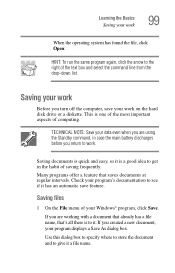
... has a file name, that saves documents at regular intervals. Many programs offer a feature that 's all there is a good idea to get in case the main battery discharges before you turn off the computer, save feature. HINT: To run the same program again, click the arrow to the right of saving frequently...
... has a file name, that saves documents at regular intervals. Many programs offer a feature that 's all there is a good idea to get in case the main battery discharges before you turn off the computer, save feature. HINT: To run the same program again, click the arrow to the right of saving frequently...

User Guide
Page 111
...of the computer's keyboard, speaker, and other openings. Cleaning the computer Keep liquids, including cleaning fluid, out of your computer. Ask your Toshiba dealer for suggestions for your computer 3 Slide the PC Card lock (located underneath the PC Card slots) to clean the computer. To keep... Cards in place. 4 Insert the cable's locking end into the security lock slot on cleaning and moving your computer's battery, see "Running the computer on battery power" on page 122. 111 Learning the Basics Caring for appropriate cleaning products. Sample locking the computer Caring for your ...
...of the computer's keyboard, speaker, and other openings. Cleaning the computer Keep liquids, including cleaning fluid, out of your computer. Ask your Toshiba dealer for suggestions for your computer 3 Slide the PC Card lock (located underneath the PC Card slots) to clean the computer. To keep... Cards in place. 4 Insert the cable's locking end into the security lock slot on cleaning and moving your computer's battery, see "Running the computer on battery power" on page 122. 111 Learning the Basics Caring for appropriate cleaning products. Sample locking the computer Caring for your ...
User Guide
Page 113
... your mind and decide to a domain server. For the Windows XP Professional operating system, follow these options to power down uses the most time and battery power. ❖ When starting up again, the computer runs a self-test and loads the operating system. The Shut Down Windows dialog box appears. Use the...
... your mind and decide to a domain server. For the Windows XP Professional operating system, follow these options to power down uses the most time and battery power. ❖ When starting up again, the computer runs a self-test and loads the operating system. The Shut Down Windows dialog box appears. Use the...


