
User Manual
Page 9
Introduction Contents Introduction SAFETY PRECAUTIONS 2 IMPORTANT SAFEGUARDS 3 Power source 5 Precautions 6 Notes and Informations 7 Contents 9 Identification of controls 10 Multi brand remote control 14 Connections Antenna connections 16 Cable TV connections 18 Connecting to a TV 20 Connecting to an audio equipment 24 Connecting to a USB Mass Storage ...
Introduction Contents Introduction SAFETY PRECAUTIONS 2 IMPORTANT SAFEGUARDS 3 Power source 5 Precautions 6 Notes and Informations 7 Contents 9 Identification of controls 10 Multi brand remote control 14 Connections Antenna connections 16 Cable TV connections 18 Connecting to a TV 20 Connecting to an audio equipment 24 Connecting to a USB Mass Storage ...

User Manual
Page 10
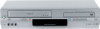
... "# 2I40301A-En_p02-13 10 21/3/06, 9:41 AM VCR/DVD mode selector button % OPEN/CLOSE button "% DVD mode indicator "% FWD button !# Cassette loading slot 34 Remote sensor ! Front panel ON/STANDBY button % REC button !' Introduction Identification of controls See the page in for details.
... "# 2I40301A-En_p02-13 10 21/3/06, 9:41 AM VCR/DVD mode selector button % OPEN/CLOSE button "% DVD mode indicator "% FWD button !# Cassette loading slot 34 Remote sensor ! Front panel ON/STANDBY button % REC button !' Introduction Identification of controls See the page in for details.
User Manual
Page 12
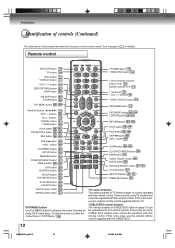
... DVD MENU button Use the MENU button to display the menu included on many DVD video discs. If this is the case, use the original remote control supplied with the TV. •CABLE BOX control buttons The various brands of controls (Continued) The instructions in for details. Introduction Identification of CABLE... listed on page 15 can be operated with the CABLE BOX. 12 2I40301A-En_p02-13 12 21/3/06, 9:42 AM See the page in this remote control. buttons 13 CANCEL button 31 CLEAR button 50 PLAY button 35 47 PAUSE/STILL button 36 48 REV button 35 49 SKIP button 49...
... DVD MENU button Use the MENU button to display the menu included on many DVD video discs. If this is the case, use the original remote control supplied with the TV. •CABLE BOX control buttons The various brands of controls (Continued) The instructions in for details. Introduction Identification of CABLE... listed on page 15 can be operated with the CABLE BOX. 12 2I40301A-En_p02-13 12 21/3/06, 9:42 AM See the page in this remote control. buttons 13 CANCEL button 31 CLEAR button 50 PLAY button 35 47 PAUSE/STILL button 36 48 REV button 35 49 SKIP button 49...
User Manual
Page 13
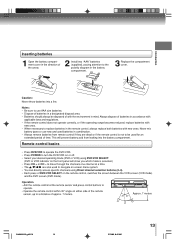
...of with the environment in mind. Caution: Never throw batteries into the battery compartment. Approx. 7 meters 2I40301A-En_p02-13 13 21/3/06, 9:42 AM 13 Remote control basics • Press DVD/VCR to operate the DVD/VCR. • Press POWER to turn the DVD/VCR on or off. • Select ...selected.) • Press CH + or CH - Introduction Inserting batteries 1 Open the battery compartment cover in the direction of DVD/VCR SELECT on the remote control, switches the screen between the VCR screen (VCR mode) and the DVD screen (DVD mode). This will show you which mode is not to ...
...of with the environment in mind. Caution: Never throw batteries into the battery compartment. Approx. 7 meters 2I40301A-En_p02-13 13 21/3/06, 9:42 AM 13 Remote control basics • Press DVD/VCR to operate the DVD/VCR. • Press POWER to turn the DVD/VCR on or off. • Select ...selected.) • Press CH + or CH - Introduction Inserting batteries 1 Open the battery compartment cover in the direction of DVD/VCR SELECT on the remote control, switches the screen between the VCR screen (VCR mode) and the DVD screen (DVD mode). This will show you which mode is not to ...
User Manual
Page 14
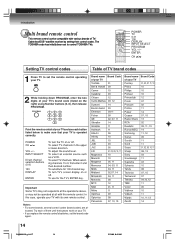
.... To use each of your TV's brand code (listed on or off . POWER TV 0-9 100 DISPLAY INPUT SELECT PROGRAM VOL +/- Point the remote control at all the operations above, or may not respond to 9, first enter 0 and then desired number. INPUT SELECT Direct channel selection buttons (0-9)..., 11,13 14 14 2I40301A-En_p14-17 14 21/3/06, 9:42 AM Try each button listed below to control TOSHIBA TVs. VOL +/- The TOSHIBA code has initially been set the remote control operating your TV is operated correctly. located. To substitute for the TV's ENTER key. Notes: • ...
.... To use each of your TV's brand code (listed on or off . POWER TV 0-9 100 DISPLAY INPUT SELECT PROGRAM VOL +/- Point the remote control at all the operations above, or may not respond to 9, first enter 0 and then desired number. INPUT SELECT Direct channel selection buttons (0-9)..., 11,13 14 14 2I40301A-En_p14-17 14 21/3/06, 9:42 AM Try each button listed below to control TOSHIBA TVs. VOL +/- The TOSHIBA code has initially been set the remote control operating your TV is operated correctly. located. To substitute for the TV's ENTER key. Notes: • ...

User Manual
Page 15
... to some brands, several control codes (brand codes) are al- Table of Cable box brand codes Brand name of your cable box Toshiba Anvision Archer Cablestar Cableview Citizen Curtis Diamond Eagle Eastern GC Brand Gemini General Instrument Hamlin Hitachi Jerrold Macom Magnavox Movietime NSC OAK OAK Sigma ...En_p14-17 15 21/3/06, 9:42 AM Introduction Setting Cable box/DSS® satellite receiver control codes 1 Press CABLE BOX to set the remote control operating your Cable box/DSS® satellite receiver. 2 While holding down PROGRAM, enter the two digits of your Cable box/DSS®...
... to some brands, several control codes (brand codes) are al- Table of Cable box brand codes Brand name of your cable box Toshiba Anvision Archer Cablestar Cableview Citizen Curtis Diamond Eagle Eastern GC Brand Gemini General Instrument Hamlin Hitachi Jerrold Macom Magnavox Movietime NSC OAK OAK Sigma ...En_p14-17 15 21/3/06, 9:42 AM Introduction Setting Cable box/DSS® satellite receiver control codes 1 Press CABLE BOX to set the remote control operating your Cable box/DSS® satellite receiver. 2 While holding down PROGRAM, enter the two digits of your Cable box/DSS®...
User Manual
Page 22
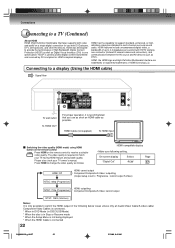
..., 9:42 AM Connections Connecting to a TV (Continued) About HDMI HDMI (High Definition Multimedia Interface) supports both video and audio on the remote control to receive a suitable video quality. Connecting to provide the technologies of High Bandwidth Digital Content Protection (HDCP) as well as follows:...signals), one specification. HDMI Cable (not supplied) To HDMI input Switching the video quality (HDMI mode) using HDMI button on the remote control Press HDMI on a single digital connection for use as short an HDMI cable as possible. HDMI has the capability to support standard...
..., 9:42 AM Connections Connecting to a TV (Continued) About HDMI HDMI (High Definition Multimedia Interface) supports both video and audio on the remote control to receive a suitable video quality. Connecting to provide the technologies of High Bandwidth Digital Content Protection (HDCP) as well as follows:...signals), one specification. HDMI Cable (not supplied) To HDMI input Switching the video quality (HDMI mode) using HDMI button on the remote control Press HDMI on a single digital connection for use as short an HDMI cable as possible. HDMI has the capability to support standard...
User Manual
Page 23
...jack/Component out jacks • VCR Mode The following refers to instructions for each output jack are performed using the "HDMI" key on the remote control. • When the HDMI Cable is connected, if the HDMI is pressed or the VCR Mode is switched to "Switching the video ...please see the following refers to instructions for Picture Output in the following table and differ depending on the remote control" ). • Refer to "Off" by pressing the HDMI button on the remote control. 3 Picture Output • DVD Mode The following instructions for HDMI output format are as almost ...
...jack/Component out jacks • VCR Mode The following refers to instructions for each output jack are performed using the "HDMI" key on the remote control. • When the HDMI Cable is connected, if the HDMI is pressed or the VCR Mode is switched to "Switching the video ...please see the following refers to instructions for Picture Output in the following table and differ depending on the remote control" ). • Refer to "Off" by pressing the HDMI button on the remote control. 3 Picture Output • DVD Mode The following instructions for HDMI output format are as almost ...
User Manual
Page 27
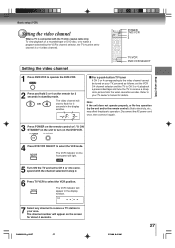
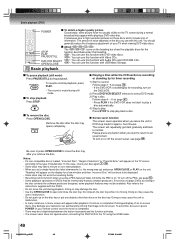
... 3 seconds in the display window. To view playback of a recorded tape or DVD disc, or to watch a program selected by the unit and/or the remote control): Static electricity, etc., may affect the player's operation. The VCR indicator on the DVD/VCR. 4 Press DVD/VCR SELECT to your area. Basic setup... to select the VCR position. Refer to select the VCR mode. Disconnect the AC power cord once, then connect it again. 3 Press POWER on the remote control or ON/ STANDBY on the unit to turn on the front panel will OR start to flash for details. The VCR indicator will appear...
... 3 seconds in the display window. To view playback of a recorded tape or DVD disc, or to watch a program selected by the unit and/or the remote control): Static electricity, etc., may affect the player's operation. The VCR indicator on the DVD/VCR. 4 Press DVD/VCR SELECT to your area. Basic setup... to select the VCR position. Refer to select the VCR mode. Disconnect the AC power cord once, then connect it again. 3 Press POWER on the remote control or ON/ STANDBY on the unit to turn on the front panel will OR start to flash for details. The VCR indicator will appear...
User Manual
Page 34
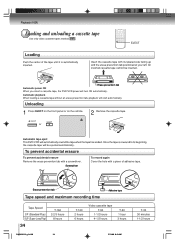
Unloading 1 Press EJECT on the front panel or on the remote. 2 Remove the cassette tape. Screwdriver To record again Cover the hole with its beginning, the cassette tape will automatically rewind the tape when the tape ...
Unloading 1 Press EJECT on the front panel or on the remote. 2 Remove the cassette tape. Screwdriver To record again Cover the hole with its beginning, the cassette tape will automatically rewind the tape when the tape ...

User Manual
Page 35
... (When loading a cassette tape without STOP), press PLAY. Notes: • This VCR selects the playback tape speed SP, LP or SLP au- " " will appear on remote control. To switch to play a prerecorded tape. neously. DVD/VCR Playback Preparation: • Turn ON the TV and select the corresponding video input. • Press...
... (When loading a cassette tape without STOP), press PLAY. Notes: • This VCR selects the playback tape speed SP, LP or SLP au- " " will appear on remote control. To switch to play a prerecorded tape. neously. DVD/VCR Playback Preparation: • Turn ON the TV and select the corresponding video input. • Press...
User Manual
Page 42
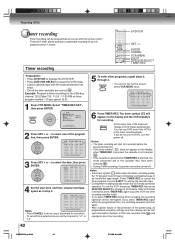
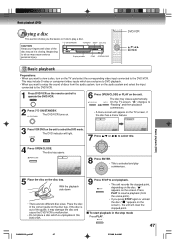
... to "L1" or "L2". 5 To enter other programs, repeat steps 2 through 4. • To return to select the VCR mode. • Load a cassette tape with the remote control. to VCR mode. Recording (VCR) Timer recording Timer recording can use DVD even if the VCR is in the timer recording mode. TSCSAIAYUHMMPSTESTOEREENTRMRUUEESPPCEETASUTEPT OONN...
... to "L1" or "L2". 5 To enter other programs, repeat steps 2 through 4. • To return to select the VCR mode. • Load a cassette tape with the remote control. to VCR mode. Recording (VCR) Timer recording Timer recording can use DVD even if the VCR is in the timer recording mode. TSCSAIAYUHMMPSTESTOEREENTRMRUUEESPPCEETASUTEPT OONN...
User Manual
Page 47
... the disc tray. The disc tray opens. 8 Press ENTER. • Title is closing. Press PLAY to resume playback (from the audio system, turn on the remote control to enjoy the sound of discs from the scene point). • If you the basics on the disc. The disc tray closes automatically. Place...
... the disc tray. The disc tray opens. 8 Press ENTER. • Title is closing. Press PLAY to resume playback (from the audio system, turn on the remote control to enjoy the sound of discs from the scene point). • If you the basics on the disc. The disc tray closes automatically. Place...
User Manual
Page 48
... open and close the disc tray after you leave the unit in DVD stop playback Press STOP. Follow steps 1~5 on -screen menu may damage your remote control once the movie is completed. • There may be a slight delay between the button is moving. The screen will appear after the disc tray...
... open and close the disc tray after you leave the unit in DVD stop playback Press STOP. Follow steps 1~5 on -screen menu may damage your remote control once the movie is completed. • There may be a slight delay between the button is moving. The screen will appear after the disc tray...
User Manual
Page 58
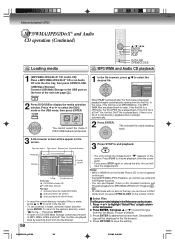
.../USB media is pressed after the file browser displayed, playback begins automatically starting from the scene point). • If you press OPEN/CLOSE on the remote control. If the first file is a JPEG file, the first JPEG file is played back. Press ENTER to resume playback (from the first file. Press...
.../USB media is pressed after the file browser displayed, playback begins automatically starting from the scene point). • If you press OPEN/CLOSE on the remote control. If the first file is a JPEG file, the first JPEG file is played back. Press ENTER to resume playback (from the first file. Press...

User Manual
Page 67
... recording level on DVD video disc. This makes it is played back. • When this function works, the volume might changed with AUDIO on the remote control ## . • This function works only when the disc recorded with a "QSound". It can also be output. On: Loud sound such as to achieve a suitable...
... recording level on DVD video disc. This makes it is played back. • When this function works, the volume might changed with AUDIO on the remote control ## . • This function works only when the disc recorded with a "QSound". It can also be output. On: Loud sound such as to achieve a suitable...
User Manual
Page 68
... D to select "Parental", then press ENTER. Press Number buttons (0-9) to activate Parental control setting. "No Disc" appears on the screen. 4) While holding 7 down on the remote control and at the same time press STOP on the screen. JPEG images is selected. 2I40301A-En_p60-69 68 21/3/06, 9:46 AM Notes: •...
... D to select "Parental", then press ENTER. Press Number buttons (0-9) to activate Parental control setting. "No Disc" appears on the screen. 4) While holding 7 down on the remote control and at the same time press STOP on the screen. JPEG images is selected. 2I40301A-En_p60-69 68 21/3/06, 9:46 AM Notes: •...
User Manual
Page 72
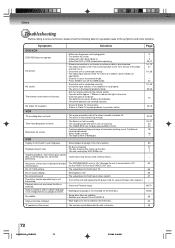
... up the disc. • The unit cannot play , etc. No 4:3 (16:9) picture. • The setup does not match your stereo system. The remote control does not function. • Make sure the power cord is plugged in. • Try another station. Replace the batteries. • Check the batteries ...proper language in the menu options. via the VIDEO OUT or the S-VIDEO OUT jack. The unit or remote operation key is in the Special playback mode. • Aim the remote control at the remote sensor. • Operate within Approx. 7 Meters or reduce the light in the room. • ...
... up the disc. • The unit cannot play , etc. No 4:3 (16:9) picture. • The setup does not match your stereo system. The remote control does not function. • Make sure the power cord is plugged in. • Try another station. Replace the batteries. • Check the batteries ...proper language in the menu options. via the VIDEO OUT or the S-VIDEO OUT jack. The unit or remote operation key is in the Special playback mode. • Aim the remote control at the remote sensor. • Operate within Approx. 7 Meters or reduce the light in the room. • ...
User Manual
Page 73
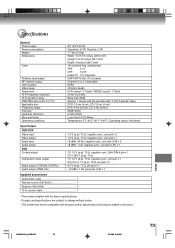
... Ω, negative sync., pin jack x 1 (PB)/(PR) 0.7 V (p-p), 75 Ω, pin jack x 2 0.5 V (p-p), 75 Ω, pin jack x 1 -12 dBm, 1 kΩ, pin jacks (L/R) x 1 Supplied accessories Audio/video cable 1 Remote control (SE-R0221 1 Batteries (R03/AAA 2 75 Ω coaxial cable 1 • This model complies with the above specifications. • Designs and specifications are subject to...
... Ω, negative sync., pin jack x 1 (PB)/(PR) 0.7 V (p-p), 75 Ω, pin jack x 2 0.5 V (p-p), 75 Ω, pin jack x 1 -12 dBm, 1 kΩ, pin jacks (L/R) x 1 Supplied accessories Audio/video cable 1 Remote control (SE-R0221 1 Batteries (R03/AAA 2 75 Ω coaxial cable 1 • This model complies with the above specifications. • Designs and specifications are subject to...

