User Manual
Page 6
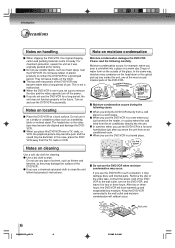
... will leave marks on the finish. Do not use the DVD/VCR when moisture condensation may become warm after you use the DVD/VCR occasionally. Wait! Notes on locating Place the DVD/VCR on cleaning Moisture condensation damages the DVD/VCR. Do not use the DVD/VCR for a prolonged period. Use a soft, dry cloth for... moisture. For maximum protection, repack the unit as they may be sure to clean the unit, follow that product's instructions. When the DVD/VCR is not a malfunction. Drops of water form on the outside of solvent, such as thinner and benzine, as it may condense on...
... will leave marks on the finish. Do not use the DVD/VCR when moisture condensation may become warm after you use the DVD/VCR occasionally. Wait! Notes on locating Place the DVD/VCR on cleaning Moisture condensation damages the DVD/VCR. Do not use the DVD/VCR for a prolonged period. Use a soft, dry cloth for... moisture. For maximum protection, repack the unit as they may be sure to clean the unit, follow that product's instructions. When the DVD/VCR is not a malfunction. Drops of water form on the outside of solvent, such as thinner and benzine, as it may condense on...
User Manual
Page 7
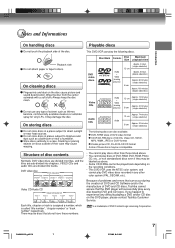
...a case. If you happen to moisture and dust such as a bathroom or near heat sources. This DVD/VCR can occur during the creation of DVD and CD Software and/or the manufacture of DVD Format/Logo Licensing Corporation. 2I40301A-En_p02-13 7 7 21/3/06, 9:41 AM Always keep the disc ...cannot be played back depending on this DVD player, please contact Toshiba Customer Service. Do not use any difficulty playing a DVD and/or CD disc on the recording conditions. • This DVD/VCR uses the NTSC color system, and cannot play every disc bearing DVD and CD logos. Wipe the disc ...
...a case. If you happen to moisture and dust such as a bathroom or near heat sources. This DVD/VCR can occur during the creation of DVD and CD Software and/or the manufacture of DVD Format/Logo Licensing Corporation. 2I40301A-En_p02-13 7 7 21/3/06, 9:41 AM Always keep the disc ...cannot be played back depending on this DVD player, please contact Toshiba Customer Service. Do not use any difficulty playing a DVD and/or CD disc on the recording conditions. • This DVD/VCR uses the NTSC color system, and cannot play every disc bearing DVD and CD logos. Wipe the disc ...

User Manual
Page 8
..., this symbol may appear on types of the disc when the STOP ( ) button is not available for the equipment shown in the DVD/ VCR. Reverse engineering or disassembly is the abbreviation of Playback Control.) You can enjoy two playback variations depending on the TV screen during playback. ...artifacts to stop the playback of copyright message of discs. • Video CD not equipped with some equipment. This is protected by the DVD/ VCR or the disc. Notes on this product and may subject you can be played on copyright The unauthorized recording, use, distribution, or ...
..., this symbol may appear on types of the disc when the STOP ( ) button is not available for the equipment shown in the DVD/ VCR. Reverse engineering or disassembly is the abbreviation of Playback Control.) You can enjoy two playback variations depending on the TV screen during playback. ...artifacts to stop the playback of copyright message of discs. • Video CD not equipped with some equipment. This is protected by the DVD/ VCR or the disc. Notes on this product and may subject you can be played on copyright The unauthorized recording, use, distribution, or ...

User Manual
Page 10
... protect it from dust intrusion. VCR/DVD mode selector button % OPEN/CLOSE button "% DVD mode indicator "% FWD button !# Cassette loading slot 34 Remote sensor ! DVD S-VIDEO OUT jack HDMI OUT jack DVD/VCR common AUDIO (L/R)/VIDEO OUT jacks ANT IN jack $ AC power cord # 10 DVD AUDIO (L/R) DVD COMPONENT OUT jacks OUT jacks DVD OPTICAL DIGITAL AUDIO OUT jack...
... protect it from dust intrusion. VCR/DVD mode selector button % OPEN/CLOSE button "% DVD mode indicator "% FWD button !# Cassette loading slot 34 Remote sensor ! DVD S-VIDEO OUT jack HDMI OUT jack DVD/VCR common AUDIO (L/R)/VIDEO OUT jacks ANT IN jack $ AC power cord # 10 DVD AUDIO (L/R) DVD COMPONENT OUT jacks OUT jacks DVD OPTICAL DIGITAL AUDIO OUT jack...
User Manual
Page 12
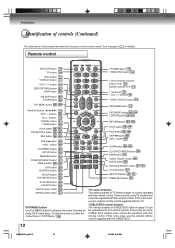
... 38 HDMI button 22 AUDIO SELECT button 44 AUDIO button 55 DVD/VCR SELECT button 27 47 TV/VCR button 27 REC/OTR button 39 41 TIMER REC button 42 DVD/USB button 58 A-B RPT button 52 EJECT button (VCR) 34 OPEN/CLOSE (DVD) 47 DVD MENU button Use the MENU button to display the menu included... remote control. If this is the case, use the original remote control supplied with this manual describe the functions on the remote control. Remote control DVD/VCR button 13 * TV button 14 * POWER button 13 CABLE BOX button 15 CALL button 11 * DISPLAY button 11 * CH / button 14 ZERO RETURN button 37...
... 38 HDMI button 22 AUDIO SELECT button 44 AUDIO button 55 DVD/VCR SELECT button 27 47 TV/VCR button 27 REC/OTR button 39 41 TIMER REC button 42 DVD/USB button 58 A-B RPT button 52 EJECT button (VCR) 34 OPEN/CLOSE (DVD) 47 DVD MENU button Use the MENU button to display the menu included... remote control. If this is the case, use the original remote control supplied with this manual describe the functions on the remote control. Remote control DVD/VCR button 13 * TV button 14 * POWER button 13 CABLE BOX button 15 CALL button 11 * DISPLAY button 11 * CH / button 14 ZERO RETURN button 37...
User Manual
Page 13
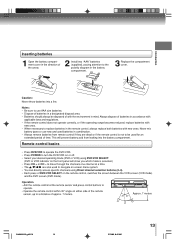
... in a designated disposal area. • Batteries should always be used to navigate on-screen menu system. • You can directly access specific channels using DVD/VCR SELECT. (DVD or VCR indicator on either side of the remote sensor, up to a distance of approx. 7 meters. Caution: Never throw batteries into the battery compartment. Always dispose...
... in a designated disposal area. • Batteries should always be used to navigate on-screen menu system. • You can directly access specific channels using DVD/VCR SELECT. (DVD or VCR indicator on either side of the remote sensor, up to a distance of approx. 7 meters. Caution: Never throw batteries into the battery compartment. Always dispose...
User Manual
Page 16
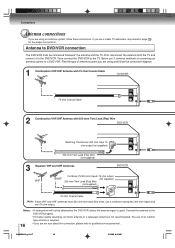
... output. Then connect the DVD/VCR to the DVD/VCR. If you are not sure about the connection, please refer to page & for the proper connections. Connect the antenna to a DVD/VCR. Antenna to DVD/VCR connection The DVD/VCR must be obtained by the DVD/VCR unless the antenna signal is... required. 16 • If you are 3 common methods of connecting an antenna system to the DVD/VCR properly. • For better quality recording,...
... output. Then connect the DVD/VCR to the DVD/VCR. If you are not sure about the connection, please refer to page & for the proper connections. Connect the antenna to a DVD/VCR. Antenna to DVD/VCR connection The DVD/VCR must be obtained by the DVD/VCR unless the antenna signal is... required. 16 • If you are 3 common methods of connecting an antenna system to the DVD/VCR properly. • For better quality recording,...
User Manual
Page 17
... type of connecting your TV has separate VHF and UHF antenna inputs (numbers 2 and 3 below), use a splitter to connect the DVD/VCR to the TV for connection to the "TV" mode. This DVD/VCR has a single 75 ohm output for VHF and UHF reception. 75 ohm Coaxial Cable (supplied) TV VHF/UHF IN Note...: If a VHF or UHF antenna is used, set the TV/CABLE menu option to the "TV" mode. If your DVD/VCR to a TV. TV with 300 ohm UHF and 300 ohm VHF antenna inputs 2I40301A-En_p14-17 17 21/3/06, 9:42 AM 17 TV with single...
... type of connecting your TV has separate VHF and UHF antenna inputs (numbers 2 and 3 below), use a splitter to connect the DVD/VCR to the TV for connection to the "TV" mode. This DVD/VCR has a single 75 ohm output for VHF and UHF reception. 75 ohm Coaxial Cable (supplied) TV VHF/UHF IN Note...: If a VHF or UHF antenna is used, set the TV/CABLE menu option to the "TV" mode. If your DVD/VCR to a TV. TV with 300 ohm UHF and 300 ohm VHF antenna inputs 2I40301A-En_p14-17 17 21/3/06, 9:42 AM 17 TV with single...
User Manual
Page 18
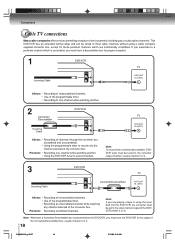
... Recording of nonscrambled channels. * Use of the programmable timer. * Recording of one channel while watching another . 2 Converter/ Descrambler Incoming Cable DVD/VCR TV VHF/UHF IN (ANT) Allows: * Recording of channels through the converter box (scrambled and unscrambled). * Using the programmable timer to ... Note: If you are intentionally scrambled. Note: To record from converter/descrambler, DVD/ VCR tuner must be tuned to most cable channels without using the tuner built into the DVD/VCR, the converter must be tuned to the video channel output of the programmable timer...
... Recording of nonscrambled channels. * Use of the programmable timer. * Recording of one channel while watching another . 2 Converter/ Descrambler Incoming Cable DVD/VCR TV VHF/UHF IN (ANT) Allows: * Recording of channels through the converter box (scrambled and unscrambled). * Using the programmable timer to ... Note: If you are intentionally scrambled. Note: To record from converter/descrambler, DVD/ VCR tuner must be tuned to most cable channels without using the tuner built into the DVD/VCR, the converter must be tuned to the video channel output of the programmable timer...
User Manual
Page 19
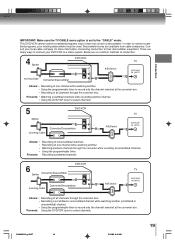
...TV VHF/UHF IN (ANT) Allows: * Recording of one channel while watching another. * Using the programmable timer to select channels. 5 Splitter DVD/VCR Incoming Cable Converter/Descrambler A/B Switch A B TV VHF/UHF IN (ANT) Allows: * Recording of nonscrambled channels. * Recording of all channels ...timer to select channels. 2I40301A-En_p18-27 19 21/3/06, 9:42 AM 19 Prevents: Recording scrambled channels. 6 Splitter Converter/Descrambler DVD/VCR Converter/Descrambler Incoming Cable A/B Switch A B TV VHF/UHF IN (ANT) Allows: * Recording of all channels through the converter ...
...TV VHF/UHF IN (ANT) Allows: * Recording of one channel while watching another. * Using the programmable timer to select channels. 5 Splitter DVD/VCR Incoming Cable Converter/Descrambler A/B Switch A B TV VHF/UHF IN (ANT) Allows: * Recording of nonscrambled channels. * Recording of all channels ...timer to select channels. 2I40301A-En_p18-27 19 21/3/06, 9:42 AM 19 Prevents: Recording scrambled channels. 6 Splitter Converter/Descrambler DVD/VCR Converter/Descrambler Incoming Cable A/B Switch A B TV VHF/UHF IN (ANT) Allows: * Recording of all channels through the converter ...
User Manual
Page 20
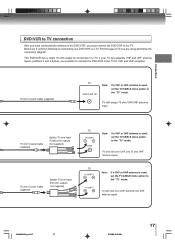
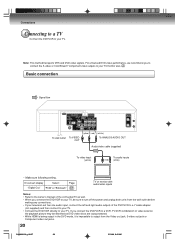
... out jack, S-video out jack or Component video out jacks. 20 2I40301A-En_p18-27 20 21/3/06, 9:42 AM If you connect the DVD/VCR to a VCR, TV/VCR combination or video selector, the playback picture may be sure to turn off the power and unplug both units from the wall outlet before...; When you to connect the S-video or ColorStream® component video outputs to your TV. Note: This method transports VHS and DVD-video signals. Connections Connecting to a TV Connect the DVD/VCR to your TV/monitor also. Basic connection Signal flow To wall outlet To VIDEO OUT (yellow) (red) (white) To ...
... out jack, S-video out jack or Component video out jacks. 20 2I40301A-En_p18-27 20 21/3/06, 9:42 AM If you connect the DVD/VCR to a VCR, TV/VCR combination or video selector, the playback picture may be sure to turn off the power and unplug both units from the wall outlet before...; When you to connect the S-video or ColorStream® component video outputs to your TV. Note: This method transports VHS and DVD-video signals. Connections Connecting to a TV Connect the DVD/VCR to your TV/monitor also. Basic connection Signal flow To wall outlet To VIDEO OUT (yellow) (red) (white) To ...
User Manual
Page 21
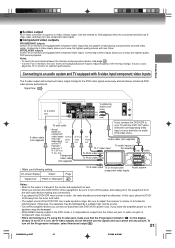
... Out" "PCM" or "Bitstream" $% Notes: • Refer to the owner's manual of the connected equipment as well. • When you place the DVD/VCR near a tuner or radio, the radio broadcast sound might be sure to a TV using the S-video jack, make sure that are equipped with component video...television has SVideo input, and does not have component video inputs. Use this case, place the DVD/ VCR away from the wall outlet before you connect the DVD/VCR to your TV with the DVD OUT jacks, select the corresponding video input on your television to view the highest quality pictures ...
... Out" "PCM" or "Bitstream" $% Notes: • Refer to the owner's manual of the connected equipment as well. • When you place the DVD/VCR near a tuner or radio, the radio broadcast sound might be sure to a TV using the S-video jack, make sure that are equipped with component video...television has SVideo input, and does not have component video inputs. Use this case, place the DVD/ VCR away from the wall outlet before you connect the DVD/VCR to your TV with the DVD OUT jacks, select the corresponding video input on your television to view the highest quality pictures ...
User Manual
Page 23
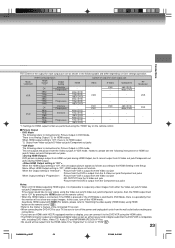
... output images. USER setting/operation Mode VCR/DVD VCR DVD HDMI Output *1 Off 480p 720p 1080i 480p 720p 1080i Off 480p 720p 1080i 480p 720p 1080i Output Setting Interlace Progressive Interlace Progressive Interlace Progressive Interlace Progressive HDMI - 480p (DVD) 720p (DVD) 1080i (DVD) 480p (DVD) 720p (DVD) 1080i (DVD) - 480p (DVD) 720p (DVD) 1080i (DVD) 480p (DVD) 720p (DVD) 1080i (DVD) Content of output for HDMI...
... output images. USER setting/operation Mode VCR/DVD VCR DVD HDMI Output *1 Off 480p 720p 1080i 480p 720p 1080i Off 480p 720p 1080i 480p 720p 1080i Output Setting Interlace Progressive Interlace Progressive Interlace Progressive Interlace Progressive HDMI - 480p (DVD) 720p (DVD) 1080i (DVD) 480p (DVD) 720p (DVD) 1080i (DVD) - 480p (DVD) 720p (DVD) 1080i (DVD) 480p (DVD) 720p (DVD) 1080i (DVD) Content of output for HDMI...
User Manual
Page 24
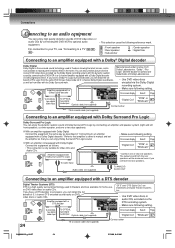
... Connect the equipment the same way as follows. • This connection is now available to reproduce this dynamic realistic sound by connecting the DVD/VCR to optional audio equipment. With an amplifier equipped with Dolby Surround Pro Logic To audio input "Digital Out" "PCM" or $% "Bitstream... You can enjoy high quality dynamic sounds of DVD video discs or audio CDs by connecting the DVD/VCR to a 6 channel amplifier equipped with a DTS decoder "DTS" and "DTS Digital Out" are trademarks of Dolby Laboratories. • Use DVD video discs encoded via the Dolby Digital recording ...
... Connect the equipment the same way as follows. • This connection is now available to reproduce this dynamic realistic sound by connecting the DVD/VCR to optional audio equipment. With an amplifier equipped with Dolby Surround Pro Logic To audio input "Digital Out" "PCM" or $% "Bitstream... You can enjoy high quality dynamic sounds of DVD video discs or audio CDs by connecting the DVD/VCR to a 6 channel amplifier equipped with a DTS decoder "DTS" and "DTS Digital Out" are trademarks of Dolby Laboratories. • Use DVD video discs encoded via the Dolby Digital recording ...
User Manual
Page 25
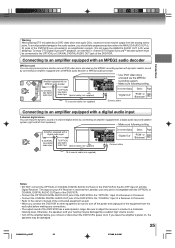
... Connect either 75 Ω coaxial cable (not supplied) Notes: • DO NOT connect the OPTICAL or COAXIAL DIGITAL AUDIO OUT jack of the DVD/VCR to the OPTICAL or COAXIAL DIGITAL AUDIO OUT jack of 2 channel digital stereo by connecting an amplifier equipped with a digital audio input To COAXIAL type... from the wall outlet before making any connections. • The output sound of the connected equipment as well. • When you connect the DVD/VCR to other equipment, be damaged by a sudden high volume sound. • Turn off the power and unplug all of the equipment from the ...
... Connect either 75 Ω coaxial cable (not supplied) Notes: • DO NOT connect the OPTICAL or COAXIAL DIGITAL AUDIO OUT jack of the DVD/VCR to the OPTICAL or COAXIAL DIGITAL AUDIO OUT jack of 2 channel digital stereo by connecting an amplifier equipped with a digital audio input To COAXIAL type... from the wall outlet before making any connections. • The output sound of the connected equipment as well. • When you connect the DVD/VCR to other equipment, be damaged by a sudden high volume sound. • Turn off the power and unplug all of the equipment from the ...
User Manual
Page 27
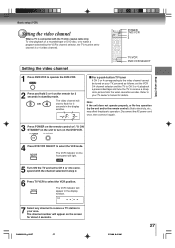
...the remote control): Static electricity, etc., may affect the player's operation. TV/VCR DVD/VCR SELECT For a push-button TV tuner If CH 3 or 4 corresponding to the video channel cannot be set the VCR 3/4 channel selector and the TV to CH 3 or 4, playback a prerecorded ...the TV to select the VCR mode. The VCR indicator on the remote for details. The VCR indicator will appear on the DVD/VCR. 4 Press DVD/VCR SELECT to receive a sharp color picture from the video cassette recorder. POWER DVD/VCR 3 4 Setting the video channel 1 Press DVD/VCR to operate the DVD/VCR. 2 Press and hold...
...the remote control): Static electricity, etc., may affect the player's operation. TV/VCR DVD/VCR SELECT For a push-button TV tuner If CH 3 or 4 corresponding to the video channel cannot be set the VCR 3/4 channel selector and the TV to CH 3 or 4, playback a prerecorded ...the TV to select the VCR mode. The VCR indicator on the remote for details. The VCR indicator will appear on the DVD/VCR. 4 Press DVD/VCR SELECT to receive a sharp color picture from the video cassette recorder. POWER DVD/VCR 3 4 Setting the video channel 1 Press DVD/VCR to operate the DVD/VCR. 2 Press and hold...
User Manual
Page 28
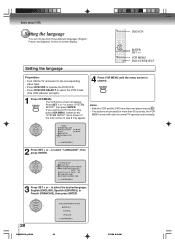
... of the "SYSTEM SETUP" menu screen of the main screen in step 2 may appear. 4 Press VCR MENU until the menu screen is cleared. Setting the language DVD/VCR ENTER SET +/- If you use the unit for the on-screen display. SYSTEM SETUP CLOCK SET LANGUAGE/IDIOMA... no buttons are pressed for more than 60 seconds, the VCR MENU screen will appear. VCR MENU DVD/VCR SELECT Preparation: • Turn ON the TV and select to the corresponding video input. • Press DVD/VCR to operate the DVD/VCR. • Press DVD/VCR SELECT to select the desired language: English (ENGLISH), Spanish ...
... of the "SYSTEM SETUP" menu screen of the main screen in step 2 may appear. 4 Press VCR MENU until the menu screen is cleared. Setting the language DVD/VCR ENTER SET +/- If you use the unit for the on-screen display. SYSTEM SETUP CLOCK SET LANGUAGE/IDIOMA... no buttons are pressed for more than 60 seconds, the VCR MENU screen will appear. VCR MENU DVD/VCR SELECT Preparation: • Turn ON the TV and select to the corresponding video input. • Press DVD/VCR to operate the DVD/VCR. • Press DVD/VCR SELECT to select the desired language: English (ENGLISH), Spanish ...

User Manual
Page 29
...Set the clock manually ! . 29 2I40301A-En_p28-33 29 21/3/06, 9:43 AM POWER DVD/VCR CALL ENTER SET +/- The DVD/VCR searches for the clock to the AC outlet. 3 Make sure the DVD/VCR is not good. TSCSAIAYUHMMPSTESTOEREENTRMRUUEESPPCEETASUTEPT OONN OOFFFF +/Ð/ENTER/MENU 2 Press SET + or - SYSTEM...; Turn ON the TV and select the corresponding video input. • Press DVD/VCR to operate the DVD/VCR. • Press DVD/VCR SELECT to select the VCR mode. (The VCR indicator will take approx. VCR MENU DVD/VCR SELECT AUTO CLOCK setting To set AUTO CLOCK to off . • Depending...
...Set the clock manually ! . 29 2I40301A-En_p28-33 29 21/3/06, 9:43 AM POWER DVD/VCR CALL ENTER SET +/- The DVD/VCR searches for the clock to the AC outlet. 3 Make sure the DVD/VCR is not good. TSCSAIAYUHMMPSTESTOEREENTRMRUUEESPPCEETASUTEPT OONN OOFFFF +/Ð/ENTER/MENU 2 Press SET + or - SYSTEM...; Turn ON the TV and select the corresponding video input. • Press DVD/VCR to operate the DVD/VCR. • Press DVD/VCR SELECT to select the VCR mode. (The VCR indicator will take approx. VCR MENU DVD/VCR SELECT AUTO CLOCK setting To set AUTO CLOCK to off . • Depending...
User Manual
Page 30
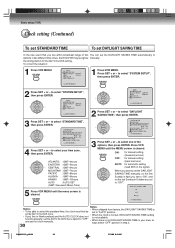
... (back one of two You can set the DAYLIGHT SAVING TIME automatically or stations in two different time zones, the DVD/VCR may recognize manually. To correct the situation: 1 Press VCR MENU. to select "DAYLIGHT SAVING TIME", then press ENTER. 3 Press SET + or - ATLANTIC : GMT-4hours...clock is not set, DAYLIGHT SAVING TIME setting is not available. • When there is cleared. TSCSAIAYUHMMPSTESTOEREENTRMRUUEESPPCEETASUTEPT OONN OOFFFF 1 Press VCR MENU. SYSTEM SETUP CLOCK SET LANGUAGE/IDIOMA/LANGUE NO NOISE BACKGROUND ON OFF AUTO CLOCK ON OFF STANDARD TIME DAYLIGHT SAVING TIME &#...
... (back one of two You can set the DAYLIGHT SAVING TIME automatically or stations in two different time zones, the DVD/VCR may recognize manually. To correct the situation: 1 Press VCR MENU. to select "DAYLIGHT SAVING TIME", then press ENTER. 3 Press SET + or - ATLANTIC : GMT-4hours...clock is not set, DAYLIGHT SAVING TIME setting is not available. • When there is cleared. TSCSAIAYUHMMPSTESTOEREENTRMRUUEESPPCEETASUTEPT OONN OOFFFF 1 Press VCR MENU. SYSTEM SETUP CLOCK SET LANGUAGE/IDIOMA/LANGUE NO NOISE BACKGROUND ON OFF AUTO CLOCK ON OFF STANDARD TIME DAYLIGHT SAVING TIME &#...
User Manual
Page 32
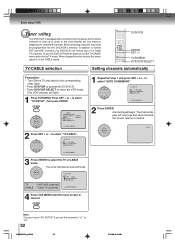
...;+/-/ENTER/MENU 〉 TSCSAIAYUHMMPSTESTOEREENTRMRUUEESPPCEETASUTEPT OONN OOFFFF +/Ð/ENTER/MENU 2 Press SET + or - In addition to normal VHF and UHF channels, this DVD/VCR can 't select "CH SETUP" if you set the channel to "L1" or "L2". 32 2I40301A-En_p28-33 32 21/3/06, 9:43 ... Setting channels automatically Preparation: • Turn ON the TV and select to the corresponding video input. • Press DVD/VCR to operate the DVD/VCR. • Press DVD/VCR SELECT to the next channel set the TV/CABLE menu option to select "AUTO CH MEMORY". CH SETUP AUTTOVCHCMAEBMLEORY ADD/...
...;+/-/ENTER/MENU 〉 TSCSAIAYUHMMPSTESTOEREENTRMRUUEESPPCEETASUTEPT OONN OOFFFF +/Ð/ENTER/MENU 2 Press SET + or - In addition to normal VHF and UHF channels, this DVD/VCR can 't select "CH SETUP" if you set the channel to "L1" or "L2". 32 2I40301A-En_p28-33 32 21/3/06, 9:43 ... Setting channels automatically Preparation: • Turn ON the TV and select to the corresponding video input. • Press DVD/VCR to operate the DVD/VCR. • Press DVD/VCR SELECT to the next channel set the TV/CABLE menu option to select "AUTO CH MEMORY". CH SETUP AUTTOVCHCMAEBMLEORY ADD/...

