

Owners Manual
Page 1
DIGITAL VIDEO DVD VIDEO PLAYER & VIDEO CASSETTE RECORDER SD-V396SU OWNER'S MANUAL Introduction 2 Connections 14 Basic setup 22 Playback (VCR) 29 Recording (VCR) 34 Other functions (VCR) 39 Basic playback (DVD) 42 Advanced playback 45 (DVD) Function setup (DVD) 55 Others 67 ©2004 Toshiba Corporation This device does not tape-record copy protected DVD Video Discs. 2C53601A (E)COV 1 3/10/04, 11:30
DIGITAL VIDEO DVD VIDEO PLAYER & VIDEO CASSETTE RECORDER SD-V396SU OWNER'S MANUAL Introduction 2 Connections 14 Basic setup 22 Playback (VCR) 29 Recording (VCR) 34 Other functions (VCR) 39 Basic playback (DVD) 42 Advanced playback 45 (DVD) Function setup (DVD) 55 Others 67 ©2004 Toshiba Corporation This device does not tape-record copy protected DVD Video Discs. 2C53601A (E)COV 1 3/10/04, 11:30

Owners Manual
Page 4
..., 11:30 c. d. REPLACEMENT PARTS When replacement parts are covered by a qualified technician to restore the unit to keep from the wall outlet. Read the owner's manual of liquid into the unit. When the power-supply cord or plug is left unattended and unused for service. 19. If the unit has been...
..., 11:30 c. d. REPLACEMENT PARTS When replacement parts are covered by a qualified technician to restore the unit to keep from the wall outlet. Read the owner's manual of liquid into the unit. When the power-supply cord or plug is left unattended and unused for service. 19. If the unit has been...

Owners Manual
Page 8
This is not a defect in this owner's manual may appear on this DVD/VCR in any other color system (PAL, SECAM, etc.). 8 2C53601A (E)p02-13 8 3/10/04, 11:30 This DVD/VCR can ... (double sided disc) 8 cm Approx. 80 minutes (single sided disc) Approx. 160 minutes (double sided disc) Notes on discs (continued) About this owner's manual Playable discs This owner's manual explains the basic instructions of this DVD/VCR. A " " means that the operation is the abbreviation of Playback Control.) You can enjoy two playback...
This is not a defect in this owner's manual may appear on this DVD/VCR in any other color system (PAL, SECAM, etc.). 8 2C53601A (E)p02-13 8 3/10/04, 11:30 This DVD/VCR can ... (double sided disc) 8 cm Approx. 80 minutes (single sided disc) Approx. 160 minutes (double sided disc) Notes on discs (continued) About this owner's manual Playable discs This owner's manual explains the basic instructions of this DVD/VCR. A " " means that the operation is the abbreviation of Playback Control.) You can enjoy two playback...

Owners Manual
Page 12
... ZERO RETURN JUMP MARKER TOP MENU RETURN VCR MENU SETUP SET + MENU CM SKIP ZOOM CH - Introduction Identification of Controls (continued) The instructions in this manual describe the functions on many DVD video discs. button 33 SKIP button 44 FWD button 30 STOP button 30 PAUSE/STILL button 31 TOP MENU...
... ZERO RETURN JUMP MARKER TOP MENU RETURN VCR MENU SETUP SET + MENU CM SKIP ZOOM CH - Introduction Identification of Controls (continued) The instructions in this manual describe the functions on many DVD video discs. button 33 SKIP button 44 FWD button 30 STOP button 30 PAUSE/STILL button 31 TOP MENU...
Owners Manual
Page 18
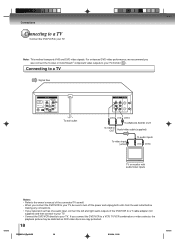
.../video cable (supplied) To video input (yellow) To audio inputs (red) (white) TV or monitor with audio/video inputs Notes: • Refer to the owner's manual of the DVD/VCR to a Y cable adapter (not supplied) and then connect to your TV. • Connect the DVD/VCR directly to your TV, be...
.../video cable (supplied) To video input (yellow) To audio inputs (red) (white) TV or monitor with audio/video inputs Notes: • Refer to the owner's manual of the DVD/VCR to a Y cable adapter (not supplied) and then connect to your TV. • Connect the DVD/VCR directly to your TV, be...

Owners Manual
Page 19
... (not supplied) If you connect the DVD/VCR to your TV with ColorStream® component video inputs Audio system Notes: • Refer to the owner's manual of the connected equipment as well. • When you connect the DVD/VCR to other equipment, be sure to turn off the power and unplug...
... (not supplied) If you connect the DVD/VCR to your TV with ColorStream® component video inputs Audio system Notes: • Refer to the owner's manual of the connected equipment as well. • When you connect the DVD/VCR to other equipment, be sure to turn off the power and unplug...
Owners Manual
Page 20
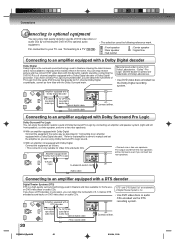
... the rear speakers will be monaural even if you will obtain the full benefit of Pro Logic from the same DVD movies that amplifier's owner's manual and set the amplifier so you can obtain the full benefit of 5.1 channel DTS encoded sound tracks on DVD video discs or audio CDs. Amplifier...
... the rear speakers will be monaural even if you will obtain the full benefit of Pro Logic from the same DVD movies that amplifier's owner's manual and set the amplifier so you can obtain the full benefit of 5.1 channel DTS encoded sound tracks on DVD video discs or audio CDs. Amplifier...

Owners Manual
Page 21
... turn off the amplifier before you should take proper precautions when the ANALOG AUDIO OUT (L/R) jacks of the DVD/VCR are connected to the owner's manual of the connected equipment as well. • When you leave the amplifier power on your A/V Receiver is reserved for Laserdisc use only and is incompatible...
... turn off the amplifier before you should take proper precautions when the ANALOG AUDIO OUT (L/R) jacks of the DVD/VCR are connected to the owner's manual of the connected equipment as well. • When you leave the amplifier power on your A/V Receiver is reserved for Laserdisc use only and is incompatible...

Owners Manual
Page 22
... correspond with the 75 ohm coaxial cable only. POWER 3 4 TV/VCR VCR DVD Setting the video channel 1 Press and hold 3 or 4 on your TV owner's manual for details. VCR DVD The VCR indicator on the front panel will start to select the VCR position. To view playback of a recorded tape or...
... correspond with the 75 ohm coaxial cable only. POWER 3 4 TV/VCR VCR DVD Setting the video channel 1 Press and hold 3 or 4 on your TV owner's manual for details. VCR DVD The VCR indicator on the front panel will start to select the VCR position. To view playback of a recorded tape or...

Owners Manual
Page 24
... is connected to an Antenna or Cable system and it is set to "OFF", the AUTO CLOCK adjustment does not function. • Set the clock manually 26 . 2C53601A (E)p18-25 24 3/10/04, 11:31
... is connected to an Antenna or Cable system and it is set to "OFF", the AUTO CLOCK adjustment does not function. • Set the clock manually 26 . 2C53601A (E)p18-25 24 3/10/04, 11:31

Owners Manual
Page 25
...- to select "DAYLIGHT SAVING TIME", then press ENTER. to select "SYSTEM SETUP", then press ENTER. SET + ENTER SET - function properly, set the clock manually. 25 2C53601A (E)p18-25 25 3/10/04, 11:31 Basic setup To set STANDARD TIME To set DAYLIGHT SAVING TIME In the rare event that... standard time, the clock must first be • When the clock is not set, DAYLIGHT SAVING TIME setting set the DAYLIGHT SAVING TIME automatically or manually. 1 Press VCR MENU. CH - DAYLIGHT SAVING TIME ON OFF AUTO á+/-/ENTER/MENU ñ Notes: • When shipped from factory, the DAYLIGHT...
...- to select "DAYLIGHT SAVING TIME", then press ENTER. to select "SYSTEM SETUP", then press ENTER. SET + ENTER SET - function properly, set the clock manually. 25 2C53601A (E)p18-25 25 3/10/04, 11:31 Basic setup To set STANDARD TIME To set DAYLIGHT SAVING TIME In the rare event that... standard time, the clock must first be • When the clock is not set, DAYLIGHT SAVING TIME setting set the DAYLIGHT SAVING TIME automatically or manually. 1 Press VCR MENU. CH - DAYLIGHT SAVING TIME ON OFF AUTO á+/-/ENTER/MENU ñ Notes: • When shipped from factory, the DAYLIGHT...

Owners Manual
Page 26
CH - Note: After a power failure or disconnection of the power, the timer settings will be lost. SET + ENTER SET - Manual clock setting 1 2-4 CANCEL 2-4 EXAMPLE: Setting the clock to set the month, then press ENTER. In this case, reset the present time. 4 Press ...DAYLIGHT SAVING TIME á+/-/ENTER/MENU ñ To make corrections any time during the process Press CANCEL repeatedly until the item you must set them manually for timer recording and DAYLIGHT SAVING TIME. to change blinks, then press SET + or -. SET + ENTER SET - Basic setup Clock setting...
CH - Note: After a power failure or disconnection of the power, the timer settings will be lost. SET + ENTER SET - Manual clock setting 1 2-4 CANCEL 2-4 EXAMPLE: Setting the clock to set the month, then press ENTER. In this case, reset the present time. 4 Press ...DAYLIGHT SAVING TIME á+/-/ENTER/MENU ñ To make corrections any time during the process Press CANCEL repeatedly until the item you must set them manually for timer recording and DAYLIGHT SAVING TIME. to change blinks, then press SET + or -. SET + ENTER SET - Basic setup Clock setting...
Owners Manual
Page 31
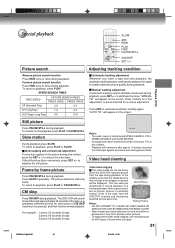
... coarse adjustment. Press ATR to stabilize the still picture. Picture search Reverse picture search function Press REW once or twice during playback. "MANUAL TR." This is the case, have the DVD/VCR checked and cleaned by frame. Discard worn out tapes. 31 2C53601A (E)p26-31 ...service personnel. To return to produce clear pictures. • To help prevent video head clogging, use only good quality VHS tapes. Manual tracking adjustment If automatic tracking cannot eliminate noises well during pause mode. Playback (VCR) Special playback SLOW ATR REW PLAY FWD PAUSE...
... coarse adjustment. Press ATR to stabilize the still picture. Picture search Reverse picture search function Press REW once or twice during playback. "MANUAL TR." This is the case, have the DVD/VCR checked and cleaned by frame. Discard worn out tapes. 31 2C53601A (E)p26-31 ...service personnel. To return to produce clear pictures. • To help prevent video head clogging, use only good quality VHS tapes. Manual tracking adjustment If automatic tracking cannot eliminate noises well during pause mode. Playback (VCR) Special playback SLOW ATR REW PLAY FWD PAUSE...

Owners Manual
Page 68
Set to VIDEO (or equivalent). • Channel is set to a TV into two parts. Try Manual tracking adjustment. • Video heads are dirty. • The tape is in the Special playback mode. • Aim the remote control at the remote sensor. &#...
Set to VIDEO (or equivalent). • Channel is set to a TV into two parts. Try Manual tracking adjustment. • Video heads are dirty. • The tape is in the Special playback mode. • Aim the remote control at the remote sensor. &#...


