User Guide
Page 33
... Slim SelectBay 157 Removing a module from the Slim SelectBay .158 Inserting a module into the Slim SelectBay.....159 Chapter 5: Toshiba Utilities 160 Fn-esse 161 Starting Fn-esse 161 Assigning a key to a program or document ....162 Viewing existing key ...169 Hotkey utility 171 TOSHIBA Hardware Setup 171 TOSHIBA Mobile Extension 173 TOSHIBA Accessibility 175 TOSHIBA CD/DVD Drive Acoustic Silencer .....176 TOSHIBA Button Controls Utility 177 TOSHIBA Rotation Utility 177 Cross Menu Utility 180 TOSHIBA Tablet Access Code Utility 182 TOSHIBA Zooming Utility 183 TOSHIBA SD Memory Boot ...
... Slim SelectBay 157 Removing a module from the Slim SelectBay .158 Inserting a module into the Slim SelectBay.....159 Chapter 5: Toshiba Utilities 160 Fn-esse 161 Starting Fn-esse 161 Assigning a key to a program or document ....162 Viewing existing key ...169 Hotkey utility 171 TOSHIBA Hardware Setup 171 TOSHIBA Mobile Extension 173 TOSHIBA Accessibility 175 TOSHIBA CD/DVD Drive Acoustic Silencer .....176 TOSHIBA Button Controls Utility 177 TOSHIBA Rotation Utility 177 Cross Menu Utility 180 TOSHIBA Tablet Access Code Utility 182 TOSHIBA Zooming Utility 183 TOSHIBA SD Memory Boot ...
User Guide
Page 73
...battery light glows green, the battery is set to 800 x 600. The Windows® XP Tablet PC Edition operating system uses the Shut down command to power down the computer. Press the Cross-Functional button to make your system settings to the hard disk so that when you turn on the...modes if the resolution is fully charged. Guidelines for 3 seconds, and then move over to the display icon. Press and hold the Cross-Functional button for powering off the computer 73 TECHNICAL NOTE: You can change from primary landscape to secondary landscape mode or visa versa using it for a longer...
...battery light glows green, the battery is set to 800 x 600. The Windows® XP Tablet PC Edition operating system uses the Shut down command to power down the computer. Press the Cross-Functional button to make your system settings to the hard disk so that when you turn on the...modes if the resolution is fully charged. Guidelines for 3 seconds, and then move over to the display icon. Press and hold the Cross-Functional button for powering off the computer 73 TECHNICAL NOTE: You can change from primary landscape to secondary landscape mode or visa versa using it for a longer...

User Guide
Page 130
...customize your virtual workspace. Its icons provide shortcuts to an empty space in the taskbar and click the secondary button. Open applications also have Forward and Backward buttons to display ❖ Desktop style-how windows are doing. Then click Properties. You can set up your ...desktop With the Windows® Professional Tablet Edition operating system you work . Bringing the world to your desktop with complete ...
...customize your virtual workspace. Its icons provide shortcuts to an empty space in the taskbar and click the secondary button. Open applications also have Forward and Backward buttons to display ❖ Desktop style-how windows are doing. Then click Properties. You can set up your ...desktop With the Windows® Professional Tablet Edition operating system you work . Bringing the world to your desktop with complete ...
User Guide
Page 139
... a dialup connection. To avoid this delay, you are at work or from a remote location. If the computer is Windows® XP Tablet PC Edition, you can connect your network administrator for the telephone number of its communication ports. Connecting your computer to a network You can connect... Control Panel. 2 Click Performance and Maintenance. 3 Click the System icon and select the Hardware tab, then select the Device Manager button. 139 Exploring Your Computer's Features Setting up for communications Now you can configure the Windows® operating system to disable the LAN port.
... a dialup connection. To avoid this delay, you are at work or from a remote location. If the computer is Windows® XP Tablet PC Edition, you can connect your network administrator for the telephone number of its communication ports. Connecting your computer to a network You can connect... Control Panel. 2 Click Performance and Maintenance. 3 Click the System icon and select the Hardware tab, then select the Device Manager button. 139 Exploring Your Computer's Features Setting up for communications Now you can configure the Windows® operating system to disable the LAN port.
User Guide
Page 148
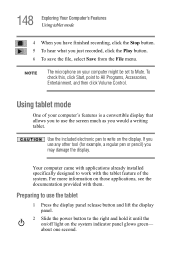
...designed to use the screen much as you to work with them. Using tablet mode One of the system. 148 Exploring Your Computer's Features Using tablet mode 4 When you have finished recording, click the Stop button. 5 To hear what you may damage the display. For more information on...example, a regular pen or pencil) you just recorded, click the Play button. 6 To save the file, select Save from the File menu. NOTE The microphone on those applications, see the documentation provided with the tablet feature of your computer might be set to All Programs, Accessories, Entertainment...
...designed to use the screen much as you to work with them. Using tablet mode One of the system. 148 Exploring Your Computer's Features Using tablet mode 4 When you have finished recording, click the Stop button. 5 To hear what you may damage the display. For more information on...example, a regular pen or pencil) you just recorded, click the Play button. 6 To save the file, select Save from the File menu. NOTE The microphone on those applications, see the documentation provided with the tablet feature of your computer might be set to All Programs, Accessories, Entertainment...

User Guide
Page 150
... information on changing tablet screen settings, see "TOSHIBA Rotation Utility" on an external monitor in primary landscape mode. NOTE You should view video on page 177. 6 To send the video to primary portrait view. 150 Exploring Your Computer's Features Using tablet mode Display Latch Sample... the display panel down flat By default, the computer desktop will display the external video resolution incorrectly. Using the Toshiba tablet pen 1 Remove the Toshiba tablet pen which is located on the right side of the computer by momentarily pressing and then releasing. Any other orientation...
... information on changing tablet screen settings, see "TOSHIBA Rotation Utility" on an external monitor in primary landscape mode. NOTE You should view video on page 177. 6 To send the video to primary portrait view. 150 Exploring Your Computer's Features Using tablet mode Display Latch Sample... the display panel down flat By default, the computer desktop will display the external video resolution incorrectly. Using the Toshiba tablet pen 1 Remove the Toshiba tablet pen which is located on the right side of the computer by momentarily pressing and then releasing. Any other orientation...

User Guide
Page 152
...the same manner you complete this task, the screen returns to another location on the tablet, press the Toshiba tablet pen on the left side of the computer. 2 Press the display latch release button. 3 Lift the display panel to its new location. Returning the computer to its ...original configuration When you would : ❖ To move the pointing icon (or cursor) on the tablet, lightly drag the Toshiba tablet pen across the tablet. ❖ To click a button, gently press the Toshiba tablet pen on the right side of the computer provides an extremely fast data transfer rate.
...the same manner you complete this task, the screen returns to another location on the tablet, press the Toshiba tablet pen on the left side of the computer. 2 Press the display latch release button. 3 Lift the display panel to its new location. Returning the computer to its ...original configuration When you would : ❖ To move the pointing icon (or cursor) on the tablet, lightly drag the Toshiba tablet pen across the tablet. ❖ To click a button, gently press the Toshiba tablet pen on the right side of the computer provides an extremely fast data transfer rate.
User Guide
Page 167
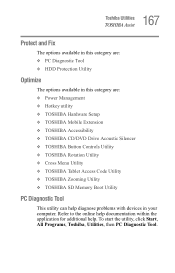
... category are: ❖ Power Management ❖ Hotkey utility ❖ TOSHIBA Hardware Setup ❖ TOSHIBA Mobile Extension ❖ TOSHIBA Accessibility ❖ TOSHIBA CD/DVD Drive Acoustic Silencer ❖ TOSHIBA Button Controls Utility ❖ TOSHIBA Rotation Utility ❖ Cross Menu Utility ❖ TOSHIBA Tablet Access Code Utility ❖ TOSHIBA Zooming Utility ❖ TOSHIBA SD Memory Boot Utility PC Diagnostic Tool This utility can...
... category are: ❖ Power Management ❖ Hotkey utility ❖ TOSHIBA Hardware Setup ❖ TOSHIBA Mobile Extension ❖ TOSHIBA Accessibility ❖ TOSHIBA CD/DVD Drive Acoustic Silencer ❖ TOSHIBA Button Controls Utility ❖ TOSHIBA Rotation Utility ❖ Cross Menu Utility ❖ TOSHIBA Tablet Access Code Utility ❖ TOSHIBA Zooming Utility ❖ TOSHIBA SD Memory Boot Utility PC Diagnostic Tool This utility can...
User Guide
Page 177
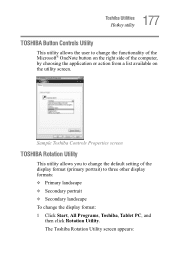
... right side of the display format (primary portrait) to change the display format: 1 Click Start, All Programs, Toshiba, Tablet PC, and then click Rotation Utility. The Toshiba Rotation Utility screen appears: 177 Toshiba Utilities Hotkey utility TOSHIBA Button Controls Utility This utility allows the user to three other display formats: ❖ Primary landscape ❖ Secondary portrait...
... right side of the display format (primary portrait) to change the display format: 1 Click Start, All Programs, Toshiba, Tablet PC, and then click Rotation Utility. The Toshiba Rotation Utility screen appears: 177 Toshiba Utilities Hotkey utility TOSHIBA Button Controls Utility This utility allows the user to three other display formats: ❖ Primary landscape ❖ Secondary portrait...

User Guide
Page 178
NOTE Toshiba recommends that you use the Toshiba Rotation Utility to change screen rotation options and settings for either PC mode or Tablet PC mode. 3 Click OK. landscape or portrait. NOTE The Escape key, located between the Cross-Functional button and the Windows Security button on the front of the display can "lock" the display in its current display setting - 178 Toshiba Utilities Hotkey utility Sample Toshiba Rotation Utility screen 2 Select a new display format for the tablet feature Tablet and Pen Settings.
NOTE Toshiba recommends that you use the Toshiba Rotation Utility to change screen rotation options and settings for either PC mode or Tablet PC mode. 3 Click OK. landscape or portrait. NOTE The Escape key, located between the Cross-Functional button and the Windows Security button on the front of the display can "lock" the display in its current display setting - 178 Toshiba Utilities Hotkey utility Sample Toshiba Rotation Utility screen 2 Select a new display format for the tablet feature Tablet and Pen Settings.
User Guide
Page 179
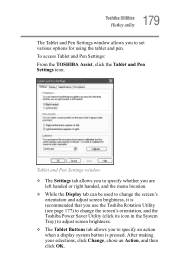
...pen. After making your selections, click Change, chose an Action, and then click OK. To access Tablet and Pen Settings: From the TOSHIBA Assist, click the Tablet and Pen Settings icon. Tablet and Pen Settings window ❖ The Settings tab allows you to specify whether you are left handed...screen brightness, it is recommended that you use the Toshiba Rotation Utility (see page 177) to change the screen's orientation, and the Toshiba Power Saver Utility (click its icon in the System Tray) to adjust screen brightness. ❖ The Tablet Buttons tab allows you to specify an action when a...
...pen. After making your selections, click Change, chose an Action, and then click OK. To access Tablet and Pen Settings: From the TOSHIBA Assist, click the Tablet and Pen Settings icon. Tablet and Pen Settings window ❖ The Settings tab allows you to specify whether you are left handed...screen brightness, it is recommended that you use the Toshiba Rotation Utility (see page 177) to change the screen's orientation, and the Toshiba Power Saver Utility (click its icon in the System Tray) to adjust screen brightness. ❖ The Tablet Buttons tab allows you to specify an action when a...

User Guide
Page 180
180 Toshiba Utilities Hotkey utility Tablet and Pen Settings Tablet Buttons tab ❖ The Pen Options tab allows you to make Hot Key assignments to set various pen options. Cross Menu Utility The Cross Menu Utility allows you to launch applications, access Toshiba utilities, or create your selections on the Tablet and Pen Settings window, click OK. To start the Cross Menu Utility: 1 Press and hold the Cross-Functional button for two seconds until the following screen displays. After making your own custom menus.
180 Toshiba Utilities Hotkey utility Tablet and Pen Settings Tablet Buttons tab ❖ The Pen Options tab allows you to make Hot Key assignments to set various pen options. Cross Menu Utility The Cross Menu Utility allows you to launch applications, access Toshiba utilities, or create your selections on the Tablet and Pen Settings window, click OK. To start the Cross Menu Utility: 1 Press and hold the Cross-Functional button for two seconds until the following screen displays. After making your own custom menus.

User Guide
Page 181
The Cross Menu Setting window appears. Creating a New Menu NOTE You can add up or down to five menus. To create a new menu: 1 Click Start, All Programs, Toshiba, Tablet PC, and then Cross Menu. 181 Toshiba Utilities Hotkey utility Sample Cross Menu Utility screen 2 Move the Cross-Functional button up to select a menu. 3 To select an item in a menu, move the Cross-Functional button left or right until the icon is highlighted, then press the Cross-Functional button.
The Cross Menu Setting window appears. Creating a New Menu NOTE You can add up or down to five menus. To create a new menu: 1 Click Start, All Programs, Toshiba, Tablet PC, and then Cross Menu. 181 Toshiba Utilities Hotkey utility Sample Cross Menu Utility screen 2 Move the Cross-Functional button up to select a menu. 3 To select an item in a menu, move the Cross-Functional button left or right until the icon is highlighted, then press the Cross-Functional button.
User Guide
Page 295
...installing drivers 155 using 155 using in Hibernation mode 156, 157 using in Standby mode 156, 157 Search Engine 144 secondary control button 56 security password 186 setting hard disk drive passwords 189 setting up computer 46, 59 Shut down using 100 Shut down command...key 175 stored data protection 2 T taskbar customizing 130 toolbars displaying in a window 135 Toshiba Internet Web sites 238 registering computer 48 worldwide offices 238 TOSHIBA Assist 165 Toshiba Hardware Setup 171, 179 Toshiba tablet pen 150 TouchPad disabling 56 enabling 56 using 55, 56 traveling tips 128 troubleshooting DVD...
...installing drivers 155 using 155 using in Hibernation mode 156, 157 using in Standby mode 156, 157 Search Engine 144 secondary control button 56 security password 186 setting hard disk drive passwords 189 setting up computer 46, 59 Shut down using 100 Shut down command...key 175 stored data protection 2 T taskbar customizing 130 toolbars displaying in a window 135 Toshiba Internet Web sites 238 registering computer 48 worldwide offices 238 TOSHIBA Assist 165 Toshiba Hardware Setup 171, 179 Toshiba tablet pen 150 TouchPad disabling 56 enabling 56 using 55, 56 traveling tips 128 troubleshooting DVD...


