User Guide
Page 27
... for the first time 52 Opening the display panel 52 Your computer's features and specifications ....53 Turning on the power 54 Adding memory (optional 55 Installing a memory module 56 Removing a memory module 61 Using an external keyboard 63 Using a mouse 63 Connecting a printer 64 Setting up a printer 65 Using the optional external USB...
... for the first time 52 Opening the display panel 52 Your computer's features and specifications ....53 Turning on the power 54 Adding memory (optional 55 Installing a memory module 56 Removing a memory module 61 Using an external keyboard 63 Using a mouse 63 Connecting a printer 64 Setting up a printer 65 Using the optional external USB...
User Guide
Page 30
... 146 Using the Bridge Media Adapter Slot 146 Inserting memory media 147 Removing memory media 147 Using QosmioPlayer 149 Using the Media Control Buttons 150 Playing an audio CD 150 Playing a DVD 151 Watching television 153 Toshiba Qosmio Remote Control 154 Installing the QosmioPlayer Recovery media ........159...Signal Source When You Have an Existing Setup 163 Starting the Media Center 165 Using Media Center 172 Using the Toshiba Qosmio Remote Control with Media Center 174 Watching Television Programs 181 Selecting a Program from the TV Guide..........182 Watching a Recorded TV ...
... 146 Using the Bridge Media Adapter Slot 146 Inserting memory media 147 Removing memory media 147 Using QosmioPlayer 149 Using the Media Control Buttons 150 Playing an audio CD 150 Playing a DVD 151 Watching television 153 Toshiba Qosmio Remote Control 154 Installing the QosmioPlayer Recovery media ........159...Signal Source When You Have an Existing Setup 163 Starting the Media Center 165 Using Media Center 172 Using the Toshiba Qosmio Remote Control with Media Center 174 Watching Television Programs 181 Selecting a Program from the TV Guide..........182 Watching a Recorded TV ...
User Guide
Page 32
... Viewing existing key assignments 225 Changing or removing existing key assignments 226 Hotkey Utility 226 TOSHIBA Assist 227 Connect 228 Secure 228 Protect & Fix 229 Optimize 229 SD Memory Card Format 230 PC Diagnostic Tool 231 Power Management 231 Power Usage Profiles 232 Quickly... creating a new power mode 233 Customizing a power mode 233 Mouse Utility 233 Accessing TOSHIBA HW Setup 234 TOSHIBA Zooming Utility 235 TOSHIBA Picture Enhancement Utility 236...
... Viewing existing key assignments 225 Changing or removing existing key assignments 226 Hotkey Utility 226 TOSHIBA Assist 227 Connect 228 Secure 228 Protect & Fix 229 Optimize 229 SD Memory Card Format 230 PC Diagnostic Tool 231 Power Management 231 Power Usage Profiles 232 Quickly... creating a new power mode 233 Customizing a power mode 233 Mouse Utility 233 Accessing TOSHIBA HW Setup 234 TOSHIBA Zooming Utility 235 TOSHIBA Picture Enhancement Utility 236...
User Guide
Page 34
... conflict 289 A plan of action 289 Resolving hardware conflicts on your own .....290 Fixing a problem with Device Manager ...........291 Memory problems 293 Power and the batteries 294 Keyboard problems 296 Display problems 297 Disk drive problems 299 DVD-ROM or multi-function ... Data and system configuration backup in Windows XP 316 If you need further assistance 322 Before you contact Toshiba 322 Contacting Toshiba 323 Other Toshiba Internet Web sites 324 Toshiba's worldwide offices 324 Appendix A: Hot Keys 326 Volume Mute 326 Password security 327 Without a password 327...
... conflict 289 A plan of action 289 Resolving hardware conflicts on your own .....290 Fixing a problem with Device Manager ...........291 Memory problems 293 Power and the batteries 294 Keyboard problems 296 Display problems 297 Disk drive problems 299 DVD-ROM or multi-function ... Data and system configuration backup in Windows XP 316 If you need further assistance 322 Before you contact Toshiba 322 Contacting Toshiba 323 Other Toshiba Internet Web sites 324 Toshiba's worldwide offices 324 Appendix A: Hot Keys 326 Volume Mute 326 Password security 327 Without a password 327...

User Guide
Page 45
... . The cooling fan may have a CPU cooling fan that cools the CPU by creating a vacuum. To register your computer online or to , a mouse, keyboard, printer, memory, and PC Cards.
... . The cooling fan may have a CPU cooling fan that cools the CPU by creating a vacuum. To register your computer online or to , a mouse, keyboard, printer, memory, and PC Cards.
User Guide
Page 47
... under this limited Warranty. Registering your computer restarts automatically. Customer failure to the Toshiba Web site at that time, you click the final screen, your computer with Toshiba 47 6 Follow the remaining screen prompts to : ❖ Add more memory (see "Adding memory (optional)" on page 55) ❖ Connect a mouse (see "Using a ... you opt not to the Internet via your software" on page 64) Once you can be connected to register at www.register.toshiba.com. See "Setting up process of your software. Adding external devices NOTE Before adding external devices...
... under this limited Warranty. Registering your computer restarts automatically. Customer failure to the Toshiba Web site at that time, you click the final screen, your computer with Toshiba 47 6 Follow the remaining screen prompts to : ❖ Add more memory (see "Adding memory (optional)" on page 55) ❖ Connect a mouse (see "Using a ... you opt not to the Internet via your software" on page 64) Once you can be connected to register at www.register.toshiba.com. See "Setting up process of your software. Adding external devices NOTE Before adding external devices...

User Guide
Page 55
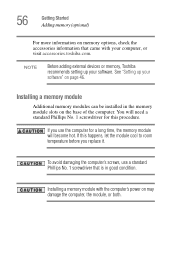
...accessories information packaged with enough memory to increase the computer's memory if you install or remove a memory module while the computer is in Standby or Hibernation mode, data will be lost. Your computer comes with your system or visit accessories.toshiba.com. If you use complex... software or process large amounts of today's popular applications. Getting Started Adding memory (optional) 55 Sample turning on the power The preinstalled operating system loads ...
...accessories information packaged with enough memory to increase the computer's memory if you install or remove a memory module while the computer is in Standby or Hibernation mode, data will be lost. Your computer comes with your system or visit accessories.toshiba.com. If you use complex... software or process large amounts of today's popular applications. Getting Started Adding memory (optional) 55 Sample turning on the power The preinstalled operating system loads ...
User Guide
Page 56
NOTE Before adding external devices or memory, Toshiba recommends setting up your software. Installing a memory module Additional memory modules can be installed in good condition. To avoid damaging the computer's screws, use the computer for this happens, let the ... the computer's power on may damage the computer, the module, or both. Installing a memory module with your computer, or visit accessories.toshiba.com. You will need a standard Phillips No. 1 screwdriver for a long time, the memory module will become hot. See "Setting up your software" on page 46. If you...
NOTE Before adding external devices or memory, Toshiba recommends setting up your software. Installing a memory module Additional memory modules can be installed in good condition. To avoid damaging the computer's screws, use the computer for this happens, let the ... the computer's power on may damage the computer, the module, or both. Installing a memory module with your computer, or visit accessories.toshiba.com. You will need a standard Phillips No. 1 screwdriver for a long time, the memory module will become hot. See "Setting up your software" on page 46. If you...

User Guide
Page 57
...3 Unplug and remove any cables connected to step 3. 1 If the computer is on , begin at step 1; Before you install or remove a memory module while the computer is on , click Start, Turn off computer window appears. 2 Click Turn Off. If the computer is in Standby or ..., including the AC adapter. 4 Remove the battery. You can install one or two memory modules. Getting Started Adding memory (optional) 57 The computer has two memory module slots - Memory module slot cover Front of computer Sample locating the memory module slot cover The Turn off computer. Slot A and Slot B.
...3 Unplug and remove any cables connected to step 3. 1 If the computer is on , begin at step 1; Before you install or remove a memory module while the computer is on , click Start, Turn off computer window appears. 2 Click Turn Off. If the computer is in Standby or ..., including the AC adapter. 4 Remove the battery. You can install one or two memory modules. Getting Started Adding memory (optional) 57 The computer has two memory module slots - Memory module slot cover Front of computer Sample locating the memory module slot cover The Turn off computer. Slot A and Slot B.

User Guide
Page 58
...a safe place so that secures the memory module slot cover. 7 Remove the memory slot cover. 58 Getting Started Adding memory (optional) 6 Using a standard Phillips No. 1 screwdriver, loosen the captive screw that you can damage the memory module. To avoid damaging the memory module, be careful not to discharge ... you insert into the computer. 9 Remove the new memory module from its pin connector on the side you may cause memory access problems. Static electricity can retrieve it later. Avoid touching the connectors on the memory module or on the connectors may have built up. ...
...a safe place so that secures the memory module slot cover. 7 Remove the memory slot cover. 58 Getting Started Adding memory (optional) 6 Using a standard Phillips No. 1 screwdriver, loosen the captive screw that you can damage the memory module. To avoid damaging the memory module, be careful not to discharge ... you insert into the computer. 9 Remove the new memory module from its pin connector on the side you may cause memory access problems. Static electricity can retrieve it later. Avoid touching the connectors on the memory module or on the connectors may have built up. ...
User Guide
Page 59
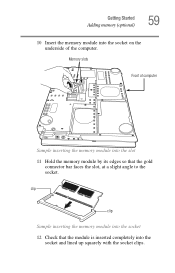
Memory slots Front of the computer. clip clip Sample inserting the memory module into the socket 12 Check that the module is inserted completely into the slot 11 Hold the memory module by its edges so that the gold connector bar faces the slot, at a slight angle to the socket. Getting Started Adding memory (optional) 59 10 Insert the memory module into the socket on the underside of computer Sample inserting the memory module into the socket and lined up squarely with the socket clips.
Memory slots Front of the computer. clip clip Sample inserting the memory module into the socket 12 Check that the module is inserted completely into the slot 11 Hold the memory module by its edges so that the gold connector bar faces the slot, at a slight angle to the socket. Getting Started Adding memory (optional) 59 10 Insert the memory module into the socket on the underside of computer Sample inserting the memory module into the socket and lined up squarely with the socket clips.

User Guide
Page 60
...slot cover and tighten the screw. 15 Re-insert the battery. 60 Getting Started Adding memory (optional) Sample aligning the module into the socket 13 Gently press down on either side of the memory module snap into the socket and level when secured in place. For more information on ...inserting the battery, see "Changing the main battery" on the memory module connector until the clips snap into position. The clips on the memory module Do not force the memory module into place. clip clip Sample pressing down on page 119. 16 Turn the computer ...
...slot cover and tighten the screw. 15 Re-insert the battery. 60 Getting Started Adding memory (optional) Sample aligning the module into the socket 13 Gently press down on either side of the memory module snap into the socket and level when secured in place. For more information on ...inserting the battery, see "Changing the main battery" on the memory module connector until the clips snap into position. The clips on the memory module Do not force the memory module into place. clip clip Sample pressing down on page 119. 16 Turn the computer ...
User Guide
Page 61
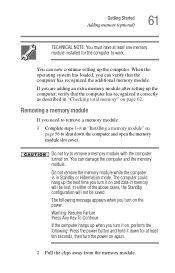
...the computer hangs up the computer. Do not try to work. Do not remove the memory module while the computer is in memory will not be lost. You can now continue setting up when you turn it on... The following : Press the power button and hold it down the computer and open the memory module slot cover. You can verify that the computer has recognized it on and data in... mode. In either of the above cases, the Standby configuration will be saved. Getting Started Adding memory (optional) 61 TECHNICAL NOTE: You must have at least ten seconds, then turn the power on again. ...
...the computer hangs up the computer. Do not try to work. Do not remove the memory module while the computer is in memory will not be lost. You can now continue setting up when you turn it on... The following : Press the power button and hold it down the computer and open the memory module slot cover. You can verify that the computer has recognized it on and data in... mode. In either of the above cases, the Standby configuration will be saved. Getting Started Adding memory (optional) 61 TECHNICAL NOTE: You must have at least ten seconds, then turn the power on again. ...
User Guide
Page 62
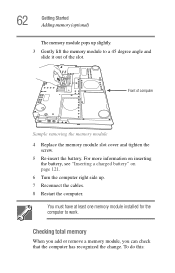
... slot cover and tighten the screw. 5 Re-insert the battery. 62 Getting Started Adding memory (optional) The memory module pops up . 7 Reconnect the cables. 8 Restart the computer. Checking total memory When you add or remove a memory module, you can check that the computer has recognized the change. Front of the slot. To do this...
... slot cover and tighten the screw. 5 Re-insert the battery. 62 Getting Started Adding memory (optional) The memory module pops up . 7 Reconnect the cables. 8 Restart the computer. Checking total memory When you add or remove a memory module, you can check that the computer has recognized the change. Front of the slot. To do this...
User Guide
Page 63
... an external keyboard If you prefer to use a mouse instead of the screen. If the computer does not recognize the memory configuration, turn off the computer, remove the memory slot cover, and check that the module is USB-compatible. Getting Started Using an external keyboard 63 1 Click Start, Control... Panel, Performance and Maintenance, and then System. 2 The General tab view automatically appears and shows total memory. Using a mouse You may move to use a full-size keyboard, you can attach an external mouse to one to its original position.
... an external keyboard If you prefer to use a mouse instead of the screen. If the computer does not recognize the memory configuration, turn off the computer, remove the memory slot cover, and check that the module is USB-compatible. Getting Started Using an external keyboard 63 1 Click Start, Control... Panel, Performance and Maintenance, and then System. 2 The General tab view automatically appears and shows total memory. Using a mouse You may move to use a full-size keyboard, you can attach an external mouse to one to its original position.

User Guide
Page 76
... on the hard disk, no main battery power. ❖ Because the state of the system is being retrieved from the hard disk rather than from memory, restarting from Hibernation takes a little more time and consumes more main battery power to start up again, Hibernation takes less time and consumes less main...
... on the hard disk, no main battery power. ❖ Because the state of the system is being retrieved from the hard disk rather than from memory, restarting from Hibernation takes a little more time and consumes more main battery power to start up again, Hibernation takes less time and consumes less main...
User Guide
Page 77
... configuring Hibernation mode" on placing your computer into a powersaving mode. For information on page 80. Standby holds the current state of the computer in system memory (RAM) so that, when you restart the computer, you can continue working from turning off the computer or using Hibernation mode. ❖ When starting up...
... configuring Hibernation mode" on placing your computer into a powersaving mode. For information on page 80. Standby holds the current state of the computer in system memory (RAM) so that, when you restart the computer, you can continue working from turning off the computer or using Hibernation mode. ❖ When starting up...
User Guide
Page 86
... of charge while you when the battery is running low. Your computer can activate. You will lose all unsaved work temporarily stays in the computer's memory until you save feature that you can be configured to the hard disk at preset intervals. See "Setting battery alarms" on page 115. Chapter 2 Learning...
... of charge while you when the battery is running low. Your computer can activate. You will lose all unsaved work temporarily stays in the computer's memory until you save feature that you can be configured to the hard disk at preset intervals. See "Setting battery alarms" on page 115. Chapter 2 Learning...
User Guide
Page 109
...AC power source, you travel and need to a configuration that stores your computer). Power management Your computer ships with setup changes, contact Toshiba's Global Support Centre. For assistance with the power management options preset to work for up to the main battery, you . TECHNICAL NOTE:...turned off . If you may purchase a battery module for both AC power and battery modes. The RTC battery powers the RTC memory that will provide the most stable operating environment and optimum system performance for use the preset configuration. 109 Mobile Computing Running the computer...
...AC power source, you travel and need to a configuration that stores your computer). Power management Your computer ships with setup changes, contact Toshiba's Global Support Centre. For assistance with the power management options preset to work for up to the main battery, you . TECHNICAL NOTE:...turned off . If you may purchase a battery module for both AC power and battery modes. The RTC battery powers the RTC memory that will provide the most stable operating environment and optimum system performance for use the preset configuration. 109 Mobile Computing Running the computer...
User Guide
Page 111
... NOTE The above error message may display the incorrect time and date, or stop working. The RTC battery powers the System Time Clock and BIOS memory used to a month when the computer is powered off even when the AC adapter is low, the real-time clock and calendar may vary by...
... NOTE The above error message may display the incorrect time and date, or stop working. The RTC battery powers the System Time Clock and BIOS memory used to a month when the computer is powered off even when the AC adapter is low, the real-time clock and calendar may vary by...


