

User Guide
Page 27
...in the United States and/or other countries. Adobe and Photoshop are either registered trademarks or trademarks of Synaptics, Inc. Memory Stick, Memory Stick PRO, and i.LINK are trademarks or registered trademarks of such marks by the Bluetooth SIG, Inc. Bluetooth word mark... xD-Picture Card is a trademark of Microsoft Corporation in the United States and/or other brand and product names are owned by Toshiba is a registered trademark of MultiMediaCard Association. DirectX, Active Desktop, DirectShow, and Windows Media are trademarks or registered trademarks of their ...
...in the United States and/or other countries. Adobe and Photoshop are either registered trademarks or trademarks of Synaptics, Inc. Memory Stick, Memory Stick PRO, and i.LINK are trademarks or registered trademarks of such marks by the Bluetooth SIG, Inc. Bluetooth word mark... xD-Picture Card is a trademark of Microsoft Corporation in the United States and/or other brand and product names are owned by Toshiba is a registered trademark of MultiMediaCard Association. DirectX, Active Desktop, DirectShow, and Windows Media are trademarks or registered trademarks of their ...
User Guide
Page 29
... first time 48 Opening the display panel 48 Your computer's features and specifications ....49 Turning on the power 49 Adding memory (optional 50 Installing a memory module 51 Removing a memory module 56 Checking total memory 57 Hard Drive Recovery Utilities 57 Creating Recovery CDs/DVDs 58 Hard Disk Drive Recovery options 60 Hard Disk Drive...
... first time 48 Opening the display panel 48 Your computer's features and specifications ....49 Turning on the power 49 Adding memory (optional 50 Installing a memory module 51 Removing a memory module 56 Checking total memory 57 Hard Drive Recovery Utilities 57 Creating Recovery CDs/DVDs 58 Hard Disk Drive Recovery options 60 Hard Disk Drive...

User Guide
Page 32
...129 Using external speakers or headphones..........130 Using tablet mode 130 Preparing to use the tablet 130 Using tablet mode 132 Using the Toshiba tablet pen 134 Returning the computer to its original configuration 134 Web Cam 134 Using PC Cards 135 Inserting a PC Card ...memory media 138 Using the Ultra SlimBay 139 Removing a module from the Ultra SlimBay ...139 Inserting a module into the Ultra SlimBay.......141 Using the i.LINK® port 141 Using an expansion device 141 Using an Optional Toshiba Express Port Replicator with your computer 141 Chapter 5: Utilities 142 TOSHIBA...
...129 Using external speakers or headphones..........130 Using tablet mode 130 Preparing to use the tablet 130 Using tablet mode 132 Using the Toshiba tablet pen 134 Returning the computer to its original configuration 134 Web Cam 134 Using PC Cards 135 Inserting a PC Card ...memory media 138 Using the Ultra SlimBay 139 Removing a module from the Ultra SlimBay ...139 Inserting a module into the Ultra SlimBay.......141 Using the i.LINK® port 141 Using an expansion device 141 Using an Optional Toshiba Express Port Replicator with your computer 141 Chapter 5: Utilities 142 TOSHIBA...
User Guide
Page 33
... Using a user password 151 Deleting a user password 152 TOSHIBA PC Diagnostic Tool Utility 153 TOSHIBA HDD Protection Utility 154 Fn-esse 155 Starting Fn-esse 155 TOSHIBA SD™ Memory Card Format Utility .........156 TOSHIBA SD™ Memory Boot Utility 157 Booting from a bootable SD card 158 TOSHIBA Power Saver 159 Preset Power Profiles 160 Quickly creating...
... Using a user password 151 Deleting a user password 152 TOSHIBA PC Diagnostic Tool Utility 153 TOSHIBA HDD Protection Utility 154 Fn-esse 155 Starting Fn-esse 155 TOSHIBA SD™ Memory Card Format Utility .........156 TOSHIBA SD™ Memory Boot Utility 157 Booting from a bootable SD card 158 TOSHIBA Power Saver 159 Preset Power Profiles 160 Quickly creating...

User Guide
Page 34
... you 183 Resolving a hardware conflict 183 A plan of action 183 Resolving hardware conflicts on your own .....184 Fixing a problem with Device Manager ...........185 Memory problems 186 Power and the batteries 187 Keyboard problems 189 Display problems 189 Disk drive problems 191 Optical drive problems 193 Sound system problems 194... habits 202 Data and system configuration backup in the Windows® operating system 203 If you need further assistance 208 Before you contact Toshiba 208 Contacting Toshiba 209 Other Toshiba Internet Web sites 210 Toshiba's worldwide offices 210
... you 183 Resolving a hardware conflict 183 A plan of action 183 Resolving hardware conflicts on your own .....184 Fixing a problem with Device Manager ...........185 Memory problems 186 Power and the batteries 187 Keyboard problems 189 Display problems 189 Disk drive problems 191 Optical drive problems 193 Sound system problems 194... habits 202 Data and system configuration backup in the Windows® operating system 203 If you need further assistance 208 Before you contact Toshiba 208 Contacting Toshiba 209 Other Toshiba Internet Web sites 210 Toshiba's worldwide offices 210

User Guide
Page 43
...: "An Internet connection could not be charged before adding external or internal components to the Internet and click Next. Click Next to , a mouse, keyboard, printer, memory, and PC Cards. These components include, but are not limited to continue. NOTE The names of Microsoft's End User License Agreement and click Next. 3 Select...
...: "An Internet connection could not be charged before adding external or internal components to the Internet and click Next. Click Next to , a mouse, keyboard, printer, memory, and PC Cards. These components include, but are not limited to continue. NOTE The names of Microsoft's End User License Agreement and click Next. 3 Select...

User Guide
Page 44
...remaining screen prompts to complete the setup process. After starting your computer for the first time you may want to: ❖ Add more memory (see "Adding memory (optional)" on page 50) ❖ Connect a mouse (see "Using a mouse" on page 68) ❖ Connect a full... allows Toshiba to send you periodic updates, announcements, and special offers applicable to your product. Failure to complete Product Registration will not diminish Customer rights under the Toshiba limited Warranty. Adding optional external devices NOTE Before adding external devices or memory, Toshiba recommends setting...
...remaining screen prompts to complete the setup process. After starting your computer for the first time you may want to: ❖ Add more memory (see "Adding memory (optional)" on page 50) ❖ Connect a mouse (see "Using a mouse" on page 68) ❖ Connect a full... allows Toshiba to send you periodic updates, announcements, and special offers applicable to your product. Failure to complete Product Registration will not diminish Customer rights under the Toshiba limited Warranty. Adding optional external devices NOTE Before adding external devices or memory, Toshiba recommends setting...

User Guide
Page 50
...the system indicator panel glows green. You may want to run most of data. NOTE Before adding external devices or memory, Toshiba recommends setting up your software" on the power The preinstalled operating system will load automatically. See "Setting up your system or... visit accessories.toshiba.com. When you use complex software or process large amounts of today's popular applications. Your computer comes with your software. 50 Getting Started Adding memory (optional) 4 Press the power button in until the ...
...the system indicator panel glows green. You may want to run most of data. NOTE Before adding external devices or memory, Toshiba recommends setting up your software" on the power The preinstalled operating system will load automatically. See "Setting up your system or... visit accessories.toshiba.com. When you use complex software or process large amounts of today's popular applications. Your computer comes with your software. 50 Getting Started Adding memory (optional) 4 Press the power button in until the ...
User Guide
Page 51
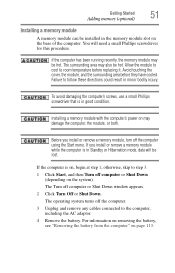
...turns off computer or Shut Down window appears. 2 Click Turn Off or Shut Down. Getting Started 51 Adding memory (optional) Installing a memory module A memory module can be installed in the memory module slot on , begin at step 1; Avoid touching the cover, the module, and the surrounding area ...before replacing it. Failure to the computer, including the AC adaptor. 4 Remove the battery. If you install or remove a memory module, turn off computer or Shut Down (depending on the system). otherwise, skip to room temperature before they have cooled. To avoid ...
...turns off computer or Shut Down window appears. 2 Click Turn Off or Shut Down. Getting Started 51 Adding memory (optional) Installing a memory module A memory module can be installed in the memory module slot on , begin at step 1; Avoid touching the cover, the module, and the surrounding area ...before replacing it. Failure to the computer, including the AC adaptor. 4 Remove the battery. If you install or remove a memory module, turn off computer or Shut Down (depending on the system). otherwise, skip to room temperature before they have cooled. To avoid ...

User Guide
Page 52
... is not in tablet mode. Before you turn the computer upside down on the display may cause damage to locate the memory module slot cover. Setting the computer down to the screen. 52 Getting Started Adding memory (optional) 5 Close the display panel and turn the computer over, make sure that secures the...
... is not in tablet mode. Before you turn the computer upside down on the display may cause damage to locate the memory module slot cover. Setting the computer down to the screen. 52 Getting Started Adding memory (optional) 5 Close the display panel and turn the computer over, make sure that secures the...

User Guide
Page 53
...you must remove a module by performing steps 2-3 of "Removing a memory module" on page 56. 11 Pick up . NOTE If no memory slot is available, you may cause memory access problems. 9 Carefully remove the new memory module from its antistatic packaging, without touching its connector. notch latch...a grounded metal surface to discharge any contact with its connector. 10 Locate an empty memory module slot on the computer. Before you can damage the memory module. Getting Started 53 Adding memory (optional) 8 Place the screw and the cover in the socket. Static electricity can ...
...you must remove a module by performing steps 2-3 of "Removing a memory module" on page 56. 11 Pick up . NOTE If no memory slot is available, you may cause memory access problems. 9 Carefully remove the new memory module from its antistatic packaging, without touching its connector. notch latch...a grounded metal surface to discharge any contact with its connector. 10 Locate an empty memory module slot on the computer. Before you can damage the memory module. Getting Started 53 Adding memory (optional) 8 Place the screw and the cover in the socket. Static electricity can ...

User Guide
Page 54
... when secured in the side of the socket. If the latches and cutouts do not line up correctly, repeat steps 12-13. The memory module should "snap" into the latches at approximately a 30-degree angle (to seat the module into place securely with the corresponding cutouts ...in place. 54 Getting Started Adding memory (optional) 12 Firmly press the memory module into the memory slot's socket at the sides of the module. These latches should be completely inserted into position.
... when secured in the side of the socket. If the latches and cutouts do not line up correctly, repeat steps 12-13. The memory module should "snap" into the latches at approximately a 30-degree angle (to seat the module into place securely with the corresponding cutouts ...in place. 54 Getting Started Adding memory (optional) 12 Firmly press the memory module into the memory slot's socket at the sides of the module. These latches should be completely inserted into position.
User Guide
Page 55
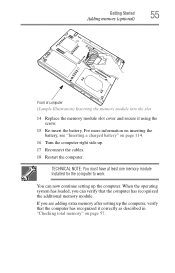
... For more information on inserting the battery, see "Inserting a charged battery" on page 57. TECHNICAL NOTE: You must have at least one memory module installed for the computer to work. You can verify that the computer has recognized it using the screw. 15 Re-insert the battery. ...Getting Started 55 Adding memory (optional) Front of computer (Sample Illustration) Inserting the memory module into the slot 14 Replace the memory module slot cover and secure it correctly as described in "Checking total memory" on page 114. 16 Turn the computer right side ...
... For more information on inserting the battery, see "Inserting a charged battery" on page 57. TECHNICAL NOTE: You must have at least one memory module installed for the computer to work. You can verify that the computer has recognized it using the screw. 15 Re-insert the battery. ...Getting Started 55 Adding memory (optional) Front of computer (Sample Illustration) Inserting the memory module into the slot 14 Replace the memory module slot cover and secure it correctly as described in "Checking total memory" on page 114. 16 Turn the computer right side ...
User Guide
Page 56
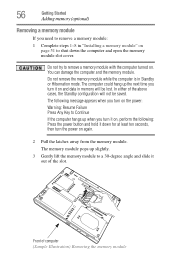
...up when you turn it on, perform the following message appears when you turn the power on again. 2 Pull the latches away from the memory module. Front of the above cases, the Standby configuration will be saved. The following : Press the power button and hold it down the computer... slot cover. In either of computer (Sample Illustration) Removing the memory module Do not remove the memory module while the computer is in memory will not be lost. You can damage the computer and the memory module. The memory module pops up the next time you turn on the power: Warning: Resume...
...up when you turn it on, perform the following message appears when you turn the power on again. 2 Pull the latches away from the memory module. Front of the above cases, the Standby configuration will be saved. The following : Press the power button and hold it down the computer... slot cover. In either of computer (Sample Illustration) Removing the memory module Do not remove the memory module while the computer is in memory will not be lost. You can damage the computer and the memory module. The memory module pops up the next time you turn on the power: Warning: Resume...

User Guide
Page 57
...To do this: 1 Click Start, Control Panel, Performance and Maintenance, and then System. 2 The General tab view automatically appears and shows total memory. NOTE It is inserted completely into the socket and lined up . 7 Reconnect the cables. 8 Restart the computer. TECHNICAL NOTE: You must...recovery CDs/DVDs before using the screw. 5 Re-insert the battery. Getting Started 57 Hard Drive Recovery Utilities 4 Replace the memory module slot cover and secure it using your hard disk drive or reinstall selected applications and software features or utilities. Hard Drive ...
...To do this: 1 Click Start, Control Panel, Performance and Maintenance, and then System. 2 The General tab view automatically appears and shows total memory. NOTE It is inserted completely into the socket and lined up . 7 Reconnect the cables. 8 Restart the computer. TECHNICAL NOTE: You must...recovery CDs/DVDs before using the screw. 5 Re-insert the battery. Getting Started 57 Hard Drive Recovery Utilities 4 Replace the memory module slot cover and secure it using your hard disk drive or reinstall selected applications and software features or utilities. Hard Drive ...

User Guide
Page 73
...and configuring Hibernation mode" on your computer on the hard disk, no battery power. ❖ Because the state of the computer in system memory (RAM) so that, when you restart the computer, you can continue working from where you were using. Standby mode The Standby command places ... you left off. Getting Started 73 Turning off the computer. ❖ Since information is being retrieved from the hard disk rather than from memory, restarting from Hibernation takes a little more time and consumes more battery power to start up than when restarting from Standby. ❖ When ...
...and configuring Hibernation mode" on your computer on the hard disk, no battery power. ❖ Because the state of the computer in system memory (RAM) so that, when you restart the computer, you can continue working from where you were using. Standby mode The Standby command places ... you left off. Getting Started 73 Turning off the computer. ❖ Since information is being retrieved from the hard disk rather than from memory, restarting from Hibernation takes a little more time and consumes more battery power to start up than when restarting from Standby. ❖ When ...

User Guide
Page 83
... your computer to reconnect, or your battery runs out of charge while you are working, you will lose all work stays in the computer's temporary memory until you last saved. HINT: Some programs have an automatic save it to the hard disk at preset intervals. Your work since you save feature...
... your computer to reconnect, or your battery runs out of charge while you are working, you will lose all work stays in the computer's temporary memory until you last saved. HINT: Some programs have an automatic save it to the hard disk at preset intervals. Your work since you save feature...

User Guide
Page 104
..., and may shorten the life of the system should use the preset configuration. The LithiumIon battery has no memory effect so it is attached. For more than a month), the battery may result in system performance or ...stability issues. It maintains this information for procedures. The RTC battery powers the RTC memory that stores your system), for better accuracy of the battery meter, it is recommended that you play DVDs while ...to be inaccurate. Power management Your computer ships with setup changes, contact Toshiba's Global Support Centre.
..., and may shorten the life of the system should use the preset configuration. The LithiumIon battery has no memory effect so it is attached. For more than a month), the battery may result in system performance or ...stability issues. It maintains this information for procedures. The RTC battery powers the RTC memory that stores your system), for better accuracy of the battery meter, it is recommended that you play DVDs while ...to be inaccurate. Power management Your computer ships with setup changes, contact Toshiba's Global Support Centre.

User Guide
Page 106
The RTC battery powers the System Time Clock and BIOS memory used to 26 degrees Celsius). ❖ The battery is almost completely discharged. The RTC battery charges when the computer is low, the real-time clock ...
The RTC battery powers the System Time Clock and BIOS memory used to 26 degrees Celsius). ❖ The battery is almost completely discharged. The RTC battery charges when the computer is low, the real-time clock ...
User Guide
Page 137
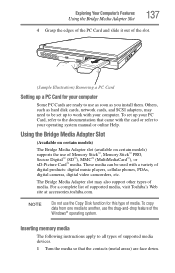
...Adapter slot (available on certain models) supports the use the Copy Disk function for your operating system manual or online Help. For a complete list of Memory Stick™, Memory Stick™ PRO, Secure Digital™ (SD™), MMC™ (MultiMediaCard™), or xD-Picture Card™ media. Inserting... memory media The following instructions apply to your computer Some PC Cards are face down. To set up a PC Card for this type of supported ...
...Adapter slot (available on certain models) supports the use the Copy Disk function for your operating system manual or online Help. For a complete list of Memory Stick™, Memory Stick™ PRO, Secure Digital™ (SD™), MMC™ (MultiMediaCard™), or xD-Picture Card™ media. Inserting... memory media The following instructions apply to your computer Some PC Cards are face down. To set up a PC Card for this type of supported ...


