
User Guide
Page 175
175 Toshiba Utilities TOSHIBA Console Select the boot device by pressing the right or left arrow keys, then pressing the Enter key. This function does not work with a USB keyboard. ❖ USB-Allows you to one of "Dynamically Switchable," "Always High," or "Always Low." ❖.... ❖ Parallel/Printer-Allows you to configure the Advanced Port Replicator parallel port default settings. ❖ Display-Allows you to view the current BIOS. ❖ Device Config-Shows the Device configuration options. Allows you to enable or disable the processor serial number, and to set the "CPU ...
175 Toshiba Utilities TOSHIBA Console Select the boot device by pressing the right or left arrow keys, then pressing the Enter key. This function does not work with a USB keyboard. ❖ USB-Allows you to one of "Dynamically Switchable," "Always High," or "Always Low." ❖.... ❖ Parallel/Printer-Allows you to configure the Advanced Port Replicator parallel port default settings. ❖ Display-Allows you to view the current BIOS. ❖ Device Config-Shows the Device configuration options. Allows you to enable or disable the processor serial number, and to set the "CPU ...

Maintenance Manual
Page 116
...Charge This subtest checks the status for the quick charge. The following format. Make sure the rotation of the BIOS ROM (range: F0000h to the subtest you press Enter, the fan should stop. Model Name Version Number Serial Number Model Number PCN/BND Number : XXXXXXXXXXX : XXXXXXXXXXXX... from the DIAGNOSTIC TEST MENU, press Enter and follow the directions on /off command. PORTEGE M100 Maintenance Manual (960-452) 3-9 Subtest 01 ROM Checksum This subtest executes a checksum test of the fan starts and press Enter. *** Fan OFF *** : Press [Enter] key? Make sure the rotation of...
...Charge This subtest checks the status for the quick charge. The following format. Make sure the rotation of the BIOS ROM (range: F0000h to the subtest you press Enter, the fan should stop. Model Name Version Number Serial Number Model Number PCN/BND Number : XXXXXXXXXXX : XXXXXXXXXXXX... from the DIAGNOSTIC TEST MENU, press Enter and follow the directions on /off command. PORTEGE M100 Maintenance Manual (960-452) 3-9 Subtest 01 ROM Checksum This subtest executes a checksum test of the fan starts and press Enter. *** Fan OFF *** : Press [Enter] key? Make sure the rotation of...

Maintenance Manual
Page 118
... messages appear. The following message appears. * Get! Battery Data * Battery Type = XXXXXXXXXXXX PORTEGE M100 Maintenance Manual (960-452) 3-11 The following message appears. * Get! The parameter of the... correct constant data. Blue-tooth Switch "ON", and press [Enter] key Blue-tooth Switch "OFF", and press [Enter] key Battery F/W test This subtest reads F/W data from the... Subtest 11 Subtest 12 Subtest 13 Temperature surveillance test Settings at the start of test • BIOS test mode (FAN -forced high speed, prohibition of SM interruptionetc.) • Prohibition of TCC ...
... messages appear. The following message appears. * Get! Battery Data * Battery Type = XXXXXXXXXXXX PORTEGE M100 Maintenance Manual (960-452) 3-11 The following message appears. * Get! The parameter of the... correct constant data. Blue-tooth Switch "ON", and press [Enter] key Blue-tooth Switch "OFF", and press [Enter] key Battery F/W test This subtest reads F/W data from the... Subtest 11 Subtest 12 Subtest 13 Temperature surveillance test Settings at the start of test • BIOS test mode (FAN -forced high speed, prohibition of SM interruptionetc.) • Prohibition of TCC ...

Maintenance Manual
Page 141
... specified address. Playback Music (CD only) This subtest reads track data from the DIAGNOSTICS TEST MENU, press Enter and follow the directions on a CD/RW media. If the "ALL DEVICE" is a sequential reading of... 02 Subtest 03 Subtest 04 Sequential read This subtest is not selected, music can not be played. PORTEGE M100 Maintenance Manual (960-452) 3-33 CAUTION: When the CD-ROM test is executed, "ALL DEVICE"... use a CD-RW on the market. NOTE: For the subtest 01, 02 and 03, use the TOSHIBA CD-ROM TEST DISK (ZA1217P01/P000204190) for CD-ROM and DVD-ROM TEST DISK TSD-1 for DVD-ROM...
... specified address. Playback Music (CD only) This subtest reads track data from the DIAGNOSTICS TEST MENU, press Enter and follow the directions on a CD/RW media. If the "ALL DEVICE" is a sequential reading of... 02 Subtest 03 Subtest 04 Sequential read This subtest is not selected, music can not be played. PORTEGE M100 Maintenance Manual (960-452) 3-33 CAUTION: When the CD-ROM test is executed, "ALL DEVICE"... use a CD-RW on the market. NOTE: For the subtest 01, 02 and 03, use the TOSHIBA CD-ROM TEST DISK (ZA1217P01/P000204190) for CD-ROM and DVD-ROM TEST DISK TSD-1 for DVD-ROM...
Maintenance Manual
Page 158
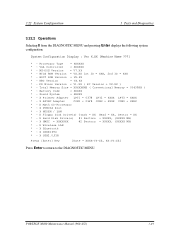
...BIOS ROM Version = VX.XX 1st ID = XXH, 2nd ID = XXH * - KBC Version = VX.XX * - Sound System = XXXXX * - X PCMCIA Slot * - X HWSC = XXXXXXX #2 Sectors = XXXXX, (XXXXX MB) * - X IEEE1394 * - 3.22 System Configuration 3 Tests and Diagnostics 3.22.2 Operations Selecting 8 from the DIAGNOSTIC MENU and pressing Enter... = XX Head = XX, Sector = XX * - X Hard Disk Drive(s) #1 Sectors = XXXXX, (XXXXX MB) * - X Bluetooth * - X USB2.0 FIR Press [Enter] Key [Date = XXXX-YY-ZZ, XX:YY:ZZ] Press Enter to return to the DIAGNOSTIC MENU. PORTEGE M100 Maintenance Manual (960-452) 3-49
...BIOS ROM Version = VX.XX 1st ID = XXH, 2nd ID = XXH * - KBC Version = VX.XX * - Sound System = XXXXX * - X PCMCIA Slot * - X HWSC = XXXXXXX #2 Sectors = XXXXX, (XXXXX MB) * - X IEEE1394 * - 3.22 System Configuration 3 Tests and Diagnostics 3.22.2 Operations Selecting 8 from the DIAGNOSTIC MENU and pressing Enter... = XX Head = XX, Sector = XX * - X Hard Disk Drive(s) #1 Sectors = XXXXX, (XXXXX MB) * - X Bluetooth * - X USB2.0 FIR Press [Enter] Key [Date = XXXX-YY-ZZ, XX:YY:ZZ] Press Enter to return to the DIAGNOSTIC MENU. PORTEGE M100 Maintenance Manual (960-452) 3-49

Maintenance Manual
Page 162
Others Power-up Mode is divided into two pages. PORTEGE M100 Maintenance Manual (960-452) 3-53 The SETUP screen is in Resume mode. SYSTEM SETUP (2/2) ACPI BIOS version = X.XX = Setup by OS PC CARD Controller Mode = Auto-Selected I/O PORTS Serial = COM1(3F8H/IRQ4) Parallel = LPT1(378H/... Auto- 3.23 SETUP 3 Tests and Diagnostics 3.23.2 Accessing the SETUP Program Selecting 0 from the DIAGNOSTICS MENU and pressing Enter displays the SETUP screen. SYSTEM SETUP (1/2) ACPI BIOS version = X.XX MEMORY Total = XXXXX KB SYSTEM DATE/TIME Date(MM-DD-YY) = XX-XX-XXXX Time(HH:MM...
Others Power-up Mode is divided into two pages. PORTEGE M100 Maintenance Manual (960-452) 3-53 The SETUP screen is in Resume mode. SYSTEM SETUP (2/2) ACPI BIOS version = X.XX = Setup by OS PC CARD Controller Mode = Auto-Selected I/O PORTS Serial = COM1(3F8H/IRQ4) Parallel = LPT1(378H/... Auto- 3.23 SETUP 3 Tests and Diagnostics 3.23.2 Accessing the SETUP Program Selecting 0 from the DIAGNOSTICS MENU and pressing Enter displays the SETUP screen. SYSTEM SETUP (1/2) ACPI BIOS version = X.XX MEMORY Total = XXXXX KB SYSTEM DATE/TIME Date(MM-DD-YY) = XX-XX-XXXX Time(HH:MM...

User Manual
Page 87
... and this menu. (*) It is recommended that the keyboard cursor keys (movement) and enter key (selection) or the directional pad be accurately screen out unauthorized users at all times...system, see Manual to enabling and configuring the FingerPrint Single Sign-On Feature. Satellite M100 4-9 Please use of the screen. You should check that your finger on the ... across the FingerPrint Sensor. 2. FingerPrint utility limitations TOSHIBA does not guarantee that might arise out of the use TOSHIBA Password Utility to replace the User/BIOS Password (and, if applicable, the HDD (Hard...
... and this menu. (*) It is recommended that the keyboard cursor keys (movement) and enter key (selection) or the directional pad be accurately screen out unauthorized users at all times...system, see Manual to enabling and configuring the FingerPrint Single Sign-On Feature. Satellite M100 4-9 Please use of the screen. You should check that your finger on the ... across the FingerPrint Sensor. 2. FingerPrint utility limitations TOSHIBA does not guarantee that might arise out of the use TOSHIBA Password Utility to replace the User/BIOS Password (and, if applicable, the HDD (Hard...
User Manual
Page 123
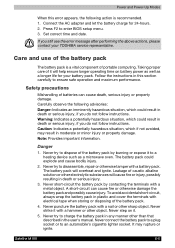
...operating time on it to a heating device such as a longer life for 24-hours. 2. Satellite M100 6-5 Safety precautions Mishandling of it with a hammer or other sharp object. Caution: Indicates a potentially ...death or serious injury. 3. Never connect the battery pack to a plug socket or to enter BIOS setup menu. 3. Press F2 to an automobile's cigarette lighter socket. Care and use of... or property damage. Connect the AC adapter and let the battery charge for your TOSHIBA service representative. Note: Provides important information. It may result in any manner other...
...operating time on it to a heating device such as a longer life for 24-hours. 2. Satellite M100 6-5 Safety precautions Mishandling of it with a hammer or other sharp object. Caution: Indicates a potentially ...death or serious injury. 3. Never connect the battery pack to a plug socket or to enter BIOS setup menu. 3. Press F2 to an automobile's cigarette lighter socket. Care and use of... or property damage. Connect the AC adapter and let the battery charge for your TOSHIBA service representative. Note: Provides important information. It may result in any manner other...

