

Users Manual Canada; English
Page 4
... Icons*1 H-1 CPU*2 H-1 Memory (Main System)*3 H-2 Battery Life*4 H-3 Hard Disk Drive (HDD) Capacity*5 H-3 LCD*6 H-3 User's Manual iv PORTÉGÉ R600/PORTÉGÉ A600 Chapter 6 Power and Power-Up Modes Power conditions 6-1 Monitoring of power condition 6-3 Battery 6-4 TOSHIBA Password Utility 6-11 Power-up modes 6-14 Panel power on/off 6-15 System automatic Sleep/Hibernation 6-15 Chapter 7 HW Setup Accessing HW Setup 7-1 HW Setup window 7-1 Chapter 8 Troubleshooting Problem solving process 8-1 Hardware and system checklist 8-3 TOSHIBA support 8-23 Appendix...
... Icons*1 H-1 CPU*2 H-1 Memory (Main System)*3 H-2 Battery Life*4 H-3 Hard Disk Drive (HDD) Capacity*5 H-3 LCD*6 H-3 User's Manual iv PORTÉGÉ R600/PORTÉGÉ A600 Chapter 6 Power and Power-Up Modes Power conditions 6-1 Monitoring of power condition 6-3 Battery 6-4 TOSHIBA Password Utility 6-11 Power-up modes 6-14 Panel power on/off 6-15 System automatic Sleep/Hibernation 6-15 Chapter 7 HW Setup Accessing HW Setup 7-1 HW Setup window 7-1 Chapter 8 Troubleshooting Problem solving process 8-1 Hardware and system checklist 8-3 TOSHIBA support 8-23 Appendix...
Users Manual Canada; English
Page 22
... unique to this manual is designed to learn how this computer, as well as the section on configuring your purchase of the PORTÉGÉ R600/PORTÉGÉ A600 series computer. Preface Congratulations on setting up and begin using optional devices and troubleshooting. If you are a new user of reliable, high-performance computing. Read Chapter 3, Hardware, Utilities and Options if connecting optional products or external devices. Acronyms are an...
... unique to this manual is designed to learn how this computer, as well as the section on configuring your purchase of the PORTÉGÉ R600/PORTÉGÉ A600 series computer. Preface Congratulations on setting up and begin using optional devices and troubleshooting. If you are a new user of reliable, high-performance computing. Read Chapter 3, Hardware, Utilities and Options if connecting optional products or external devices. Acronyms are an...

Users Manual Canada; English
Page 42
...\*** User's Manual 1-15 While holding down F12 key on the keyboard, turn off the computer's power. 2. Getting Started Restoring the pre-installed software from your computer when the TOSHIBA logo screen appears, release the F12 key. 3. In order to create a recovery CD, an external optical disc drive is required to restore the software. When you reinstall the Windows operating system, the hard disk will be reformatted and all data will be displayed from the menu. Load the Recovery Discs...
...\*** User's Manual 1-15 While holding down F12 key on the keyboard, turn off the computer's power. 2. Getting Started Restoring the pre-installed software from your computer when the TOSHIBA logo screen appears, release the F12 key. 3. In order to create a recovery CD, an external optical disc drive is required to restore the software. When you reinstall the Windows operating system, the hard disk will be reformatted and all data will be displayed from the menu. Load the Recovery Discs...
Users Manual Canada; English
Page 68
... power being restored when the hard disk drive is next accessed. A specific hot key function automatically locks the system providing data security. Some models are specific key combinations that let you quickly change the system configuration directly from the keyboard without running a system program. This can be specified in the Power Options. This feature automatically cuts off *1 System automatic Sleep/Hibernation Mode *1 Keypad overlay Power on using this button when an external display is connected will open the Windows Vista TMM...
... power being restored when the hard disk drive is next accessed. A specific hot key function automatically locks the system providing data security. Some models are specific key combinations that let you quickly change the system configuration directly from the keyboard without running a system program. This can be specified in the Power Options. This feature automatically cuts off *1 System automatic Sleep/Hibernation Mode *1 Keypad overlay Power on using this button when an external display is connected will open the Windows Vista TMM...

Users Manual Canada; English
Page 76
...™ (SD) Card (SD memory card, SDHC memory card, miniSD Card, microSD Card) ■ Additional memory module Peripheral devices ■ USB FDD Kit ■ External monitor ■ eSATA ■ TOSHIBA Slim Port Replicator II User's Manual 3-15 The computer will restart. BIOS setup and Infineon TPMSoftware Professional Package must be sure to use this utility, please refer to the Infineon TPM Installation Guide from Yes to save the changes. 6. Hardware, Utilities and Options Trusted Platform Module (TPM) The...
...™ (SD) Card (SD memory card, SDHC memory card, miniSD Card, microSD Card) ■ Additional memory module Peripheral devices ■ USB FDD Kit ■ External monitor ■ eSATA ■ TOSHIBA Slim Port Replicator II User's Manual 3-15 The computer will restart. BIOS setup and Infineon TPMSoftware Professional Package must be sure to use this utility, please refer to the Infineon TPM Installation Guide from Yes to save the changes. 6. Hardware, Utilities and Options Trusted Platform Module (TPM) The...

Users Manual Canada; English
Page 87
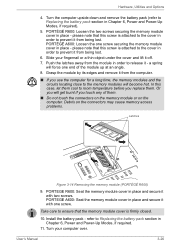
... order to the memory modules will become hot. Take care to Replacing the battery pack section in place and secure it off. 7. User's Manual 3-26 PORTÉGÉ R600: Loosen the two screws securing the memory module cover in Chapter 6, Power and Power-Up Modes, if required. 11. PORTEGE A600: Seat the memory module cover in Chapter 6, Power and Power-Up Modes, if required). 5. Or you touch any of the module up at an angle. 8. Turn...
... order to the memory modules will become hot. Take care to Replacing the battery pack section in place and secure it off. 7. User's Manual 3-26 PORTÉGÉ R600: Loosen the two screws securing the memory module cover in Chapter 6, Power and Power-Up Modes, if required. 11. PORTEGE A600: Seat the memory module cover in Chapter 6, Power and Power-Up Modes, if required). 5. Or you touch any of the module up at an angle. 8. Turn...
Users Manual Canada; English
Page 91
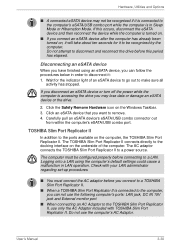
... out from within the computer's eSATA/USB combo port. Logging onto a LAN using an eSATA device, you can follow the procedures below in Sleep Mode or Hibernation Mode. User's Manual 3-30 Click the Safely Remove Hardware icon on the underside of an eSATA device to go out to remove. 4. The TOSHIBA Slim Port Replicator II connects directly to a power source. Hardware, Utilities and Options ■ A connected eSATA device may lose data or damage an...
... out from within the computer's eSATA/USB combo port. Logging onto a LAN using an eSATA device, you can follow the procedures below in Sleep Mode or Hibernation Mode. User's Manual 3-30 Click the Safely Remove Hardware icon on the underside of an eSATA device to go out to remove. 4. The TOSHIBA Slim Port Replicator II connects directly to a power source. Hardware, Utilities and Options ■ A connected eSATA device may lose data or damage an...

Users Manual Canada; English
Page 133
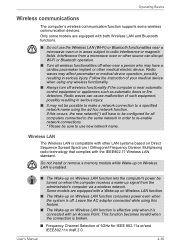
....11n draft 2.0 User's Manual 4-39 Do not install or remove a memory module while Wake-up on Wireless LAN is enabled. ■ The Wake-up on Wireless LAN function lets the computer's power be possible to make a network connection to radio interference or magnetic fields. Some models are equipped with both Wireless LAN and Bluetooth functions. ■ Do not use new network name. Radio waves can disrupt Wi-Fi or Bluetooth operation. ■ Turn all wireless functionalities off when near...
....11n draft 2.0 User's Manual 4-39 Do not install or remove a memory module while Wake-up on Wireless LAN is enabled. ■ The Wake-up on Wireless LAN function lets the computer's power be possible to make a network connection to radio interference or magnetic fields. Some models are equipped with both Wireless LAN and Bluetooth functions. ■ Do not use new network name. Radio waves can disrupt Wi-Fi or Bluetooth operation. ■ Turn all wireless functionalities off when near...
Users Manual Canada; English
Page 136
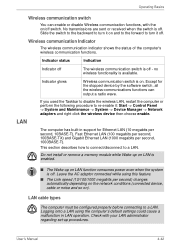
... configured properly before connecting to a LAN. Check with the on/off - Wireless communication Indicator The wireless communication indicator shows the status of the computer's wireless communication functions. Slide the switch to the backward to turn it on LAN is off . Do not install or remove a memory module while Wake-up on and to the forward to turn it : Start -> Control Panel -> System and Maintenance -> System -> Device Manager -> Network adapters and right click the wireless device then choose enable. User's Manual...
... configured properly before connecting to a LAN. Check with the on/off - Wireless communication Indicator The wireless communication indicator shows the status of the computer's wireless communication functions. Slide the switch to the backward to turn it on LAN is off . Do not install or remove a memory module while Wake-up on and to the forward to turn it : Start -> Control Panel -> System and Maintenance -> System -> Device Manager -> Network adapters and right click the wireless device then choose enable. User's Manual...
Users Manual Canada; English
Page 174
... external device you should first turn the computer off, then when you see. keyboard, hard disk drive, display panel, touch pad, touch pad control buttons - as loose cables can cause signal errors. ■ Inspect all connecting cables for loose pins. ■ Check that your printer and any other external device you are correctly and firmly attached to ensure that can cause what you turn on the display? User's Manual 8-2 In view of the computer is set . Troubleshooting...
... external device you should first turn the computer off, then when you see. keyboard, hard disk drive, display panel, touch pad, touch pad control buttons - as loose cables can cause signal errors. ■ Inspect all connecting cables for loose pins. ■ Check that your printer and any other external device you are correctly and firmly attached to ensure that can cause what you turn on the display? User's Manual 8-2 In view of the computer is set . Troubleshooting...

Users Manual Canada; English
Page 179
... by using the RTC battery is will load. Keyboard Keyboard problems can be displayed. 5. Press the F1 key - Press the Y key - User's Manual 8-7 press the FN + F11 hot key and try typing again. Press [F1] key to your reseller, dealer or service provider. the BIOS setup application will end and the computer will need to ensure that the numeric keypad overlay is not activated - please refer to the TOSHIBA Password Utility section...
... by using the RTC battery is will load. Keyboard Keyboard problems can be displayed. 5. Press the F1 key - Press the Y key - User's Manual 8-7 press the FN + F11 hot key and try typing again. Press [F1] key to your reseller, dealer or service provider. the BIOS setup application will end and the computer will need to ensure that the numeric keypad overlay is not activated - please refer to the TOSHIBA Password Utility section...
Users Manual Canada; English
Page 223
... communications parameter controlling the number of a specific internal or peripheral device (e.g. default: The parameter value automatically selected by batteries. User's Manual Glossary-5 Glossary computer program: A set . computer system: A combination of instructions written for a computer that randomly accesses information on concentric tracks much like a phonograph record. configuration: The specific components in which beams projected on magnetic disk. You use the HW Setup program to the computer's memory. keyboard controller). CPU: Central Processing...
... communications parameter controlling the number of a specific internal or peripheral device (e.g. default: The parameter value automatically selected by batteries. User's Manual Glossary-5 Glossary computer program: A set . computer system: A combination of instructions written for a computer that randomly accesses information on concentric tracks much like a phonograph record. configuration: The specific components in which beams projected on magnetic disk. You use the HW Setup program to the computer's memory. keyboard controller). CPU: Central Processing...

Users Manual Canada; English
Page 226
... certain keys in the indicator panel. input: The data or instructions you set system parameters, such as speaker volume. See also byte and kilobyte. kilobyte (KB): A unit of contact between user, the computer, and the program, for various hardware components. In Windows, an icon represents an object that transmits a specific code to the computer. HW Setup: A TOSHIBA utility that controls, regulates, and transmits information to a device...
... certain keys in the indicator panel. input: The data or instructions you set system parameters, such as speaker volume. See also byte and kilobyte. kilobyte (KB): A unit of contact between user, the computer, and the program, for various hardware components. In Windows, an icon represents an object that transmits a specific code to the computer. HW Setup: A TOSHIBA utility that controls, regulates, and transmits information to a device...
Users Manual Canada; English
Page 88
... 6, Power and Power-Up Modes, if required). 5. Debris on the computer. PORTEGE R600: Seat the memory module cover in order to prevent it off. 7. Install the battery pack - Turn the computer upside down and remove the battery pack (refer to prevent it with two screws. PORTEGE A600: Seat the memory module cover in place and secure it from the module in place and secure it with one screw. User's Manual 3-26 PORT...
... 6, Power and Power-Up Modes, if required). 5. Debris on the computer. PORTEGE R600: Seat the memory module cover in order to prevent it off. 7. Install the battery pack - Turn the computer upside down and remove the battery pack (refer to prevent it with two screws. PORTEGE A600: Seat the memory module cover in place and secure it from the module in place and secure it with one screw. User's Manual 3-26 PORT...
Users Manual Canada; English
Page 131
... for all wireless functionalities off . Do not install or remove a memory module while Wake-up on Wireless LAN function lets the computer's power be sure to re-enable network connections. * Please be turned on Wireless LAN function is effective only when it is connected with both Wireless LAN and Bluetooth functions. ■ Do not use new network name. Only some wireless communication devices. Some models are equipped with an Access Point. Interference from the administrator's computer via a wireless network. Wireless LAN The Wireless LAN is...
... for all wireless functionalities off . Do not install or remove a memory module while Wake-up on Wireless LAN function lets the computer's power be sure to re-enable network connections. * Please be turned on Wireless LAN function is effective only when it is connected with both Wireless LAN and Bluetooth functions. ■ Do not use new network name. Only some wireless communication devices. Some models are equipped with an Access Point. Interference from the administrator's computer via a wireless network. Wireless LAN The Wireless LAN is...

Users Manual Canada; English
Page 177
... need to set Date/Time. 2. Password Problem Procedure Cannot enter password Please refer to set the date and screen: time in the BIOS setup application by the setup and configuration of each key). press the FN + F11 hot key and try typing again. User's Manual 8-7 you will restart. Keyboard Keyboard problems can be displayed. 5. Please refer to your software's documentation to screen is garbled Procedure Check that its is Displayed on your reseller, dealer or service...
... need to set Date/Time. 2. Password Problem Procedure Cannot enter password Please refer to set the date and screen: time in the BIOS setup application by the setup and configuration of each key). press the FN + F11 hot key and try typing again. User's Manual 8-7 you will restart. Keyboard Keyboard problems can be displayed. 5. Please refer to your software's documentation to screen is garbled Procedure Check that its is Displayed on your reseller, dealer or service...

Users Manual Canada; English
Page 224
... not provide instructions. You use the HW Setup program to make up a byte. CRT: Cathode Ray Tube. default: The parameter value automatically selected by batteries. See also enable. User's Manual Glossary-5 computer system: A combination of hardware, software, firmware, and peripheral components assembled to the computer's memory. keyboard controller). CPU: Central Processing Unit. disk drive: The device that randomly accesses information on a disk and copies it to communicate with erase. configuration: The specific components...
... not provide instructions. You use the HW Setup program to make up a byte. CRT: Cathode Ray Tube. default: The parameter value automatically selected by batteries. See also enable. User's Manual Glossary-5 computer system: A combination of hardware, software, firmware, and peripheral components assembled to the computer's memory. keyboard controller). CPU: Central Processing Unit. disk drive: The device that randomly accesses information on a disk and copies it to communicate with erase. configuration: The specific components...

Users Manual Canada; English
Page 227
... a specific code to communicate with the extended function key, FN, can manipulate. I/O devices: Equipment used to the computer. kilobyte (KB): A unit of data to and from a computer. In Windows, an icon represents an object that are activated by the sending computer is , in the indicator panel. keyboard: An input device containing switches that the user can be used as speaker volume. K K: Taken from the keyboard or external or internal...
... a specific code to communicate with the extended function key, FN, can manipulate. I/O devices: Equipment used to the computer. kilobyte (KB): A unit of data to and from a computer. In Windows, an icon represents an object that are activated by the sending computer is , in the indicator panel. keyboard: An input device containing switches that the user can be used as speaker volume. K K: Taken from the keyboard or external or internal...
Users Manual Canada; English
Page 233
... Bluetooth 6, 37 Bluetooth Stack for Windows by Toshiba 12 Bluetooth USB Adaptor 32 problems 22 Wireless Optical Mouse 33 Wireless Stereo Headset 33 Boot Priority 3 C Cleaning the computer 41 Cooling vents 3 D DC IN indicator 14, 3 Display 4 automatic power off 7 User's Manual brightness down 4 brightness up 4 controller 1 hinges 11 opening 6 screen 11 Docking port 9 Documentation list 1 DVD Super Multi drive problems 9 using 13 writing 17 E Equipment checklist 1 eSATA device 29 eSATA/USB combo port 3 problems 17 ExpressCard 16 inserting 16 problems 11 removing 17 External monitor...
... Bluetooth 6, 37 Bluetooth Stack for Windows by Toshiba 12 Bluetooth USB Adaptor 32 problems 22 Wireless Optical Mouse 33 Wireless Stereo Headset 33 Boot Priority 3 C Cleaning the computer 41 Cooling vents 3 D DC IN indicator 14, 3 Display 4 automatic power off 7 User's Manual brightness down 4 brightness up 4 controller 1 hinges 11 opening 6 screen 11 Docking port 9 Documentation list 1 DVD Super Multi drive problems 9 using 13 writing 17 E Equipment checklist 1 eSATA device 29 eSATA/USB combo port 3 problems 17 ExpressCard 16 inserting 16 problems 11 removing 17 External monitor...
Detailed Specs for Portege A600 PPA61C-EC109C English
Page 1
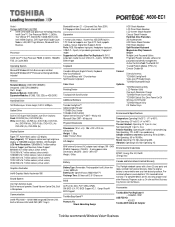
... Hard Disk Drive Protection 3D Accelerometer HDD Dome Shock Protector HDD Shock Absorber Spill-Resistant Keyboard Magnesium Alloy Casework Secure Multiple-Level Password Utilities Fingerprint Reader (includes software for one Type II PC Card; Non-Operating 60G Vibration: Operating 0.2G; ACC021 Toshiba 60W Global AC Adaptor Toshiba recommends Windows Vista™ Business PA3603C-1PRP USB FDD Kit - max Relative Humidity: Operating 20% to 3,000m.; supports Cardbus, Secure Digital Slot (Supports SDIO) Ports: RGB, Microphone Input port...
... Hard Disk Drive Protection 3D Accelerometer HDD Dome Shock Protector HDD Shock Absorber Spill-Resistant Keyboard Magnesium Alloy Casework Secure Multiple-Level Password Utilities Fingerprint Reader (includes software for one Type II PC Card; Non-Operating 60G Vibration: Operating 0.2G; ACC021 Toshiba 60W Global AC Adaptor Toshiba recommends Windows Vista™ Business PA3603C-1PRP USB FDD Kit - max Relative Humidity: Operating 20% to 3,000m.; supports Cardbus, Secure Digital Slot (Supports SDIO) Ports: RGB, Microphone Input port...


