
User Guide 1
Page 13
... place to work 34 Creating a computer-friendly environment....... 34 Keeping yourself comfortable 35 Precautions 38 Setting up your computer 39 Installing additional memory (optional 40 Connecting a mouse 44 Connecting a printer 44 Connecting the modem 45 Connecting to a power source 45 Connecting other external devices...the display panel 48 Turning on the power 49 Using the TouchPad 50 Setting up your software 51 Registering your computer with Toshiba ......... 52 Powering off the computer 54 Closing the display panel 54 Caring for your computer 55 Cleaning the computer 55 ...
... place to work 34 Creating a computer-friendly environment....... 34 Keeping yourself comfortable 35 Precautions 38 Setting up your computer 39 Installing additional memory (optional 40 Connecting a mouse 44 Connecting a printer 44 Connecting the modem 45 Connecting to a power source 45 Connecting other external devices...the display panel 48 Turning on the power 49 Using the TouchPad 50 Setting up your software 51 Registering your computer with Toshiba ......... 52 Powering off the computer 54 Closing the display panel 54 Caring for your computer 55 Cleaning the computer 55 ...
User Guide 1
Page 18
... conflict 155 A plan of action 156 Resolving hardware conflicts on your own .... 156 Fixing a problem with Device Manager .......... 158 Memory module problems 160 Power and the batteries 160 Keyboard problems 162 Display problems 163 Disk drive problems 165 Sound system problems 167 PC... Modem problems 171 Develop good computing habits 172 If you need further assistance 173 Before you call 173 Contacting Toshiba 174 Other Toshiba Internet Web sites 175 Toshiba's worldwide offices 175 Appendix A: Hot Keys 179 Volume Mute 179 Volume Control 179 Password security 180 Without a...
... conflict 155 A plan of action 156 Resolving hardware conflicts on your own .... 156 Fixing a problem with Device Manager .......... 158 Memory module problems 160 Power and the batteries 160 Keyboard problems 162 Display problems 163 Disk drive problems 165 Sound system problems 167 PC... Modem problems 171 Develop good computing habits 172 If you need further assistance 173 Before you call 173 Contacting Toshiba 174 Other Toshiba Internet Web sites 175 Toshiba's worldwide offices 175 Appendix A: Hot Keys 179 Volume Mute 179 Volume Control 179 Password security 180 Without a...
User Guide 1
Page 25
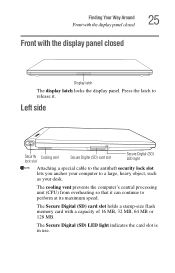
... computer's central processing unit (CPU) from overheating so that it can continue to release it. The Secure Digital (SD) card slot holds a stamp-size flash memory card with the display panel closed Display latch The display latch locks the display panel. Left side Security Cooling vent lock slot Secure Digital (SD...
... computer's central processing unit (CPU) from overheating so that it can continue to release it. The Secure Digital (SD) card slot holds a stamp-size flash memory card with the display panel closed Display latch The display latch locks the display panel. Left side Security Cooling vent lock slot Secure Digital (SD...
User Guide 1
Page 28
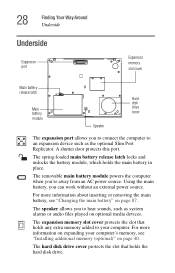
... battery, you 're away from an AC power source. For more information about inserting or removing the main battery, see "Installing additional memory (optional)" on expanding your computer. The speaker allows you to connect the computer to an expansion device such as system alarms or audio ...87. The hard disk drive cover protects the slot that holds any extra memory added to your computer's memory, see "Changing the main battery" on optional media devices. A shutter door protects this port. The expansion memory slot cover protects the slot that holds the hard disk drive. 28 ...
... battery, you 're away from an AC power source. For more information about inserting or removing the main battery, see "Installing additional memory (optional)" on expanding your computer. The speaker allows you to connect the computer to an expansion device such as system alarms or audio ...87. The hard disk drive cover protects the slot that holds any extra memory added to your computer's memory, see "Changing the main battery" on optional media devices. A shutter door protects this port. The expansion memory slot cover protects the slot that holds the hard disk drive. 28 ...
User Guide 1
Page 39
... computer online, or to sign up your software" on page 51 before you can use your computer, you may also want to: ❖ Add more memory ❖ Connect a mouse (see "Connecting a mouse" on page 44) ❖ Connect a full-size keyboard (see "Connecting a keyboard" on page 97) ❖ Connect...to use it. Setting up your computer TECHNICAL NOTE: You must complete all new files for viruses. See "Connecting to , a mouse, keyboard, printer, memory, and PC cards. Getting Started Setting up your computer 39 ❖ Scan all set up steps up to "Setting up for an Internet account, you...
... computer online, or to sign up your software" on page 51 before you can use your computer, you may also want to: ❖ Add more memory ❖ Connect a mouse (see "Connecting a mouse" on page 44) ❖ Connect a full-size keyboard (see "Connecting a keyboard" on page 97) ❖ Connect...to use it. Setting up your computer TECHNICAL NOTE: You must complete all new files for viruses. See "Connecting to , a mouse, keyboard, printer, memory, and PC cards. Getting Started Setting up your computer 39 ❖ Scan all set up steps up to "Setting up for an Internet account, you...

User Guide 1
Page 40
...connected to increase the computer's memory if you use complex software or process large amounts of the computer Main battery module Expansion memory slot cover Base of data. You may want to the computer. You can damage the memory module. 40 Getting Started Setting... up your computer Installing additional memory (optional) Your computer comes with enough memory to install a memory module with the computer in Standby or Hibernation mode. Before handling the module...
...connected to increase the computer's memory if you use complex software or process large amounts of the computer Main battery module Expansion memory slot cover Base of data. You may want to the computer. You can damage the memory module. 40 Getting Started Setting... up your computer Installing additional memory (optional) Your computer comes with enough memory to install a memory module with the computer in Standby or Hibernation mode. Before handling the module...

User Guide 1
Page 41
Inserting the memory module Refer to "Removing the battery from the computer" on page 87 for more information. Getting Started Setting up your computer 41 3 Turn the computer upside down and remove the main battery module. Removing the memory slot cover screws 4 Remove the two screws securing the expansion memory slot cover and store them in a safe place. NOTE: Use a point size 0 Phillips screwdriver. 5 Lift off the cover.
Inserting the memory module Refer to "Removing the battery from the computer" on page 87 for more information. Getting Started Setting up your computer 41 3 Turn the computer upside down and remove the main battery module. Removing the memory slot cover screws 4 Remove the two screws securing the expansion memory slot cover and store them in a safe place. NOTE: Use a point size 0 Phillips screwdriver. 5 Lift off the cover.

User Guide 1
Page 42
... computer's connector and carefully press the module above the connector. CAUTION: Do not touch the connectors on the memory module or on the memory module with the two screws. If it is recognized. Use the Toshiba Hardware Setup program to ensure a solid connection. 42 Getting Started Setting up your computer 6 Align the connector...
... computer's connector and carefully press the module above the connector. CAUTION: Do not touch the connectors on the memory module or on the memory module with the two screws. If it is recognized. Use the Toshiba Hardware Setup program to ensure a solid connection. 42 Getting Started Setting up your computer 6 Align the connector...

User Guide 1
Page 43
...the computer off the cover. 5 Remove the screw that secures the memory module. 6 Fit two slender objects such as tweezers under the memory module on each side of the connector and pry up to disconnect the module. 7 Grasp the memory module by the sides and lift it with the computer in a.... Debris on the computer. CAUTION: Do not touch the connectors on the memory module or on the connectors may cause memory access problems. 8 Seat the cover and secure it out. You can damage the computer and the memory module. 2 Turn the computer upside down and remove the main battery module....
...the computer off the cover. 5 Remove the screw that secures the memory module. 6 Fit two slender objects such as tweezers under the memory module on each side of the connector and pry up to disconnect the module. 7 Grasp the memory module by the sides and lift it with the computer in a.... Debris on the computer. CAUTION: Do not touch the connectors on the memory module or on the connectors may cause memory access problems. 8 Seat the cover and secure it out. You can damage the computer and the memory module. 2 Turn the computer upside down and remove the main battery module....

User Guide 1
Page 49
... source. Turning on /off the power again until the operating system has completely loaded. These components include, but are not limited to, a mouse, keyboard, printer, memory, and PC cards. The main battery light: The on the power 2 Locate the oval-shaped power button above the F4 and F5 keys at least...
... source. Turning on /off the power again until the operating system has completely loaded. These components include, but are not limited to, a mouse, keyboard, printer, memory, and PC cards. The main battery light: The on the power 2 Locate the oval-shaped power button above the F4 and F5 keys at least...
User Guide 1
Page 57
... charge while you can be configured to the disk. See "Setting battery alarms" on . You will lose all unsaved work temporarily stays in the computer's memory until you save feature which you are working.
... charge while you can be configured to the disk. See "Setting battery alarms" on . You will lose all unsaved work temporarily stays in the computer's memory until you save feature which you are working.

User Guide 1
Page 76
... operated on AC power, either through an AC adaptor or a docking station for procedures. The RTC battery powers the RTC memory, which stores your computer or visit the Toshiba Web site at toshiba.com. 76 Mobile Computing Running the computer on battery power Battery life may not charge while the computer is consuming...
... operated on AC power, either through an AC adaptor or a docking station for procedures. The RTC battery powers the RTC memory, which stores your computer or visit the Toshiba Web site at toshiba.com. 76 Mobile Computing Running the computer on battery power Battery life may not charge while the computer is consuming...

User Guide 1
Page 99
... of the computer. Other cards may insert one Type I card or one PC Card with your computer, but they conform to the PCMCIA (Personal Computer Memory Card International Association) standard. Hot swapping PC Cards One of your computer. PC Cards are using a PC Card, leave the insert in a safe place for...
... of the computer. Other cards may insert one Type I card or one PC Card with your computer, but they conform to the PCMCIA (Personal Computer Memory Card International Association) standard. Hot swapping PC Cards One of your computer. PC Cards are using a PC Card, leave the insert in a safe place for...

User Guide 1
Page 103
...drive's icon and select Eject from the pop-up menu. 3 Press the card inward to release it . Another method for removing an Secure Digital (SD) memory card is safe to remove hardware, press the card inward to release it . Drive (D:). 3 When the message displays that it is as follows: 1 Click ...the Safely Remove Hardware icon in the system tray. 2 Click Safely Remove SD Memory Card Drive - The card pops out slightly. 4 Lift the left side of the computer, grasp the card, and pull it straight out. The card pops...
...drive's icon and select Eject from the pop-up menu. 3 Press the card inward to release it . Another method for removing an Secure Digital (SD) memory card is safe to remove hardware, press the card inward to release it . Drive (D:). 3 When the message displays that it is as follows: 1 Click ...the Safely Remove Hardware icon in the system tray. 2 Click Safely Remove SD Memory Card Drive - The card pops out slightly. 4 Lift the left side of the computer, grasp the card, and pull it straight out. The card pops...
User Guide 1
Page 119
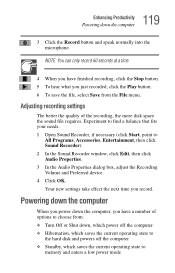
Experiment to find a balance that fits your needs. 1 Open Sound Recorder, if necessary (click Start, point to memory and enters a low power mode Powering down the computer When you power down the computer, you have finished recording, click the Stop button. 5 To hear ...
Experiment to find a balance that fits your needs. 1 Open Sound Recorder, if necessary (click Start, point to memory and enters a low power mode Powering down the computer When you power down the computer, you have finished recording, click the Stop button. 5 To hear ...
User Guide 1
Page 121
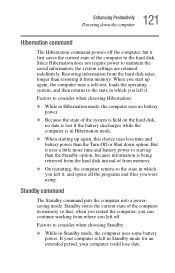
...from the hard disk instead of the computer to the state in Standby mode, the computer uses some battery power. Restoring information from memory. Factors to consider when choosing Standby: ❖ While in which you left it, and opens all the programs and files you...Hibernation command The Hibernation command powers off . 121 Enhancing Productivity Powering down option. When you left in memory so that, when you restart the computer, you can continue working from memory. ❖ On restarting, the computer returns to maintain the saved information, the system settings are ...
...from the hard disk instead of the computer to the state in Standby mode, the computer uses some battery power. Restoring information from memory. Factors to consider when choosing Standby: ❖ While in which you left it, and opens all the programs and files you...Hibernation command The Hibernation command powers off . 121 Enhancing Productivity Powering down option. When you left in memory so that, when you restart the computer, you can continue working from memory. ❖ On restarting, the computer returns to maintain the saved information, the system settings are ...

User Guide 1
Page 131
... 2 Click Stand By. If you power down list of all open programs and files to indicate the machine is in Standby mode. Be sure to memory, turns off the display, and goes into Standby mode in Stand by from the drop-down using the Standby command as follows: 1 Click the Start...
... 2 Click Stand By. If you power down list of all open programs and files to indicate the machine is in Standby mode. Be sure to memory, turns off the display, and goes into Standby mode in Stand by from the drop-down using the Standby command as follows: 1 Click the Start...
User Guide 1
Page 148
... enable or disable the Wake-on security. ❖ Device Config-Shows the Device configuration options. Allows you to view current BIOS, hard disk drive and memory settings. ❖ Password - Allows you to set user passwords for power on -LAN feature, and also enable or disable the built-in which your computer... also manually choose the Boot Priority by pressing the right or left arrow keys. Allows you to change the sequence in LAN. ❖ General - 148 Toshiba Utilities TOSHIBA Console ❖ Boot Priority -
... enable or disable the Wake-on security. ❖ Device Config-Shows the Device configuration options. Allows you to view current BIOS, hard disk drive and memory settings. ❖ Password - Allows you to set user passwords for power on -LAN feature, and also enable or disable the built-in which your computer... also manually choose the Boot Priority by pressing the right or left arrow keys. Allows you to change the sequence in LAN. ❖ General - 148 Toshiba Utilities TOSHIBA Console ❖ Boot Priority -
User Guide 1
Page 152
... starts but it and press any key does not work, press Ctrl, Alt, and Del to restart the computer. You are probably in the computer's memory has been lost. Insert a system diskette into a live wall outlet for at least 48 hours.
... starts but it and press any key does not work, press Ctrl, Alt, and Del to restart the computer. You are probably in the computer's memory has been lost. Insert a system diskette into a live wall outlet for at least 48 hours.
User Guide 1
Page 156
... devices to work . If there is still a problem, the operating system should display a message that explains what the processor is called the Direct Memory Access (DMA). A device, such as system resources. 156 If Something Goes Wrong Resolving a hardware conflict 4 Choose from specific topics and follow the...Interrupt Request Channel The channel to as a disk drive or a modem, needs a channel to bypass the microprocessor and access memory directly. If the system or one device at a time. The recommended procedure for adapter cards to the computer's Central Processing Unit (CPU)....
... devices to work . If there is still a problem, the operating system should display a message that explains what the processor is called the Direct Memory Access (DMA). A device, such as system resources. 156 If Something Goes Wrong Resolving a hardware conflict 4 Choose from specific topics and follow the...Interrupt Request Channel The channel to as a disk drive or a modem, needs a channel to bypass the microprocessor and access memory directly. If the system or one device at a time. The recommended procedure for adapter cards to the computer's Central Processing Unit (CPU)....


