

User Guide
Page 3
... Toshiba PDR-M25 Digital Still Camera. To ensure that you start using the camera. Conventions Used In This Manual IMPORTANT • Indicates items or details that you use this camera safely and correctly, read this Instruction Manual, keep it handy at all times. Trademark Information • MS-DOS, Windows, Windows 98, Windows 2000, Windows ME are trademarks or registered trademarks of the U.S. Also indicates information relating to specifications and functions. About OS Abbreviations • Windows...
... Toshiba PDR-M25 Digital Still Camera. To ensure that you start using the camera. Conventions Used In This Manual IMPORTANT • Indicates items or details that you use this camera safely and correctly, read this Instruction Manual, keep it handy at all times. Trademark Information • MS-DOS, Windows, Windows 98, Windows 2000, Windows ME are trademarks or registered trademarks of the U.S. Also indicates information relating to specifications and functions. About OS Abbreviations • Windows...

User Guide
Page 4
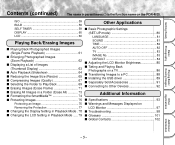
... Using the LCD Monitor 41 ■ Setting the Image Size and Quality 43 ■ Zoom Photography 45 ■ Digital Zoom Photography 46 ■ Close-up Photography (Macro Photography 47 ■ Photography Using the Self-timer (Self-timer Photography 48 ■ Photography Using the Flash (Flash Photography 49 ■ Multi Image Photography (Multi Photography 52 ■ Long Exposure Photography (Bulb Photography 53 ■ Taking Photographs Manually (Manual Photography 54 W.B. (White Balance 55 E.V. (Exposure Compensation 56 ■ Changing...
... Using the LCD Monitor 41 ■ Setting the Image Size and Quality 43 ■ Zoom Photography 45 ■ Digital Zoom Photography 46 ■ Close-up Photography (Macro Photography 47 ■ Photography Using the Self-timer (Self-timer Photography 48 ■ Photography Using the Flash (Flash Photography 49 ■ Multi Image Photography (Multi Photography 52 ■ Long Exposure Photography (Bulb Photography 53 ■ Taking Photographs Manually (Manual Photography 54 W.B. (White Balance 55 E.V. (Exposure Compensation 56 ■ Changing...
User Guide
Page 5
... Settings (SET-UP mode 80 LANGUAGE 81 SOUND 81 TIME 82 AUTO-OFF 82 TV 83 IMAGE No 83 DEFAULT 84 ■ Adjusting the LCD Monitor Brightness 85 ■ Taking and Playing Back Photographs on a TV 86 ■ Transferring Images to a PC 88 ■ Installing the USB driver 89 ■ Separately Sold Accessories 91 ■ Connecting to Other Devices 92 Additional Information ■ Specifications 93 ■ Warnings and Messages Displayed on the PDR-M25. ISO...
... Settings (SET-UP mode 80 LANGUAGE 81 SOUND 81 TIME 82 AUTO-OFF 82 TV 83 IMAGE No 83 DEFAULT 84 ■ Adjusting the LCD Monitor Brightness 85 ■ Taking and Playing Back Photographs on a TV 86 ■ Transferring Images to a PC 88 ■ Installing the USB driver 89 ■ Separately Sold Accessories 91 ■ Connecting to Other Devices 92 Additional Information ■ Specifications 93 ■ Warnings and Messages Displayed on the PDR-M25. ISO...
User Guide
Page 13
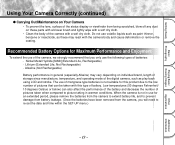
... low number of pictures that you will need to picture taking in general (especially Alkaine) may react with a soft dry cloth. Getting Ready Basic Photography Playing Back/ Erasing Images Using Your Camera Correctly (continued) ● Carrying Out Maintenance on Your Camera • To prevent the lens, surface of the status display or viewfinder from the camera, you only use the following types of batteries: - Do not use volatile...
... low number of pictures that you will need to picture taking in general (especially Alkaine) may react with a soft dry cloth. Getting Ready Basic Photography Playing Back/ Erasing Images Using Your Camera Correctly (continued) ● Carrying Out Maintenance on Your Camera • To prevent the lens, surface of the status display or viewfinder from the camera, you only use the following types of batteries: - Do not use volatile...
User Guide
Page 16
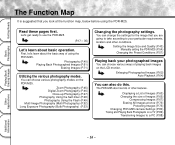
... Images (P.67) Erasing All Images at the function map, below before using the PDR-M25. Zoom Photography (P.45) Digital Zoom Photography (P.46) Close-up Photography (P.47) Photography Using the Self-timer (P.48) Photography Using the Flash (P.49) Multi Image Photography (Multi Photography) (P.52) Long Exposure Photography (Bulb Photography) (P.53) Changing the photography settings. You can change the settings for the image that you are going to take according to a PC (P.88) Playing Back/ Erasing Images Other...
... Images (P.67) Erasing All Images at the function map, below before using the PDR-M25. Zoom Photography (P.45) Digital Zoom Photography (P.46) Close-up Photography (P.47) Photography Using the Self-timer (P.48) Photography Using the Flash (P.49) Multi Image Photography (Multi Photography) (P.52) Long Exposure Photography (Bulb Photography) (P.53) Changing the photography settings. You can change the settings for the image that you are going to take according to a PC (P.88) Playing Back/ Erasing Images Other...
User Guide
Page 27
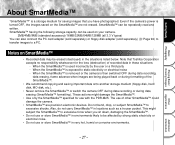
... use of the SmartMedia™. • We recommend copying and saving important data onto another storage medium (floppy disk, hard disk, MO disk, etc.). • Never remove the SmartMedia™ or switch the camera OFF during data recording or during formatting of other SmartMedia™ could damage the camera. • SmartMedia™ are not erased. SmartMedia™ having the following storage capacity can also connect the PC card adapter...
... use of the SmartMedia™. • We recommend copying and saving important data onto another storage medium (floppy disk, hard disk, MO disk, etc.). • Never remove the SmartMedia™ or switch the camera OFF during data recording or during formatting of other SmartMedia™ could damage the camera. • SmartMedia™ are not erased. SmartMedia™ having the following storage capacity can also connect the PC card adapter...

User Guide
Page 41
... down fully takes the shot. • When the focus and exposure are adjusted, the viewfinder lamp lights. (➲ Page 39) • If you shoot a picture, when preview is set to ON (➲ Page 59), a preview image is displayed on the power. - 41 - Photography (Auto Photography) (continued) Look through the viewfinder to take the photograph. Getting Ready Basic Photography Playing Back/ Erasing Images Other Applications Press the shutter button down half...
... down fully takes the shot. • When the focus and exposure are adjusted, the viewfinder lamp lights. (➲ Page 39) • If you shoot a picture, when preview is set to ON (➲ Page 59), a preview image is displayed on the power. - 41 - Photography (Auto Photography) (continued) Look through the viewfinder to take the photograph. Getting Ready Basic Photography Playing Back/ Erasing Images Other Applications Press the shutter button down half...

User Guide
Page 42
... the shutter button down fully takes the shot. • When the focus and exposure are adjusted, the viewfinder lamp lights. (➲ Page 39) • If you shoot a picture, when preview is set to [ ]. Getting Ready Basic Photography Photography (Auto Photography) (continued) Set the mode dial to ON (➲ Page 59), a preview image is displayed on screen for about two seconds. • The viewfinder lamp flashes while image data is being recorded onto...
... the shutter button down fully takes the shot. • When the focus and exposure are adjusted, the viewfinder lamp lights. (➲ Page 39) • If you shoot a picture, when preview is set to [ ]. Getting Ready Basic Photography Photography (Auto Photography) (continued) Set the mode dial to ON (➲ Page 59), a preview image is displayed on screen for about two seconds. • The viewfinder lamp flashes while image data is being recorded onto...

User Guide
Page 43
Press the image quality button to turn on the status display. Change the setting according to how the image is to be used and the remaining amount of the image. Slide the POWER knob to set the required quality and size while viewing the image on the power. Select from the available combinations of quality and size. ★★FULL (default) ★★★FULL ★HALF ★...
Press the image quality button to turn on the status display. Change the setting according to how the image is to be used and the remaining amount of the image. Slide the POWER knob to set the required quality and size while viewing the image on the power. Select from the available combinations of quality and size. ★★FULL (default) ★★★FULL ★HALF ★...

User Guide
Page 48
... manual setup screen is activated. Basic Photography Playing Back/ Erasing Images Press the button to set to the self-timer mode. [ ] is used, the shutter automatically closes after the preset time (two or ten seconds). ☞ Changing the set time until photography ➲ Page 59 Set the mode dial to [ ] or [ ]. When photographs are taken using the LCD monitor, the count down fully. ➲ Page 37 The self-timer lamp flashes after the preset time...
... manual setup screen is activated. Basic Photography Playing Back/ Erasing Images Press the button to set to the self-timer mode. [ ] is used, the shutter automatically closes after the preset time (two or ten seconds). ☞ Changing the set time until photography ➲ Page 59 Set the mode dial to [ ] or [ ]. When photographs are taken using the LCD monitor, the count down fully. ➲ Page 37 The self-timer lamp flashes after the preset time...

User Guide
Page 52
... Auto Power OFF function is opened and closed 16 times. The 16 photographed images are canceled when you remove or insert the batteries or disconnect or connect the AC adapter. Playing Back/ Erasing Images Other Applications Additional Information - 52 - Press the (MENU) button. 2. In the Manual Photography mode, [ ] is displayed. Use the or buttons to [ ] or [ ]. Getting Ready Basic Photography Multi Image Photography (Multi Photography) This mode takes 16 shots continuously at 0.25 second intervals. Set...
... Auto Power OFF function is opened and closed 16 times. The 16 photographed images are canceled when you remove or insert the batteries or disconnect or connect the AC adapter. Playing Back/ Erasing Images Other Applications Additional Information - 52 - Press the (MENU) button. 2. In the Manual Photography mode, [ ] is displayed. Use the or buttons to [ ] or [ ]. Getting Ready Basic Photography Multi Image Photography (Multi Photography) This mode takes 16 shots continuously at 0.25 second intervals. Set...

User Guide
Page 53
... LCD monitor when the manual setup screen is activated. • The settings are canceled when you remove or insert the batteries or disconnect or connect the AC adapter. Press the (MENU) button. 2. Set the mode dial to select [BULB] and press the ENTER button. 4. Getting Ready Basic Photography Long Exposure Photography (Bulb Photography) This mode is used for taking the photograph due to processing of the captured image. ☞ Changing...
... LCD monitor when the manual setup screen is activated. • The settings are canceled when you remove or insert the batteries or disconnect or connect the AC adapter. Press the (MENU) button. 2. Set the mode dial to select [BULB] and press the ENTER button. 4. Getting Ready Basic Photography Long Exposure Photography (Bulb Photography) This mode is used for taking the photograph due to processing of the captured image. ☞ Changing...

User Guide
Page 54
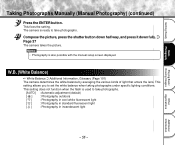
... Photography Playing Back/ Erasing Images Other Applications Press the or buttons to select the setting item and the or buttons to [ ]. IMPORTANT • If you remove or insert the batteries or disconnect or connect the AC adapter, the manual photography settings will return to their defaults. This is displayed. Set values E.V. +0.3 0 W.B. 0.3 AUTO Setting items Additional Information Getting Ready Taking Photographs Manually (Manual Photography) You can manually adjust conditions such as white balance and exposure compensation, and take...
... Photography Playing Back/ Erasing Images Other Applications Press the or buttons to select the setting item and the or buttons to [ ]. IMPORTANT • If you remove or insert the batteries or disconnect or connect the AC adapter, the manual photography settings will return to their defaults. This is displayed. Set values E.V. +0.3 0 W.B. 0.3 AUTO Setting items Additional Information Getting Ready Taking Photographs Manually (Manual Photography) You can manually adjust conditions such as white balance and exposure compensation, and take...
User Guide
Page 55
... fluorescent light [ ] : Photography in incandescent light Playing Back/ Erasing Images Other Applications Additional Information - 55 - This setting does not function when the flash is used to take photographs. W.B. (White Balance) ☞ White Balance ➲ Additional Information, Glossary (Page 101) The camera determines the white balance by averaging the various kinds of light that enters the lens. The camera is also possible with the manual setup screen displayed. This fixes the setting. Compose the picture, press the shutter button down...
... fluorescent light [ ] : Photography in incandescent light Playing Back/ Erasing Images Other Applications Additional Information - 55 - This setting does not function when the flash is used to take photographs. W.B. (White Balance) ☞ White Balance ➲ Additional Information, Glossary (Page 101) The camera determines the white balance by averaging the various kinds of light that enters the lens. The camera is also possible with the manual setup screen displayed. This fixes the setting. Compose the picture, press the shutter button down...

User Guide
Page 57
... camera is turned OFF or the Auto Power OFF function is activated. The image before the photograph is taken is for setting the basic settings to be used for photography in the [ ] automatic photography and [ ] manual photography mode. Getting Ready Changing the Preset Conditions (REC MENU) This menu is displayed on the LCD monitor when selecting [LCD]. ☞ REC. The settings are canceled when you remove or insert the batteries...
... camera is turned OFF or the Auto Power OFF function is activated. The image before the photograph is taken is for setting the basic settings to be used for photography in the [ ] automatic photography and [ ] manual photography mode. Getting Ready Changing the Preset Conditions (REC MENU) This menu is displayed on the LCD monitor when selecting [LCD]. ☞ REC. The settings are canceled when you remove or insert the batteries...

User Guide
Page 74
... button. Basic Photography Playing Back/ Erasing Images Other Applications Use the or buttons to [ ], [ ] or [ ]. Make sure that [FORMAT] is displayed. IMPORTANT • The SmartMedia™ must be formatted if it is selected, the last image frame appears on the LCD monitor. ERASE 2 Use the or buttons to select [YES], and press the ENTER button. FRAME 100 0004 YES 1 NO ALL FORMAT Additional Information To reset the image number, use . When [ ] is write-protected...
... button. Basic Photography Playing Back/ Erasing Images Other Applications Use the or buttons to [ ], [ ] or [ ]. Make sure that [FORMAT] is displayed. IMPORTANT • The SmartMedia™ must be formatted if it is selected, the last image frame appears on the LCD monitor. ERASE 2 Use the or buttons to select [YES], and press the ENTER button. FRAME 100 0004 YES 1 NO ALL FORMAT Additional Information To reset the image number, use . When [ ] is write-protected...

User Guide
Page 80
.... Additional Information The following items can be changed in the mode: LANGUAGE/SOUND/TIME/AUTO-OFF/TV/IMAGE No./DEFAULT The details set here are held in addition to set up the environment for using your camera in memory even if the camera is called "setup". DEFAULT English ON SET 1MIN NTSC SET SET - 80 - Getting Ready Basic Photographic Settings (SET-UP mode) This feature allows you want to image-related settings. Set the mode dial to [ ].
.... Additional Information The following items can be changed in the mode: LANGUAGE/SOUND/TIME/AUTO-OFF/TV/IMAGE No./DEFAULT The details set here are held in addition to set up the environment for using your camera in memory even if the camera is called "setup". DEFAULT English ON SET 1MIN NTSC SET SET - 80 - Getting Ready Basic Photographic Settings (SET-UP mode) This feature allows you want to image-related settings. Set the mode dial to [ ].
User Guide
Page 89
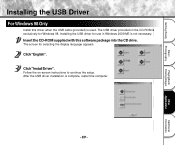
... driver when the USB cable (provided) is complete, restart the computer. - 89 - Other Applications Additional Information Getting Ready Basic Photography Playing Back/ Erasing Images Installing the USB Driver For Windows 98 Only Install this software package into the CD drive. Click "Install Driver". After the USB driver installation is used. Follow the on the CD-ROM is not necessary. Installing the USB driver for selecting the display language appears. The USB driver provided on -screen instructions to continue the setup...
... driver when the USB cable (provided) is complete, restart the computer. - 89 - Other Applications Additional Information Getting Ready Basic Photography Playing Back/ Erasing Images Installing the USB Driver For Windows 98 Only Install this software package into the CD drive. Click "Install Driver". After the USB driver installation is used. Follow the on the CD-ROM is not necessary. Installing the USB driver for selecting the display language appears. The USB driver provided on -screen instructions to continue the setup...

User Guide
Page 99
... the shutter button. The image is too far away. Select a different folder to Auto, Red-Eye Reduction or P.49 Forced Flash mode. Set the mode dial to the subject. Replace with new batteries. The subject is out of focus. Nothing happens when I cannot erase all the frames. Remove the write-protection. The camera is write-protected Camera malfunction. I use the flash to Suppressed Flash mode. The SmartMedia™ is set to Suppressed Flash mode. The camera is set to take pictures. The flash is...
... the shutter button. The image is too far away. Select a different folder to Auto, Red-Eye Reduction or P.49 Forced Flash mode. Set the mode dial to the subject. Replace with new batteries. The subject is out of focus. Nothing happens when I cannot erase all the frames. Remove the write-protection. The camera is write-protected Camera malfunction. I use the flash to Suppressed Flash mode. The SmartMedia™ is set to Suppressed Flash mode. The camera is set to take pictures. The flash is...
User Guide
Page 101
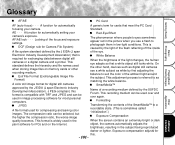
... and saving color images. On the other recording medium. ● Exif File Format (Exchangeable Image File Format) When the brightness of the SmartMedia™ to a recordable state. (This is ● White Balance required for Camera File System) The phenomenon where people's eyes sometimes appear red in the picture when you use a flash to photograph them in image processing software for PCs and on memory cards or other hand, devices such as digital still cameras see a white...
... and saving color images. On the other recording medium. ● Exif File Format (Exchangeable Image File Format) When the brightness of the SmartMedia™ to a recordable state. (This is ● White Balance required for Camera File System) The phenomenon where people's eyes sometimes appear red in the picture when you use a flash to photograph them in image processing software for PCs and on memory cards or other hand, devices such as digital still cameras see a white...

