

User Manual
Page 1
dynadock™ wireless U User's Manual GMAA00165010 07/09
dynadock™ wireless U User's Manual GMAA00165010 07/09

User Manual
Page 10
...peripherals 28 Connecting to a network 28 Connecting a monitor 29 Connecting audio devices 30 Connecting USB devices 31 Chapter 2: Using the dynadock™ and Adjusting Settings...... 33 Undocking your computer 33 Undocking via the undock button 34 Undocking via the utility 34 Undocking ...connecting and docking your computer 36 Using the dynadock™ software 37 The background utility 37 Using the Wireless USB Manager 37 Using the TOSHIBA dynadock Utility 42 Using the USB Multi-Channel Audio Device Utility 45 Using the TOSHIBA Video Dock Utility 45 Uninstalling the software ...
...peripherals 28 Connecting to a network 28 Connecting a monitor 29 Connecting audio devices 30 Connecting USB devices 31 Chapter 2: Using the dynadock™ and Adjusting Settings...... 33 Undocking your computer 33 Undocking via the undock button 34 Undocking via the utility 34 Undocking ...connecting and docking your computer 36 Using the dynadock™ software 37 The background utility 37 Using the Wireless USB Manager 37 Using the TOSHIBA dynadock Utility 42 Using the USB Multi-Channel Audio Device Utility 45 Using the TOSHIBA Video Dock Utility 45 Uninstalling the software ...
User Manual
Page 12
The wireless function uses UWB (ultra-wide band) radio technology. Keep your computer peripherals wirelessly or through a single USB cable to obtain software driver and support updates. 12 Introduction Thank you for purchasing the dynadock™ wireless U, the universal docking station that enables you to connect your dynadock™ up-to-date with the latest technological advances: visit pcsupport.toshiba.com periodically to just about any Windows®-based computer.
The wireless function uses UWB (ultra-wide band) radio technology. Keep your computer peripherals wirelessly or through a single USB cable to obtain software driver and support updates. 12 Introduction Thank you for purchasing the dynadock™ wireless U, the universal docking station that enables you to connect your dynadock™ up-to-date with the latest technological advances: visit pcsupport.toshiba.com periodically to just about any Windows®-based computer.
User Manual
Page 13
Introduction 13 Overview Overview Features ❖ ❖ ❖ ❖ ❖ Wireless or single USB cable connection to your computer* Upright slim design saves desktop space Easily accessible USB and audio ports located on the ...Timing) on an external monitor Hot-swappable: add or remove most devices without rebooting the computer Virtual 7.1 channel digital surround sound Includes TOSHIBA dynadock Utility for customizing dynadock™ settings Charges your USB peripherals with the front powered USB ports even when the connected computer is off Undock button allows you to...
Introduction 13 Overview Overview Features ❖ ❖ ❖ ❖ ❖ Wireless or single USB cable connection to your computer* Upright slim design saves desktop space Easily accessible USB and audio ports located on the ...Timing) on an external monitor Hot-swappable: add or remove most devices without rebooting the computer Virtual 7.1 channel digital surround sound Includes TOSHIBA dynadock Utility for customizing dynadock™ settings Charges your USB peripherals with the front powered USB ports even when the connected computer is off Undock button allows you to...
User Manual
Page 14
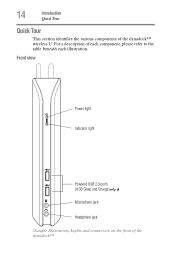
14 Introduction Quick Tour Quick Tour This section identifies the various components of each component, please refer to the table beneath each illustration. For a description of the dynadock™ wireless U. Front view Power light Indicator light Powered USB 2.0 ports (USB Sleep and Charge) Microphone jack Headphone jack (Sample Illustration) Lights and connectors on the front of the dynadock™
14 Introduction Quick Tour Quick Tour This section identifies the various components of each component, please refer to the table beneath each illustration. For a description of the dynadock™ wireless U. Front view Power light Indicator light Powered USB 2.0 ports (USB Sleep and Charge) Microphone jack Headphone jack (Sample Illustration) Lights and connectors on the front of the dynadock™
User Manual
Page 17
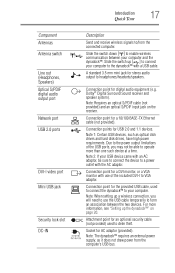
...an optical S/PDIF input jack on page 20. Connection point for stereo audio output to enable wireless communication between the two devices. Attachment point for the provided USB cable, used to the dynadock™ with use the USB cable temporarily to VGA adaptor. Connection points for digital audio equipment... deter theft. Slide the switch up a wireless connection, you will need to use of the USB ports, you may not be able to a power outlet with an AC adaptor, be sure to connect the device to operate more information, see "Setting up the dynadock™" on the receiver.
...an optical S/PDIF input jack on page 20. Connection point for stereo audio output to enable wireless communication between the two devices. Attachment point for the provided USB cable, used to the dynadock™ with use the USB cable temporarily to VGA adaptor. Connection points for digital audio equipment... deter theft. Slide the switch up a wireless connection, you will need to use of the USB ports, you may not be able to a power outlet with an AC adaptor, be sure to connect the device to operate more information, see "Setting up the dynadock™" on the receiver.
User Manual
Page 18
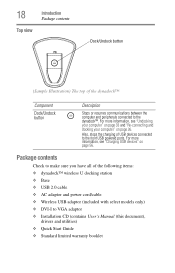
... Top view Introduction Package contents Dock/Undock button (Sample Illustration) The top of the following items: ❖ dynadock™ wireless U docking station ❖ Base ❖ USB 2.0 cable ❖ AC adaptor and power cord/cable ❖ Wireless USB adaptor (included with select models only) ❖ DVI-I to VGA adaptor ❖ Installation CD (contains User...
... Top view Introduction Package contents Dock/Undock button (Sample Illustration) The top of the following items: ❖ dynadock™ wireless U docking station ❖ Base ❖ USB 2.0 cable ❖ AC adaptor and power cord/cable ❖ Wireless USB adaptor (included with select models only) ❖ DVI-I to VGA adaptor ❖ Installation CD (contains User...
User Manual
Page 19
... memory or higher recommended) ❖ USB 2.0 port ❖ 30 MB of available disk space ❖ Certified Wireless USB adaptor or a computer with Integrated Certified Wireless USB functionality* ❖ Microsoft® Windows® XP (32-bit edition) with SP2/SP3, or Microsoft®...) with SP1 NOTE When Windows® 7 becomes available, Windows® 7-compatible drivers for the dynadock™ wireless U will be available for wireless communication between the dynadock™ and your product (part number: PA3686U). *Required for download from Toshiba's Web site at pcsupport...
... memory or higher recommended) ❖ USB 2.0 port ❖ 30 MB of available disk space ❖ Certified Wireless USB adaptor or a computer with Integrated Certified Wireless USB functionality* ❖ Microsoft® Windows® XP (32-bit edition) with SP2/SP3, or Microsoft®...) with SP1 NOTE When Windows® 7 becomes available, Windows® 7-compatible drivers for the dynadock™ wireless U will be available for wireless communication between the dynadock™ and your product (part number: PA3686U). *Required for download from Toshiba's Web site at pcsupport...

User Manual
Page 20
... section on the indicated page. Assemble the dynadock™ Slide the dynadock™ onto the base as shown below. (Sample Illustration) Attaching the base to your computer You may either: a Set up a wireless connection OR b Set up the dynadock™. You will need to perform the ...following steps in the order shown: 1 Assemble the dynadock™ 2 Connect the power adaptor 3 Install the software 4 Connect the dynadock™ to the dynadock™ 20
... section on the indicated page. Assemble the dynadock™ Slide the dynadock™ onto the base as shown below. (Sample Illustration) Attaching the base to your computer You may either: a Set up a wireless connection OR b Set up the dynadock™. You will need to perform the ...following steps in the order shown: 1 Assemble the dynadock™ 2 Connect the power adaptor 3 Install the software 4 Connect the dynadock™ to the dynadock™ 20

User Manual
Page 23
... Peripherals 23 Setting up the dynadock™ (Sample Image) dynadock Installer The following programs are installed during the installation process: Driver Type Wireless USB device driver Wireless USB host driver dynadock Utility Network driver Audio driver Video driver Driver Name Wireless USB Manager dynadock Utility II AX88772A & AX88772 USB Multi-Channel Audio Device TOSHIBA Video Dock Utility (DisplayLink...
... Peripherals 23 Setting up the dynadock™ (Sample Image) dynadock Installer The following programs are installed during the installation process: Driver Type Wireless USB device driver Wireless USB host driver dynadock Utility Network driver Audio driver Video driver Driver Name Wireless USB Manager dynadock Utility II AX88772A & AX88772 USB Multi-Channel Audio Device TOSHIBA Video Dock Utility (DisplayLink...

User Manual
Page 24
... connection you are not using a Toshiba adaptor or if your computer has integrated Certified Wireless USB functionality, please refer to the documentation provided with your computer You may either a Certified Wireless USB adaptor (included with certain models) or a computer with integrated Certified Wireless USB functionality. 24 Setting Up the dynadock™ and Connecting Peripherals Setting...
... connection you are not using a Toshiba adaptor or if your computer has integrated Certified Wireless USB functionality, please refer to the documentation provided with your computer You may either a Certified Wireless USB adaptor (included with certain models) or a computer with integrated Certified Wireless USB functionality. 24 Setting Up the dynadock™ and Connecting Peripherals Setting...
User Manual
Page 25
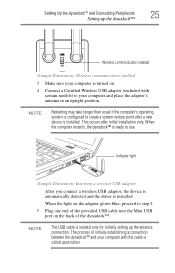
... and the driver is needed only for initially setting up the dynadock™ Wireless communication enabled (Sample Illustration) Wireless communication enabled 3 Make sure your computer is turned on. 4 Connect a Certified Wireless USB adaptor (included with the cable is called association. The process of the dynadock™. This occurs after a new device is ready to your...
... and the driver is needed only for initially setting up the dynadock™ Wireless communication enabled (Sample Illustration) Wireless communication enabled 3 Make sure your computer is turned on. 4 Connect a Certified Wireless USB adaptor (included with the cable is called association. The process of the dynadock™. This occurs after a new device is ready to your...

User Manual
Page 26
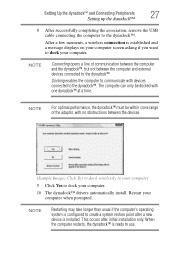
26 Setting Up the dynadock™ and Connecting Peripherals Setting up the dynadock™ (Sample Illustration) Connecting the USB cable to the Mini USB port 6 Plug the other end of the USB cable into an available USB 2.0 port on your computer. (Sample Illustration) Connecting the USB cable to your computer The Wireless USB Manager opens automatically on your computer screen. 7 Click Yes allow the device to associate to start the association. (Sample Image) Association screen
26 Setting Up the dynadock™ and Connecting Peripherals Setting up the dynadock™ (Sample Illustration) Connecting the USB cable to the Mini USB port 6 Plug the other end of the USB cable into an available USB 2.0 port on your computer. (Sample Illustration) Connecting the USB cable to your computer The Wireless USB Manager opens automatically on your computer screen. 7 Click Yes allow the device to associate to start the association. (Sample Image) Association screen
User Manual
Page 27
... only be within close range of communication between the computer and the dynadock™, but not between the devices. (Sample Image) Click Yes to dock wirelessly to your computer. 10 The dynadock™ drivers automatically install. When the computer restarts, the dynadock™ is ready to create a system restore point after initial installation only...
... only be within close range of communication between the computer and the dynadock™, but not between the devices. (Sample Image) Click Yes to dock wirelessly to your computer. 10 The dynadock™ drivers automatically install. When the computer restarts, the dynadock™ is ready to create a system restore point after initial installation only...
User Manual
Page 28
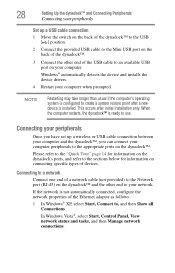
...) to the Network port (RJ-45) on your computer. 28 Setting Up the dynadock™ and Connecting Peripherals Connecting your peripherals Set up a wireless or USB cable connection between your computer and the dynadock™, you have set up a USB cable connection 1 Move the switch on the... back of the dynadock™ to the USB [ ] position. 2 Connect the provided USB cable ...
...) to the Network port (RJ-45) on your computer. 28 Setting Up the dynadock™ and Connecting Peripherals Connecting your peripherals Set up a wireless or USB cable connection between your computer and the dynadock™, you have set up a USB cable connection 1 Move the switch on the... back of the dynadock™ to the USB [ ] position. 2 Connect the provided USB cable ...
User Manual
Page 30
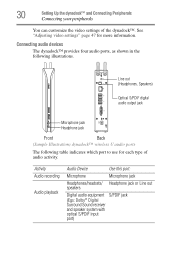
...;. Line out (Headphones, Speakers) Optical S/PDIF digital audio output jack Microphone jack Headphone jack Front Back (Sample Illustration) dynadock™ wireless U audio ports The following illustrations. Activity Audio recording Audio playback Audio Device Use this port: Microphone Microphone jack Headphones/headsets/ Headphone jack or Line out ...
...;. Line out (Headphones, Speakers) Optical S/PDIF digital audio output jack Microphone jack Headphone jack Front Back (Sample Illustration) dynadock™ wireless U audio ports The following illustrations. Activity Audio recording Audio playback Audio Device Use this port: Microphone Microphone jack Headphones/headsets/ Headphone jack or Line out ...

User Manual
Page 33
...USB cable connecting your computer to the dynadock™ (if you are using a wireless connection). ❖ Move the computer outside of the operational range (approximately 10 meters/32 feet) of the dynadock™, or ❖ Use the TOSHIBA dynadock Utility. NOTE If you undock your computer..., it is safe to break the wireless or cable connection between the computer and the dynadock™. "Undocking" your computer, either: ❖...
...USB cable connecting your computer to the dynadock™ (if you are using a wireless connection). ❖ Move the computer outside of the operational range (approximately 10 meters/32 feet) of the dynadock™, or ❖ Use the TOSHIBA dynadock Utility. NOTE If you undock your computer..., it is safe to break the wireless or cable connection between the computer and the dynadock™. "Undocking" your computer, either: ❖...

User Manual
Page 35
... necessary, to display hidden icons. 2 Select Eject and Sleep from the TOSHIBA dynadock Utility menu. Using the dynadock™ and Adjusting Settings 35 Undocking your computer The indicator light on the front of the dynadock™ flashes orange, and the following message appears on your System tray/...desktop. (Sample Image) TOSHIBA dynadock Utility icon NOTE If the icon is not visible in your computer screen. (Sample Image) Undocking in the System tray/Notification Area of the dynadock™ antennas or to disconnect the USB cable if you are using a wireless USB adaptor, you ...
... necessary, to display hidden icons. 2 Select Eject and Sleep from the TOSHIBA dynadock Utility menu. Using the dynadock™ and Adjusting Settings 35 Undocking your computer The indicator light on the front of the dynadock™ flashes orange, and the following message appears on your System tray/...desktop. (Sample Image) TOSHIBA dynadock Utility icon NOTE If the icon is not visible in your computer screen. (Sample Image) Undocking in the System tray/Notification Area of the dynadock™ antennas or to disconnect the USB cable if you are using a wireless USB adaptor, you ...

User Manual
Page 36
...), do the following: ❖ If you are using a wireless USB adaptor, make sure the adaptor is properly connected or re-connect the adaptor. ❖ Make sure the computer is within wireless communication range of the dynadock™. ❖ Remove any obstructions between the computer and the... dynadock™. ❖ If the computer is in standby/sleep/hibernation mode, press the computer...
...), do the following: ❖ If you are using a wireless USB adaptor, make sure the adaptor is properly connected or re-connect the adaptor. ❖ Make sure the computer is within wireless communication range of the dynadock™. ❖ Remove any obstructions between the computer and the... dynadock™. ❖ If the computer is in standby/sleep/hibernation mode, press the computer...
User Manual
Page 42
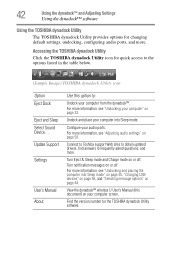
...; and Adjusting Settings Using the dynadock™ software Using the TOSHIBA dynadock Utility The TOSHIBA dynadock Utility provides options for changing default settings, undocking, configuring audio ports, and more information, see "Undocking and placing the computer into Sleep mode. Undock and place your audio ports. View the dynadock™ wireless U User's Manual (this option to frequently asked...
...; and Adjusting Settings Using the dynadock™ software Using the TOSHIBA dynadock Utility The TOSHIBA dynadock Utility provides options for changing default settings, undocking, configuring audio ports, and more information, see "Undocking and placing the computer into Sleep mode. Undock and place your audio ports. View the dynadock™ wireless U User's Manual (this option to frequently asked...