Owners Manual
Page 1
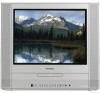
DIGITAL VIDEO Introduction 2 COMBINATION FLAT COLOR TELEVISION AND VIDEO CASSETTE RECORDER / DVD VIDEO PLAYER MW20FP1 MW24FP1 MW27FP1 Connections 13 Basic setup 18 TV operation 23 Playback (VCR) 33 Recording (VCR) 38 OWNER'S MANUAL Other functions (VCR) 42 Basic playback (DVD) 44 Advanced playback 47 (DVD) Function setup (DVD) 56 Others 60 Illustration of MW20FP1 ©2004 Toshiba Corporation This device does not tape-record copy protected DVD video discs. 5L00201C [E]Cover 1 20/4/04, 16:04
DIGITAL VIDEO Introduction 2 COMBINATION FLAT COLOR TELEVISION AND VIDEO CASSETTE RECORDER / DVD VIDEO PLAYER MW20FP1 MW24FP1 MW27FP1 Connections 13 Basic setup 18 TV operation 23 Playback (VCR) 33 Recording (VCR) 38 OWNER'S MANUAL Other functions (VCR) 42 Basic playback (DVD) 44 Advanced playback 47 (DVD) Function setup (DVD) 56 Others 60 Illustration of MW20FP1 ©2004 Toshiba Corporation This device does not tape-record copy protected DVD video discs. 5L00201C [E]Cover 1 20/4/04, 16:04
Owners Manual
Page 2
... record television programs, films, video tapes and other rights are designed to radio communications. TO ENSURE PROPER USE OF THIS PRODUCT, PLEASE READ THIS OWNER'S MANUAL CAREFULLY AND RETAIN FOR FUTURE REFERENCE. SHOULD THE UNIT REQUIRE MAINTENANCE, CONTACT AN AUTHORIZED SERVICE LOCATION-SEE SERVICE PROCEDURE. This equipment generates, uses and can...
... record television programs, films, video tapes and other rights are designed to radio communications. TO ENSURE PROPER USE OF THIS PRODUCT, PLEASE READ THIS OWNER'S MANUAL CAREFULLY AND RETAIN FOR FUTURE REFERENCE. SHOULD THE UNIT REQUIRE MAINTENANCE, CONTACT AN AUTHORIZED SERVICE LOCATION-SEE SERVICE PROCEDURE. This equipment generates, uses and can...
Owners Manual
Page 3
... the exterior cabinet only. 6. This unit should be blocked by RETAC) Do not place this unit does not make any recommendations for future reference. 3. er's Manual for their operating instructions. 11. If the plug should be routed so that they may be placed in a built-in the cabinet back or bottom...
... the exterior cabinet only. 6. This unit should be blocked by RETAC) Do not place this unit does not make any recommendations for future reference. 3. er's Manual for their operating instructions. 11. If the plug should be routed so that they may be placed in a built-in the cabinet back or bottom...
Owners Manual
Page 4
...-05 4 20/4/04, 16:04 Refer all of the disc tray as an improper adjustment of other equipment, turn on the product. c. Read the owner's manual of liquid into the unit. LIGHTNING To protect your fingers well clear of the equipment from the wall outlet and disconnect the antenna or cable...
...-05 4 20/4/04, 16:04 Refer all of the disc tray as an improper adjustment of other equipment, turn on the product. c. Read the owner's manual of liquid into the unit. LIGHTNING To protect your fingers well clear of the equipment from the wall outlet and disconnect the antenna or cable...

Owners Manual
Page 8
... numbers, which stand for the disc. Playable discs This unit can be played on this owner's manual may appear on the TV screen during playback. Introduction Notes on discs (Continued) About this owner's manual This owner's manual explains the basic instructions of this unit is 1. A " " means that allows specific or limited operation during...
... numbers, which stand for the disc. Playable discs This unit can be played on this owner's manual may appear on the TV screen during playback. Introduction Notes on discs (Continued) About this owner's manual This owner's manual explains the basic instructions of this unit is 1. A " " means that allows specific or limited operation during...
Owners Manual
Page 10
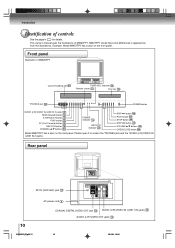
This owner's manual uses the illustrations of MW20FP1. Front panel Illustration of MW20FP1 Cassette loading slot 33 TIMER REC indicator 40 Remote sensor 12 Disc tray 44 *PHONES jack 24 POWER button *AUDIO (L/R)/VIDEO IN (LINE IN 2) jacks ...
This owner's manual uses the illustrations of MW20FP1. Front panel Illustration of MW20FP1 Cassette loading slot 33 TIMER REC indicator 40 Remote sensor 12 Disc tray 44 *PHONES jack 24 POWER button *AUDIO (L/R)/VIDEO IN (LINE IN 2) jacks ...
Owners Manual
Page 11
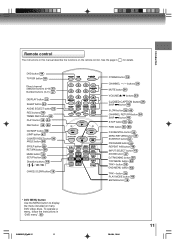
... MENU TRK - See the page in "DVD menu". 50 5L00201C [E]p06-12 11 20/4/04, 16:04 11 Introduction Remote control The instructions in this manual describe the functions on many DVD video discs. CLEAR PLAY MODE 18 POWER button 24 CHANNEL / buttons 24 MUTE button 23 VOLUME / buttons CLOSED CAPTION...
... MENU TRK - See the page in "DVD menu". 50 5L00201C [E]p06-12 11 20/4/04, 16:04 11 Introduction Remote control The instructions in this manual describe the functions on many DVD video discs. CLEAR PLAY MODE 18 POWER button 24 CHANNEL / buttons 24 MUTE button 23 VOLUME / buttons CLOSED CAPTION...
Owners Manual
Page 16
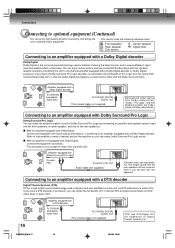
... not equipped with Dolby Digital Connect the equipment as described in "Connecting to an amplifier equipped with a Dolby Digital decoder." Refer to that amplifier's owner's manual and set the amplifier so you can obtain the full benefit of Pro Logic from the same DVD movies that provide full 5.1-channel Dolby Digital...
... not equipped with Dolby Digital Connect the equipment as described in "Connecting to an amplifier equipped with a Dolby Digital decoder." Refer to that amplifier's owner's manual and set the amplifier so you can obtain the full benefit of Pro Logic from the same DVD movies that provide full 5.1-channel Dolby Digital...

Owners Manual
Page 17
... unit. • Connect the COAXIAL DIGITAL AUDIO OUT jack of the unit to the "COAXIAL" input of a Receiver or Processor. • Refer to the owner's manual of the connected equipment as well. • When you leave the amplifier power on your A/V Receiver is reserved for Laserdisc use only and is incompatible...
... unit. • Connect the COAXIAL DIGITAL AUDIO OUT jack of the unit to the "COAXIAL" input of a Receiver or Processor. • Refer to the owner's manual of the connected equipment as well. • When you leave the amplifier power on your A/V Receiver is reserved for Laserdisc use only and is incompatible...
Owners Manual
Page 19
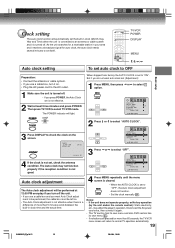
... DAYLIGHT SAVING TIME / / / / MENU 2 Press or to select "AUTO CLOCK". 3 Press DISPLAY to "OFF", the Auto Clock adjustment does not function. • Set the clock manually 21 . MENU SETUP • When the AUTO CLOCK is set to check the clock on the screen. Basic setup Clock setting The auto clock function...
... DAYLIGHT SAVING TIME / / / / MENU 2 Press or to select "AUTO CLOCK". 3 Press DISPLAY to "OFF", the Auto Clock adjustment does not function. • Set the clock manually 21 . MENU SETUP • When the AUTO CLOCK is set to check the clock on the screen. Basic setup Clock setting The auto clock function...
Owners Manual
Page 20
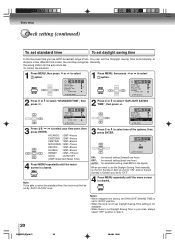
...select "STANDARD TIME", then press . the wrong station for automatic setting (read EDS in the signal) When you want to set the Daylight Saving Time manually, on the first Sunday in April you set to "ON", and on the last Sunday in October you live within broadcast range of the options..., then press ENTER. ENTER DAYLIGHT SAVING TIME ON OFF AUTO / /ENTER/MENU ON: for manual setting (forward one hour) OFF: for manual setting (back one of two You can set to select the standard time, the clock must first be set . Basic setup Clock...
...select "STANDARD TIME", then press . the wrong station for automatic setting (read EDS in the signal) When you want to set the Daylight Saving Time manually, on the first Sunday in April you set to "ON", and on the last Sunday in October you live within broadcast range of the options..., then press ENTER. ENTER DAYLIGHT SAVING TIME ON OFF AUTO / /ENTER/MENU ON: for manual setting (forward one hour) OFF: for manual setting (back one of two You can set to select the standard time, the clock must first be set . Basic setup Clock...
Owners Manual
Page 21
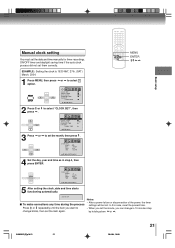
... 20/4/04, 16:05 21 In this case, reset the present time. • When you set them correctly. Basic setup Manual clock setting You must set the date and time manually for timer recordings, ON/OFF timer and daylight saving time if the auto clock process did not set the minute, you...
... 20/4/04, 16:05 21 In this case, reset the present time. • When you set them correctly. Basic setup Manual clock setting You must set the date and time manually for timer recordings, ON/OFF timer and daylight saving time if the auto clock process did not set the minute, you...

Owners Manual
Page 35
...Forward picture search function Press FWD once or twice during playback. to playback, press PLAY or PAUSE/STILL. SLP (Super Long Play) 9 X 15 X MANUAL TRACK DIGITAL TRACK Still picture Press PAUSE/STILL during slow motion, press the TRK + / - to playback, press PLAY or SLOW. Slow motion During playback... the best possible picture. "DIGITAL TRACK" will appear for 4 seconds on the screen. If noise bars appear during playback, adjust the tracking manually as less noise appeared during search and still playback for each press of tape 35 5L00201C [E]p33-37 35 20/4/04, 16:07...
...Forward picture search function Press FWD once or twice during playback. to playback, press PLAY or PAUSE/STILL. SLP (Super Long Play) 9 X 15 X MANUAL TRACK DIGITAL TRACK Still picture Press PAUSE/STILL during slow motion, press the TRK + / - to playback, press PLAY or SLOW. Slow motion During playback... the best possible picture. "DIGITAL TRACK" will appear for 4 seconds on the screen. If noise bars appear during playback, adjust the tracking manually as less noise appeared during search and still playback for each press of tape 35 5L00201C [E]p33-37 35 20/4/04, 16:07...
Owners Manual
Page 63
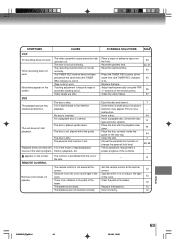
The TIMER REC buttons have not been pressed at the remote 12 sensor. Video heads are not inserted correctly. Reset the present time. Adjust tracking manually using the TRK 35 +/- Some times a small amount of picture distortion may prevent a proper progress of the beam. Place the disc with the unit or ...
The TIMER REC buttons have not been pressed at the remote 12 sensor. Video heads are not inserted correctly. Reset the present time. Adjust tracking manually using the TRK 35 +/- Some times a small amount of picture distortion may prevent a proper progress of the beam. Place the disc with the unit or ...

Owners Manual
Page 65
...within ten days after the date of sale or provide other purchaser or transferee . You should read this owner's manual thoroughly before operating this product. This is replaced after ninety (90) days from the Service Station. Reception problems caused... all transportation and insurance charges for all transportation and insurance charges for rental units begins with better customer service and improved products. Limited warranty Toshiba America Consumer Products, L.L.C. ("TACP") makes the following conditions: ( 1 ) You must retain your responsibility. ( 5 ) Warranties extend ...
...within ten days after the date of sale or provide other purchaser or transferee . You should read this owner's manual thoroughly before operating this product. This is replaced after ninety (90) days from the Service Station. Reception problems caused... all transportation and insurance charges for all transportation and insurance charges for rental units begins with better customer service and improved products. Limited warranty Toshiba America Consumer Products, L.L.C. ("TACP") makes the following conditions: ( 1 ) You must retain your responsibility. ( 5 ) Warranties extend ...
Owners Manual
Page 66
...state law as hereby limited, the foregoing warranty is exclusive and in lieu of all of the operating instructions in the U.S.A. and used in this manual and checking the section " Troubleshooting" and you still find that service is needed; ( 1 ) Call the TACP toll free number 1-800-631...-3811 after you find a defective product or part to find the nearest Toshiba Authorized Service Station. ( 2 ) Please present your home when warranty service is authorized to change, modify or extend the terms of these warranties. Products...
...state law as hereby limited, the foregoing warranty is exclusive and in lieu of all of the operating instructions in the U.S.A. and used in this manual and checking the section " Troubleshooting" and you still find that service is needed; ( 1 ) Call the TACP toll free number 1-800-631...-3811 after you find a defective product or part to find the nearest Toshiba Authorized Service Station. ( 2 ) Please present your home when warranty service is authorized to change, modify or extend the terms of these warranties. Products...


