
Owners Manual
Page 1
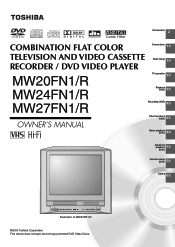
DIGITAL VIDEO Introduction 2 COMBINATION FLAT COLOR Connections 14 TELEVISION AND VIDEO CASSETTE Basicsetup 19 RECORDER / DVD VIDEO PLAYER MW20FN1/R MW24FN1/R TV operation 23 Playback (VCR) 35 MW27FN1/R Recording (VCR) 40 OWNER'S MANUAL Other functions (VCR) 45 Basic playback (DVD) 49 Advanced playback 52 (DVD) Function setup (DVD) 56 Others 62 Illustration of MW20FN1/R ©2003 Toshiba Corporation This device does not tape-record copy protected DVD Video Discs.
DIGITAL VIDEO Introduction 2 COMBINATION FLAT COLOR Connections 14 TELEVISION AND VIDEO CASSETTE Basicsetup 19 RECORDER / DVD VIDEO PLAYER MW20FN1/R MW24FN1/R TV operation 23 Playback (VCR) 35 MW27FN1/R Recording (VCR) 40 OWNER'S MANUAL Other functions (VCR) 45 Basic playback (DVD) 49 Advanced playback 52 (DVD) Function setup (DVD) 56 Others 62 Illustration of MW20FN1/R ©2003 Toshiba Corporation This device does not tape-record copy protected DVD Video Discs.

Owners Manual
Page 2
... product's enclosure that third party copyrights and other rights are not violated. Reorient or relocate the receiving antenna. - Consult the dealer or an experienced radio/TV technician for help. SHOULD THE UNIT REQUIRE MAINTENANCE, CONTACT AN AUTHORIZED SERVICE LOCATION-SEE SERVICE PROCEDURE. Introduction IMPORTANT SAFEGUARDS CAUTION RISK OF ELECTRIC SHOCK DO...
... product's enclosure that third party copyrights and other rights are not violated. Reorient or relocate the receiving antenna. - Consult the dealer or an experienced radio/TV technician for help. SHOULD THE UNIT REQUIRE MAINTENANCE, CONTACT AN AUTHORIZED SERVICE LOCATION-SEE SERVICE PROCEDURE. Introduction IMPORTANT SAFEGUARDS CAUTION RISK OF ELECTRIC SHOCK DO...

Owners Manual
Page 6
... to remove the disc and the video cassette turn on the unit, and leave it on a shaky or unstable surface such as insect spray, near a TV, radio, or VCR, the playback picture may become warm after you use . In this unit, one of the most crucial internal parts of the unit... nearest dealer. If you use the unit for two or three hours. Do not use any moisture. When you bring the unit directly from the TV, radio, or VCR. Introduction Precautions Notes on handling Notes on moisture condensation When shipping the unit, the original shipping carton and packing materials come off...
... to remove the disc and the video cassette turn on the unit, and leave it on a shaky or unstable surface such as insect spray, near a TV, radio, or VCR, the playback picture may become warm after you use . In this unit, one of the most crucial internal parts of the unit... nearest dealer. If you use the unit for two or three hours. Do not use any moisture. When you bring the unit directly from the TV, radio, or VCR. Introduction Precautions Notes on handling Notes on moisture condensation When shipping the unit, the original shipping carton and packing materials come off...
Owners Manual
Page 8
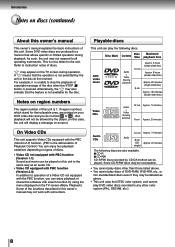
... ( ) button is 1. Audio CDs Audio 12 cm Approx. 74 minutes 8 cm (CD Approx. 20 minutes single) The following discs. " " may appear on the TV screen during playback. For example, it is unable to instruction notes of this unit. Disc Mark Contents Disc Size Maximum playback time DVD video discs... function, you do not find 1 or ALL , disc playback will display a message on-screen.) Playable discs This unit can be played on the TV screen (Menu Playback). Some CD-R/RW discs may not work with search function by the player. (In this case, the unit will not be labeled...
... ( ) button is 1. Audio CDs Audio 12 cm Approx. 74 minutes 8 cm (CD Approx. 20 minutes single) The following discs. " " may appear on the TV screen during playback. For example, it is unable to instruction notes of this unit. Disc Mark Contents Disc Size Maximum playback time DVD video discs... function, you do not find 1 or ALL , disc playback will display a message on-screen.) Playable discs This unit can be played on the TV screen (Menu Playback). Some CD-R/RW discs may not work with search function by the player. (In this case, the unit will not be labeled...

Owners Manual
Page 9
...language/Subtitles ....... 54 Changing angles/Title selection/DVD menu... 55 Function setup (DVD) Setting language 56 Setting the aspect ratio of TV screen/ Setting on screen display 57 Dynamic Range Control 58 Parental control setting 59 To change the parental level 60 Temporary disabling of...Others Before calling service personnel 62 Reception disturbances 64 Language code list 65 Specifications 66 Limited warranty 67 Recording (VCR) Recording a TV program 40 One-touch Timer Recording (OTR 42 Timer recording 43 Other functions (VCR) Setting the surround sound/ Setting the stable...
...language/Subtitles ....... 54 Changing angles/Title selection/DVD menu... 55 Function setup (DVD) Setting language 56 Setting the aspect ratio of TV screen/ Setting on screen display 57 Dynamic Range Control 58 Parental control setting 59 To change the parental level 60 Temporary disabling of...Others Before calling service personnel 62 Reception disturbances 64 Language code list 65 Specifications 66 Limited warranty 67 Recording (VCR) Recording a TV program 40 One-touch Timer Recording (OTR 42 Timer recording 43 Other functions (VCR) Setting the surround sound/ Setting the stable...
Owners Manual
Page 11
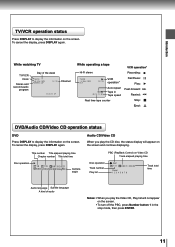
...Disc operation Track number Play list PBC T 1/8 0:02:31 0:53:09 Playlist 1 2 3 4 5 6 7 8 Track total time Audio language Subtitle language A kind of the week TV/VCR 8 : 47AM MON STEREO SAP CH 125 Channel 00 : 00 : 00 SP While operating a tape VCR operation* Hi-Fi stereo Recording... : Fast-forward : Rewind : Stop : Eject : DVD/Audio CD/Video CD operation status DVD Press DISPLAY to display the information on the screen. While watching TV TV/VCR Clock Stereo and second audio program Day of audio Notes: • When you play the Video CD, Play list will appear on the screen...
...Disc operation Track number Play list PBC T 1/8 0:02:31 0:53:09 Playlist 1 2 3 4 5 6 7 8 Track total time Audio language Subtitle language A kind of the week TV/VCR 8 : 47AM MON STEREO SAP CH 125 Channel 00 : 00 : 00 SP While operating a tape VCR operation* Hi-Fi stereo Recording... : Fast-forward : Rewind : Stop : Eject : DVD/Audio CD/Video CD operation status DVD Press DISPLAY to display the information on the screen. While watching TV TV/VCR Clock Stereo and second audio program Day of audio Notes: • When you play the Video CD, Play list will appear on the screen...
Owners Manual
Page 12
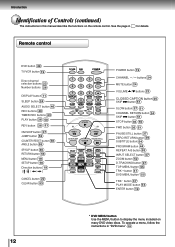
Remote control DVD button 49 TV/VCR button 19 Direct channel selection buttons 23 Number buttons 28 DISPLAY button 11 SLEEP button 24 AUDIO SELECT button 46 REC buttons 40 TIMER ... ANGLE button 55 SP/SLP button 40 RETURN button 56 MENU button 19 SETUP button 56 Direction buttons 19 (// / ) CANCEL button 22 CLEAR button 53 TV/VCR DVD POWER 123 CHANNEL 456 789 DISPLAY 0 MUTE VOLUME SLEEP AUDIO CHANNEL CLOSED SELECT RETURN CAPTION TIMER REC SKIP REC SKIP SLOW PLAY REV...
Remote control DVD button 49 TV/VCR button 19 Direct channel selection buttons 23 Number buttons 28 DISPLAY button 11 SLEEP button 24 AUDIO SELECT button 46 REC buttons 40 TIMER ... ANGLE button 55 SP/SLP button 40 RETURN button 56 MENU button 19 SETUP button 56 Direction buttons 19 (// / ) CANCEL button 22 CLEAR button 53 TV/VCR DVD POWER 123 CHANNEL 456 789 DISPLAY 0 MUTE VOLUME SLEEP AUDIO CHANNEL CLOSED SELECT RETURN CAPTION TIMER REC SKIP REC SKIP SLOW PLAY REV...
Owners Manual
Page 13
...type of MW20FN1/R Approx. 7 meters 13 Do not try to recharge batteries not intended to be used to navigate on either side of the remote sensor, up to a distance of time, remove the batteries to turn the unit on or off. • Select your desired operating mode (TV/VCR or... "-" end first. 3. they can directly access specific channels using Direct channel selection buttons. Battery precautions: The precautions below should be followed when using TV/VCR or DVD. • Tap CH or CH to move through the channels one channel at the remote sensor and press control buttons to operate...
...type of MW20FN1/R Approx. 7 meters 13 Do not try to recharge batteries not intended to be used to navigate on either side of the remote sensor, up to a distance of time, remove the batteries to turn the unit on or off. • Select your desired operating mode (TV/VCR or... "-" end first. 3. they can directly access specific channels using Direct channel selection buttons. Battery precautions: The precautions below should be followed when using TV/VCR or DVD. • Tap CH or CH to move through the channels one channel at the remote sensor and press control buttons to operate...

Owners Manual
Page 14
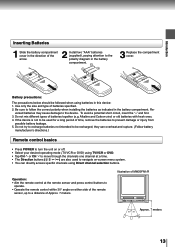
... (not supplied). Attach the Transformer to the Combiner, then attach the Combiner to the Combiner (not supplied). Connections Antenna connections If you are using a cable TV service (CATV), see page 15 for Cable...
... (not supplied). Attach the Transformer to the Combiner, then attach the Combiner to the Combiner (not supplied). Connections Antenna connections If you are using a cable TV service (CATV), see page 15 for Cable...
Owners Manual
Page 15
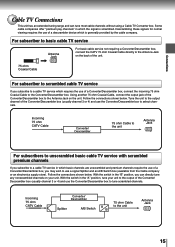
.../Descrambler box. Incoming 75 ohm CATV Cable Converter/ Descrambler 75 ohm Cable to the unit Antenna Jack For subscribers to unscrambled basic cable TV service with scrambled premium channels If you subscribe to select channels. Incoming 75 ohm CATV Cable Converter/ Descrambler Splitter A/B Switch A B... your unit to the output of the Converter/Descrambler box (usually channel 3 or 4) and use the Converter/Descrambler box to a cable TV service in which requires the use a signal Splitter and an A/B Switch box (available from the Cable company or an electronics supply store)....
.../Descrambler box. Incoming 75 ohm CATV Cable Converter/ Descrambler 75 ohm Cable to the unit Antenna Jack For subscribers to unscrambled basic cable TV service with scrambled premium channels If you subscribe to select channels. Incoming 75 ohm CATV Cable Converter/ Descrambler Splitter A/B Switch A B... your unit to the output of the Converter/Descrambler box (usually channel 3 or 4) and use the Converter/Descrambler box to a cable TV service in which requires the use a signal Splitter and an A/B Switch box (available from the Cable company or an electronics supply store)....

Owners Manual
Page 16
... volume sound. • Turn off the power and unplug all of the unit has a wide dynamic range. You can enjoy the TV game, camcorder or high quality dynamic sounds of MW20FN1/R Camcorder (yellow) (white) (red) AUDIO PHONES VIDEO L/MONO R REW STOP/EJECT PLAY FF REC/OTR CHANNEL LINE IN 2 POWER REC/OTR...
... volume sound. • Turn off the power and unplug all of the unit has a wide dynamic range. You can enjoy the TV game, camcorder or high quality dynamic sounds of MW20FN1/R Camcorder (yellow) (white) (red) AUDIO PHONES VIDEO L/MONO R REW STOP/EJECT PLAY FF REC/OTR CHANNEL LINE IN 2 POWER REC/OTR...
Owners Manual
Page 19
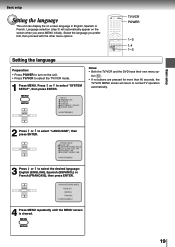
...CH SETUP AUTO REPEAT ON OFF SYSTEM SETUP 〈 / /ENTER/MENU〉 Notes: • Both the TV/VCR and the DVD have their own menu op- Basic setup 2 Press or to select the TV/VCR mode. 1 Press MENU. ENTER LANGUAGE/IDIOMA/LANGUE ENGLISH ESPAÑOL FRANCAIS á / /ENTER/MENU&#...4 Press MENU repeatedly until the MENU screen is cleared. MENU SETUP 19 Press or to normal TV operation automatically. tion 56 . • If no buttons are pressed for more than 60 seconds, the TV/VCR MENU screen will automatically appear on screen language in English, Spanish or French. ENTER SYSTEM...
...CH SETUP AUTO REPEAT ON OFF SYSTEM SETUP 〈 / /ENTER/MENU〉 Notes: • Both the TV/VCR and the DVD have their own menu op- Basic setup 2 Press or to select the TV/VCR mode. 1 Press MENU. ENTER LANGUAGE/IDIOMA/LANGUE ENGLISH ESPAÑOL FRANCAIS á / /ENTER/MENU&#...4 Press MENU repeatedly until the MENU screen is cleared. MENU SETUP 19 Press or to normal TV operation automatically. tion 56 . • If no buttons are pressed for more than 60 seconds, the TV/VCR MENU screen will automatically appear on screen language in English, Spanish or French. ENTER SYSTEM...
Owners Manual
Page 20
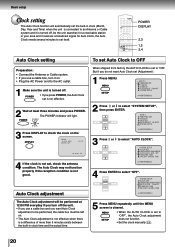
... when there is a difference of more than 5 minutes exists between the built-in clock time and the actual time. MENU SETUP M E N U TIMER REC SET TV SETUP CH SETUP AUTO REPEAT ON OFF SYSTEM SETUP 〈 / /ENTER/MENU〉 2 Press or to an Antenna or Cable system and it receives a broadcast... • If you press POWER, the Auto Clock POWER set itself. But if you want Auto Clock set (Adjustment): 1 Press MENU. ENTER M E N U TIMER REC SET TV SETUP CH SETUP AUTO REPEAT ON OFF SYSTEM SETUP 〈 / /ENTER/MENU〉 3 Press or ENTER to set is not effective. 2 Wait at 12:00...
... when there is a difference of more than 5 minutes exists between the built-in clock time and the actual time. MENU SETUP M E N U TIMER REC SET TV SETUP CH SETUP AUTO REPEAT ON OFF SYSTEM SETUP 〈 / /ENTER/MENU〉 2 Press or to an Antenna or Cable system and it receives a broadcast... • If you press POWER, the Auto Clock POWER set itself. But if you want Auto Clock set (Adjustment): 1 Press MENU. ENTER M E N U TIMER REC SET TV SETUP CH SETUP AUTO REPEAT ON OFF SYSTEM SETUP 〈 / /ENTER/MENU〉 3 Press or ENTER to set is not effective. 2 Wait at 12:00...
Owners Manual
Page 21
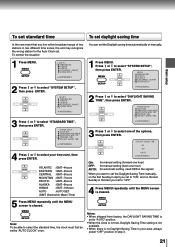
... SETUP Notes: • When shipped from factory, the DAYLIGHT SAVING TIME is set to select "STANDARD TIME", then press ENTER. ENTER M E N U TIMER REC SET TV SETUP CH SETUP AUTO REPEAT ON OFF SYSTEM SETUP 〈 / /ENTER/MENU〉 3 Press or to "AUTO" position. • When the clock is not set...set daylight saving time In the rare event that you live within broadcast range of the options, then press ENTER. MENU SETUP M E N U TIMER REC SET TV SETUP CH SETUP AUTO REPEAT ON OFF SYSTEM SETUP 〈 / /ENTER/MENU〉 2 Press or to select your area, always select "OFF" position in...
... SETUP Notes: • When shipped from factory, the DAYLIGHT SAVING TIME is set to select "STANDARD TIME", then press ENTER. ENTER M E N U TIMER REC SET TV SETUP CH SETUP AUTO REPEAT ON OFF SYSTEM SETUP 〈 / /ENTER/MENU〉 3 Press or to "AUTO" position. • When the clock is not set...set daylight saving time In the rare event that you live within broadcast range of the options, then press ENTER. MENU SETUP M E N U TIMER REC SET TV SETUP CH SETUP AUTO REPEAT ON OFF SYSTEM SETUP 〈 / /ENTER/MENU〉 2 Press or to select your area, always select "OFF" position in...

Owners Manual
Page 22
... by holding down or . 4 Press or to set them correctly. 2-4 1 2-4 Manual clock setting EXAMPLE: Setting the clock to change in step 4. ENTER M E N U TIMER REC SET TV SETUP CH SETUP AUTO REPEAT ON OFF SYSTEM SETUP 〈 / /ENTER/MENU〉 3 Press or to select the "SYSTEM SETUP", then press ENTER. Basic setup...
... by holding down or . 4 Press or to set them correctly. 2-4 1 2-4 Manual clock setting EXAMPLE: Setting the clock to change in step 4. ENTER M E N U TIMER REC SET TV SETUP CH SETUP AUTO REPEAT ON OFF SYSTEM SETUP 〈 / /ENTER/MENU〉 3 Press or to select the "SYSTEM SETUP", then press ENTER. Basic setup...
Owners Manual
Page 23
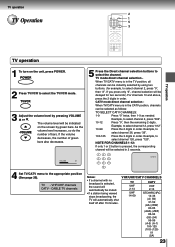
...the corresponding channel will automatically shut itself off after 15 minutes. NOTE FOR CHANNELS 1-12: If only 1 or 2 button is in the TV position, all channels can be instantly selected by using two buttons. (for two seconds.) For channels 10 and above, press the 2 .... VHF/UHF channels CATV - If the volume decreases, the number of bars. Example, to the appropriate position (See page 26). TV operation 2 TV Operation 1 5 3 TV operation TV operation 1 To turn on the screen by pressing VOLUME L or M. If you press only "2", channel selection will be delayed for...
...the corresponding channel will automatically shut itself off after 15 minutes. NOTE FOR CHANNELS 1-12: If only 1 or 2 button is in the TV position, all channels can be instantly selected by using two buttons. (for two seconds.) For channels 10 and above, press the 2 .... VHF/UHF channels CATV - If the volume decreases, the number of bars. Example, to the appropriate position (See page 26). TV operation 2 TV Operation 1 5 3 TV operation TV operation 1 To turn on the screen by pressing VOLUME L or M. If you press only "2", channel selection will be delayed for...
Owners Manual
Page 24
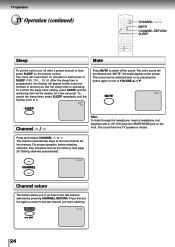
...press of VOLUME L or M. CHANNEL RETURN CH 012 SKIP 24 The unit's sound will be switched back on the front. The sound from the TV speaker is operating. Press this button again or one of SLEEP (120, 110, ...10, 0). To confirm the sleep timer setting, press SLEEP and... the remaining time will count down 10 minutes for a few seconds. TV operation TV Operation (continued) CHANNEL / MUTE CHANNEL RETURN SLEEP Sleep Mute To set the unit to turn off the sound. After the sleep time is programmed, ...
...press of VOLUME L or M. CHANNEL RETURN CH 012 SKIP 24 The unit's sound will be switched back on the front. The sound from the TV speaker is operating. Press this button again or one of SLEEP (120, 110, ...10, 0). To confirm the sleep timer setting, press SLEEP and... the remaining time will count down 10 minutes for a few seconds. TV operation TV Operation (continued) CHANNEL / MUTE CHANNEL RETURN SLEEP Sleep Mute To set the unit to turn off the sound. After the sleep time is programmed, ...
Owners Manual
Page 25
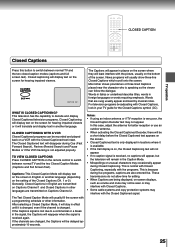
...of the screen. For television programs broadcasting with a programming schedule or other information. This television has the capability to switch between normal TV and the two closed caption modes (captions and full screen text). The Text Closed Caption Mode will usually fill the screen with Closed... Caption Mode, it will stay in effect until it is available. • If the Call display is on Captions Channel 2. CLOSED CAPTION TV operation Closed Captions Press this case, adjust the antenna for better reception or use an outdoor antenna. • When activating the Closed Captioned...
...of the screen. For television programs broadcasting with a programming schedule or other information. This television has the capability to switch between normal TV and the two closed caption modes (captions and full screen text). The Text Closed Caption Mode will usually fill the screen with Closed... Caption Mode, it will stay in effect until it is available. • If the Call display is on Captions Channel 2. CLOSED CAPTION TV operation Closed Captions Press this case, adjust the antenna for better reception or use an outdoor antenna. • When activating the Closed Captioned...
Owners Manual
Page 26
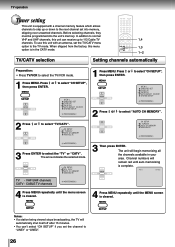
...〉 2 Press or to select "CH SETUP", then press ENTER. The unit will remain red until the menu screen is cleared. ENTER AUTO CH 002 TV - To use this menu option is in your area. Press or to select "AUTO CH MEMORY". The arrow indicates the selected mode. CABLE... TV channels 〈 / /ENTER/MENU〉 4 Press MENU repeatedly until auto memorizing is equipped with an antenna, set into the unit's memory. VHF/UHF channels CATV - ...
...〉 2 Press or to select "CH SETUP", then press ENTER. The unit will remain red until the menu screen is cleared. ENTER AUTO CH 002 TV - To use this menu option is in your area. Press or to select "AUTO CH MEMORY". The arrow indicates the selected mode. CABLE... TV channels 〈 / /ENTER/MENU〉 4 Press MENU repeatedly until auto memorizing is equipped with an antenna, set into the unit's memory. VHF/UHF channels CATV - ...
Owners Manual
Page 27
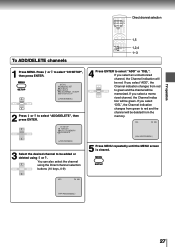
...press ENTER. MENU SETUP ADD CH 003 〈0-9/ / /ENTER/MENU〉 27 Press or to select "ADD" or "DEL". MENU SETUP ENTER M E N U TIMER REC SET TV SETUP CH SETUP AUTO REPEAT ON OFF SYSTEM SETUP 〈 / /ENTER/MENU〉 2 Press or to be memorized. If you select "ADD", the Channel indication... select a memo rized channel, the Channel indica tion will be deleted from green to green and the channel will be green. ENTER CH SETUP TV CATV AUTO CH MEMORY ADD/DELETE 〈 / /ENTER/MENU〉 3 Select the desired channel to select "ADD/DELETE", then press ENTER...
...press ENTER. MENU SETUP ADD CH 003 〈0-9/ / /ENTER/MENU〉 27 Press or to select "ADD" or "DEL". MENU SETUP ENTER M E N U TIMER REC SET TV SETUP CH SETUP AUTO REPEAT ON OFF SYSTEM SETUP 〈 / /ENTER/MENU〉 2 Press or to be memorized. If you select "ADD", the Channel indication... select a memo rized channel, the Channel indica tion will be deleted from green to green and the channel will be green. ENTER CH SETUP TV CATV AUTO CH MEMORY ADD/DELETE 〈 / /ENTER/MENU〉 3 Select the desired channel to select "ADD/DELETE", then press ENTER...


