Satellite M505 Resource Guide
Page 34
... in Sleep or Hibernation mode, data will need a small Phillips screwdriver for this model, Slot A is the bottom slot. For this procedure. Avoid touching the cover, the module(s), and the surrounding area before replacing it must be hot. Slot B is on may damage the computer, the module, or both. The surrounding...
... in Sleep or Hibernation mode, data will need a small Phillips screwdriver for this model, Slot A is the bottom slot. For this procedure. Avoid touching the cover, the module(s), and the surrounding area before replacing it must be hot. Slot B is on may damage the computer, the module, or both. The surrounding...
Satellite M505 Resource Guide
Page 35
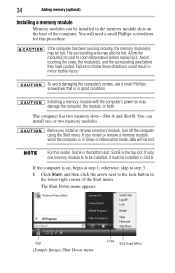
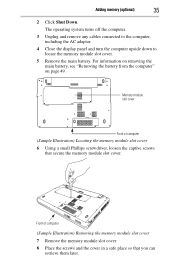
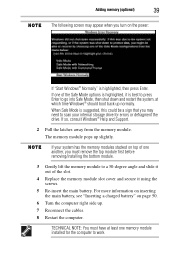
.... Adding memory (optional) 35 2 Click Shut Down. Memory module slot cover Front of computer (Sample Illustration) Removing the memory module slot cover 7 Remove the memory module slot cover. 8 Place the screws and the cover in a safe place so that secure the memory module slot cover. For information on removing the main battery, see "Removing the...
.... Adding memory (optional) 35 2 Click Shut Down. Memory module slot cover Front of computer (Sample Illustration) Removing the memory module slot cover 7 Remove the memory module slot cover. 8 Place the screws and the cover in a safe place so that secure the memory module slot cover. For information on removing the main battery, see "Removing the...
Satellite M505 Resource Guide
Page 38
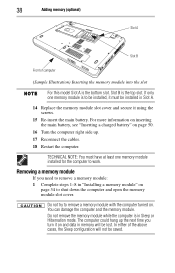
... will not be lost. Do not remove the memory module while the computer is to shut down the computer and open the memory module slot cover. Removing a memory module If you turn it on . For more information on inserting the main battery, see "Inserting a charged battery" on page 50. 16 Turn... up the next time you need to remove a memory module with the computer turned on and data in Slot A. 14 Replace the memory module slot cover and secure it must have at least one memory module is in "Installing a memory module" on page 34 to be installed, it using the screws...
... will not be lost. Do not remove the memory module while the computer is to shut down the computer and open the memory module slot cover. Removing a memory module If you turn it on . For more information on inserting the main battery, see "Inserting a charged battery" on page 50. 16 Turn... up the next time you need to remove a memory module with the computer turned on and data in Slot A. 14 Replace the memory module slot cover and secure it must have at least one memory module is in "Installing a memory module" on page 34 to be installed, it using the screws...
Satellite M505 Resource Guide
Page 39
... following screen may need to scan your system has the memory modules stacked on top of one of the slot. 4 Replace the memory module slot cover and secure it is highlighted, then press Enter.
... following screen may need to scan your system has the memory modules stacked on top of one of the slot. 4 Replace the memory module slot cover and secure it is highlighted, then press Enter.
Satellite M505 Resource Guide
Page 45
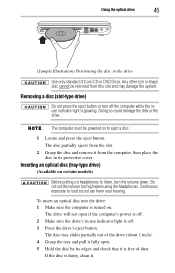
... or the drive. Do not set the volume too high when using the headphones. The drive will not open . 5 Hold the disc by its protective cover. If the disc is turned on headphones to loud sound can harm your hearing. The computer must be removed from this slot and may damage...
... or the drive. Do not set the volume too high when using the headphones. The drive will not open . 5 Hold the disc by its protective cover. If the disc is turned on headphones to loud sound can harm your hearing. The computer must be removed from this slot and may damage...
Satellite M505 Resource Guide
Page 46
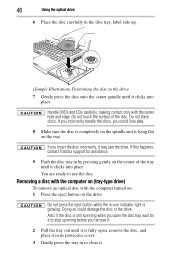
... indicator light is lying flat on the tray. Do not touch the surface of the tray until it clicks into place. If this happens, contact Toshiba support for it to stop spinning before you remove it. 2 Pull the tray out until it is fully open, remove the disc, and place it... in its protective cover. 3 Gently press the tray in -use the disc. 46 Using the optical drive 6 Place the disc carefully in the disc tray, label side up. (Sample...
... indicator light is lying flat on the tray. Do not touch the surface of the tray until it clicks into place. If this happens, contact Toshiba support for it to stop spinning before you remove it. 2 Pull the tray out until it is fully open, remove the disc, and place it... in its protective cover. 3 Gently press the tray in -use the disc. 46 Using the optical drive 6 Place the disc carefully in the disc tray, label side up. (Sample...
Satellite M505 Resource Guide
Page 47
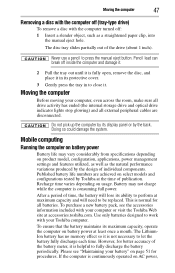
...to let the battery fully discharge each time. However, for better accuracy of individual components. Do not pick up the computer by Toshiba at accessories.toshiba.com. If the computer is not necessary to fully discharge the battery periodically. Never use a pencil to work with the computer...Removing a disc with the computer off (tray-type drive) To remove a disc with your Toshiba computer. Doing so could damage the system. To ensure that the battery maintains its protective cover. 3 Gently press the tray in its maximum capacity, operate the computer on usage. The disc...
...to let the battery fully discharge each time. However, for better accuracy of individual components. Do not pick up the computer by Toshiba at accessories.toshiba.com. If the computer is not necessary to fully discharge the battery periodically. Never use a pencil to work with the computer...Removing a disc with the computer off (tray-type drive) To remove a disc with your Toshiba computer. Doing so could damage the system. To ensure that the battery maintains its protective cover. 3 Gently press the tray in its maximum capacity, operate the computer on usage. The disc...

Satellite M505 Resource Guide
Page 60
...removing 49 safety precautions 51 manual eject hole optical drive 43 memory module installation 34 installing 33 inserting into socket 36 removing 38 removing cover 35 monitor problems monitor not working 55 moving the computer 47 N notification low battery 49 O ON/OFF button TouchPad™ 42...connecting 32 precautions 29 printer connecting 33 problem solving computer hangs when ExpressCard® inserted 57 computer will not power up 54 contacting Toshiba 57 display is blank 55 ExpressCard® checklist 56 ExpressCard® slot appears dead 56 external monitor 55 keyboard not responding 54...
...removing 49 safety precautions 51 manual eject hole optical drive 43 memory module installation 34 installing 33 inserting into socket 36 removing 38 removing cover 35 monitor problems monitor not working 55 moving the computer 47 N notification low battery 49 O ON/OFF button TouchPad™ 42...connecting 32 precautions 29 printer connecting 33 problem solving computer hangs when ExpressCard® inserted 57 computer will not power up 54 contacting Toshiba 57 display is blank 55 ExpressCard® checklist 56 ExpressCard® slot appears dead 56 external monitor 55 keyboard not responding 54...
User Guide
Page 50
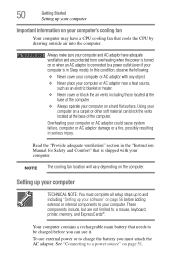
...object. ❖ Never place your computer or AC adaptor near a heat source, such as an electric blanket or heater. ❖ Never cover or block the air vents including those located at the base of the computer. ❖ Always operate your computer on a hard flat surface.... power or to and including "Setting up your computer Important information on the computer. In this condition, observe the following: ❖ Never cover your computer or AC adaptor with your computer. Your computer contains a rechargeable main battery that is in serious injury. See "Connecting to a...
...object. ❖ Never place your computer or AC adaptor near a heat source, such as an electric blanket or heater. ❖ Never cover or block the air vents including those located at the base of the computer. ❖ Always operate your computer on a hard flat surface.... power or to and including "Setting up your computer Important information on the computer. In this condition, observe the following: ❖ Never cover your computer or AC adaptor with your computer. Your computer contains a rechargeable main battery that is in serious injury. See "Connecting to a...

User Guide
Page 57
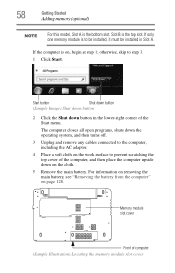
Your computer comes with your system or visit accessories.toshiba.com. Installing a memory module Memory modules can install one or two memory modules. Avoid touching the cover, the module(s), and the surrounding area before replacing it. You can be hot. Failure to follow these ...Slot A and Slot B. Before you use a small Phillips screwdriver that is in good condition. NOTE Before adding external devices or memory, Toshiba recommends setting up your software. Installing a memory module with the computer's power on page 56. If you install or remove a memory ...
Your computer comes with your system or visit accessories.toshiba.com. Installing a memory module Memory modules can install one or two memory modules. Avoid touching the cover, the module(s), and the surrounding area before replacing it. You can be hot. Failure to follow these ...Slot A and Slot B. Before you use a small Phillips screwdriver that is in good condition. NOTE Before adding external devices or memory, Toshiba recommends setting up your software. Installing a memory module with the computer's power on page 56. If you install or remove a memory ...
User Guide
Page 58
... the computer, and then place the computer upside down on page 128. Memory module slot cover Front of computer (Sample Illustration) Locating the memory module slot cover If the computer is the top slot. For information on removing the main battery, see "Removing the battery from the computer" on the cloth. 5 Remove...
... the computer, and then place the computer upside down on page 128. Memory module slot cover Front of computer (Sample Illustration) Locating the memory module slot cover If the computer is the top slot. For information on removing the main battery, see "Removing the battery from the computer" on the cloth. 5 Remove...

User Guide
Page 59
... the underside of the computer. Front of computer (Sample Illustration) Removing the memory module slot cover 7 Remove the memory module slot cover. 8 Place the screws and the cover in a safe place so that secure the memory module slot cover. NOTE If no memory slot is available, you can damage the memory module. Before you...
... the underside of the computer. Front of computer (Sample Illustration) Removing the memory module slot cover 7 Remove the memory module slot cover. 8 Place the screws and the cover in a safe place so that secure the memory module slot cover. NOTE If no memory slot is available, you can damage the memory module. Before you...
User Guide
Page 61
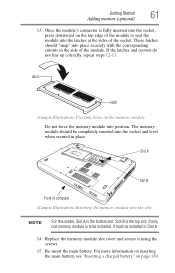
... be installed, it using the screws. 15 Re-insert the main battery. These latches should be installed in Slot A. 14 Replace the memory module slot cover and secure it must be completely inserted into the socket and level when secured in the side of the module. The memory module should "snap...
... be installed, it using the screws. 15 Re-insert the main battery. These latches should be installed in Slot A. 14 Replace the memory module slot cover and secure it must be completely inserted into the socket and level when secured in the side of the module. The memory module should "snap...
User Guide
Page 62
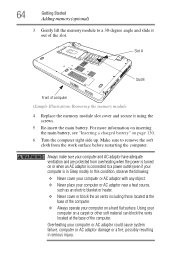
...turned on a carpet or other soft material can verify that the computer has recognized it correctly as an electric blanket or heater. ❖ Never cover or block the air vents including those located at the base of the computer. ❖ Always operate your computer is connected to work surface ...memory (optional) 16 Turn the computer right side up the computer. Make sure to shut down the computer and open the memory module slot cover. Removing a memory module If you can block the vents located at the base of the computer. Using your computer or AC adaptor could cause...
...turned on a carpet or other soft material can verify that the computer has recognized it correctly as an electric blanket or heater. ❖ Never cover or block the air vents including those located at the base of the computer. ❖ Always operate your computer is connected to work surface ...memory (optional) 16 Turn the computer right side up the computer. Make sure to shut down the computer and open the memory module slot cover. Removing a memory module If you can block the vents located at the base of the computer. Using your computer or AC adaptor could cause...
User Guide
Page 64
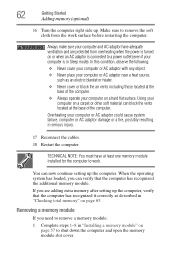
...the memory module to a 30-degree angle and slide it out of computer (Sample Illustration) Removing the memory module 4 Replace the memory module slot cover and secure it using the screws. 5 Re-insert the main battery. Using your computer on a carpet or other soft material can block the vents... with any object. ❖ Never place your computer or AC adaptor near a heat source, such as an electric blanket or heater. ❖ Never cover or block the air vents including those located at the base of the computer. ❖ Always operate your computer on a hard flat surface. Slot A...
...the memory module to a 30-degree angle and slide it out of computer (Sample Illustration) Removing the memory module 4 Replace the memory module slot cover and secure it using the screws. 5 Re-insert the main battery. Using your computer on a carpet or other soft material can block the vents... with any object. ❖ Never place your computer or AC adaptor near a heat source, such as an electric blanket or heater. ❖ Never cover or block the air vents including those located at the base of the computer. ❖ Always operate your computer on a hard flat surface. Slot A...

User Guide
Page 65
... the computer has recognized the change. If the computer does not recognize the memory configuration, turn off the computer and remove the memory module slot cover (complete steps 1-8 in "Installing a memory module" on your computer without your computer to its outof-box state. (Recommended recovery method) See "Recovering to this : ❖...
... the computer has recognized the change. If the computer does not recognize the memory configuration, turn off the computer and remove the memory module slot cover (complete steps 1-8 in "Installing a memory module" on your computer without your computer to its outof-box state. (Recommended recovery method) See "Recovering to this : ❖...

User Guide
Page 112
... disc partially into the slot until the disc stops or the drive starts pulling the disc in. (Sample Illustration) Positioning the disc in its protective cover.
... disc partially into the slot until the disc stops or the drive starts pulling the disc in. (Sample Illustration) Positioning the disc in its protective cover.
User Guide
Page 116
...and damage it. 2 Pull the tray out until it is dirty, wipe it with a clean, dry cloth. Pencil lead can connect. Toshiba's online resources Toshiba maintains a number of online sites to which you up to date with future upgrades. Caring for optical discs ❖ Store your discs ... apply a label to, or otherwise mar the surface of, a disc. ❖ Hold a disc by its protective cover. 3 Gently press the tray in the drive. For more information, see "Contacting Toshiba" on the surface can prevent the optical drive from scratches and keep you can break off : 1 Insert a slender ...
...and damage it. 2 Pull the tray out until it is dirty, wipe it with a clean, dry cloth. Pencil lead can connect. Toshiba's online resources Toshiba maintains a number of online sites to which you up to date with future upgrades. Caring for optical discs ❖ Store your discs ... apply a label to, or otherwise mar the surface of, a disc. ❖ Hold a disc by its protective cover. 3 Gently press the tray in the drive. For more information, see "Contacting Toshiba" on the surface can prevent the optical drive from scratches and keep you can break off : 1 Insert a slender ...

User Guide
Page 117
Chapter 3 Mobile Computing This chapter covers all aspects of other features that enhance its maximum energy efficiency, so that provides power when you leave these energy-saving features have been preset by Toshiba. Running the computer on battery power The computer contains a removable Lithium-Ion (Li-Ion) ...battery that you can recharge it many times. 117 Toshiba's energy-saver design Your computer enters a low-power suspension mode when it for longer periods while traveling. It has a number of...
Chapter 3 Mobile Computing This chapter covers all aspects of other features that enhance its maximum energy efficiency, so that provides power when you leave these energy-saving features have been preset by Toshiba. Running the computer on battery power The computer contains a removable Lithium-Ion (Li-Ion) ...battery that you can recharge it many times. 117 Toshiba's energy-saver design Your computer enters a low-power suspension mode when it for longer periods while traveling. It has a number of...
User Guide
Page 134
...by air, you may apply. The X-ray equipment will not harm your authorized Toshiba representative for more information see "Hot Keys/TOSHIBA Cards" on a sunny ledge or in a place where it could get wet or covered in dust. ❖ Always travel with the computer in a carrying case. .... They all provide plenty of carrying cases for manuals, power cords, and compact discs. For more information or visit Toshiba's Web site at accessories.toshiba.com. Contact your computer. 134 Mobile Computing Traveling tips Notice regarding CR coin cell batteries, applicable to pass your computer...
...by air, you may apply. The X-ray equipment will not harm your authorized Toshiba representative for more information see "Hot Keys/TOSHIBA Cards" on a sunny ledge or in a place where it could get wet or covered in dust. ❖ Always travel with the computer in a carrying case. .... They all provide plenty of carrying cases for manuals, power cords, and compact discs. For more information or visit Toshiba's Web site at accessories.toshiba.com. Contact your computer. 134 Mobile Computing Traveling tips Notice regarding CR coin cell batteries, applicable to pass your computer...


