
Quick Start Guide
Page 1
Refer to view PDF files. The application Adobe Reader is needed to the user's manual (PDF file) contained in the CD-ROM for settings, operations and other information. For information on our latest products and peripheral devices, refer to the following Website: n http://www.toshibasecurity.com If the URL changes, refer to the Toshiba website (http://www.toshiba.com). NETWORK CAMERA Model: IK-WR12A Quick Start Guide and Important Safeguards This guide describes the hardware installation. If you do not have this application, download it from the Adobe Systems Incorporated website.
Refer to view PDF files. The application Adobe Reader is needed to the user's manual (PDF file) contained in the CD-ROM for settings, operations and other information. For information on our latest products and peripheral devices, refer to the following Website: n http://www.toshibasecurity.com If the URL changes, refer to the Toshiba website (http://www.toshiba.com). NETWORK CAMERA Model: IK-WR12A Quick Start Guide and Important Safeguards This guide describes the hardware installation. If you do not have this application, download it from the Adobe Systems Incorporated website.

Quick Start Guide
Page 3
... notice. The design, specifications, software, and quick start guide may be trademarks or registered trademarks of the network camera may vary depending on the network environment. 3 Once you have finished reading this product. -- Windows 7®: Microsoft® Windows 7®... Windows® XP operating system -- Before you start using the camera, read this quick start guide contents are trademarks or registered trademarks of Microsoft® Corporation in a convenient place for purchasing the IK-WR12A Network Camera. NOTE l The performance of their respective holders.
... notice. The design, specifications, software, and quick start guide may be trademarks or registered trademarks of the network camera may vary depending on the network environment. 3 Once you have finished reading this product. -- Windows 7®: Microsoft® Windows 7®... Windows® XP operating system -- Before you start using the camera, read this quick start guide contents are trademarks or registered trademarks of Microsoft® Corporation in a convenient place for purchasing the IK-WR12A Network Camera. NOTE l The performance of their respective holders.
Quick Start Guide
Page 4
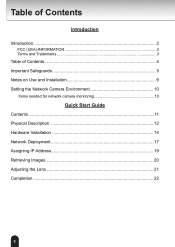
Table of Contents Introduction Introduction 2 FCC (USA)-INFORMATION 2 Terms and Trademarks 3 Table of Contents 4 Important Safeguards 5 Notes on Use and Installation 9 Setting the Network Camera Environment 10 Items needed for network camera monitoring 10 Quick Start Guide Contents 11 Physical Description 12 Hardware Installation 14 Network Deployment 17 Assigning IP Address 19 Retrieving Images 20 Adjusting the Lens 21 Completion 22 4
Table of Contents Introduction Introduction 2 FCC (USA)-INFORMATION 2 Terms and Trademarks 3 Table of Contents 4 Important Safeguards 5 Notes on Use and Installation 9 Setting the Network Camera Environment 10 Items needed for network camera monitoring 10 Quick Start Guide Contents 11 Physical Description 12 Hardware Installation 14 Network Deployment 17 Assigning IP Address 19 Retrieving Images 20 Adjusting the Lens 21 Completion 22 4
Quick Start Guide
Page 10
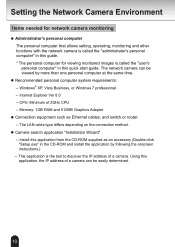
... or router. -- Windows® XP, Vista Business, or Windows 7 professional. -- Setting the Network Camera Environment Items needed for network camera monitoring l Administrator's personal computer The personal computer that allows setting, operating, monitoring and other functions with the network camera is called the "user's personal computer" in the CD-ROM and install the application by... is the tool to discover the IP address of 2GHz CPU -- The LAN cable type differs depending on the connection method. The network camera can be viewed by following the onscreen instructions.) --
... or router. -- Windows® XP, Vista Business, or Windows 7 professional. -- Setting the Network Camera Environment Items needed for network camera monitoring l Administrator's personal computer The personal computer that allows setting, operating, monitoring and other functions with the network camera is called the "user's personal computer" in the CD-ROM and install the application by... is the tool to discover the IP address of 2GHz CPU -- The LAN cable type differs depending on the connection method. The network camera can be viewed by following the onscreen instructions.) --
Quick Start Guide
Page 11
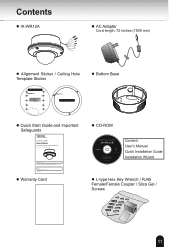
Contents l IK-WR12A l AC Adapter Cord length: 72 inches (1828 mm) N.C. Refer to the Toshiba website (http://www.toshiba.com/tai/products/ prod_biz.jsp). For information on our latest products and peripheral devices, refer to the following Website: &#... l Alignment Sticker / Ceiling Hole Template Sticker l Bottom Base Drill hole Ceiling Hole Template Sticker l Quick Start Guide and Important Safeguards NETWORK CAMERA Model: IK-WR12A Quick Start Guide and Important Safeguards This guide describes the hardware installation. If you do not have this application, download it from the ...
Contents l IK-WR12A l AC Adapter Cord length: 72 inches (1828 mm) N.C. Refer to the Toshiba website (http://www.toshiba.com/tai/products/ prod_biz.jsp). For information on our latest products and peripheral devices, refer to the following Website: &#... l Alignment Sticker / Ceiling Hole Template Sticker l Bottom Base Drill hole Ceiling Hole Template Sticker l Quick Start Guide and Important Safeguards NETWORK CAMERA Model: IK-WR12A Quick Start Guide and Important Safeguards This guide describes the hardware installation. If you do not have this application, download it from the ...
Quick Start Guide
Page 12
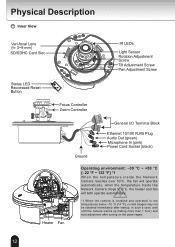
when the temparature inside the Network Camera reaches over 50°C, the fan will both operate automatically. *1 When the camera is installed and operated in low temperatures below -10 °C {14 °F}, normal images may not be obtained immediately after turning...-30 °C ~ +50 °C {-22 °F ~ 122 °F} *1 When the temparature inside the Network Camera drops to 0°C, the heater and fan will operate automatically; In such a case, wait until the camera warms up (taking more than 1 hour) and start adjustment after startup. Physical Description Inner View Vari-focal...
when the temparature inside the Network Camera reaches over 50°C, the fan will both operate automatically. *1 When the camera is installed and operated in low temperatures below -10 °C {14 °F}, normal images may not be obtained immediately after turning...-30 °C ~ +50 °C {-22 °F ~ 122 °F} *1 When the temparature inside the Network Camera drops to 0°C, the heater and fan will operate automatically; In such a case, wait until the camera warms up (taking more than 1 hour) and start adjustment after startup. Physical Description Inner View Vari-focal...
Quick Start Guide
Page 16
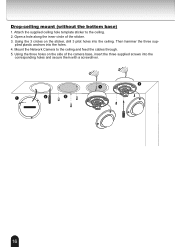
... bottom base) 1. Using the 3 circles on the side of the sticker. 3. Mount the Network Camera to the ceiling. 2. Using the three holes on the sticker, drill 3 pilot holes into the holes. 4. Open a hole along the inner circle of the camera base, insert the three supplied screws into the corresponding holes and secure them...
... bottom base) 1. Using the 3 circles on the side of the sticker. 3. Mount the Network Camera to the ceiling. 2. Using the three holes on the sticker, drill 3 pilot holes into the holes. 4. Open a hole along the inner circle of the camera base, insert the three supplied screws into the corresponding holes and secure them...

Quick Start Guide
Page 17
...Using a different AC adapter may cause the camera to use only the supplied AC adapter. C . : No Connector N.C. N . Connect the supplied AC adapter. Use the supplied RJ45 female/female coupler to connect the Network Camera to the power socket. Power Input Connect ...the power adapter of this camera is directly connected to the Network Camera before plugging in 24V AC G N D : Ground GND DI D I /O terminal block....
...Using a different AC adapter may cause the camera to use only the supplied AC adapter. C . : No Connector N.C. N . Connect the supplied AC adapter. Use the supplied RJ45 female/female coupler to connect the Network Camera to the power socket. Power Input Connect ...the power adapter of this camera is directly connected to the Network Camera before plugging in 24V AC G N D : Ground GND DI D I /O terminal block....
Quick Start Guide
Page 18
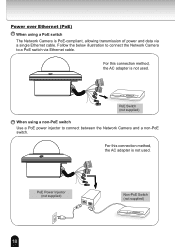
... a non-PoE switch. NA.CC.24V AC24V POWER COLLISION 1 2 3 4 5 LINK RECEIVE PARTITION PoE Switch (not supplied) When using a PoE switch The Network Camera is PoE-compliant, allowing transmission of power and data via Ethernet cable. N.C. AACC2244VV PoE Power Injector (not supplied) Non-PoE Switch (not supplied) POWER COLLISION 1 2 3 4 5 ...
... a non-PoE switch. NA.CC.24V AC24V POWER COLLISION 1 2 3 4 5 LINK RECEIVE PARTITION PoE Switch (not supplied) When using a PoE switch The Network Camera is PoE-compliant, allowing transmission of power and data via Ethernet cable. N.C. AACC2244VV PoE Power Injector (not supplied) Non-PoE Switch (not supplied) POWER COLLISION 1 2 3 4 5 ...
Quick Start Guide
Page 19
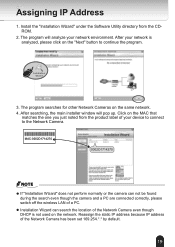
...window will analyze your network environment. Click on the "Next" button to the Network Camera. Reassign the static IP address because IP address of your network is not used on the same network. 4. Assigning IP Address 1. MAC:0002D1714270 00-02-D1-71-42-70 169.254.0.99 IK-WR12A 0002D1714270 NOTE l ...If "Installation Wizard" does not perform normally or the camera can search the location of the Network Camera even though DHCP is analyzed, please click on the MAC that matches the ...
...window will analyze your network environment. Click on the "Next" button to the Network Camera. Reassign the static IP address because IP address of your network is not used on the same network. 4. Assigning IP Address 1. MAC:0002D1714270 00-02-D1-71-42-70 169.254.0.99 IK-WR12A 0002D1714270 NOTE l ...If "Installation Wizard" does not perform normally or the camera can search the location of the Network Camera even though DHCP is analyzed, please click on the MAC that matches the ...
Quick Start Guide
Page 20
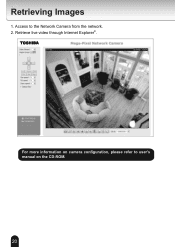
Access to user's manual on the CD-ROM. 20 Retrieving Images 1. Retrieve live video through Internet Explorer®. 2010/09/01 16:34:42 For more information on camera configuration, please refer to the Network Camera from the network. 2.
Access to user's manual on the CD-ROM. 20 Retrieving Images 1. Retrieve live video through Internet Explorer®. 2010/09/01 16:34:42 For more information on camera configuration, please refer to the Network Camera from the network. 2.
