
Operation Manual
Page 1
Ihttp://www.netcam.toshiba.com The above URL is subject to the firmware version R1.01 and later. This User's Guide applies to change without prior notice. For information on the latest products and peripheral devices, refer to the Toshiba website (http://www.cctv.toshiba.com). NETWORK CAMERA Model: IK-WR01A Operation Manual To get started, read the separate "Safety Precautions" carefully. WR01-01 If the URL changes, refer to the following Web page.
Ihttp://www.netcam.toshiba.com The above URL is subject to the firmware version R1.01 and later. This User's Guide applies to change without prior notice. For information on the latest products and peripheral devices, refer to the Toshiba website (http://www.cctv.toshiba.com). NETWORK CAMERA Model: IK-WR01A Operation Manual To get started, read the separate "Safety Precautions" carefully. WR01-01 If the URL changes, refer to the following Web page.
Operation Manual
Page 3
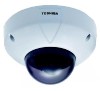
Installation/Set up Viewing and Operation Recording INTRODUCTION FEATURES & DESCRIPTION IK-WR01A has the following features: (1) Flush/Surface mount. (2) IP66 Standard for dust and water resistance. (3) Built in vari-focal lens with auto-iris ...22 G Connecting ...23 GUsing the Camera Search Application "Camera Finder 24 GChanging Administrator Login ID and Password 26 GSetting up Access Restriction 28 GConfiguring the Network Manually 30 3 Setting up GINSTALLATION ...8 G Adjust the Angle of Parts 5 Installation/Set up Others This camera automatically detects the power. (7) BLC,...
Installation/Set up Viewing and Operation Recording INTRODUCTION FEATURES & DESCRIPTION IK-WR01A has the following features: (1) Flush/Surface mount. (2) IP66 Standard for dust and water resistance. (3) Built in vari-focal lens with auto-iris ...22 G Connecting ...23 GUsing the Camera Search Application "Camera Finder 24 GChanging Administrator Login ID and Password 26 GSetting up Access Restriction 28 GConfiguring the Network Manually 30 3 Setting up GINSTALLATION ...8 G Adjust the Angle of Parts 5 Installation/Set up Others This camera automatically detects the power. (7) BLC,...

Operation Manual
Page 4
... Still Image 53 Setting up GHow to Set up ...56 G General Configuration 56 GSystem Settings 57 • Restoring the default settings 58 • Rebooting the network camera 59 • Updating the Firmware 59 • Click "Firmware update 59 • Importing the Settings Saved on a Personal Computer 59 GUser Settings ...60 GAdmin...
... Still Image 53 Setting up GHow to Set up ...56 G General Configuration 56 GSystem Settings 57 • Restoring the default settings 58 • Rebooting the network camera 59 • Updating the Firmware 59 • Click "Firmware update 59 • Importing the Settings Saved on a Personal Computer 59 GUser Settings ...60 GAdmin...

Operation Manual
Page 5
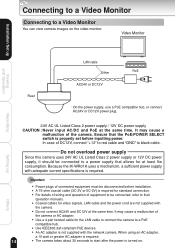
... (Backlight Compensation Switch) With the switch on . Clockwise: The picture becomes brighter. Monitor Out Connector Connect with AC24V. Default switch is set values of the network camera are reset to obtain the best possible image. "Optimum Value" is pressed, all the set to ACDC. (Refer to line lock with the switch...
... (Backlight Compensation Switch) With the switch on . Clockwise: The picture becomes brighter. Monitor Out Connector Connect with AC24V. Default switch is set values of the network camera are reset to obtain the best possible image. "Optimum Value" is pressed, all the set to ACDC. (Refer to line lock with the switch...
Operation Manual
Page 14
... coaxial cable (3C-2V or 5C-2V) is properly set before installation. It may cause a malfunction of the camera. Because the IK-WR01A uses a mechanism, a sufficient power supply with the network camera. G Use IEEE802.3af-compliant PoE devices. Ensure that allows for the LAN cable to connect the camera to black cable. It...
... coaxial cable (3C-2V or 5C-2V) is properly set before installation. It may cause a malfunction of the camera. Because the IK-WR01A uses a mechanism, a sufficient power supply with the network camera. G Use IEEE802.3af-compliant PoE devices. Ensure that allows for the LAN cable to connect the camera to black cable. It...

Operation Manual
Page 20
... 6.0 or later • CPU: Intel® Pentium® III 500 MHz or greater • Memory: at least 256 MB ° Network camera (this product) • Purchase the required and appropriate number of cameras for the installation location. ° Appropriate connection devices (hub, router,...images from the supplied CD-ROM (➝ page. 24). 20 Setting up Viewing and Operation Recording Setting Up the Network Camera Environment Requirements for Network Camera Monitoring System ° Administrator's personal computer This manual refers to a personal computer that has been granted all ...
... 6.0 or later • CPU: Intel® Pentium® III 500 MHz or greater • Memory: at least 256 MB ° Network camera (this product) • Purchase the required and appropriate number of cameras for the installation location. ° Appropriate connection devices (hub, router,...images from the supplied CD-ROM (➝ page. 24). 20 Setting up Viewing and Operation Recording Setting Up the Network Camera Environment Requirements for Network Camera Monitoring System ° Administrator's personal computer This manual refers to a personal computer that has been granted all ...
Operation Manual
Page 21
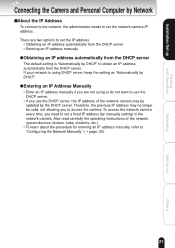
...camera. GEntering an IP Address Manually • Enter an IP address manually if you use the DHCP server, the IP address of the network system devices (routers, hubs, modems, etc.). • To learn about the procedure for entering an IP address manually, refer to obtain... DHCP". There are not using DHCP server, keep the setting as "Automatically by manually setting) in the network camera. If your network is "Automatically by DHCP" to "Configuring the Network Manually" (➝ page. 30). 21 Setting up Viewing and Operation Recording Connecting the Camera and Personal Computer...
...camera. GEntering an IP Address Manually • Enter an IP address manually if you use the DHCP server, the IP address of the network system devices (routers, hubs, modems, etc.). • To learn about the procedure for entering an IP address manually, refer to obtain... DHCP". There are not using DHCP server, keep the setting as "Automatically by manually setting) in the network camera. If your network is "Automatically by DHCP" to "Configuring the Network Manually" (➝ page. 30). 21 Setting up Viewing and Operation Recording Connecting the Camera and Personal Computer...

Operation Manual
Page 22
...(crossover) Crossover cable is also recommended to set the computer's IP address from the router's DHCP server and may not be run in the same network segment). G You can also use the LAN port of not using a hub. G In the case of your broadband router's user guide. Others... by DHCP, " the camera will get the IP address from the router's DHCP server. G Establishing a connection via a hub or router (example) Network camera IP address 192.168.0.30 Internet Hub or router Personal computer IP address 192.168.0.50 LAN cable (straight through) LAN cable (straight through...
...(crossover) Crossover cable is also recommended to set the computer's IP address from the router's DHCP server and may not be run in the same network segment). G You can also use the LAN port of not using a hub. G In the case of your broadband router's user guide. Others... by DHCP, " the camera will get the IP address from the router's DHCP server. G Establishing a connection via a hub or router (example) Network camera IP address 192.168.0.30 Internet Hub or router Personal computer IP address 192.168.0.50 LAN cable (straight through) LAN cable (straight through...

Operation Manual
Page 23
...powered hub. Recording Make sure whether the camera receives a reply from ..." Alternatively, use a LAN cable (crossover) to the user's guide of the network camera. Set the IP address of the computer to a setting different that the camera name "wrcam01" and the IP address "192.168.0.30" are... screen without using a PoE compatible hub, connect AC24V or DC12V power plug with the power plug terminal. Connecting Installation/Set up Search for the network camera with the "Camera Finder" (➝ page. 24) and then view camera images. G Set the IP address of the personal computer. ...
...powered hub. Recording Make sure whether the camera receives a reply from ..." Alternatively, use a LAN cable (crossover) to the user's guide of the network camera. Set the IP address of the computer to a setting different that the camera name "wrcam01" and the IP address "192.168.0.30" are... screen without using a PoE compatible hub, connect AC24V or DC12V power plug with the power plug terminal. Connecting Installation/Set up Search for the network camera with the "Camera Finder" (➝ page. 24) and then view camera images. G Set the IP address of the personal computer. ...
Operation Manual
Page 24
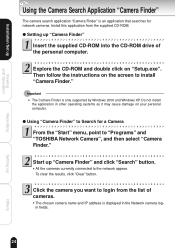
...To clear the results, click "Clear" button. Do not install the application in the Network camera login fields. 24 Setting up Others G All the cameras currently connected to "Programs" and "TOSHIBA Network Camera", and then select "Camera Finder." Installation/Set up Viewing and Operation Recording Using the... Important G The Camera Finder is an application that searches for a Camera From the "Start" menu, point to the network appear. G Using "Camera Finder" to Search for network cameras. Explore the CD-ROM and double click on the screen to login from the supplied CD-ROM.
...To clear the results, click "Clear" button. Do not install the application in the Network camera login fields. 24 Setting up Others G All the cameras currently connected to "Programs" and "TOSHIBA Network Camera", and then select "Camera Finder." Installation/Set up Viewing and Operation Recording Using the... Important G The Camera Finder is an application that searches for a Camera From the "Start" menu, point to the network appear. G Using "Camera Finder" to Search for network cameras. Explore the CD-ROM and double click on the screen to login from the supplied CD-ROM.

Operation Manual
Page 25
... up Viewing and Operation Recording Setting up and then the "Camera Window" screen appears. When connecting to the IK-WR01A, be sure to the network camera from "Camera Finder." To close the window without logging in Click "Exit" button to close "Camera Finder" Important G Toshiba is invalid for any damages caused by this software.
... up Viewing and Operation Recording Setting up and then the "Camera Window" screen appears. When connecting to the IK-WR01A, be sure to the network camera from "Camera Finder." To close the window without logging in Click "Exit" button to close "Camera Finder" Important G Toshiba is invalid for any damages caused by this software.

Operation Manual
Page 27
Enter a new login ID in the New login ID field and a new password in the network camera. G New login ID and password are stored in the New Password field and New Password (Confirm) field. Installation/Set up Others G Enter the same ...
Enter a new login ID in the New login ID field and a new password in the network camera. G New login ID and password are stored in the New Password field and New Password (Confirm) field. Installation/Set up Others G Enter the same ...

Operation Manual
Page 29
... browser. G When accessing to the camera next time, you to enter the user ID and password. Enter the Administrator login ID and password in the network camera. G New user ID and password for the User login are stored in the field of user name and password, respectively ➝Click the "OK...
... browser. G When accessing to the camera next time, you to enter the user ID and password. Enter the Administrator login ID and password in the network camera. G New user ID and password for the User login are stored in the field of user name and password, respectively ➝Click the "OK...
Operation Manual
Page 30
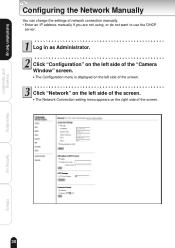
Log in as Administrator. Click "Network" on the left side of the "Camera Window" screen. Click "Configuration" on the left side of the screen. G The Network Connection setting menu appears on the left side of network connection manually. • Enter an IP address manually if you are not using, or do not want to use the DHCP server. G The Configuration menu is displayed on the right side of the screen. 30 Setting up Viewing and Operation Recording Configuring the Network Manually You can change the settings of the screen. Installation/Set up Others
Log in as Administrator. Click "Network" on the left side of the "Camera Window" screen. Click "Configuration" on the left side of the screen. G The Network Connection setting menu appears on the left side of network connection manually. • Enter an IP address manually if you are not using, or do not want to use the DHCP server. G The Configuration menu is displayed on the right side of the screen. 30 Setting up Viewing and Operation Recording Configuring the Network Manually You can change the settings of the screen. Installation/Set up Others
Operation Manual
Page 31
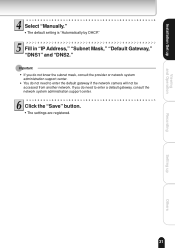
... "IP Address," "Subnet Mask," "Default Gateway," "DNS1" and "DNS2." Installation/Set up Others If you do not know the subnet mask, consult the provider or network system administration support center. Important G If you do not need to enter the default gateway if the...
... "IP Address," "Subnet Mask," "Default Gateway," "DNS1" and "DNS2." Installation/Set up Others If you do not know the subnet mask, consult the provider or network system administration support center. Important G If you do not need to enter the default gateway if the...

Operation Manual
Page 34
... about how to log into the camera. Installation/Set up and then the Camera Window screen appears for the network camera with the "Camera Finder" ¡ Log into the network camera with the Internet browser on the camera Close the browser to log off (disconnect) the camera. 34 Setting... up Others G The browser starts up Viewing and Operation Recording Viewing Viewing Images The images in the network camera can be displayed with the "Camera Finder," refer to "Using the Camera Search Application "Camera Finder"" (¡ page.24). Image on...
... about how to log into the camera. Installation/Set up and then the Camera Window screen appears for the network camera with the "Camera Finder" ¡ Log into the network camera with the Internet browser on the camera Close the browser to log off (disconnect) the camera. 34 Setting... up Others G The browser starts up Viewing and Operation Recording Viewing Viewing Images The images in the network camera can be displayed with the "Camera Finder," refer to "Using the Camera Search Application "Camera Finder"" (¡ page.24). Image on...

Operation Manual
Page 42
Installation/Set up Others 42 Recordable media and its recordable contents are as follows. Recordable Media FTP Server Personal Computer Recordable Contents G Data of "Periodic FTP by Schedule" G Data of "Motion Detection" G Image data recorded by "Image Recording" (JPEG) (➝ page. 51) G Video data recorded by "Image Recording" (AVI) (➝ page. 51) G Still images recorded by "Save Current Picture As" (➝ page. 53) Viewing and Operation Recording Setting up About Recording Images Network camera can record images according to your need.
Installation/Set up Others 42 Recordable media and its recordable contents are as follows. Recordable Media FTP Server Personal Computer Recordable Contents G Data of "Periodic FTP by Schedule" G Data of "Motion Detection" G Image data recorded by "Image Recording" (JPEG) (➝ page. 51) G Video data recorded by "Image Recording" (AVI) (➝ page. 51) G Still images recorded by "Save Current Picture As" (➝ page. 53) Viewing and Operation Recording Setting up About Recording Images Network camera can record images according to your need.

Operation Manual
Page 44
... "Periodic FTP by Schedule". Important • Do not change the port number unless your provider or the network administrator instructs you are unsure about which mode to choose. •PASV (passive mode): If the network camera is behind a firewall, access to the FTP server may be restricted in PORT (active mode). GPassword...
... "Periodic FTP by Schedule". Important • Do not change the port number unless your provider or the network administrator instructs you are unsure about which mode to choose. •PASV (passive mode): If the network camera is behind a firewall, access to the FTP server may be restricted in PORT (active mode). GPassword...

Operation Manual
Page 45
... while transferring a file), the camera logs out from the FTP server until all images have been transferred. • When not selecting "Periodic," network camera logs in the camera. GConnection to set up the configuration for the item you selected. For setup details on each time an alarm goes... The camera will not log out from the server after . Installation/Set up Viewing and Operation Recording NOTE • When selecting "Periodic", network camera logs in to the section on the next page and after transferring last image data. When the scheduled recording stops, there may be...
... while transferring a file), the camera logs out from the FTP server until all images have been transferred. • When not selecting "Periodic," network camera logs in the camera. GConnection to set up the configuration for the item you selected. For setup details on each time an alarm goes... The camera will not log out from the server after . Installation/Set up Viewing and Operation Recording NOTE • When selecting "Periodic", network camera logs in to the section on the next page and after transferring last image data. When the scheduled recording stops, there may be...

Operation Manual
Page 47
...). N N: Not in Daylight Time D: Daylight (Summer) Time Recording Setting up Viewing and Operation NOTE • The cycle may shift depending of Resolution (image size) and networking conditions. 4) Enter "File Name" G Select one image at the same period, the *** order is the "Periodic FTP by Schedule" file. (Keyword) Enter user defined keyword...
...). N N: Not in Daylight Time D: Daylight (Summer) Time Recording Setting up Viewing and Operation NOTE • The cycle may shift depending of Resolution (image size) and networking conditions. 4) Enter "File Name" G Select one image at the same period, the *** order is the "Periodic FTP by Schedule" file. (Keyword) Enter user defined keyword...