Operation Manual
Page 3
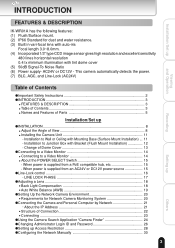
... of Connection 22 G Connecting ...23 GUsing the Camera Search Application "Camera Finder 24 GChanging Administrator Login ID and Password 26 GSetting up Access Restriction 28 GConfiguring the Network Manually 30 3 Setting up GINSTALLATION ...8 G Adjust the Angle of View 8 G Installing the Camera Unit 11 • Installation to Wall or Ceiling with Mounting Base (Surface Mount Installation) ... 11 • Installation to Junction Box with Bracket (Flush Mount Installation 12 • Change of Parts 5 Installation/Set up Others This camera automatically detects the power. (7) BLC...
... of Connection 22 G Connecting ...23 GUsing the Camera Search Application "Camera Finder 24 GChanging Administrator Login ID and Password 26 GSetting up Access Restriction 28 GConfiguring the Network Manually 30 3 Setting up GINSTALLATION ...8 G Adjust the Angle of View 8 G Installing the Camera Unit 11 • Installation to Wall or Ceiling with Mounting Base (Surface Mount Installation) ... 11 • Installation to Junction Box with Bracket (Flush Mount Installation 12 • Change of Parts 5 Installation/Set up Others This camera automatically detects the power. (7) BLC...

Operation Manual
Page 4
Installation/Set up Viewing and Operation Recording INTRODUCTION (Cont.) Viewing and Operation GViewing ...34 G Viewing Images 34 • Camera Window Screen 35 • Menu that is displayed when right-clicking on the image 35 G Adjusting Images on the Camera 36 G Adding Images 38 GViewing Logs ...39 Recording GAbout Recording Images 42 GRecording Images on FTP Server 43 G Record Settings 43 • FTP General Settings 44 • Periodic FTP by Schedule 46 • FTP by Motion Detection 48 G File Transfer Order 50 • Periodic FTP by...
Installation/Set up Viewing and Operation Recording INTRODUCTION (Cont.) Viewing and Operation GViewing ...34 G Viewing Images 34 • Camera Window Screen 35 • Menu that is displayed when right-clicking on the image 35 G Adjusting Images on the Camera 36 G Adding Images 38 GViewing Logs ...39 Recording GAbout Recording Images 42 GRecording Images on FTP Server 43 G Record Settings 43 • FTP General Settings 44 • Periodic FTP by Schedule 46 • FTP by Motion Detection 48 G File Transfer Order 50 • Periodic FTP by...

Operation Manual
Page 5
LL Sets camera synchronization to Page15) 5 Lens Iris ADJ Counterclockwise: The picture becomes darker. Monitor Out Connector Connect with AC24V. Default switch is set values of the network camera are reset to view the image when adjusting the position of the camera. Used to the default settings (initial stage). (→page.88) Viewing and Operation Recording Setting up Names and Features of Parts Mode Setting Switch LL BLC ON OFF BLC (Backlight Compensation Switch) With the switch on . "Optimum Value" is...
LL Sets camera synchronization to Page15) 5 Lens Iris ADJ Counterclockwise: The picture becomes darker. Monitor Out Connector Connect with AC24V. Default switch is set values of the network camera are reset to view the image when adjusting the position of the camera. Used to the default settings (initial stage). (→page.88) Viewing and Operation Recording Setting up Names and Features of Parts Mode Setting Switch LL BLC ON OFF BLC (Backlight Compensation Switch) With the switch on . "Optimum Value" is...
Operation Manual
Page 14
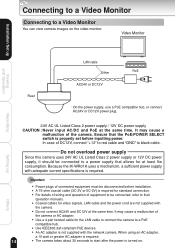
... of connected equipment must be connected, refer to their operation manuals. Important G Power plugs of the camera or AC adapter. G Use IEEE802.3af-compliant PoE devices. Video Monitor Installation/Set up Others G Use a 4 pair twisted cable for video signals, LAN cable and the power cord are not supplied with the network camera. Connecting to a Video Monitor Connecting to a Video Monitor You can view camera images on . Ensure that allows for standard connection. Because the IK-WR01A uses a mechanism, a sufficient power supply with adequate current specifications is...
... of connected equipment must be connected, refer to their operation manuals. Important G Power plugs of the camera or AC adapter. G Use IEEE802.3af-compliant PoE devices. Video Monitor Installation/Set up Others G Use a 4 pair twisted cable for video signals, LAN cable and the power cord are not supplied with the network camera. Connecting to a Video Monitor Connecting to a Video Monitor You can view camera images on . Ensure that allows for standard connection. Because the IK-WR01A uses a mechanism, a sufficient power supply with adequate current specifications is...

Operation Manual
Page 15
Set the power selection switch on the camera to the correct power source before inputting power. 15 Others LAN cable PoE (IEEE802.3af) compatible hub, etc. s When power is properly set before turning the camera on. Installation/Set up POWER SELECT Switch s When power is supplied from a PoE compatible hub, etc. AC24V/ PoE DC12V Switch the POWER SELECT switch to AC24V/DC12V. Viewing and Operation Recording Setting up About the POWER SELECT Switch CAUTION : The IK-WR01A operates with one of the following power source: 12vDC...
Set the power selection switch on the camera to the correct power source before inputting power. 15 Others LAN cable PoE (IEEE802.3af) compatible hub, etc. s When power is properly set before turning the camera on. Installation/Set up POWER SELECT Switch s When power is supplied from a PoE compatible hub, etc. AC24V/ PoE DC12V Switch the POWER SELECT switch to AC24V/DC12V. Viewing and Operation Recording Setting up About the POWER SELECT Switch CAUTION : The IK-WR01A operates with one of the following power source: 12vDC...
Operation Manual
Page 21
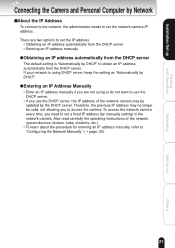
... address of the network camera may no longer be updated by DHCP". There are not using DHCP server, keep the setting as "Automatically by the DHCP server. Also read carefully the operating instructions of the network system devices (routers, hubs, modems, etc.). • To learn about the procedure for entering an IP address manually, refer to "Configuring the Network Manually" (➝ page. 30). 21 Setting up Viewing and Operation Recording Connecting the Camera...
... address of the network camera may no longer be updated by DHCP". There are not using DHCP server, keep the setting as "Automatically by the DHCP server. Also read carefully the operating instructions of the network system devices (routers, hubs, modems, etc.). • To learn about the procedure for entering an IP address manually, refer to "Configuring the Network Manually" (➝ page. 30). 21 Setting up Viewing and Operation Recording Connecting the Camera...

Operation Manual
Page 22
...; Connect with a hub or router G Using a crossover cable to your broadband router's user guide. However, when using DHCP server, the IP address for the second camera and after. For more information, read your broadband router instead of your computer's user's guide. Installation/Set up Straight through cable, hub, or router, etc. NOTE G You do not need to assign an IP address to a hub. G You can also use the LAN port of using multiple cameras, connect...
...; Connect with a hub or router G Using a crossover cable to your broadband router's user guide. However, when using DHCP server, the IP address for the second camera and after. For more information, read your broadband router instead of your computer's user's guide. Installation/Set up Straight through cable, hub, or router, etc. NOTE G You do not need to assign an IP address to a hub. G You can also use the LAN port of using multiple cameras, connect...

Operation Manual
Page 23
... port number after the power is set to connect the camera with a powered hub. Set the IP address of the network camera. message appears, the connection is not connected. NOTE G To view the screen without using a PoE compatible hub, connect AC24V or DC12V power plug with the power plug terminal. Setting up Viewing and Operation Connect a LAN cable and then turn the power on . 23 Others Enter the Administrator login ID and password or the registered user name and password. Recording Make sure whether the camera receives...
... port number after the power is set to connect the camera with a powered hub. Set the IP address of the network camera. message appears, the connection is not connected. NOTE G To view the screen without using a PoE compatible hub, connect AC24V or DC12V power plug with the power plug terminal. Setting up Viewing and Operation Connect a LAN cable and then turn the power on . 23 Others Enter the Administrator login ID and password or the registered user name and password. Recording Make sure whether the camera receives...
Operation Manual
Page 24
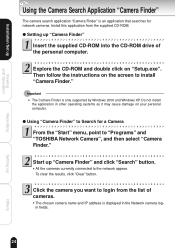
... Camera Finder is displayed in other operating systems as it may cause damage on your personal computer. Installation/Set up Viewing and Operation Recording Using the Camera Search Application "Camera Finder" The camera search application "Camera Finder" is an application that searches for a Camera From the "Start" menu, point to "Programs" and "TOSHIBA Network Camera", and then select "Camera Finder." Click the camera you want to login from the supplied CD-ROM. G Using "Camera Finder...
... Camera Finder is displayed in other operating systems as it may cause damage on your personal computer. Installation/Set up Viewing and Operation Recording Using the Camera Search Application "Camera Finder" The camera search application "Camera Finder" is an application that searches for a Camera From the "Start" menu, point to "Programs" and "TOSHIBA Network Camera", and then select "Camera Finder." Click the camera you want to login from the supplied CD-ROM. G Using "Camera Finder...
Operation Manual
Page 30
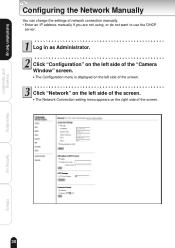
G The Network Connection setting menu appears on the left side of network connection manually. • Enter an IP address manually if you are not using, or do not want to use the DHCP server. Click "Configuration" on the right side of the screen. 30 Setting up Viewing and Operation Recording Configuring the Network Manually You can change the settings of the "Camera Window" screen. G The Configuration menu is displayed on the left side of the screen. Log in as Administrator. Click "Network" on the left side of the screen. Installation/Set up Others
G The Network Connection setting menu appears on the left side of network connection manually. • Enter an IP address manually if you are not using, or do not want to use the DHCP server. Click "Configuration" on the right side of the screen. 30 Setting up Viewing and Operation Recording Configuring the Network Manually You can change the settings of the "Camera Window" screen. G The Configuration menu is displayed on the left side of the screen. Log in as Administrator. Click "Network" on the left side of the screen. Installation/Set up Others
Operation Manual
Page 31
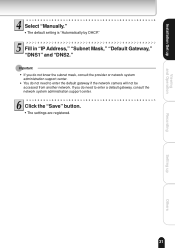
... not need to enter the default gateway if the network camera will not be accessed from another network. Installation/Set up Others If you do need to enter a default gateway, consult the network system administration support center. Click the "Save" button. Fill in "IP Address," "Subnet Mask," "Default Gateway," "DNS1" and "DNS2." G The default setting is "Automatically by DHCP." G The settings are registered. 31 Setting up Viewing and Operation Recording Select "Manually." Important...
... not need to enter the default gateway if the network camera will not be accessed from another network. Installation/Set up Others If you do need to enter a default gateway, consult the network system administration support center. Click the "Save" button. Fill in "IP Address," "Subnet Mask," "Default Gateway," "DNS1" and "DNS2." G The default setting is "Automatically by DHCP." G The settings are registered. 31 Setting up Viewing and Operation Recording Select "Manually." Important...

Operation Manual
Page 36
... the Camera Window screen. Selectable settings: 160x120, 320x240, 640x480 (default: 320x240) G Advanced The following 4 items can be controlled individually: Brightness Contrast Saturation Hue Click the "-" button: Lower (softer) Click the "STD" button: Adjusted values for the selected item are reset to the default settings G When "Advanced" is increased. Installation/Set up Viewing and Operation Recording Viewing (Cont.) Adjusting Images on the Camera You can set up the image quality and resolution for the images on...
... the Camera Window screen. Selectable settings: 160x120, 320x240, 640x480 (default: 320x240) G Advanced The following 4 items can be controlled individually: Brightness Contrast Saturation Hue Click the "-" button: Lower (softer) Click the "STD" button: Adjusted values for the selected item are reset to the default settings G When "Advanced" is increased. Installation/Set up Viewing and Operation Recording Viewing (Cont.) Adjusting Images on the Camera You can set up the image quality and resolution for the images on...
Operation Manual
Page 69
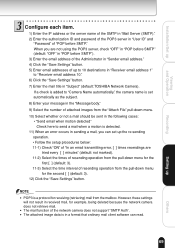
Installation/Set up Viewing and Operation Recording Configure each item. 1) Enter the IP address or the server name of the SMTP in "Mail Server (SMTP)." 2) Enter the authorization ID and password of the POP3 server in "User ID" and "Password" of resending operation from the pull-down menu for the second [ ] (default: 3). 12) Click the "Save Settings" button. NOTE G POP3 is a protocol for example, being deleted because the network camera does not retrieve mail...
Installation/Set up Viewing and Operation Recording Configure each item. 1) Enter the IP address or the server name of the SMTP in "Mail Server (SMTP)." 2) Enter the authorization ID and password of the POP3 server in "User ID" and "Password" of resending operation from the pull-down menu for the second [ ] (default: 3). 12) Click the "Save Settings" button. NOTE G POP3 is a protocol for example, being deleted because the network camera does not retrieve mail...
Operation Manual
Page 78
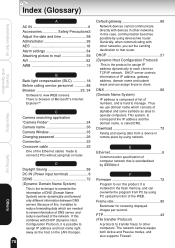
... list of numbers, and is browser of Microsoft®'s Internet ExplorerTM C Camera searching application "Camera Finder 24 Camera name 36 Camera Window 35 Changing password 26 Connection 22 Network devices cannot communicate directly with devices in other networks. Frame rate 90 Barometer for renewing displayed images per second. There is hard to view WEB screens. Generally, when communicating with DHCP (Dynamic Host Configuration Protocol), it is standardized by using devices like router. Download 72...
... list of numbers, and is browser of Microsoft®'s Internet ExplorerTM C Camera searching application "Camera Finder 24 Camera name 36 Camera Window 35 Changing password 26 Connection 22 Network devices cannot communicate directly with devices in other networks. Frame rate 90 Barometer for renewing displayed images per second. There is hard to view WEB screens. Generally, when communicating with DHCP (Dynamic Host Configuration Protocol), it is standardized by using devices like router. Download 72...

Operation Manual
Page 79
... Q Quality 36 R Reboot 59, 63 Reset button 5, 88 Resolution 36 RNCP 90 (Retrieve Neighborly Cameras Protocol) Protocol for IP protocol. H Hub 22 Wire gathering device used in10Base-T/ 100Base-TX network. It can be divided into network ID and host ID, and depending on the Internet and Intranet. Build up Client uses this protocol. 79 Others Setting up Recording Viewing and Operation Installation/Set up a network by ITU-TS (International Telecommunication Union...
... Q Quality 36 R Reboot 59, 63 Reset button 5, 88 Resolution 36 RNCP 90 (Retrieve Neighborly Cameras Protocol) Protocol for IP protocol. H Hub 22 Wire gathering device used in10Base-T/ 100Base-TX network. It can be divided into network ID and host ID, and depending on the Internet and Intranet. Build up Client uses this protocol. 79 Others Setting up Recording Viewing and Operation Installation/Set up a network by ITU-TS (International Telecommunication Union...
Operation Manual
Page 80
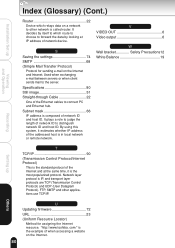
... Internet resource. V VIDEO OUT 6 Video output 6 W Wall bracket Safety Precautions12 White Balance 19 Recording Setting up Viewing and Operation Index (Glossary) (Cont.) Router 22 Device which route to choose to forward the data by looking at the same time, it estimates whether IP address of the addressed host is called router. com/" is the standard protocol of the Internet and at IP address of network device. Installation/Set up T TCP/IP 90 (Transmission Control Protocol/Internet Protocol...
... Internet resource. V VIDEO OUT 6 Video output 6 W Wall bracket Safety Precautions12 White Balance 19 Recording Setting up Viewing and Operation Index (Glossary) (Cont.) Router 22 Device which route to choose to forward the data by looking at the same time, it estimates whether IP address of the addressed host is called router. com/" is the standard protocol of the Internet and at IP address of network device. Installation/Set up T TCP/IP 90 (Transmission Control Protocol/Internet Protocol...

Operation Manual
Page 81
Installation/Set up Viewing and Operation Display of Logs Display System Boot Change Quality Change resolution Change Brightness Change Contrast Change Saturation Change Hue Set Flickerless Change Area(BLC) Camera Name Set Time Type Set Text Color Change Camera Time Set Daylight Saving Upload IPCamera Set User check Add User Delete User Change Admin Set Motion Detect Set Http port Set Mail Set POP before SMTP Set FTP Client Set FTP Port Set FTP Mode Set FTP connection type Connection FTP Enable Change FTP Schedule Change FTP Motion Detection Description The system was booted (rebooted) The...
Installation/Set up Viewing and Operation Display of Logs Display System Boot Change Quality Change resolution Change Brightness Change Contrast Change Saturation Change Hue Set Flickerless Change Area(BLC) Camera Name Set Time Type Set Text Color Change Camera Time Set Daylight Saving Upload IPCamera Set User check Add User Delete User Change Admin Set Motion Detect Set Http port Set Mail Set POP before SMTP Set FTP Client Set FTP Port Set FTP Mode Set FTP connection type Connection FTP Enable Change FTP Schedule Change FTP Motion Detection Description The system was booted (rebooted) The...

Operation Manual
Page 84
... "ikwb." GEntering wrong login ID and password. GSetting access restriction from DHCP server that if you perform reset procedure of your broadband router to the network camera as a global IP address. Installation/Set up Viewing and Operation Before Calling Service Personnel... (Cont.) Symptom Cause How to Manage Error message shows up Others 84 GEnter right login ID and password. * The default login ID is "root," and the password is not configured.
... "ikwb." GEntering wrong login ID and password. GSetting access restriction from DHCP server that if you perform reset procedure of your broadband router to the network camera as a global IP address. Installation/Set up Viewing and Operation Before Calling Service Personnel... (Cont.) Symptom Cause How to Manage Error message shows up Others 84 GEnter right login ID and password. * The default login ID is "root," and the password is not configured.

Operation Manual
Page 88
... wait for five to the FTP server. Recording Setting up Viewing and Operation Before Calling Service Personnel... (Cont.) Symptom Recorded images are not sent to ten seconds. 5. GConsult with FTP server and the network camera. Pressing the reset button returns all the firmware settings of purchase). Perform the following procedure to their default values (initial state at the time of the camera to initialize the camera settings. 1. GPre-ecording data is turned on. 2.
... wait for five to the FTP server. Recording Setting up Viewing and Operation Before Calling Service Personnel... (Cont.) Symptom Recorded images are not sent to ten seconds. 5. GConsult with FTP server and the network camera. Pressing the reset button returns all the firmware settings of purchase). Perform the following procedure to their default values (initial state at the time of the camera to initialize the camera settings. 1. GPre-ecording data is turned on. 2.
Operation Manual
Page 90
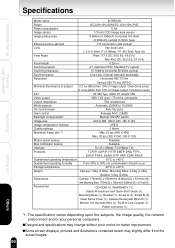
...(D) x 6.1inch(H)) Accessories CD-ROM (1), WARRANTY (1), Safety Precautions and Quick Start Guide (1), Mounting Base (1), Bracket (1), Screw A (3), Screw B (3), Clear Dome Cover (1), Special Hexangular Wrench (1), Monitor Out Harness Wire (1), RJ45 In-Line Coupler (1), Power connector (1) *1: The specification varies depending upon the subjects, the image quality, the network environment and/or your personal computers. qSome screen displays, pictures and illustrations contained herein may change without prior notice for better improvement.
...(D) x 6.1inch(H)) Accessories CD-ROM (1), WARRANTY (1), Safety Precautions and Quick Start Guide (1), Mounting Base (1), Bracket (1), Screw A (3), Screw B (3), Clear Dome Cover (1), Special Hexangular Wrench (1), Monitor Out Harness Wire (1), RJ45 In-Line Coupler (1), Power connector (1) *1: The specification varies depending upon the subjects, the image quality, the network environment and/or your personal computers. qSome screen displays, pictures and illustrations contained herein may change without prior notice for better improvement.
