Operation Manual
Page 3
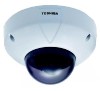
... G Connecting ...23 GUsing the Camera Search Application "Camera Finder 24 GChanging Administrator Login ID and Password 26 GSetting up Access Restriction 28 GConfiguring the Network Manually 30 3 Setting up Viewing and Operation Recording INTRODUCTION FEATURES & DESCRIPTION IK-WR01A has the following features: (1) Flush/Surface mount. (2) IP66 Standard for dust and water resistance. (3) Built...
... G Connecting ...23 GUsing the Camera Search Application "Camera Finder 24 GChanging Administrator Login ID and Password 26 GSetting up Access Restriction 28 GConfiguring the Network Manually 30 3 Setting up Viewing and Operation Recording INTRODUCTION FEATURES & DESCRIPTION IK-WR01A has the following features: (1) Flush/Surface mount. (2) IP66 Standard for dust and water resistance. (3) Built...

Operation Manual
Page 23
... even though the power plug terminal is correctly established. G If the "Reply from the personal computer. Enter the Administrator login ID and password or the registered user name and password. d) The Camera Window screen appears. G The camera takes about 30 seconds to connect the camera with the "Camera Finder" (➝ page. 24... turned on . When you to the camera with the power plug terminal. Connect the LAN cable (straight) leading to enter the user name and the password. http://192.168.0.30:88/).
... even though the power plug terminal is correctly established. G If the "Reply from the personal computer. Enter the Administrator login ID and password or the registered user name and password. d) The Camera Window screen appears. G The camera takes about 30 seconds to connect the camera with the "Camera Finder" (➝ page. 24... turned on . When you to the camera with the power plug terminal. Connect the LAN cable (straight) leading to enter the user name and the password. http://192.168.0.30:88/).

Operation Manual
Page 26
...displayed on the left side of the screen. 26 Setting up Viewing and Operation Recording Changing Administrator Login ID and Password Be sure to change your login ID and the password. G The Configuration menu is displayed on the left side of the "Camera Window" screen. You are able ...to change the default login ID and password. Remember this new login ID and password. Click "Admin" on the left side of the screen. Installation/Set up Others G The Admin Settings window is "ikwb". Click...
...displayed on the left side of the screen. 26 Setting up Viewing and Operation Recording Changing Administrator Login ID and Password Be sure to change your login ID and the password. G The Configuration menu is displayed on the left side of the "Camera Window" screen. You are able ...to change the default login ID and password. Remember this new login ID and password. Click "Admin" on the left side of the screen. Installation/Set up Others G The Admin Settings window is "ikwb". Click...

Operation Manual
Page 27
G New login ID and password are stored in the New Password field and the New Password (Confirm) field. G The current login operation terminates. G Enter the same password in the network camera. G Afterwards, follow the procedures to set up access restrictions (➝ page. 28). 27 Setting up Viewing... and Operation Recording - Click the "Change" button. Enter a new login ID in the New login ID field and a new password in the Current Password field. Click the browser. Installation/Set up Others Enter "root" in the Current login ID field and "ikwb" in the New...
G New login ID and password are stored in the New Password field and the New Password (Confirm) field. G The current login operation terminates. G Enter the same password in the network camera. G Afterwards, follow the procedures to set up access restrictions (➝ page. 28). 27 Setting up Viewing... and Operation Recording - Click the "Change" button. Enter a new login ID in the New login ID field and a new password in the Current Password field. Click the browser. Installation/Set up Others Enter "root" in the Current login ID field and "ikwb" in the New...

Operation Manual
Page 28
... verification. 28 Setting up the access restriction by requiring the user to enter the user ID and password for the Administrator login or the registered user ID and password. Enter the user name and the password for a new user in the field of the "Camera Window" screen. Installation/Set up Viewing and Operation... Setting menu is displayed on the right side of the screen. G The Configuration menu is displayed on the left side of the screen. G Enter the password again in "Add a user or change...
... verification. 28 Setting up the access restriction by requiring the user to enter the user ID and password for the Administrator login or the registered user ID and password. Enter the user name and the password for a new user in the field of the "Camera Window" screen. Installation/Set up Viewing and Operation... Setting menu is displayed on the right side of the screen. G The Configuration menu is displayed on the left side of the screen. G Enter the password again in "Add a user or change...

Operation Manual
Page 29
...the "Set" button. G When accessing to the camera next time, you to enter the user ID and password. Check "ON" in the network camera. Close the browser. G New user ID and password for the User login are stored in the "User authorization required" section. G A screen appears, asking you... the "Set/Change" button. Enter the Administrator login ID and password in as User, both the user ID and the password are required to enter a user name and password. G To log in the field of user name and password, respectively ➝Click the "OK" button. Installation/Set up Others...
...the "Set" button. G When accessing to the camera next time, you to enter the user ID and password. Check "ON" in the network camera. Close the browser. G New user ID and password for the User login are stored in the "User authorization required" section. G A screen appears, asking you... the "Set/Change" button. Enter the Administrator login ID and password in as User, both the user ID and the password are required to enter a user name and password. G To log in the field of user name and password, respectively ➝Click the "OK" button. Installation/Set up Others...

Operation Manual
Page 44
... FTP server. In this case, select PASV (passive mode). In this way, you can control the settings to connect to do so. GPassword: • Enter password registered with user ID above. GFTP sever: Select either one of them below and enter correct information. • Server Name • IP Address GUser ID...
... FTP server. In this case, select PASV (passive mode). In this way, you can control the settings to connect to do so. GPassword: • Enter password registered with user ID above. GFTP sever: Select either one of them below and enter correct information. • Server Name • IP Address GUser ID...

Operation Manual
Page 60
... "ON" in "User authorization required" (default: OFF). 2) Click the "Set" button. • When accessing to the camera, you are required to enter a user name and password. 60 Setting up access rights. Click "Configuration" on the left side of the "Camera Window" screen. • The Configuration menu appears on the left side...
... "ON" in "User authorization required" (default: OFF). 2) Click the "Set" button. • When accessing to the camera, you are required to enter a user name and password. 60 Setting up access rights. Click "Configuration" on the left side of the "Camera Window" screen. • The Configuration menu appears on the left side...

Operation Manual
Page 61
Installation/Set up Others G Deleting a user name 1) Select the "User name" you want to delete from the pull-down menu. 2) Click the "Delete" button. 61 Setting up Viewing and Operation Recording G Storing the user name and password 1) Enter the user name, password and password (confirm) for a new user in the field of "User ID," "Password" and "Confirm," respectively in "Add a user or change password." 2) Click the "Set/Change" button. • New user ID and password are stored in the network camera.
Installation/Set up Others G Deleting a user name 1) Select the "User name" you want to delete from the pull-down menu. 2) Click the "Delete" button. 61 Setting up Viewing and Operation Recording G Storing the user name and password 1) Enter the user name, password and password (confirm) for a new user in the field of "User ID," "Password" and "Confirm," respectively in "Add a user or change password." 2) Click the "Set/Change" button. • New user ID and password are stored in the network camera.

Operation Manual
Page 62
Click "Configuration" on the left side of the "Camera Window" screen. • The Configuration menu appears on the left side of the screen. • The Admin setting screen appears on the left side of the display. 62 Setting up Viewing and Operation Recording Admin Settings You can change the Administrator ID and password. Click "Admin" on the right side of the screen. Installation/Set up Others
Click "Configuration" on the left side of the "Camera Window" screen. • The Configuration menu appears on the left side of the screen. • The Admin setting screen appears on the left side of the display. 62 Setting up Viewing and Operation Recording Admin Settings You can change the Administrator ID and password. Click "Admin" on the right side of the screen. Installation/Set up Others

Operation Manual
Page 63
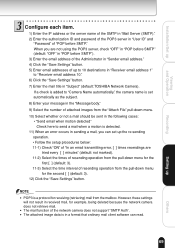
G Changing the Administrator ID and password 1) Enter the current login ID and the current password in "Current Login ID" and "Current Password," respectively. 2) Enter new login ID, new password and new password (confirm) in "New Login ID," "New Password" and "New Password (Confirm)," respectively. 3) Click the "Change" button. Installation/Set up Others G Restarting the camera Click the "Reboot IP Camera." 63 Setting up Viewing and Operation Recording Configure each item.
G Changing the Administrator ID and password 1) Enter the current login ID and the current password in "Current Login ID" and "Current Password," respectively. 2) Enter new login ID, new password and new password (confirm) in "New Login ID," "New Password" and "New Password (Confirm)," respectively. 3) Click the "Change" button. Installation/Set up Others G Restarting the camera Click the "Reboot IP Camera." 63 Setting up Viewing and Operation Recording Configure each item.
Operation Manual
Page 69
...1) Enter the IP address or the server name of the SMTP in "Mail Server (SMTP)." 2) Enter the authorization ID and password of the POP3 server in "User ID" and "Password" of up to 10 destinations in "Receiver email address 1" to send a mail when a motion is detected. 11) When an... email when motion detected" Check here to "Receiver email address 10." 6) Click the "Save Settings" button. 7) Enter the mail title in "Subject" (default: TOSHIBA Network Camera). However, these settings will not result in the "Message body." 9) Select the number of attached images from the pull-down menu for the...
...1) Enter the IP address or the server name of the SMTP in "Mail Server (SMTP)." 2) Enter the authorization ID and password of the POP3 server in "User ID" and "Password" of up to 10 destinations in "Receiver email address 1" to send a mail when a motion is detected. 11) When an... email when motion detected" Check here to "Receiver email address 10." 6) Click the "Save Settings" button. 7) Enter the mail title in "Subject" (default: TOSHIBA Network Camera). However, these settings will not result in the "Message body." 9) Select the number of attached images from the pull-down menu for the...

Operation Manual
Page 71
... connection for a DDNS server. displays a web page, allowing you to use the DDNS (default: OFF). 2) Enter the user name in "User ID." 3) Enter the password in "Password." 4) Enter the DDNS server name in "To sign up Viewing and Operation Recording DDNS Settings You can utilize the DDNS. Do not change the DDNS...
... connection for a DDNS server. displays a web page, allowing you to use the DDNS (default: OFF). 2) Enter the user name in "User ID." 3) Enter the password in "Password." 4) Enter the DDNS server name in "To sign up Viewing and Operation Recording DDNS Settings You can utilize the DDNS. Do not change the DDNS...
Operation Manual
Page 78
... enables to reduce forwarding data which consists of Microsoft®'s Internet ExplorerTM C Camera searching application "Camera Finder 24 Camera name 36 Camera Window 35 Changing password 26 Connection 22 Network devices cannot communicate directly with other networks, you set the sending destination to operate computers. There is possible to assign IP...
... enables to reduce forwarding data which consists of Microsoft®'s Internet ExplorerTM C Camera searching application "Camera Finder 24 Camera name 36 Camera Window 35 Changing password 26 Connection 22 Network devices cannot communicate directly with other networks, you set the sending destination to operate computers. There is possible to assign IP...

Operation Manual
Page 84
...provided from the DHCP server of your broadband router to the network camera as a global IP address. Enter your login ID and the password. Installation/Set up Viewing and Operation Before Calling Service Personnel... (Cont.) Symptom Cause How to Manage Error message shows up Others 84...the restriction setting. GConfirm the new IP address and try to the DDNS server. GEnter right login ID and password. * The default login ID is "root," and the password is not configured. Ask your broadband router. GCapsLock of the camera, all the settings you need to the ...
...provided from the DHCP server of your broadband router to the network camera as a global IP address. Enter your login ID and the password. Installation/Set up Viewing and Operation Before Calling Service Personnel... (Cont.) Symptom Cause How to Manage Error message shows up Others 84...the restriction setting. GConfirm the new IP address and try to the DDNS server. GEnter right login ID and password. * The default login ID is "root," and the password is not configured. Ask your broadband router. GCapsLock of the camera, all the settings you need to the ...

Operation Manual
Page 88
... initialize the camera settings. 1. GDepending on the conditions of your server, networking, image size and/or image quality settings, numbers of the FTP server, ID/ password or transfer directory is turned on. 2. Recording Setting up Viewing and Operation Before Calling Service Personnel... (Cont.) Symptom Recorded images are not sent to ten...
... initialize the camera settings. 1. GDepending on the conditions of your server, networking, image size and/or image quality settings, numbers of the FTP server, ID/ password or transfer directory is turned on. 2. Recording Setting up Viewing and Operation Before Calling Service Personnel... (Cont.) Symptom Recorded images are not sent to ten...