
Operation Manual
Page 1
This User's Guide applies to the Toshiba website (http://www.cctv.toshiba.com). If the URL changes, refer to the firmware version R1.01 and later. For information on the latest products and peripheral devices, refer to change without prior notice. WR01-01 Ihttp://www.netcam.toshiba.com The above URL is subject to the following Web page. NETWORK CAMERA Model: IK-WR01A Operation Manual To get started, read the separate "Safety Precautions" carefully.
This User's Guide applies to the Toshiba website (http://www.cctv.toshiba.com). If the URL changes, refer to the firmware version R1.01 and later. For information on the latest products and peripheral devices, refer to change without prior notice. WR01-01 Ihttp://www.netcam.toshiba.com The above URL is subject to the following Web page. NETWORK CAMERA Model: IK-WR01A Operation Manual To get started, read the separate "Safety Precautions" carefully.
Operation Manual
Page 3
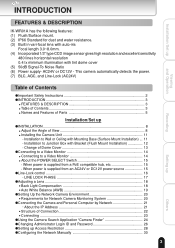
Installation/Set up Viewing and Operation Recording INTRODUCTION FEATURES & DESCRIPTION IK-WR01A has the following features: (1) Flush/Surface mount. (2) IP66 Standard for dust and water resistance. (3) Built in vari-focal lens with auto-iris Focal length... G Connecting ...23 GUsing the Camera Search Application "Camera Finder 24 GChanging Administrator Login ID and Password 26 GSetting up Access Restriction 28 GConfiguring the Network Manually 30 3 Setting up GINSTALLATION ...8 G Adjust the Angle of View 8 G Installing the Camera Unit 11 • Installation to Wall or Ceiling with ...
Installation/Set up Viewing and Operation Recording INTRODUCTION FEATURES & DESCRIPTION IK-WR01A has the following features: (1) Flush/Surface mount. (2) IP66 Standard for dust and water resistance. (3) Built in vari-focal lens with auto-iris Focal length... G Connecting ...23 GUsing the Camera Search Application "Camera Finder 24 GChanging Administrator Login ID and Password 26 GSetting up Access Restriction 28 GConfiguring the Network Manually 30 3 Setting up GINSTALLATION ...8 G Adjust the Angle of View 8 G Installing the Camera Unit 11 • Installation to Wall or Ceiling with ...
Operation Manual
Page 14
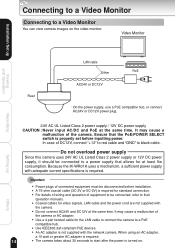
...this camera uses 24V AC UL Listed Class 2 power supply or 12V DC power supply, it should be connected, refer to their operation manuals. In case of connected equipment must be disconnected before inputting power. G Use a 4 pair twisted cable for standard connection. Ensure that ...Connecting to a Video Monitor You can view camera images on . G Do not connect AC24V and DC12V at the same time. Because the IK-WR01A uses a mechanism, a sufficient power supply with adequate current specifications is not supplied with the camera. G For details of wiring and operation of...
...this camera uses 24V AC UL Listed Class 2 power supply or 12V DC power supply, it should be connected, refer to their operation manuals. In case of connected equipment must be disconnected before inputting power. G Use a 4 pair twisted cable for standard connection. Ensure that ...Connecting to a Video Monitor You can view camera images on . G Do not connect AC24V and DC12V at the same time. Because the IK-WR01A uses a mechanism, a sufficient power supply with adequate current specifications is not supplied with the camera. G For details of wiring and operation of...

Operation Manual
Page 20
...and Operation Recording Setting Up the Network Camera Environment Requirements for Network Camera Monitoring System ° Administrator's personal computer This manual refers to a personal computer that has been granted all privileges for monitoring images as the "administrator's personal computer." * This... manual refers to "Structure of LAN cable depends on the connection method used just for configuring, operating, monitoring, and other operations as...
...and Operation Recording Setting Up the Network Camera Environment Requirements for Network Camera Monitoring System ° Administrator's personal computer This manual refers to a personal computer that has been granted all privileges for monitoring images as the "administrator's personal computer." * This... manual refers to "Structure of LAN cable depends on the connection method used just for configuring, operating, monitoring, and other operations as...
Operation Manual
Page 21
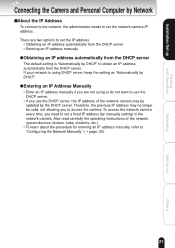
...network, the administrator needs to set the IP address. • Obtaining an IP address automatically from the DHCP server • Entering an IP address manually GObtaining an IP address automatically from the DHCP server The default setting is using or do not want to use the DHCP server. • If..., the IP address of the network system devices (routers, hubs, modems, etc.). • To learn about the procedure for entering an IP address manually, refer to access the camera. If your network is "Automatically by DHCP" to set the network camera IP address. Installation/Set up Others
...network, the administrator needs to set the IP address. • Obtaining an IP address automatically from the DHCP server • Entering an IP address manually GObtaining an IP address automatically from the DHCP server The default setting is using or do not want to use the DHCP server. • If..., the IP address of the network system devices (routers, hubs, modems, etc.). • To learn about the procedure for entering an IP address manually, refer to access the camera. If your network is "Automatically by DHCP" to set the network camera IP address. Installation/Set up Others
Operation Manual
Page 30
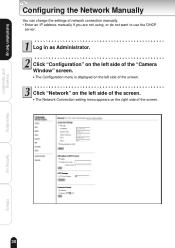
G The Configuration menu is displayed on the left side of the screen. Log in as Administrator. Click "Configuration" on the left side of the "Camera Window" screen. G The Network Connection setting menu appears on the left side of network connection manually. • Enter an IP address manually if you are not using, or do not want to use the DHCP server. Click "Network" on the right side of the screen. 30 Setting up Viewing and Operation Recording Configuring the Network Manually You can change the settings of the screen. Installation/Set up Others
G The Configuration menu is displayed on the left side of the screen. Log in as Administrator. Click "Configuration" on the left side of the "Camera Window" screen. G The Network Connection setting menu appears on the left side of network connection manually. • Enter an IP address manually if you are not using, or do not want to use the DHCP server. Click "Network" on the right side of the screen. 30 Setting up Viewing and Operation Recording Configuring the Network Manually You can change the settings of the screen. Installation/Set up Others
Operation Manual
Page 31
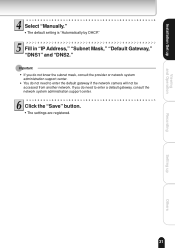
Fill in "IP Address," "Subnet Mask," "Default Gateway," "DNS1" and "DNS2." G The settings are registered. 31 Setting up Viewing and Operation Recording Select "Manually." Important G If you do need to enter a default gateway, consult the network system administration support center. Click the "Save" button. Installation/Set up Others If ...
Fill in "IP Address," "Subnet Mask," "Default Gateway," "DNS1" and "DNS2." G The settings are registered. 31 Setting up Viewing and Operation Recording Select "Manually." Important G If you do need to enter a default gateway, consult the network system administration support center. Click the "Save" button. Installation/Set up Others If ...
Operation Manual
Page 66
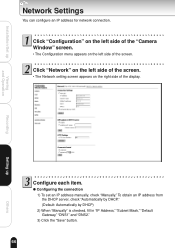
To obtain an IP address from the DHCP server, check "Automatically by DHCP." (Default: Automatically by DHCP) 2) When "Manually" is checked, fill in "IP Address," "Subnet Mask," "Default Gateway," "DNS1" and "DNS2." 3) Click the "Save" button. 66 Setting up Viewing and Operation Recording Network ... Window" screen. • The Configuration menu appears on the right side of the screen. Configure each item. G Configuring the connection 1) To set an IP address manually, check "Manually." Installation/Set up Others Click "Configuration" on the left side of the display.
To obtain an IP address from the DHCP server, check "Automatically by DHCP." (Default: Automatically by DHCP) 2) When "Manually" is checked, fill in "IP Address," "Subnet Mask," "Default Gateway," "DNS1" and "DNS2." 3) Click the "Save" button. 66 Setting up Viewing and Operation Recording Network ... Window" screen. • The Configuration menu appears on the right side of the screen. Configure each item. G Configuring the connection 1) To set an IP address manually, check "Manually." Installation/Set up Others Click "Configuration" on the left side of the display.

Operation Manual
Page 89
For details, refer to the user's manual of the power supply device. • Be sure to change the direction of the lens. 89 Setting up Viewing and Operation Recording About PoE Power ...
For details, refer to the user's manual of the power supply device. • Be sure to change the direction of the lens. 89 Setting up Viewing and Operation Recording About PoE Power ...
Operation Manual
Page 90
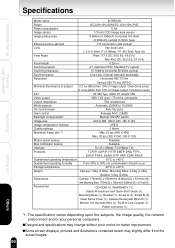
qDesigns and specifications may slightly differ from the actual images. 90 Setting up Viewing and Operation Recording Model name IK-WR01A Power AC 24V±10% 60Hz/DC 12V±10%/ PoE Power consumption 5.5w Image sensor 1/3 inch CCD ...(V) Focal length 0.2m~∞ Scanning system 2:1 interlace NTSC Standard TV system Scanning frequency 15.734kHz horizontal 59.94Hz vertical Synchronization Line-Lock, Internal manually switchable Resolution Horizontal 480 TV line Vertical 350 TV line (NTSC) Minimum illuminance of subject 0.2 lux (More than 10% of image output, Clear...
qDesigns and specifications may slightly differ from the actual images. 90 Setting up Viewing and Operation Recording Model name IK-WR01A Power AC 24V±10% 60Hz/DC 12V±10%/ PoE Power consumption 5.5w Image sensor 1/3 inch CCD ...(V) Focal length 0.2m~∞ Scanning system 2:1 interlace NTSC Standard TV system Scanning frequency 15.734kHz horizontal 59.94Hz vertical Synchronization Line-Lock, Internal manually switchable Resolution Horizontal 480 TV line Vertical 350 TV line (NTSC) Minimum illuminance of subject 0.2 lux (More than 10% of image output, Clear...