
User Manual
Page 2
... Hardware Installation...17 Network Deployment ...17 Software Installation ...19 Ready to Use...20 Accessing the Network Camera ...21 Using Web Browsers ...21 Using RTSP Players...23 Using 3GPP-compatible Mobile Devices...24 Main Page ...25 Client Settings ...29 Configuration ...31 System ...32 Security ...34 HTTPS ...35 SNMP ...40 Network ...41 DDNS ...56 Access List ...57 Audio and Video ...60 Motion Detection ...73 Camera Tampering Detection ...76 Camera Control ...77 Homepage Layout ...84 Application ...87 Recording ...100 Local Storage...
... Hardware Installation...17 Network Deployment ...17 Software Installation ...19 Ready to Use...20 Accessing the Network Camera ...21 Using Web Browsers ...21 Using RTSP Players...23 Using 3GPP-compatible Mobile Devices...24 Main Page ...25 Client Settings ...29 Configuration ...31 System ...32 Security ...34 HTTPS ...35 SNMP ...40 Network ...41 DDNS ...56 Access List ...57 Audio and Video ...60 Motion Detection ...73 Camera Tampering Detection ...76 Camera Control ...77 Homepage Layout ...84 Application ...87 Recording ...100 Local Storage...
User Manual
Page 13
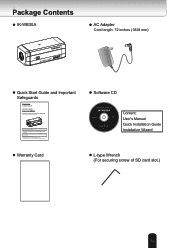
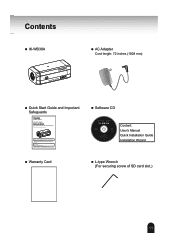
... to the Toshiba website (http://www.toshiba.com). Package Contents IK-WB30A AC Adapter Cord length: 72 inches (1828 mm) Quick Start Guide and Important Safeguards NETWORK CAMERA Model: IK-WB30A Quick Start Guide and Important Safeguards This guide describes the hardware installation. If you do not have this application, download it from the Website of SD card slot.) 13 Warranty Card Software CD IK-WB30A Content: User's Manual Quick Installation Guide Installation Wizard L-type Wrench (For securing screw...
... to the Toshiba website (http://www.toshiba.com). Package Contents IK-WB30A AC Adapter Cord length: 72 inches (1828 mm) Quick Start Guide and Important Safeguards NETWORK CAMERA Model: IK-WB30A Quick Start Guide and Important Safeguards This guide describes the hardware installation. If you do not have this application, download it from the Website of SD card slot.) 13 Warranty Card Software CD IK-WB30A Content: User's Manual Quick Installation Guide Installation Wizard L-type Wrench (For securing screw...

User Manual
Page 14
... DC Output 2 Digital Output 3 Digital Input 4 Ground 5 Power in 24V AC 6 Power in Microphone Status LED Microphone In Ethernet 10/100 RJ45 Socket Recessed Reset Button Audio Out SD/SDHC Card Slot Power Cord Socket Fixing Hole General I/O Terminal Block External/Internal MIC Switch General I/O Terminal Block This Network Camera provides a general I/O terminal block which is connected, don't supply AC24V from 1-pin. ● When an AC adapter or PoE is used to a camera...
... DC Output 2 Digital Output 3 Digital Input 4 Ground 5 Power in 24V AC 6 Power in Microphone Status LED Microphone In Ethernet 10/100 RJ45 Socket Recessed Reset Button Audio Out SD/SDHC Card Slot Power Cord Socket Fixing Hole General I/O Terminal Block External/Internal MIC Switch General I/O Terminal Block This Network Camera provides a general I/O terminal block which is connected, don't supply AC24V from 1-pin. ● When an AC adapter or PoE is used to a camera...

User Manual
Page 16
... standard SD cards for the Network Camera to reset the system or restore the factory default settings. Restore: Press and hold the recessed reset button until the status LED (Green and red) rapidly blinks. Replacing the SD memory card when performing periodic maintenance of an SD memory card. Note that is compliant with a purchased memory card. ● An SD memory card can return the camera to normal operation. It may...
... standard SD cards for the Network Camera to reset the system or restore the factory default settings. Restore: Press and hold the recessed reset button until the status LED (Green and red) rapidly blinks. Replacing the SD memory card when performing periodic maintenance of an SD memory card. Note that is compliant with a purchased memory card. ● An SD memory card can return the camera to normal operation. It may...

User Manual
Page 17
... Network Camera and grant user access to Software Installation on page 19 for details. The second way is illustrated below . 1. Connect your Network Camera behind a router. Regarding how to obtain your IP address, please refer to the camera. Network Deployment is shown in the Quick Start Guide(QSG). Hardware Installation is shown in the Quick Start Guide(QSG). Internet connection via a router Before setting up the Network Camera over the Internet, make sure you have a router...
... Network Camera and grant user access to Software Installation on page 19 for details. The second way is illustrated below . 1. Connect your Network Camera behind a router. Regarding how to obtain your IP address, please refer to the camera. Network Deployment is shown in the Quick Start Guide(QSG). Hardware Installation is shown in the Quick Start Guide(QSG). Internet connection via a router Before setting up the Network Camera over the Internet, make sure you have a router...

User Manual
Page 21
... Network Camera This chapter explains how to install the required plug-in on your network environment is not password-protected. Enter the IP address of the Network Camera in your web browser (Microsoft® Internet Explorer). 2. If your computer. ► By default, the Network Camera is not a LAN, follow these steps to set a password for the Network Camera. The live video will pop up as shown below. Follow the instructions to access the Network Camera through web browsers, RTSP...
... Network Camera This chapter explains how to install the required plug-in on your network environment is not password-protected. Enter the IP address of the Network Camera in your web browser (Microsoft® Internet Explorer). 2. If your computer. ► By default, the Network Camera is not a LAN, follow these steps to set a password for the Network Camera. The live video will pop up as shown below. Follow the instructions to access the Network Camera through web browsers, RTSP...

User Manual
Page 22
select Enable or Prompt. Click OK. 3. Follow the instructions to complete installation. 22 Look for your web browser, then install the Active X® control. Refresh your browser. 1. Choose Tools > Internet Options > Security > Custom Level. 2. ► If you see a dialog box indicating that your security settings prohibit running ActiveX® Controls, please enable the ActiveX® Controls for Download signed ActiveX® controls;
select Enable or Prompt. Click OK. 3. Follow the instructions to complete installation. 22 Look for your web browser, then install the Active X® control. Refresh your browser. 1. Choose Tools > Internet Options > Security > Custom Level. 2. ► If you see a dialog box indicating that your security settings prohibit running ActiveX® Controls, please enable the ActiveX® Controls for Download signed ActiveX® controls;

User Manual
Page 25
... of the curruent video stream). Camera Control Area Video Stream: This Network Cmera supports multiple streams (stream 1 ~ 4) simultaneously. PTZ Panel: This Network Camera supports both "digital" (e-PTZ) and "mechanical" pan/tilt/zoom control. TOSHIBA Logo Host Name Camera Control Area Configuration Area Live View Window TOSHIBA Logo Click this item to display the Global View window. Global View: Click on page 32. The Global View window contains a full view image (the largest frame size of the captured video) and a floating frame (the viewing region of the following...
... of the curruent video stream). Camera Control Area Video Stream: This Network Cmera supports multiple streams (stream 1 ~ 4) simultaneously. PTZ Panel: This Network Camera supports both "digital" (e-PTZ) and "mechanical" pan/tilt/zoom control. TOSHIBA Logo Host Name Camera Control Area Configuration Area Live View Window TOSHIBA Logo Click this item to display the Global View window. Global View: Click on page 32. The Global View window contains a full view image (the largest frame size of the captured video) and a floating frame (the viewing region of the following...

User Manual
Page 34
... to add more information, please refer to access the Network Camera. Root Password The administrator account name is "root", which is not work if using IE7 and IE8. Manage Privilege Advanced Mode Digital Output & PTZ control: You can access the Configuration page. Make necessary changes and click Update or Delete to enable the settings. Check or uncheck the item, then click Save to enable the setting. 34 Viewers access...
... to add more information, please refer to access the Network Camera. Root Password The administrator account name is "root", which is not work if using IE7 and IE8. Manage Privilege Advanced Mode Digital Output & PTZ control: You can access the Configuration page. Make necessary changes and click Update or Delete to enable the settings. Check or uncheck the item, then click Save to enable the setting. 34 Viewers access...
User Manual
Page 41
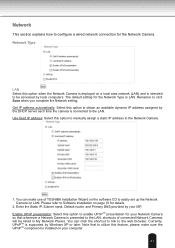
... Network Type is presented to the web browser. Network Type LAN Select this option to be listed in My Network Places. The default setting for your Network Camera so that to utilize this option to manually assign a static IP address to the LAN. You can click the shortcut to link to the LAN, shortcuts of TOSHIBA Installation Wizard on the software CD to Software Installation on LAN. Enable...
... Network Type is presented to the web browser. Network Type LAN Select this option to be listed in My Network Places. The default setting for your Network Camera so that to utilize this option to manually assign a static IP address to the LAN. You can click the shortcut to link to the LAN, shortcuts of TOSHIBA Installation Wizard on the software CD to Software Installation on LAN. Enable...

User Manual
Page 49
...-end guarantees since it is based on the network. Enter the VLAN ID of service are important if the network capacity is set up on the network. The web browsing may use different queuing disciplines to forward the packets. The following requirements must be QoS-enabled. If you assign Video the highest level, the switch will handle video packets first. Quality of...
...-end guarantees since it is based on the network. Enter the VLAN ID of service are important if the network capacity is set up on the network. The web browsing may use different queuing disciplines to forward the packets. The following requirements must be QoS-enabled. If you assign Video the highest level, the switch will handle video packets first. Quality of...

User Manual
Page 60
... display color or black/white video streams. Power line frequency: Set the power line frequency consistent with local utility settings to eliminate image flickering associated with fluorescent lights. Exposure time will be controlled automatically for all use. (If connected Auto Iris Lens, lens iris will be opened automatically.) ■ Indoor: Mode for the new setting to take effect. Lens iris and exposure time will be controlled automatically for outdoor use . ■ Outdoor: Mode for manual iris lens. Select caching stream...
... display color or black/white video streams. Power line frequency: Set the power line frequency consistent with local utility settings to eliminate image flickering associated with fluorescent lights. Exposure time will be controlled automatically for all use. (If connected Auto Iris Lens, lens iris will be opened automatically.) ■ Indoor: Mode for the new setting to take effect. Lens iris and exposure time will be controlled automatically for outdoor use . ■ Outdoor: Mode for manual iris lens. Select caching stream...

User Manual
Page 67
... selected Output Frame Size will be applied to page 82. 67 For more information about the e-PTZ function, please refer to the Frame size of Interest from the drop-down list. Click Viewing Window to open the viewing region settings page. Select a Region of each video stream as the one in the Viewing Window, click Save to enable the settings and click...
... selected Output Frame Size will be applied to page 82. 67 For more information about the e-PTZ function, please refer to the Frame size of Interest from the drop-down list. Click Viewing Window to open the viewing region settings page. Select a Region of each video stream as the one in the Viewing Window, click Save to enable the settings and click...

User Manual
Page 77
... for detailed instruction. Digital: Control the e-PTZ operation. It allows users to quickly move the focus to enable PTZ operation. If you click Save to enable this feature, please connect the Network Camera to the user's manual of your PTZ scanner, please select Custom camera (scanner). PTZ camera: Select this function. To utilize this function, the camera control panel will be displayed on page 79. 77 Mechanical: Connect the Network Camera to enable the camera control function: 1. Mechanical PTZ Operation If you...
... for detailed instruction. Digital: Control the e-PTZ operation. It allows users to quickly move the focus to enable PTZ operation. If you click Save to enable this feature, please connect the Network Camera to the user's manual of your PTZ scanner, please select Custom camera (scanner). PTZ camera: Select this function. To utilize this function, the camera control panel will be displayed on page 79. 77 Mechanical: Connect the Network Camera to enable the camera control function: 1. Mechanical PTZ Operation If you...
User Manual
Page 110
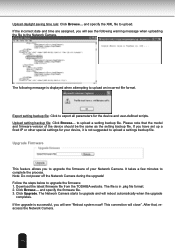
... power off the Network Camera during the upgrade! The Network Camera starts to export all parameters for your Network Camera. If the incorrect date and time are assigned, you have set up a fixed IP or other special settings for the device and user-defined scripts. This connection will reboot automatically when the upgrade completes. Click Upgrade. Export setting backup file: Click to upgrade...
... power off the Network Camera during the upgrade! The Network Camera starts to export all parameters for your Network Camera. If the incorrect date and time are assigned, you have set up a fixed IP or other special settings for the device and user-defined scripts. This connection will reboot automatically when the upgrade completes. Click Upgrade. Export setting backup file: Click to upgrade...

User Manual
Page 113
..., 15 fps at 1600 x 1200 Digital zoom Maximum 4 times Audio in/out*2 MIC IN/ LINE OUT (2way audio) Lens mount CS mount I/O terminal Input 1, output 1 Network interface 10Base-T / 100Base-TX, RJ45 connector, IEEE 802.3af (PoE compatible) Protocols TCP/IP, HTTP, UPnP, RTSP/RTP/RTCP, IGMP, SMTP, FTP, OS Browser DHCP, NTP, DNS, DDNS, PPPoE, SNMP Windows® XP, Windows Vista® Business Internet Explorer® Ver. 7.0 or 8.0 Operating temperature 14°F to 122...
..., 15 fps at 1600 x 1200 Digital zoom Maximum 4 times Audio in/out*2 MIC IN/ LINE OUT (2way audio) Lens mount CS mount I/O terminal Input 1, output 1 Network interface 10Base-T / 100Base-TX, RJ45 connector, IEEE 802.3af (PoE compatible) Protocols TCP/IP, HTTP, UPnP, RTSP/RTP/RTCP, IGMP, SMTP, FTP, OS Browser DHCP, NTP, DNS, DDNS, PPPoE, SNMP Windows® XP, Windows Vista® Business Internet Explorer® Ver. 7.0 or 8.0 Operating temperature 14°F to 122...

Brochure
Page 2
... reserved. NETWORK SPECIFICATIONS Support-protocol Internet protocol Camera setup program Application plug-in MPEG4/JPEG Maximum access user Band width control Image sizes (JPEG) Image sizes (Mpeg4) Max frames-per-second (fps) *1 Security DDNS Multi-cast/Uni-cast Alarm recording, e-mail, FTP Recording on SD card ePTZ Export/upload function Daylight savings TCP/ IP, HTTP, HTTPs, UPnP, RTSP/RTP/RTCP, IGMP, SMTP,FTP, DHCP,NTP,DNS,DDNS,PPPoE, SNMP IPv4, IPv6 Installation Wizard ActiveX Simultaneous four streamings Up to...
... reserved. NETWORK SPECIFICATIONS Support-protocol Internet protocol Camera setup program Application plug-in MPEG4/JPEG Maximum access user Band width control Image sizes (JPEG) Image sizes (Mpeg4) Max frames-per-second (fps) *1 Security DDNS Multi-cast/Uni-cast Alarm recording, e-mail, FTP Recording on SD card ePTZ Export/upload function Daylight savings TCP/ IP, HTTP, HTTPs, UPnP, RTSP/RTP/RTCP, IGMP, SMTP,FTP, DHCP,NTP,DNS,DDNS,PPPoE, SNMP IPv4, IPv6 Installation Wizard ActiveX Simultaneous four streamings Up to...

Quick Start Guide
Page 10
... or router. -- The network camera can be viewed by following the onscreen instructions.) -- CPU: Minimum of a camera. Camera search application "Installation Wizard" -- This application is the tool which gets to support in the future.) -- Memory: 1GB RAM and 512MB Graphics Adapter Connection equipment such as an accessory (Double-click "Setup.exe" in this quick start guide. If this application is used, the IP address of a camera can...
... or router. -- The network camera can be viewed by following the onscreen instructions.) -- CPU: Minimum of a camera. Camera search application "Installation Wizard" -- This application is the tool which gets to support in the future.) -- Memory: 1GB RAM and 512MB Graphics Adapter Connection equipment such as an accessory (Double-click "Setup.exe" in this quick start guide. If this application is used, the IP address of a camera can...
Quick Start Guide
Page 11
Warranty Card Software CD IK-WB30A Content: User's Manual Quick Installation Guide Installation Wizard L-type Wrench (For securing screw of Adobe Systems Incorporated. Contents IK-WB30A AC Adapter Cord length: 72 inches (1828 mm) Quick Start Guide and Important Safeguards NETWORK CAMERA Model: IK-WB30A Quick Start Guide and Important Safeguards This guide describes the hardware installation. Refer the user's manual (PDF file) contained in the CD-ROM for settings, operations and other information. For information on our latest products...
Warranty Card Software CD IK-WB30A Content: User's Manual Quick Installation Guide Installation Wizard L-type Wrench (For securing screw of Adobe Systems Incorporated. Contents IK-WB30A AC Adapter Cord length: 72 inches (1828 mm) Quick Start Guide and Important Safeguards NETWORK CAMERA Model: IK-WB30A Quick Start Guide and Important Safeguards This guide describes the hardware installation. Refer the user's manual (PDF file) contained in the CD-ROM for settings, operations and other information. For information on our latest products...

Quick Start Guide
Page 13
... injury. Do not block the light sensor when using a screw driver. Mounting the Lens to the camera. Mounting bracket is using Fixing Hole to the Mounting Bracket. And Hammer the plastic anchors (not included) into the holes. 2. Example of Horizontal installation Wall 9.5 (0.37) 4 (0.16) ͝6 (0.24) 80 (3.15) UP RIGHT LEFT 1/4"-20UNC DOWN 112 (4.41) NOTE The mounting hole of power cord or other cable. 13
... injury. Do not block the light sensor when using a screw driver. Mounting the Lens to the camera. Mounting bracket is using Fixing Hole to the Mounting Bracket. And Hammer the plastic anchors (not included) into the holes. 2. Example of Horizontal installation Wall 9.5 (0.37) 4 (0.16) ͝6 (0.24) 80 (3.15) UP RIGHT LEFT 1/4"-20UNC DOWN 112 (4.41) NOTE The mounting hole of power cord or other cable. 13
