

Owner's Manual - English
Page 8
...names: You can change the title name you can be increased by entering the exact amount of the left and right channels automatically (the input from discs with recording on DVD-RW/-R and DVD+RW/+R. E9MG0UD_D-VR660KU_EN.indd 8 2008/01/29 17:20:12 Search for playing back...: You can enjoy stereophonic space through your home: DVD mode When connecting the unit to an amplifier or a decoder which are also available. HDMI (High-Definition Multimedia Interface) You can go to 12 programs, within a month in video mode Description refers to DVD+RW Description refers to ...
...names: You can change the title name you can be increased by entering the exact amount of the left and right channels automatically (the input from discs with recording on DVD-RW/-R and DVD+RW/+R. E9MG0UD_D-VR660KU_EN.indd 8 2008/01/29 17:20:12 Search for playing back...: You can enjoy stereophonic space through your home: DVD mode When connecting the unit to an amplifier or a decoder which are also available. HDMI (High-Definition Multimedia Interface) You can go to 12 programs, within a month in video mode Description refers to DVD+RW Description refers to ...

Owner's Manual - English
Page 11
...cable. 13. Electrostatic discharge may cause permanent damage to start the one -touch timer recording. 9. VIDEO input jack (L2) (DVD/VCR) Use to connect a TV monitor, AV receiver or other device with an HDMI compatible port. 3. I REC button (VCR) Press once to connect a TV monitor, AV receiver or...repeatedly to turn on by pressing these buttons or by inserting a cassette tape. 1. HDMI OUT jack (DVD only) Use an HDMI cable to connect to connect a TV monitor, AV receiver or other device with a coaxial digital input jack with an RCA audio cable. 9. VIDEO OUT jack (DVD/VCR) Use to ...
...cable. 13. Electrostatic discharge may cause permanent damage to start the one -touch timer recording. 9. VIDEO input jack (L2) (DVD/VCR) Use to connect a TV monitor, AV receiver or other device with an HDMI compatible port. 3. I REC button (VCR) Press once to connect a TV monitor, AV receiver or...repeatedly to turn on by pressing these buttons or by inserting a cassette tape. 1. HDMI OUT jack (DVD only) Use an HDMI cable to connect to connect a TV monitor, AV receiver or other device with a coaxial digital input jack with an RCA audio cable. 9. VIDEO OUT jack (DVD/VCR) Use to ...
Owner's Manual - English
Page 12
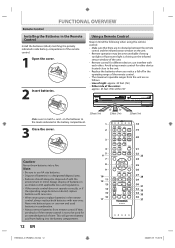
...; Replace the batteries when you notice a fall off in the battery compartment. 3 Close the cover. Caution: Never throw batteries into the battery compartment. 1 OPEN/ INPUT CLOSE SELECT HDMI 2 .@/: ABC DEF 3 4 5 6 7 GHI JKL MNO CH PQRS TUV WXYZ SPACE TIMER PROG. This will prevent battery acid from the unit are no obstacles between...
...; Replace the batteries when you notice a fall off in the battery compartment. 3 Close the cover. Caution: Never throw batteries into the battery compartment. 1 OPEN/ INPUT CLOSE SELECT HDMI 2 .@/: ABC DEF 3 4 5 6 7 GHI JKL MNO CH PQRS TUV WXYZ SPACE TIMER PROG. This will prevent battery acid from the unit are no obstacles between...

Owner's Manual - English
Page 13
...the beginning of the cassette tape. • While playback is not available. SKIP H button (DVD) • During playback, press to return to slow forward playback. HDMI button (DVD) • Press to set in pause, press to fast forward the cassette tape in stop mode. • When playback is in the main... 34. VCR mode: • Press to open or close the disc tray. OPEN/CLOSE A button DVD mode: • Press to reset the tape counter. 10. INPUT SELECT button • Press to select the repeat mode. REPEAT button DVD mode: • Press to select the appropriate...
...the beginning of the cassette tape. • While playback is not available. SKIP H button (DVD) • During playback, press to return to slow forward playback. HDMI button (DVD) • Press to set in pause, press to fast forward the cassette tape in stop mode. • When playback is in the main... 34. VCR mode: • Press to open or close the disc tray. OPEN/CLOSE A button DVD mode: • Press to reset the tape counter. 10. INPUT SELECT button • Press to select the repeat mode. REPEAT button DVD mode: • Press to select the appropriate...

Owner's Manual - English
Page 14
...-VR660KU_EN.indd 14 2008/01/29 17:20:21 THE VCR / DVD RECORDER SWITCHING Because this product is lit.) DVD indicator VCR indicator OPEN/ INPUT CLOSE SELECT HDMI .@/: ABC DEF GHI JKL MNO CH PQRS TUV WXYZ SPACE TIMER PROG. DTV/TV SETUP DISPLAY AUDIO DISC MENU TOP MENU CLEAR ENTER RETURN...
...-VR660KU_EN.indd 14 2008/01/29 17:20:21 THE VCR / DVD RECORDER SWITCHING Because this product is lit.) DVD indicator VCR indicator OPEN/ INPUT CLOSE SELECT HDMI .@/: ABC DEF GHI JKL MNO CH PQRS TUV WXYZ SPACE TIMER PROG. DTV/TV SETUP DISPLAY AUDIO DISC MENU TOP MENU CLEAR ENTER RETURN...
Owner's Manual - English
Page 15
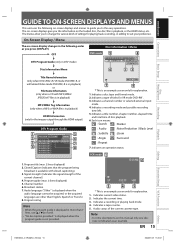
...press [DISPLAY]. Audio language ("Other" is displayed in playback, or the HDMI status, etc. Indicates a disc type and format mode. 2. Indicates a channel number or selected external input mode. 4. Indicates the current time. 3. Introduction Connections Basic Setup Disc Management... INFORMATION-6 1. Closed Caption (Indicates that the program being broadcast is available with MP3/WMA/ JPEG/DivX® files is in playback) HDMI Information (only for playing back, recording, or editing to the easy operations. Indicates a recording or playing back mode. 4. Indicates a ...
...press [DISPLAY]. Audio language ("Other" is displayed in playback, or the HDMI status, etc. Indicates a disc type and format mode. 2. Indicates a channel number or selected external input mode. 4. Indicates the current time. 3. Introduction Connections Basic Setup Disc Management... INFORMATION-6 1. Closed Caption (Indicates that the program being broadcast is available with MP3/WMA/ JPEG/DivX® files is in playback) HDMI Information (only for playing back, recording, or editing to the easy operations. Indicates a recording or playing back mode. 4. Indicates a ...

Owner's Manual - English
Page 19
rear of this unit HDMI OUT DVD/VCR S-VIDEO IN ---AUDIO---OUT L DIGITAL AUDIO OUT DVD DVD/VCR AUDIO S-VIDEO COMPONENT S-VIDEO IN ---AUDIO---OUT OUT VIDEO...local store. rear of this unit and your safety and to avoid damage to the device, please unplug the RF coaxial cable from antenna input jack of your TV VHF / UHF antenna 1 disconnect ANT. DVD DVD/VCR DIGITAL AUDIO S-VIDEO COMPONENT S-VIDEO IN ---AUDIO---OUT (... should also work for the unit to memorize all availableOUT channels in the power cord of this unit HDMI OUT *Once connections are as illustrated below.
rear of this unit HDMI OUT DVD/VCR S-VIDEO IN ---AUDIO---OUT L DIGITAL AUDIO OUT DVD DVD/VCR AUDIO S-VIDEO COMPONENT S-VIDEO IN ---AUDIO---OUT OUT VIDEO...local store. rear of this unit and your safety and to avoid damage to the device, please unplug the RF coaxial cable from antenna input jack of your TV VHF / UHF antenna 1 disconnect ANT. DVD DVD/VCR DIGITAL AUDIO S-VIDEO COMPONENT S-VIDEO IN ---AUDIO---OUT (... should also work for the unit to memorize all availableOUT channels in the power cord of this unit HDMI OUT *Once connections are as illustrated below.

Owner's Manual - English
Page 22
... selects an external input channel until the DVD recorder's opening picture appears. Check your TV to hear the sound being output from the VIDEO OUT or S-VIDEO OUT jack. VCR and basic DVD connection TV RCA audio cable R L VIDEO AUDIO IN IN RCA video cable this unit HDMI OUT DIGITAL AUDIO... due to the TV. To utilize this unit directly to the copy protection system. • You will not be able to an appropriate external input channel. CONNECTION TO A TV Make one of the following connections, depending on the capabilities of the necessary cables at your display device.
... selects an external input channel until the DVD recorder's opening picture appears. Check your TV to hear the sound being output from the VIDEO OUT or S-VIDEO OUT jack. VCR and basic DVD connection TV RCA audio cable R L VIDEO AUDIO IN IN RCA video cable this unit HDMI OUT DIGITAL AUDIO... due to the TV. To utilize this unit directly to the copy protection system. • You will not be able to an appropriate external input channel. CONNECTION TO A TV Make one of the following connections, depending on the capabilities of the necessary cables at your display device.
Owner's Manual - English
Page 24
... comprises data encryption and authentication of the connected AV device. Copyright protection system To play back the digital video images of a DVD via an HDMI connection, it is possible that some devices with an HDMI input may not operate properly with HDMI BITSTREAM, DTS sound will be output regardless of the "Dolby Digital" setting.
... comprises data encryption and authentication of the connected AV device. Copyright protection system To play back the digital video images of a DVD via an HDMI connection, it is possible that some devices with an HDMI input may not operate properly with HDMI BITSTREAM, DTS sound will be output regardless of the "Dolby Digital" setting.
Owner's Manual - English
Page 25
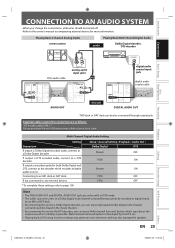
... Digital decoder, DTS decoder Basic Setup Disc Management Recording Playback COAXIAL R L AUDIO IN analog audio input jacks RCA audio cable DIGITAL AUDIO OUT DVD AUDIO S-VIDEO COMPONENT OUT VIDEO OUT Y HDMI OUT L OUT PB /CB COAXIAL R PR /CR DIGITAL AUDIO OUT DVD DVD/VCR AUDIO S-VIDEO...VCR S-VIDEO IN ---AUDIO---OUT L IN R IN ---VIDEO---OUT AUDIO OUT or this unit digital audio coaxial input jack DIGITAL AUDIO OUT DVD AUDIO S-VIDEO COMPONENT OUT VIDEO OUT Y HDMI OUT L OUT PB /CB COAXIAL R PR /CR digital audio coaxial cable DIGITAL AUDIO OUT DVD DVD/VCR...
... Digital decoder, DTS decoder Basic Setup Disc Management Recording Playback COAXIAL R L AUDIO IN analog audio input jacks RCA audio cable DIGITAL AUDIO OUT DVD AUDIO S-VIDEO COMPONENT OUT VIDEO OUT Y HDMI OUT L OUT PB /CB COAXIAL R PR /CR DIGITAL AUDIO OUT DVD DVD/VCR AUDIO S-VIDEO...VCR S-VIDEO IN ---AUDIO---OUT L IN R IN ---VIDEO---OUT AUDIO OUT or this unit digital audio coaxial input jack DIGITAL AUDIO OUT DVD AUDIO S-VIDEO COMPONENT OUT VIDEO OUT Y HDMI OUT L OUT PB /CB COAXIAL R PR /CR digital audio coaxial cable DIGITAL AUDIO OUT DVD DVD/VCR...

Owner's Manual - English
Page 26
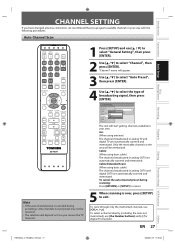
...RETURN] or [SETUP] to exit, then follow these steps. Only the receivable channels in TV and DTV are automatically scanned and memorized. OPEN/ INPUT CLOSE SELECT HDMI .@/: ABC DEF GHI JKL MNO CH PQRS TUV WXYZ SPACE TIMER PROG. 1 Press [I/y ON/STANDBY]. Initial Setting DTV/TV SETUP DISPLAY AUDIO...station) is connected to follow "Auto Clock Setting" on page 30. 26 EN E9MG0UD_D-VR660KU_EN.indd 26 2008/02/06 20:30:09 Select the input to step 5 in your area. Initial Setting Clock Setting -- : -- -- 5 Proceed to which the unit is used will start getting channels ...
...RETURN] or [SETUP] to exit, then follow these steps. Only the receivable channels in TV and DTV are automatically scanned and memorized. OPEN/ INPUT CLOSE SELECT HDMI .@/: ABC DEF GHI JKL MNO CH PQRS TUV WXYZ SPACE TIMER PROG. 1 Press [I/y ON/STANDBY]. Initial Setting DTV/TV SETUP DISPLAY AUDIO...station) is connected to follow "Auto Clock Setting" on page 30. 26 EN E9MG0UD_D-VR660KU_EN.indd 26 2008/02/06 20:30:09 Select the input to step 5 in your area. Initial Setting Clock Setting -- : -- -- 5 Proceed to which the unit is used will start getting channels ...
Owner's Manual - English
Page 27
...you receive the TV channels. 4 Use [K / L] to select the type of broadcasting signal, then press [ENTER]. Auto Channel Scan OPEN/ INPUT CLOSE SELECT HDMI .@/: ABC DEF GHI JKL MNO CH PQRS TUV WXYZ SPACE TIMER PROG. Air: (When using antenna) The channels broadcasted in your area. To ...channel preset is over, press [SETUP] to select "Auto Preset", then press [ENTER]. General Setting Playback Display Video Recording Clock Channel DivX HDMI Reset All Auto Preset Auto Preset Manual Preset TV Audio Select Air Cable Cable (Extended Scan) The unit will be received. • The ...
...you receive the TV channels. 4 Use [K / L] to select the type of broadcasting signal, then press [ENTER]. Auto Channel Scan OPEN/ INPUT CLOSE SELECT HDMI .@/: ABC DEF GHI JKL MNO CH PQRS TUV WXYZ SPACE TIMER PROG. Air: (When using antenna) The channels broadcasted in your area. To ...channel preset is over, press [SETUP] to select "Auto Preset", then press [ENTER]. General Setting Playback Display Video Recording Clock Channel DivX HDMI Reset All Auto Preset Auto Preset Manual Preset TV Audio Select Air Cable Cable (Extended Scan) The unit will be received. • The ...
Owner's Manual - English
Page 28
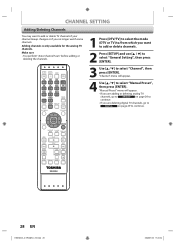
OPEN/ INPUT CLOSE SELECT HDMI .@/: ABC DEF GHI JKL MNO CH PQRS TUV WXYZ SPACE TIMER PROG. "Channel" menu will appear. • If you are adding or deleting analog TV ...
OPEN/ INPUT CLOSE SELECT HDMI .@/: ABC DEF GHI JKL MNO CH PQRS TUV WXYZ SPACE TIMER PROG. "Channel" menu will appear. • If you are adding or deleting analog TV ...

Owner's Manual - English
Page 30
... Setting", then press [ENTER]. 2 Use [K / L] to select "Clock", then press [ENTER]. General Setting Playback Display Video Recording Clock Channel DivX HDMI Reset All Clock Setting Auto Clock SAetutitnogClock Setting Daylight Saving Time OFF Auto Manual CLEAR ENTER RETURN 5 Press [SETUP] to select "Auto", then press [...minutes to give this unit receive the antenna/cable signal and plug in your PBS channel number, then press [ENTER]. OPEN/ INPUT CLOSE SELECT HDMI .@/: ABC DEF GHI JKL MNO CH PQRS TUV WXYZ SPACE TIMER PROG. If a PBS (public broadcasting station) is off ...
... Setting", then press [ENTER]. 2 Use [K / L] to select "Clock", then press [ENTER]. General Setting Playback Display Video Recording Clock Channel DivX HDMI Reset All Clock Setting Auto Clock SAetutitnogClock Setting Daylight Saving Time OFF Auto Manual CLEAR ENTER RETURN 5 Press [SETUP] to select "Auto", then press [...minutes to give this unit receive the antenna/cable signal and plug in your PBS channel number, then press [ENTER]. OPEN/ INPUT CLOSE SELECT HDMI .@/: ABC DEF GHI JKL MNO CH PQRS TUV WXYZ SPACE TIMER PROG. If a PBS (public broadcasting station) is off ...

Owner's Manual - English
Page 33
Selecting TV Audio Digital TV OPEN/ INPUT CLOSE SELECT HDMI 1 Press [AUDIO ] to switch the TV audio. SKIP STOP SKIP PAUSE VCR DVD DUBBING REC MODE REC REPEAT TIMER SET SEARCH ZOOM SE-R0294 Recording ...
Selecting TV Audio Digital TV OPEN/ INPUT CLOSE SELECT HDMI 1 Press [AUDIO ] to switch the TV audio. SKIP STOP SKIP PAUSE VCR DVD DUBBING REC MODE REC REPEAT TIMER SET SEARCH ZOOM SE-R0294 Recording ...
Owner's Manual - English
Page 34
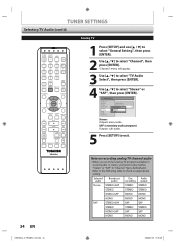
... All Auto Preset Manual Preset TV AudioTVSeAleucdtio Select Stereo SAP Stereo: Outputs main-audio. TUNER SETTINGS Selecting TV Audio (cont'd) Analog TV OPEN/ INPUT CLOSE SELECT HDMI .@/: ABC DEF GHI JKL MNO CH PQRS TUV WXYZ SPACE TIMER PROG. Refer to the following table to exit. SAP (secondary audio program): Outputs sub...
... All Auto Preset Manual Preset TV AudioTVSeAleucdtio Select Stereo SAP Stereo: Outputs main-audio. TUNER SETTINGS Selecting TV Audio (cont'd) Analog TV OPEN/ INPUT CLOSE SELECT HDMI .@/: ABC DEF GHI JKL MNO CH PQRS TUV WXYZ SPACE TIMER PROG. Refer to the following table to exit. SAP (secondary audio program): Outputs sub...

Owner's Manual - English
Page 35
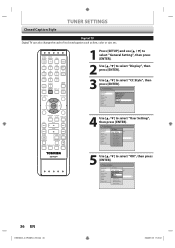
... / L] to select "Caption Service", then press [ENTER]. General Setting Playback Display Video Recording Clock Channel DivX HDMI Reset All CaptionOSSeDrvLiacneguage DCRTaepcVotiOSSSSCrodeeeeCFnirrrrSFDCVFnvvvvS-LcTCgiiiiCeccccrVDehreeeeSvei1234iCtmpiyncClmeSeavr er Service5 Service6 OFF: Select if you do not want DTV CC. EN 35 ... Closed Caption TUNER SETTINGS Digital TV Apart from closed captions, Digital TV has its own closed captions called DTV CC. OPEN/ INPUT CLOSE SELECT HDMI 1 Press [SETUP] and use [K / L] to select "General Setting", then press [ENTER]. .@/: ABC DEF GHI JKL...
... / L] to select "Caption Service", then press [ENTER]. General Setting Playback Display Video Recording Clock Channel DivX HDMI Reset All CaptionOSSeDrvLiacneguage DCRTaepcVotiOSSSSCrodeeeeCFnirrrrSFDCVFnvvvvS-LcTCgiiiiCeccccrVDehreeeeSvei1234iCtmpiyncClmeSeavr er Service5 Service6 OFF: Select if you do not want DTV CC. EN 35 ... Closed Caption TUNER SETTINGS Digital TV Apart from closed captions, Digital TV has its own closed captions called DTV CC. OPEN/ INPUT CLOSE SELECT HDMI 1 Press [SETUP] and use [K / L] to select "General Setting", then press [ENTER]. .@/: ABC DEF GHI JKL...
Owner's Manual - English
Page 36
OPEN/ INPUT CLOSE SELECT HDMI .@/: ABC DEF GHI ... [K / L] to select "ON", then press [ENTER]. General Setting Playback Display Video Recording Clock Channel DivX HDMI Reset All CC Style User SeOttSinDg Language Font SSiczreeen Saver Font SFLtyDleimmer Font ODTpVacCitCy Font CCoCloSrtyle EdgeVT-yCpheip Edge Color...select "CC Style", then press [ENTER]. General Setting Playback Display Video Recording Clock Channel DivX HDMI Reset All CC Style User SeOttSinDg Language UsFFeoornnStteSSSFtLitctzyirneDleegeimnmSeavr er FoOntNODTpVacCitCy FoOntFCCFoCloSrtyle EdgeVT-yCpheip Edge Color Back ...
OPEN/ INPUT CLOSE SELECT HDMI .@/: ABC DEF GHI ... [K / L] to select "ON", then press [ENTER]. General Setting Playback Display Video Recording Clock Channel DivX HDMI Reset All CC Style User SeOttSinDg Language Font SSiczreeen Saver Font SFLtyDleimmer Font ODTpVacCitCy Font CCoCloSrtyle EdgeVT-yCpheip Edge Color...select "CC Style", then press [ENTER]. General Setting Playback Display Video Recording Clock Channel DivX HDMI Reset All CC Style User SeOttSinDg Language UsFFeoornnStteSSSFtLitctzyirneDleegeimnmSeavr er FoOntNODTpVacCitCy FoOntFCCFoCloSrtyle EdgeVT-yCpheip Edge Color Back ...
Owner's Manual - English
Page 38
OPEN/ INPUT CLOSE SELECT HDMI .@/: ABC DEF GHI JKL MNO CH PQRS TUV WXYZ SPACE TIMER PROG. "100%" is completed. If you insert a disc that has been recorded before, the ...
OPEN/ INPUT CLOSE SELECT HDMI .@/: ABC DEF GHI JKL MNO CH PQRS TUV WXYZ SPACE TIMER PROG. "100%" is completed. If you insert a disc that has been recorded before, the ...

Owner's Manual - English
Page 39
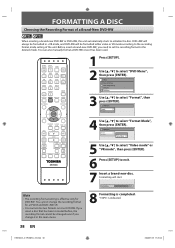
... DVD DUBBING REC MODE REC REPEAT TIMER SET SEARCH ZOOM SE-R0294 Insert a recordable disc. 1 Press [SETUP]. 2 Use [K / L] to cancel formatting, select "No". OPEN/ INPUT CLOSE SELECT HDMI .@/: ABC DEF GHI JKL MNO CH PQRS TUV WXYZ SPACE TIMER PROG. If you want to select "DVD Menu", then press [ENTER]. Setup General...
... DVD DUBBING REC MODE REC REPEAT TIMER SET SEARCH ZOOM SE-R0294 Insert a recordable disc. 1 Press [SETUP]. 2 Use [K / L] to cancel formatting, select "No". OPEN/ INPUT CLOSE SELECT HDMI .@/: ABC DEF GHI JKL MNO CH PQRS TUV WXYZ SPACE TIMER PROG. If you want to select "DVD Menu", then press [ENTER]. Setup General...


