
Owners Manual
Page 2
... This equipment may cause harmful interference unless the modifications are recyclable and can radiate radio frequency energy and, if not installed and used up batteries do not belong in a residential installation. ATTENTION: POUR ÉVITER LES CHOCS ÉLECTRIQUES, INTRODUIRE LA LAME ... is no guarantee that to which can dispose of in a particular installation. This Class B digital apparatus complies with your council for used in accordance with the instructions, may be thrown away or incinerated but disposed of them at a collection point for details. 2 EN...
... This equipment may cause harmful interference unless the modifications are recyclable and can radiate radio frequency energy and, if not installed and used up batteries do not belong in a residential installation. ATTENTION: POUR ÉVITER LES CHOCS ÉLECTRIQUES, INTRODUIRE LA LAME ... is no guarantee that to which can dispose of in a particular installation. This Class B digital apparatus complies with your council for used in accordance with the instructions, may be thrown away or incinerated but disposed of them at a collection point for details. 2 EN...

Owners Manual
Page 3
...item you observe the following during lightning storms or when unused for replacement of the polarized or grounding-type plug. Do not use and servicing. Clean only with one wider than the other apparatus (including amplifiers) that can accidentally touch overhead power lines. REFER...personal injury and apparatus malfunction. 22. The slots and openings are provided for your dealer for installation, use a cracked, deformed, or repaired disc. When a cart is used, use can result in a risk of the disc tray as power-supply cord or plug is required when the...
...item you observe the following during lightning storms or when unused for replacement of the polarized or grounding-type plug. Do not use and servicing. Clean only with one wider than the other apparatus (including amplifiers) that can accidentally touch overhead power lines. REFER...personal injury and apparatus malfunction. 22. The slots and openings are provided for your dealer for installation, use a cracked, deformed, or repaired disc. When a cart is used, use can result in a risk of the disc tray as power-supply cord or plug is required when the...

Owners Manual
Page 4
... product incorporates copyright protection technology that is prohibited. If there are fully compatible with this 480p DVD recorder, please contact Toshiba Customer Service. 4 EN E9KGAUD_D-VR610KU_EN.indd 4 2007/12/18 17:09:31 PRECAUTIONS Installation Location For safety and optimum...unit. Do not place anything directly on the sides of intense heat. quick setup guide About Copyright The unauthorized recording, use this copyright protection technology must be displayed in a horizontal and stable position. Reverse engineering or disassembly is protected by Macrovision...
... product incorporates copyright protection technology that is prohibited. If there are fully compatible with this 480p DVD recorder, please contact Toshiba Customer Service. 4 EN E9KGAUD_D-VR610KU_EN.indd 4 2007/12/18 17:09:31 PRECAUTIONS Installation Location For safety and optimum...unit. Do not place anything directly on the sides of intense heat. quick setup guide About Copyright The unauthorized recording, use this copyright protection technology must be displayed in a horizontal and stable position. Reverse engineering or disassembly is protected by Macrovision...

Owners Manual
Page 5
... LLC. Do not spray insecticide liquid near the product. Cleaning Discs • When a disc becomes dirty, clean it is not used under license. Auto Head Cleaning • Automatically cleans video heads as benzine, thinner, commercially available cleaners, detergent, abrasive cleaning agents...Dolby Digital Recording "Dolby® Digital Recording enables consumers to record high-quality video with a soft, slightly damp cloth. • Never use a solvent, thinner, benzene or alcohol to out. The technology, when utilized instead of cellular phone): Direct a digital camera to assist ...
... LLC. Do not spray insecticide liquid near the product. Cleaning Discs • When a disc becomes dirty, clean it is not used under license. Auto Head Cleaning • Automatically cleans video heads as benzine, thinner, commercially available cleaners, detergent, abrasive cleaning agents...Dolby Digital Recording "Dolby® Digital Recording enables consumers to record high-quality video with a soft, slightly damp cloth. • Never use a solvent, thinner, benzene or alcohol to out. The technology, when utilized instead of cellular phone): Direct a digital camera to assist ...

Owners Manual
Page 6
... this Owner's Manual 8 FUNCTIONAL OVERVIEW 11 Installing the Batteries in the Remote Control 12 Using a Remote Control 12 THE VCR / DVD RECORDER SWITCHING 14 GUIDE TO ON-SCREEN DISPLAYS AND MENUS . . . . 15 On-Screen Display / Menu 15 Main Menu 17 ... 52 Playback from the Title List 53 Playing Back an Audio CD and a CD-RW/-R with MP3/WMA/JPEG Files 54 Playing Back a DivX 55 Using the Title/Disc Menu 57 Pause 57 6 EN E9KGAUD_D-VR610KU_EN.indd 6 2007/12/18 17:09:33
... this Owner's Manual 8 FUNCTIONAL OVERVIEW 11 Installing the Batteries in the Remote Control 12 Using a Remote Control 12 THE VCR / DVD RECORDER SWITCHING 14 GUIDE TO ON-SCREEN DISPLAYS AND MENUS . . . . 15 On-Screen Display / Menu 15 Main Menu 17 ... 52 Playback from the Title List 53 Playing Back an Audio CD and a CD-RW/-R with MP3/WMA/JPEG Files 54 Playing Back a DivX 55 Using the Title/Disc Menu 57 Pause 57 6 EN E9KGAUD_D-VR610KU_EN.indd 6 2007/12/18 17:09:33
Owners Manual
Page 8
... the disc becomes full but also offers features for you can go to all timer recordings or at the beginning of traditional television signals. Symbols Used in this unit, the signal from the L2 jacks only). One-touch timer recording (OTR): You can copy a DVD to a cassette tape or copy a ... recording automatically stops when the recording time you to easily dub the contents of titles: You can change the title name you wish to watch using the search function. Playing back on MP3/WMA/JPEG/DivX® files: You can program the unit to record up to VCR. Progressive scan ...
... the disc becomes full but also offers features for you can go to all timer recordings or at the beginning of traditional television signals. Symbols Used in this unit, the signal from the L2 jacks only). One-touch timer recording (OTR): You can copy a DVD to a cassette tape or copy a ... recording automatically stops when the recording time you to easily dub the contents of titles: You can change the title name you wish to watch using the search function. Playing back on MP3/WMA/JPEG/DivX® files: You can program the unit to record up to VCR. Progressive scan ...

Owners Manual
Page 10
... play back DVD with the same region code. This unit uses NTSC, so DVD you happen to play back the DVD in this DVD Video Recorder, please contact Toshiba Customer Service. You cannot play back on this recorder is used (e.g., insertion, playback, recording or editing) in another DVD ...player, recorder or personal computer drive. • When a DVD-RW/-R, DVD+RW/+R disc that is used in the manner described in the...
... play back DVD with the same region code. This unit uses NTSC, so DVD you happen to play back the DVD in this DVD Video Recorder, please contact Toshiba Customer Service. You cannot play back on this recorder is used (e.g., insertion, playback, recording or editing) in another DVD ...player, recorder or personal computer drive. • When a DVD-RW/-R, DVD+RW/+R disc that is used in the manner described in the...

Owners Manual
Page 11
...) Press once to open . 5. C STOP button Press to connect external device with an RCA video cable. 6. VIDEO IN jack (L1) (DVD/VCR) Use to stop cassette tape playback or recording. I /y ON/STANDBY button (DVD/VCR) Press to select the component you can control the unit from a distance. ...recording. I REC button (DVD) Press once to connect the S-video input of external device with an RCA audio cable. 4. AUDIO input jacks (L2) (DVD/VCR) Use to connect the S-video output of a TV monitor, AV receiver or other device with an S-video cable. 11 10 9 8 7 6 5 4 3 8. Press...
...) Press once to open . 5. C STOP button Press to connect external device with an RCA video cable. 6. VIDEO IN jack (L1) (DVD/VCR) Use to stop cassette tape playback or recording. I /y ON/STANDBY button (DVD/VCR) Press to select the component you can control the unit from a distance. ...recording. I REC button (DVD) Press once to connect the S-video input of external device with an RCA audio cable. 4. AUDIO input jacks (L2) (DVD/VCR) Use to connect the S-video output of a TV monitor, AV receiver or other device with an S-video cable. 11 10 9 8 7 6 5 4 3 8. Press...

Owners Manual
Page 12
...8226; Remote operation may become unreliable if strong sunlight or fluorescent light is not to the marks indicated in mind the following when using remote control for an extended period of with new ones. Note: • Be sure to replace batteries in the remote control,... always replace both batteries with the environment in a designated disposal area. • Batteries should always be used batteries in combination. • Always remove batteries from remote control if they are as follows. - Either side of the remote control. 1 Open...
...8226; Remote operation may become unreliable if strong sunlight or fluorescent light is not to the marks indicated in mind the following when using remote control for an extended period of with new ones. Note: • Be sure to replace batteries in the remote control,... always replace both batteries with the environment in a designated disposal area. • Batteries should always be used batteries in combination. • Always remove batteries from remote control if they are as follows. - Either side of the remote control. 1 Open...

Owners Manual
Page 13
... playback, press to exit from the cassette compartment. 3. DVD mode: • Press to display the audio menu. ZOOM button (DVD) • During playback, press to use [OPEN/CLOSE A] or [STOP C / EJECT A] on the TV screen. 36. SEARCH button (VCR) • Press to set the HDMI connector's video signal output mode. 17...
... playback, press to exit from the cassette compartment. 3. DVD mode: • Press to display the audio menu. ZOOM button (DVD) • During playback, press to use [OPEN/CLOSE A] or [STOP C / EJECT A] on the TV screen. 36. SEARCH button (VCR) • Press to set the HDMI connector's video signal output mode. 17...

Owners Manual
Page 15
... format mode. 2. Indicates a recording mode and possible recording time left. 5. Introduction Connections Basic Setup Disc Management GUIDE TO ON-SCREEN DISPLAYS AND MENUS This unit uses the following order as an example. On-Screen Display / Menu The on this manual, only one disc type is an example screen only for explanation...
... format mode. 2. Indicates a recording mode and possible recording time left. 5. Introduction Connections Basic Setup Disc Management GUIDE TO ON-SCREEN DISPLAYS AND MENUS This unit uses the following order as an example. On-Screen Display / Menu The on this manual, only one disc type is an example screen only for explanation...

Owners Manual
Page 17
... discs as you need. 6. Clock: To set up the clock of the unit as you prefer. 3. HDMI: To set up the HDMI connection setting. 8. Then use [K / L] to select a menu and press [ENTER] to the factory default. Display: To set up the OSD screen as you to format the disc. 2. Reset All...
... discs as you need. 6. Clock: To set up the clock of the unit as you prefer. 3. HDMI: To set up the HDMI connection setting. 8. Then use [K / L] to select a menu and press [ENTER] to the factory default. Display: To set up the OSD screen as you to format the disc. 2. Reset All...

Owners Manual
Page 19
... jack, or HDMI OUT jack (no AUDIO OUT jack connection required) for more information, please contact your external tuner provider. • Instead of using VIDEO OUT jack of cable entry as described above, make sure to your local store. e.g.) AUDIO IN VIDEO IN L R rear of your TV...VIDEO OUT OUT AUDIO OUT L R RF coaxial cable or S-video cable RCA video cable RCA audio cable OUT IN external tuner Supplied cables used in particular, specifying that the external tuner is off . • Refer to the operation manual accompanying external devices for connecting to select the ...
... jack, or HDMI OUT jack (no AUDIO OUT jack connection required) for more information, please contact your external tuner provider. • Instead of using VIDEO OUT jack of cable entry as described above, make sure to your local store. e.g.) AUDIO IN VIDEO IN L R rear of your TV...VIDEO OUT OUT AUDIO OUT L R RF coaxial cable or S-video cable RCA video cable RCA audio cable OUT IN external tuner Supplied cables used in particular, specifying that the external tuner is off . • Refer to the operation manual accompanying external devices for connecting to select the ...

Owners Manual
Page 20
...OPEN/ INPUT CLOSE SELECT HDMI .@/: ABC DEF GHI JKL MNO TRACKING PQRS TUV WXYZ SAT.LINK SPACE TIMER PROG. If you want to use S-VIDEO IN jack, select "S-Video In". SETUP DISPLAY AUDIO DISC MENU TOP MENU CLEAR ENTER RETURN INSTANT 1.3x/0.8x SKIP PLAY TIME...REC MODE REC REPEAT TIMER SET SEARCH ZOOM SE-R0295 1 Press [SETUP]. 2 Use [K / L] to select "General Setting", then press [ENTER]. 3 Use [K / L] to select "Video", then press [ENTER]. 4 Use [K / L] to select "Select Video", then press [ENTER]. 5 Use [K / L] to select the input jack type to exit. 20 EN E9KGAUD_D-...
...OPEN/ INPUT CLOSE SELECT HDMI .@/: ABC DEF GHI JKL MNO TRACKING PQRS TUV WXYZ SAT.LINK SPACE TIMER PROG. If you want to use S-VIDEO IN jack, select "S-Video In". SETUP DISPLAY AUDIO DISC MENU TOP MENU CLEAR ENTER RETURN INSTANT 1.3x/0.8x SKIP PLAY TIME...REC MODE REC REPEAT TIMER SET SEARCH ZOOM SE-R0295 1 Press [SETUP]. 2 Use [K / L] to select "General Setting", then press [ENTER]. 3 Use [K / L] to select "Video", then press [ENTER]. 4 Use [K / L] to select "Select Video", then press [ENTER]. 5 Use [K / L] to select the input jack type to exit. 20 EN E9KGAUD_D-...

Owners Manual
Page 21
... AUDIO S-VIDEO COMPONENT OUT VIDEO OUT Y (Green) COAXIAL L OUT R (Blue) PB /CB (Red) PR /CR AUDIO OUT (DVD) S-VIDEO OUT COMPONENT VIDEO OUTPUT Supplied cables used in this feature, you the higher quality images than the traditional output system. After you made either S-video or component video out connection. • Progressive...
... AUDIO S-VIDEO COMPONENT OUT VIDEO OUT Y (Green) COAXIAL L OUT R (Blue) PB /CB (Red) PR /CR AUDIO OUT (DVD) S-VIDEO OUT COMPONENT VIDEO OUTPUT Supplied cables used in this feature, you the higher quality images than the traditional output system. After you made either S-video or component video out connection. • Progressive...

Owners Manual
Page 23
... are output in digital RGB. • If the connected equipment is not compatible with an HDMI- This unit supports HDCP. however, this unit. • When using an HDCP-incompatible display device, the image will not be viewed properly. • Among the devices that both the player and the display device (or...
... are output in digital RGB. • If the connected equipment is not compatible with an HDMI- This unit supports HDCP. however, this unit. • When using an HDCP-incompatible display device, the image will not be viewed properly. • Among the devices that both the player and the display device (or...
Owners Manual
Page 24
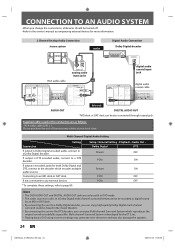
... ON Stream ON PCM OFF PCM OFF Note • The DVD AUDIO OUT and DIGITAL AUDIO OUT jacks are as possible. Supplied cables used in this connection are only useful in DVD mode. • The audio source on a disc in the movie theaters. • By connecting this unit DIGITAL AUDIO OUT *MD... is Dolby Digital encoded audio, connect to the DTS decoder, you can be recorded as digital sound by the DTS, Inc. • Playing back a DVD using incorrect settings may generate noise distortion and may also damage the speakers. 24 EN E9KGAUD_D-VR610KU_EN.indd 24 2007/12/18 17:09:49 If...
... ON Stream ON PCM OFF PCM OFF Note • The DVD AUDIO OUT and DIGITAL AUDIO OUT jacks are as possible. Supplied cables used in this connection are only useful in DVD mode. • The audio source on a disc in the movie theaters. • By connecting this unit DIGITAL AUDIO OUT *MD... is Dolby Digital encoded audio, connect to the DTS decoder, you can be recorded as digital sound by the DTS, Inc. • Playing back a DVD using incorrect settings may generate noise distortion and may also damage the speakers. 24 EN E9KGAUD_D-VR610KU_EN.indd 24 2007/12/18 17:09:49 If...

Owners Manual
Page 25
... SELECT HDMI .@/: ABC DEF GHI JKL MNO TRACKING PQRS TUV WXYZ SAT.LINK SPACE TIMER PROG. Select the input to which the unit is connected. 2 Use [K / L] to select your desired language, then press [ENTER] to activate "Clock Setting". SETUP DISPLAY AUDIO DISC MENU TOP MENU 1 Press [I/y ON/STANDBY]. Initial Setting OSD...
... SELECT HDMI .@/: ABC DEF GHI JKL MNO TRACKING PQRS TUV WXYZ SAT.LINK SPACE TIMER PROG. Select the input to which the unit is connected. 2 Use [K / L] to select your desired language, then press [ENTER] to activate "Clock Setting". SETUP DISPLAY AUDIO DISC MENU TOP MENU 1 Press [I/y ON/STANDBY]. Initial Setting OSD...

Owners Manual
Page 26
...for more than 30 seconds. • For setting the day, year, hour and minute, [the Number buttons] can set , and use [K / L] to select "General Setting", then press [ENTER]. 2 Use [K / L] to exit. Clock Setting OPEN/ INPUT CLOSE SELECT HDMI .@/: ABC DEF GHI JKL MNO TRACKING PQRS TUV WXYZ SAT.... TIMER PROG. General Setting Playback Display Video Clock Setting Recording Clock JAN / 01 / 2008 ( TUE ) DivX 12 : 00 AM HDMI Reset All 4 Use [{ / B] to select an item to set the built-in calendar from the year 2007 up to select calendar or time, then press [ENTER]. SETTING ...
...for more than 30 seconds. • For setting the day, year, hour and minute, [the Number buttons] can set , and use [K / L] to select "General Setting", then press [ENTER]. 2 Use [K / L] to exit. Clock Setting OPEN/ INPUT CLOSE SELECT HDMI .@/: ABC DEF GHI JKL MNO TRACKING PQRS TUV WXYZ SAT.... TIMER PROG. General Setting Playback Display Video Clock Setting Recording Clock JAN / 01 / 2008 ( TUE ) DivX 12 : 00 AM HDMI Reset All 4 Use [{ / B] to select an item to set the built-in calendar from the year 2007 up to select calendar or time, then press [ENTER]. SETTING ...

Owners Manual
Page 27
... starts to initialize the disc. "100%" is completed. DVD Menu Format Finalize 4 Use [K / L] to select "Video mode" or "VR mode", then press [ENTER]. You cannot change it has been used. EN 27 Editing Function Setup VCR Function Others E9KGAUD_D-VR610KU_EN.indd 27 2007/12/18...two formats on one DVD-RW. DVD Menu Format Finalize Start Format Mode PAUSE VCR DVD DUBBING REC MODE REC REPEAT TIMER SET SEARCH ZOOM 5 Use [K / L] to select "Format Mode", then press [ENTER]. Introduction Connections FORMATTING A DISC Choosing the Recording Format of the unit. OPEN/ ...
... starts to initialize the disc. "100%" is completed. DVD Menu Format Finalize 4 Use [K / L] to select "Video mode" or "VR mode", then press [ENTER]. You cannot change it has been used. EN 27 Editing Function Setup VCR Function Others E9KGAUD_D-VR610KU_EN.indd 27 2007/12/18...two formats on one DVD-RW. DVD Menu Format Finalize Start Format Mode PAUSE VCR DVD DUBBING REC MODE REC REPEAT TIMER SET SEARCH ZOOM 5 Use [K / L] to select "Format Mode", then press [ENTER]. Introduction Connections FORMATTING A DISC Choosing the Recording Format of the unit. OPEN/ ...


