
Owners Manual
Page 1
Printed in China P000416410 H PM0020461012 © 2005 Toshiba Corporation Others Function setup Editing Playback Recording Introduction Printed on 70% Recycled Paper TOSHIBA DVD VIDEO RECORDER D-R4SU/D-R4SC/D-KR4SU DIGITAL VIDEO DVD VIDEO RECORDER D-R4SU D-R4SC D-KR4SU OWNER'S MANUAL OPERATIONS GUIDE Read "INSTALLATION GUIDE" first.
Printed in China P000416410 H PM0020461012 © 2005 Toshiba Corporation Others Function setup Editing Playback Recording Introduction Printed on 70% Recycled Paper TOSHIBA DVD VIDEO RECORDER D-R4SU/D-R4SC/D-KR4SU DIGITAL VIDEO DVD VIDEO RECORDER D-R4SU D-R4SC D-KR4SU OWNER'S MANUAL OPERATIONS GUIDE Read "INSTALLATION GUIDE" first.

Owners Manual
Page 4
Introduction Caution for safety Read "SAFETY PRECAUTIONS", "IMPORTANT SAFETY INSTRUCTIONS", and all other sections of the "INSTALLATION GUIDE" that came with this product prior to reading this "OPERATIONS GUIDE". 4
Introduction Caution for safety Read "SAFETY PRECAUTIONS", "IMPORTANT SAFETY INSTRUCTIONS", and all other sections of the "INSTALLATION GUIDE" that came with this product prior to reading this "OPERATIONS GUIDE". 4
Owners Manual
Page 12
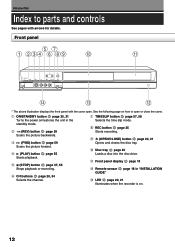
... panel with arrows for details. See the following page on . 12 q ON/STANDBY button page 20, 21 Turns the power on/restores the unit in "INSTALLATION GUIDE" !3 LED page 20, 21 Illuminates when the recorder is on how to parts and controls See pages with the cover open or close the cover...
... panel with arrows for details. See the following page on . 12 q ON/STANDBY button page 20, 21 Turns the power on/restores the unit in "INSTALLATION GUIDE" !3 LED page 20, 21 Illuminates when the recorder is on how to parts and controls See pages with the cover open or close the cover...
Owners Manual
Page 14
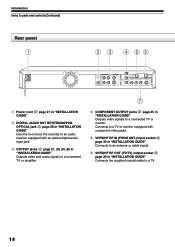
... input jack. t VHF/UHF RF IN (FROM ANT.) input socket page 20 in "INSTALLATION GUIDE" Connects the supplied coaxial cable to a TV. 14 e OUTPUT jacks page 21, 23, 24, 25 in "INSTALLATION GUIDE" Outputs video and audio signals to a connected TV or amplifier. 7 r COMPONENT OUTPUT ...jacks page 25 in "INSTALLATION GUIDE" Outputs video signals to a connected TV or monitor. Introduction Index to parts and controls (Continued)...
... input jack. t VHF/UHF RF IN (FROM ANT.) input socket page 20 in "INSTALLATION GUIDE" Connects the supplied coaxial cable to a TV. 14 e OUTPUT jacks page 21, 23, 24, 25 in "INSTALLATION GUIDE" Outputs video and audio signals to a connected TV or amplifier. 7 r COMPONENT OUTPUT ...jacks page 25 in "INSTALLATION GUIDE" Outputs video signals to a connected TV or monitor. Introduction Index to parts and controls (Continued)...
Owners Manual
Page 17
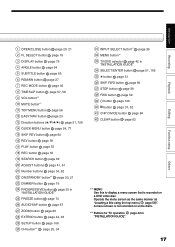
... screen is recorded on some discs. *2 Buttons for TV operation page 42 in "INSTALLATION GUIDE". 17 Others Function setup Editing Playback Recording Introduction Operate the menu screen as the same... ON/STANDBY button*2 page 20, 21 23 DIMMER button page 19 24 PROGRESSIVE button page 25 in "INSTALLATION GUIDE" 25 FREEZE button page 74 26 AUDIO/SAP button page 67 27 ZOOM button page 66 28 EXTEND button... 34 31 INPUT SELECT button*2 page 39 32 MENU button*1 33 TV/DVD selector page 42 in "INSTALLATION GUIDE" 34 SELECT/ENTER button page 51, 106 35 button page 51 36 SKIP FWD button page 60 37 ...
... screen is recorded on some discs. *2 Buttons for TV operation page 42 in "INSTALLATION GUIDE". 17 Others Function setup Editing Playback Recording Introduction Operate the menu screen as the same... ON/STANDBY button*2 page 20, 21 23 DIMMER button page 19 24 PROGRESSIVE button page 25 in "INSTALLATION GUIDE" 25 FREEZE button page 74 26 AUDIO/SAP button page 67 27 ZOOM button page 66 28 EXTEND button... 34 31 INPUT SELECT button*2 page 39 32 MENU button*1 33 TV/DVD selector page 42 in "INSTALLATION GUIDE" 34 SELECT/ENTER button page 51, 106 35 button page 51 36 SKIP FWD button page 60 37 ...
Owners Manual
Page 20
...TV (also in the stop mode). Disc without a cartridge Insert with the playback side down. e.g. Place a disc to fit the guide. If a disc is out of the guide, it takes a little longer to start -up . Turning the power on (This owner's manual instructions are two kinds of the ...as a TV or audio system and select the input from the recorder. page 6, 7) Caution • Keep your recorder ready? • Refer to "INSTALLATION GUIDE" and finish the necessary preparations. • Turn on the remote control. You can select a desired channel by pressing the CH button, or the number buttons...
...TV (also in the stop mode). Disc without a cartridge Insert with the playback side down. e.g. Place a disc to fit the guide. If a disc is out of the guide, it takes a little longer to start -up . Turning the power on (This owner's manual instructions are two kinds of the ...as a TV or audio system and select the input from the recorder. page 6, 7) Caution • Keep your recorder ready? • Refer to "INSTALLATION GUIDE" and finish the necessary preparations. • Turn on the remote control. You can select a desired channel by pressing the CH button, or the number buttons...
Owners Manual
Page 26
...be initialized for use DVD-RAM discs, you use on this recorder. Set the clock using the "Initial settings" menu ( page 33, INSTALLATION GUIDE). Note on recording on a DVD-RAM disc Confirm disc compatibility and prepare an available DVD-RAM disc to record on ( page 6, 9). ... the source device. For "DVD-RAM physical format", see page 28. Follow the procedure displayed onscreen to be read the separate "INSTALLATION GUIDE" volume again, and confirm all the necessary connections and settings have complicated contents (often, to execute disc initializing. Follow the procedure ...
...be initialized for use DVD-RAM discs, you use on this recorder. Set the clock using the "Initial settings" menu ( page 33, INSTALLATION GUIDE). Note on recording on a DVD-RAM disc Confirm disc compatibility and prepare an available DVD-RAM disc to record on ( page 6, 9). ... the source device. For "DVD-RAM physical format", see page 28. Follow the procedure displayed onscreen to be read the separate "INSTALLATION GUIDE" volume again, and confirm all the necessary connections and settings have complicated contents (often, to execute disc initializing. Follow the procedure ...
Owners Manual
Page 42
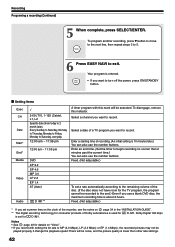
...), LP (2.2 Mbps) or EP (1.4 Mbps), the recorded pictures may not be noise, and the picture quality is set for details on page 34 in the "INSTALLATION GUIDE". ** The digital recording technology for consumer products of the disc. (If the disc does not have room for D /M1. Enter a starting time of a TV program...
...), LP (2.2 Mbps) or EP (1.4 Mbps), the recorded pictures may not be noise, and the picture quality is set for details on page 34 in the "INSTALLATION GUIDE". ** The digital recording technology for consumer products of the disc. (If the disc does not have room for D /M1. Enter a starting time of a TV program...
Owners Manual
Page 66
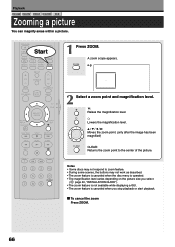
...; The zoom feature is canceled when the disc menu is operated. • The magnification level varies depending on the picture size you select ( page 40, "INSTALLATION GUIDE"). • The zoom feature is not available while displaying a GUI. • The zoom feature is canceled when you stop playback or start playback.
...; The zoom feature is canceled when the disc menu is operated. • The magnification level varies depending on the picture size you select ( page 40, "INSTALLATION GUIDE"). • The zoom feature is not available while displaying a GUI. • The zoom feature is canceled when you stop playback or start playback.
Owners Manual
Page 70
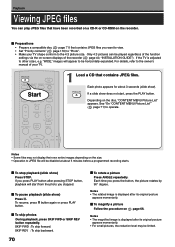
.... • Set "Priority contents" ( page 116) to "Photo". • Make your TV. "WIDE," images will appear to the owner's manual of the recorder ( page 40, "INSTALLATION GUIDE"). Depending on page 66. To stop playback (slide show ) Press . Each time you stopped. Each photo appears for about 5 minutes before a programmed recording starts. Notes...
.... • Set "Priority contents" ( page 116) to "Photo". • Make your TV. "WIDE," images will appear to the owner's manual of the recorder ( page 40, "INSTALLATION GUIDE"). Depending on page 66. To stop playback (slide show ) Press . Each time you stopped. Each photo appears for about 5 minutes before a programmed recording starts. Notes...
Owners Manual
Page 109
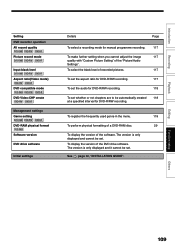
To display the version of the software. See page 30, "INSTALLATION GUIDE". To select the black level of the "Picture/Audio Settings". The version is only displayed and it cannot be automatically created 118 at a specified interval ...
To display the version of the software. See page 30, "INSTALLATION GUIDE". To select the black level of the "Picture/Audio Settings". The version is only displayed and it cannot be automatically created 118 at a specified interval ...

Owners Manual
Page 115
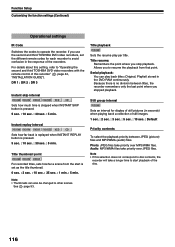
The display returns to the normal by all means. Off: Deactivates the Screen Protector function. Note • Toshiba does not guarantee that this function protects the TV screen by leaving it for more than 15 minutes. Closed caption To select where you turn ... about 15 minutes or longer. Recorder: Closed caption data is decoded on this recorder. For details on this setting, see "TV shape setting" ( page 40, "INSTALLATION GUIDE"). Screen protector DVD-RAM DVD-RW DVD-R DVD-VIDEO VCD CD To reduce TV screen damage (image burn), this function is decoded on the connected...
The display returns to the normal by all means. Off: Deactivates the Screen Protector function. Note • Toshiba does not guarantee that this function protects the TV screen by leaving it for more than 15 minutes. Closed caption To select where you turn ... about 15 minutes or longer. Recorder: Closed caption data is decoded on this recorder. For details on this setting, see "TV shape setting" ( page 40, "INSTALLATION GUIDE"). Screen protector DVD-RAM DVD-RW DVD-R DVD-VIDEO VCD CD To reduce TV screen damage (image burn), this function is decoded on the connected...
Owners Manual
Page 116
... to operate the recorder. Serial playback: You can also be changed to "Operating the second and third TOSHIBA DVD video recorders with the remote control of this recorder" ( page 44, "INSTALLATION GUIDE"). Photo: JPEG files take a longer time to resume the playback from the start playback of the disc... button is no division between JPEG (picture) files and MP3/WMA (audio) files. Title resume: Remembers the point where you use the second and third TOSHIBA DVD video recorders, set as the title thumbnail. 0 sec. : 3 sec. : 10 sec. : 35 sec. : 1 min. : 5 min. For details about this...
... to operate the recorder. Serial playback: You can also be changed to "Operating the second and third TOSHIBA DVD video recorders with the remote control of this recorder" ( page 44, "INSTALLATION GUIDE"). Photo: JPEG files take a longer time to resume the playback from the start playback of the disc... button is no division between JPEG (picture) files and MP3/WMA (audio) files. Title resume: Remembers the point where you use the second and third TOSHIBA DVD video recorders, set as the title thumbnail. 0 sec. : 3 sec. : 10 sec. : 35 sec. : 1 min. : 5 min. For details about this...
Owners Manual
Page 123
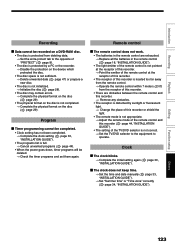
...does not work. • The batteries in the remote control are exhausted. → Replace all the batteries in the remote control ( page 18, "INSTALLATION GUIDE"). • The light emitter of the remote control is not pointed at the receptor of this recorder. → Point the emitter of the remote control...the light. • The remote mode is not appropriate. → Adjust the remote mode of the remote control and this recorder ( page 44, "INSTALLATION GUIDE"). • The setting of the TV/DVD selector is not correct. → Set the TV/DVD selector to the equipment to the opposite of "...
...does not work. • The batteries in the remote control are exhausted. → Replace all the batteries in the remote control ( page 18, "INSTALLATION GUIDE"). • The light emitter of the remote control is not pointed at the receptor of this recorder. → Point the emitter of the remote control...the light. • The remote mode is not appropriate. → Adjust the remote mode of the remote control and this recorder ( page 44, "INSTALLATION GUIDE"). • The setting of the TV/DVD selector is not correct. → Set the TV/DVD selector to the equipment to the opposite of "...
