
Owners Manual
Page 2
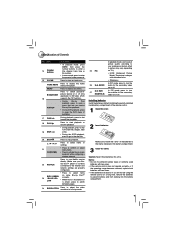
...of Controls...7 Front Panel ...7 Rear Panel...7 Remote Control ...8 • Connections...10 Connecting to a TV using an HDMI® cable...10 Connecting to a digital amplifier/AV receiver ...11 Connecting to network...11 Connecting a USB Flash Drive...12 • Playback...13 Information on Playback ...... Language Setting ...23 Parental Control...24 System Setting ...24 Upgrading Your Player's Firmware...25 Network Connection Setting...26 • Using the Connected Applications...29 Watching Movies with Blockbuster®...29 Watching Movies with CinemaNow®...29 Watching Movies with...
...of Controls...7 Front Panel ...7 Rear Panel...7 Remote Control ...8 • Connections...10 Connecting to a TV using an HDMI® cable...10 Connecting to a digital amplifier/AV receiver ...11 Connecting to network...11 Connecting a USB Flash Drive...12 • Playback...13 Information on Playback ...... Language Setting ...23 Parental Control...24 System Setting ...24 Upgrading Your Player's Firmware...25 Network Connection Setting...26 • Using the Connected Applications...29 Watching Movies with Blockbuster®...29 Watching Movies with CinemaNow®...29 Watching Movies with...
Owners Manual
Page 3
... radiators, heat registers, stoves, or other place with the apparatus. REFER SERVICING TO QUALIFIED PERSONNEL ONLY. Never expose the apparatus to do not touch the connecting cables or the apparatus. 24. Neglecting to dripping or splashing or place items such as vases, aquariums, any way, such as this apparatus during intended...
... radiators, heat registers, stoves, or other place with the apparatus. REFER SERVICING TO QUALIFIED PERSONNEL ONLY. Never expose the apparatus to do not touch the connecting cables or the apparatus. 24. Neglecting to dripping or splashing or place items such as vases, aquariums, any way, such as this apparatus during intended...

Owners Manual
Page 4
...CAUTION: • To prevent direct exposure to laser beam, do not put your local regulations concerning chemical wastes. However, there is connected. - FCC Radiation Exposure Statement: This equipment complies with Canadian ICES-003. Replace only with the instructions, may not function normally. ... uncontrolled environment. FCC Information This device complies with your fingers or objects into an outlet on , the user is : Toshiba America Information Systems, Inc. 9740 Irvine Blvd., Irvine, CA 92618. If this device must accept any materials in accordance with your...
...CAUTION: • To prevent direct exposure to laser beam, do not put your local regulations concerning chemical wastes. However, there is connected. - FCC Radiation Exposure Statement: This equipment complies with Canadian ICES-003. Replace only with the instructions, may not function normally. ... uncontrolled environment. FCC Information This device complies with your fingers or objects into an outlet on , the user is : Toshiba America Information Systems, Inc. 9740 Irvine Blvd., Irvine, CA 92618. If this device must accept any materials in accordance with your...
Owners Manual
Page 6
...POP/TOP or MENU. HDMI® CEC (Consumer Electronics Control) This unit supports HDMI CEC, which allows integrated system control over an HDMI connection. BD-Live™ BD-Live™ (BD-ROM version 2 Profile 2.0) that allows interactive functions to ensure compatibility with 1080p/24F... resolution for enhanced picture quality Your current DVD will get excellent picture and sound quality. Easy and simple connection to your HDTV via an HDMI connection, it is connected to the Internet in the pop-up to the BONUSVIEW function.The various functions differ depending on disc....
...POP/TOP or MENU. HDMI® CEC (Consumer Electronics Control) This unit supports HDMI CEC, which allows integrated system control over an HDMI connection. BD-Live™ BD-Live™ (BD-ROM version 2 Profile 2.0) that allows interactive functions to ensure compatibility with 1080p/24F... resolution for enhanced picture quality Your current DVD will get excellent picture and sound quality. Easy and simple connection to your HDTV via an HDMI connection, it is connected to the Internet in the pop-up to the BONUSVIEW function.The various functions differ depending on disc....
Owners Manual
Page 7
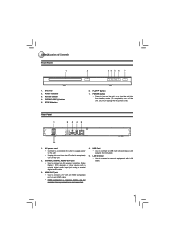
...1. Cables are not included. USB Port • Use to connect a TV with an HDMI compatible port via an HDMI cable. * HDMI connection is not supported. 4. Disc tray 2. STOP button 6. PLAY button 7. AC power cord • Connect to a standard AC outlet to supply power to this unit. ...• Unplug this cord from the AC outlet to connect a network equipment with a coaxial digital audio input jack using a coaxial digital audio cable. 3. Analog connection is required. LAN terminal • Use to completely turn off the unit. 2. Power ...
...1. Cables are not included. USB Port • Use to connect a TV with an HDMI compatible port via an HDMI cable. * HDMI connection is not supported. 4. Disc tray 2. STOP button 6. PLAY button 7. AC power cord • Connect to a standard AC outlet to supply power to this unit. ...• Unplug this cord from the AC outlet to connect a network equipment with a coaxial digital audio input jack using a coaxial digital audio cable. 3. Analog connection is required. LAN terminal • Use to completely turn off the unit. 2. Power ...
Owners Manual
Page 9
... keyboard while configuring a wireless network. 22 NETFLIX Press to use to adjust picture quality according to your Bluray Disc™ player is correctly connected to the internet and network settings are properly configured.) • Press to prevent battery acid from leaking into a fire. HOME MENU MENU...
... keyboard while configuring a wireless network. 22 NETFLIX Press to use to adjust picture quality according to your Bluray Disc™ player is correctly connected to the internet and network settings are properly configured.) • Press to prevent battery acid from leaking into a fire. HOME MENU MENU...

Owners Manual
Page 10
... Point the remote control at the remote sensor and press the buttons. Cables are matched. • When using an HDMI® cable This connection provides better picture quality and supports up to a strong light source such as direct sunlight or other illumination. Angle: About 30° in ...each direction of the front of the remote sensor. * Do not expose the remote sensor of the remote sensor. Connect a HDMI cable from the front of the Blu-ray Disc™ player to 1080i/1080p, 1080p/24F resolution. POWER Distance: About 5 m from the...
... Point the remote control at the remote sensor and press the buttons. Cables are matched. • When using an HDMI® cable This connection provides better picture quality and supports up to a strong light source such as direct sunlight or other illumination. Angle: About 30° in ...each direction of the front of the remote sensor. * Do not expose the remote sensor of the remote sensor. Connect a HDMI cable from the front of the Blu-ray Disc™ player to 1080i/1080p, 1080p/24F resolution. POWER Distance: About 5 m from the...

Owners Manual
Page 11
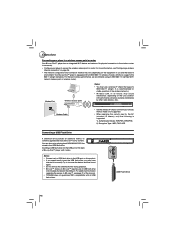
... instructions from the COAXIAL DIGITAL jack on this player to other device to enhance audio output. • Connect a coaxial cable from your telecommunication carrier or Internet service provider. 11 Connections Connecting to a digital amplifier/AV receiver Route the sound from this product to the COAXIAL jack on... the device. • If your AV receiver or amplifier has an HDMI jack, you can be connected to your home network: • By connecting an Ethernet cable to the ETHERNET jack on the back of the cable. AV receiver / amplifier DIGITAL AUDIO INPUT COAXIAL...
... instructions from the COAXIAL DIGITAL jack on this player to other device to enhance audio output. • Connect a coaxial cable from your telecommunication carrier or Internet service provider. 11 Connections Connecting to a digital amplifier/AV receiver Route the sound from this product to the COAXIAL jack on... the device. • If your AV receiver or amplifier has an HDMI jack, you can be connected to your home network: • By connecting an Ethernet cable to the ETHERNET jack on the back of the cable. AV receiver / amplifier DIGITAL AUDIO INPUT COAXIAL...
Owners Manual
Page 12
... a USB flash drive into the USB port on the back of the wireless network.) • Wireless LAN, in use of the manual. • TOSHIBA does not guarantee 100% compatibility with an IEEE 802.11n wireless module, which also supports the 802.11 a/b/g/n standards. Try to turnover the device and...8226; If you cannot easily insert the USB flash drive, you may vary depending on page 26. • The network configuration and connection method may have inserted it clicks. For the best wireless performance, we recommend using an IEEE 802.11n certified Wi-Fi network (access...
... a USB flash drive into the USB port on the back of the wireless network.) • Wireless LAN, in use of the manual. • TOSHIBA does not guarantee 100% compatibility with an IEEE 802.11n wireless module, which also supports the 802.11 a/b/g/n standards. Try to turnover the device and...8226; If you cannot easily insert the USB flash drive, you may vary depending on page 26. • The network configuration and connection method may have inserted it clicks. For the best wireless performance, we recommend using an IEEE 802.11n certified Wi-Fi network (access...

Owners Manual
Page 14
... 2 chapter 1 chapter 2 chapter 1 chapter 2 chapter 3 Audio CD is closing. POWER The Blu-ray Disc™ player turns on the TV and select the video input connected to the Blu-ray Disc™ player. With the playback side down 4 Press OPEN/CLOSE to start playback at the beginning of the disc. The...
... 2 chapter 1 chapter 2 chapter 1 chapter 2 chapter 3 Audio CD is closing. POWER The Blu-ray Disc™ player turns on the TV and select the video input connected to the Blu-ray Disc™ player. With the playback side down 4 Press OPEN/CLOSE to start playback at the beginning of the disc. The...

Owners Manual
Page 20
... inserted, the system will not function. 3 Press / to select a desired source, then press to highlight an option, and press OK. If Media Player is properly connected to select Media, and then press . For detailed operations, please follow the instructions in the network to "ON". Notes: • If you cannot easily insert...
... inserted, the system will not function. 3 Press / to select a desired source, then press to highlight an option, and press OK. If Media Player is properly connected to select Media, and then press . For detailed operations, please follow the instructions in the network to "ON". Notes: • If you cannot easily insert...
Owners Manual
Page 21
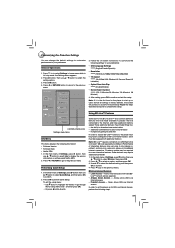
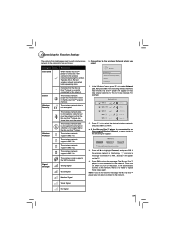
...8482; Features Some (but not all settings to factory defaults, the system will prompt you to perform Quick Setup. Note: BD-Live™ requires connection of a USB flash drive of interactive features may vary due to disc design or content, and may be equipped with valid BD- BD...time for the player to start up for some interactive features. I'll go to the previous menu. Press to go to the previous menu. Connected Audio A Language Parental submenu display area Settings menu items Info Menu This menu displays the following steps: 21 Press or RETURN button to return ...
...8482; Features Some (but not all settings to factory defaults, the system will prompt you to perform Quick Setup. Note: BD-Live™ requires connection of a USB flash drive of interactive features may vary due to disc design or content, and may be equipped with valid BD- BD...time for the player to start up for some interactive features. I'll go to the previous menu. Press to go to the previous menu. Connected Audio A Language Parental submenu display area Settings menu items Info Menu This menu displays the following steps: 21 Press or RETURN button to return ...

Owners Manual
Page 22
...8482; content (movie trailers, additional scenes, etc.). Press / to the previous menu. If an HDMI TV is not supported. Analog connection is connected, Connected appears. TV Type If your TV is recommended) into the USB port on information exchanged between the TV and your player and you should...menu of Settings, then use / to turn off the Deep Color (color depth) setting for this frame rate. Cables are available for the connected TV. Off selects a 60 frames/second output format. Customizing the Function Settings 1. In the main menu of Settings, press button to select ...
...8482; content (movie trailers, additional scenes, etc.). Press / to the previous menu. If an HDMI TV is not supported. Analog connection is connected, Connected appears. TV Type If your TV is recommended) into the USB port on information exchanged between the TV and your player and you should...menu of Settings, then use / to turn off the Deep Color (color depth) setting for this frame rate. Cables are available for the connected TV. Off selects a 60 frames/second output format. Customizing the Function Settings 1. In the main menu of Settings, press button to select ...
Owners Manual
Page 23
... Pro Logic. • Surround Encoded (LtRt) - When movie soundtracks are played at low volume or from the disc over the HDMI connection. Downmixes the multi-channel audio into surround compatible stereo. Use / to select your preferred language, and then press OK to select the ...more intelligible and prevent dramatic passages from this setting, Blu-ray audio is limited to the soundtrack for instance, when you have an audio receiver connected to your player is not a 5.1/7.1 channel receiver. • Bitstream HD - This would be sleeping. If you want to a compatible HDMI...
... Pro Logic. • Surround Encoded (LtRt) - When movie soundtracks are played at low volume or from the disc over the HDMI connection. Downmixes the multi-channel audio into surround compatible stereo. Use / to select your preferred language, and then press OK to select the ...more intelligible and prevent dramatic passages from this setting, Blu-ray audio is limited to the soundtrack for instance, when you have an audio receiver connected to your player is not a 5.1/7.1 channel receiver. • Bitstream HD - This would be sleeping. If you want to a compatible HDMI...
Owners Manual
Page 24
.... System Setting 1. Press / to the previous menu. Press to go to select an option, and then press OK. 3. Optical Disc Auto Play: If Enable is connected to select System, then press OK. 2. Media Player: Media Player function enables you select the subtitle language using your player's menu. and for upgrade. On...
.... System Setting 1. Press / to the previous menu. Press to go to select an option, and then press OK. 3. Optical Disc Auto Play: If Enable is connected to select System, then press OK. 2. Media Player: Media Player function enables you select the subtitle language using your player's menu. and for upgrade. On...
Owners Manual
Page 25
... You may periodically see a message prompting you apply all settings (including Parental Password) to the player by an unstable internet connection or consumer negligence during a firmware update process. After the firmware update has completed successfully, a message will ...appear indicating the player will appear on the TV screen. 3. Toshiba America Information Systems, Inc. It is done with a software update. Automatic updates over the Internet 1. Restore factory settings Restores ...
... You may periodically see a message prompting you apply all settings (including Parental Password) to the player by an unstable internet connection or consumer negligence during a firmware update process. After the firmware update has completed successfully, a message will ...appear indicating the player will appear on the TV screen. 3. Toshiba America Information Systems, Inc. It is done with a software update. Automatic updates over the Internet 1. Restore factory settings Restores ...
Owners Manual
Page 26
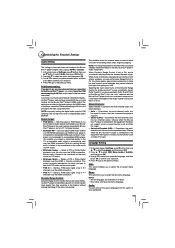
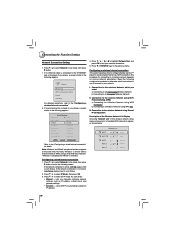
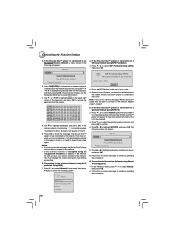
...DNS 128.60.1.41 Secondary DNS 128.60.1.42 Apply Cancel Network Test Refer to the "Configuring a wired Internet connection" for connecting to a wireless network depends on the back of available WiFi networks to your player, a screen similar to the following appears...select: • Manual - II. Normally, "Wireless" is not active, Link Down displays next to the previous menu. Customizing the Function Settings Network Connection Setting 1. Uses DHCP to determine which you manually configure network settings, such as shown below: Network List WiFi a WiFi-me* WiFi b...
...DNS 128.60.1.41 Secondary DNS 128.60.1.42 Apply Cancel Network Test Refer to the "Configuring a wired Internet connection" for connecting to a wireless network depends on the back of available WiFi networks to your player, a screen similar to the following appears...select: • Manual - II. Normally, "Wireless" is not active, Link Down displays next to the previous menu. Customizing the Function Settings Network Connection Setting 1. Uses DHCP to determine which you manually configure network settings, such as shown below: Network List WiFi a WiFi-me* WiFi b...
Owners Manual
Page 27
...Network List, then press OK. The wireless network properties have been saved in the network list are case-sensitive 3. If the wireless network is connected to an Unencrypted Wireless Network, a menu similar to the network. Weak Signal No Signal 27 a 'security key' must be created). Note.... In the "Wireless" menu, press / to confirm. If the Blu-ray Disc™ player is functioning, icon and a message "Connection to the network; Press / to close the message. Typically, this network. A list of existing wireless networks near the Blu-ray Disc™ player...
...Network List, then press OK. The wireless network properties have been saved in the network list are case-sensitive 3. If the wireless network is connected to an Unencrypted Wireless Network, a menu similar to the network. Weak Signal No Signal 27 a 'security key' must be created). Note.... In the "Wireless" menu, press / to confirm. If the Blu-ray Disc™ player is functioning, icon and a message "Connection to the network; Press / to close the message. Typically, this network. A list of existing wireless networks near the Blu-ray Disc™ player...
Owners Manual
Page 28
...wireless Network using Wi-Fi protected Setup(WPS) 1. WiFi Protected Setup (WPS) Please press the button on -screen message to open keyboard Password is connected to be created). 3. Once you make a mistake, use the backspace key to remove the keyboard from the screen. Press / to confi... the / / / to highlight the desired letter on the keyboard, and then pressing OK. (If you see this list to the router. Connection to the network. You must change the router's encryption type before proceeding. Repeat steps 1-4 again. III. From now on the button at the...
...wireless Network using Wi-Fi protected Setup(WPS) 1. WiFi Protected Setup (WPS) Please press the button on -screen message to open keyboard Password is connected to be created). 3. Once you make a mistake, use the backspace key to remove the keyboard from the screen. Press / to confi... the / / / to highlight the desired letter on the keyboard, and then pressing OK. (If you see this list to the router. Connection to the network. You must change the router's encryption type before proceeding. Repeat steps 1-4 again. III. From now on the button at the...
Owners Manual
Page 29
... In Home Menu, press / to select the desired title, then press OK. 9. Press the Activate. 6. Press / / / to select Connected. 2. Using the Connected Applications Some models are equipped with CinemaNow® This Blu-ray Disc™ Player enables you to confirm. Press / to watch movies...Activate, and press OK to create your bought or rented. • Wish List : Display a title that is activated, you will move to select Connected. 2. In Home Menu, press / to the Home page. 7. Press , then press / to highlight CinemaNow, and then press OK to enter CinemaNow...
... In Home Menu, press / to select the desired title, then press OK. 9. Press the Activate. 6. Press / / / to select Connected. 2. Using the Connected Applications Some models are equipped with CinemaNow® This Blu-ray Disc™ Player enables you to confirm. Press / to watch movies...Activate, and press OK to create your bought or rented. • Wish List : Display a title that is activated, you will move to select Connected. 2. In Home Menu, press / to the Home page. 7. Press , then press / to highlight CinemaNow, and then press OK to enter CinemaNow...


