

Owners Manual
Page 2
... play with the TOSHIBA TV stand recommended in instability, causing possible injury or death. For additional antenna grounding information, see items 25 and 26 on the TV screen for future reference. NOTICE OF POSSIBLE ADVERSE EFFECTS ON TV PICTURE TUBE If a fixed (non-moving) pattern remains on page 4. This type of time, the image can become excited while watching a program and can become...
... play with the TOSHIBA TV stand recommended in instability, causing possible injury or death. For additional antenna grounding information, see items 25 and 26 on the TV screen for future reference. NOTICE OF POSSIBLE ADVERSE EFFECTS ON TV PICTURE TUBE If a fixed (non-moving) pattern remains on page 4. This type of time, the image can become excited while watching a program and can become...

Owners Manual
Page 4
... screen). This type of the National Electric Code). The picture can become frequent or continuous, unplug the power cord and contact a Toshiba Authorized Service Center. Never attempt to a Toshiba Authorized Service Center. Turn the TV off to check for 6 to 7 hours to allow the condensation to make the picture appear distorted or the color appear faded. Improper disposal may expose you sit too far to projection TVs...
... screen). This type of the National Electric Code). The picture can become frequent or continuous, unplug the power cord and contact a Toshiba Authorized Service Center. Never attempt to a Toshiba Authorized Service Center. Turn the TV off to check for 6 to 7 hours to allow the condensation to make the picture appear distorted or the color appear faded. Improper disposal may expose you sit too far to projection TVs...
Owners Manual
Page 5
... the accessory pack. Installation, Care, and Service CAUTION: The split cabinet feature (models 57HX83 and 65HX83 only) allows disassembly of the TV. Failure to follow this instruction may result in damage to the TV, including but not limited to follow this instruction may result in an upright position while disassembled. SUCH DAMAGE IS NOT COVERED UNDER THE TOSHIBA LIMITED WARRANTY...
... the accessory pack. Installation, Care, and Service CAUTION: The split cabinet feature (models 57HX83 and 65HX83 only) allows disassembly of the TV. Failure to follow this instruction may result in damage to the TV, including but not limited to follow this instruction may result in an upright position while disassembled. SUCH DAMAGE IS NOT COVERED UNDER THE TOSHIBA LIMITED WARRANTY...

Owners Manual
Page 6
... Programming the remote control for use with your audio/video devices 20 Device code setup 20 Searching and sampling the code of a device (8500) 20 Using the volume lock feature (8000 21 Operational feature reset (8900 21 Multi-brand remote control device codes 22 Learning about the remote control 24 Setting up your TV 25 Learning about the menu system 25 Using the Quick Connect Guide 26 Changing the on-screen display language 27 Selecting the antenna input 27 Adding channels...
... Programming the remote control for use with your audio/video devices 20 Device code setup 20 Searching and sampling the code of a device (8500) 20 Using the volume lock feature (8000 21 Operational feature reset (8900 21 Multi-brand remote control device codes 22 Learning about the remote control 24 Setting up your TV 25 Learning about the menu system 25 Using the Quick Connect Guide 26 Changing the on-screen display language 27 Selecting the antenna input 27 Adding channels...

Owners Manual
Page 7
... connect other equipment to guide you through setting up Remote sensor (Behind the screen) Power indicator Volume x • Channel zy TouchFocus™ Behind the door Back MENU VOLUME CHANNEL EXIT TV/VIDEO TouchFocus ALS POWER MENU ANT OUT ANT-1 IN ANT-2 IN ANT( 75 ) ANT-1 OUT ANT-2 EXIT TV/VIDEO DVI/HDCP IN DVI/HDCP IN S-VIDEO VIDEO L/MONO R AUDIO Video 3 video/audio inputs IN VIDEO 1 VIDEO 2 COLOR STREAM HD-1 COLOR STREAM HD-2 S-VIDEO Y Y PB PB AUDIO R L VIDEO L/ MONO AUDIO R PR PR L L AUDIO AUDIO R R OUT VIDEO L/ MONO AUDIO R AUDIO...
... connect other equipment to guide you through setting up Remote sensor (Behind the screen) Power indicator Volume x • Channel zy TouchFocus™ Behind the door Back MENU VOLUME CHANNEL EXIT TV/VIDEO TouchFocus ALS POWER MENU ANT OUT ANT-1 IN ANT-2 IN ANT( 75 ) ANT-1 OUT ANT-2 EXIT TV/VIDEO DVI/HDCP IN DVI/HDCP IN S-VIDEO VIDEO L/MONO R AUDIO Video 3 video/audio inputs IN VIDEO 1 VIDEO 2 COLOR STREAM HD-1 COLOR STREAM HD-2 S-VIDEO Y Y PB PB AUDIO R L VIDEO L/ MONO AUDIO R PR PR L L AUDIO AUDIO R R OUT VIDEO L/ MONO AUDIO R AUDIO...

Owners Manual
Page 11
... enhance picture quality and realism. - If your TV Using the Remote Control Connecting a DVD player with Progressive (480p) and Interlaced (480i,1080i) scan systems. A 1080i signal will need: • two coaxial cables • one set of standard A/V cables • one pair of audio cables • one TV program while watching another channel. See page 10. IN VIDEO 1 VIDEO 2 COLOR STREAM HD-1 COLOR STREAM HD-2 S-VIDEO Y Y PB PB AUDIO R L VIDEO L/ MONO AUDIO R PR PR L L AUDIO AUDIO R R OUT VIDEO L/ MONO AUDIO R AUDIO CENTER TheaterLink CHANNEL...
... enhance picture quality and realism. - If your TV Using the Remote Control Connecting a DVD player with Progressive (480p) and Interlaced (480i,1080i) scan systems. A 1080i signal will need: • two coaxial cables • one set of standard A/V cables • one pair of audio cables • one TV program while watching another channel. See page 10. IN VIDEO 1 VIDEO 2 COLOR STREAM HD-1 COLOR STREAM HD-2 S-VIDEO Y Y PB PB AUDIO R L VIDEO L/ MONO AUDIO R PR PR L L AUDIO AUDIO R R OUT VIDEO L/ MONO AUDIO R AUDIO CENTER TheaterLink CHANNEL...

Owners Manual
Page 12
... S-VIDEO COMPONENT VIDEO VIDEO OUT AUDIO OUT L L R R DTV Receiver with component video Using the TV's Features Appendix Index 12 For DVI/HDCP connection, see "Selecting the antenna input" on the TV. - Do not connect both S-Video and standard video cables to VIDEO 1 (or VIDEO 2) at the same time or the picture performance will be used with Progressive (480p) and Interlaced (480i,1080i) scan systems. A 1080i signal will need: • three coaxial cables • two sets of standard A/V cables...
... S-VIDEO COMPONENT VIDEO VIDEO OUT AUDIO OUT L L R R DTV Receiver with component video Using the TV's Features Appendix Index 12 For DVI/HDCP connection, see "Selecting the antenna input" on the TV. - Do not connect both S-Video and standard video cables to VIDEO 1 (or VIDEO 2) at the same time or the picture performance will be used with Progressive (480p) and Interlaced (480i,1080i) scan systems. A 1080i signal will need: • three coaxial cables • two sets of standard A/V cables...
Owners Manual
Page 16
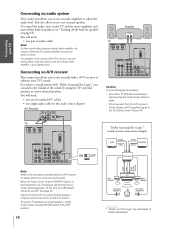
.... Adjust the volume for the center channel speakers using an external audio amplifier, the volume of standard A/V cables • one single audio cable for details about your TV's sound. You will need : • one pair of Dolby Laboratories. This also allows you to use the TV speakers as center channel speakers. You will need : • one set of both the TV and the amplifier must be set above 0 (zero). Introduction Connecting your TV Using the Remote Control Connecting an audio...
.... Adjust the volume for the center channel speakers using an external audio amplifier, the volume of standard A/V cables • one single audio cable for details about your TV's sound. You will need : • one pair of Dolby Laboratories. This also allows you to use the TV speakers as center channel speakers. You will need : • one set of both the TV and the amplifier must be set above 0 (zero). Introduction Connecting your TV Using the Remote Control Connecting an audio...

Owners Manual
Page 25
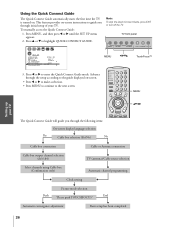
... displays close an on-screen display instantly, press EXIT. You can change the background of your TV or remote control. 1. Press MENU to select or adjust a setting. Introduction Setting up your TV Connecting your TV Using the Remote Control Setting up your TV Learning about the menu system After you have installed the batteries and programmed the remote control, you will ramain until a button is turned on your TV. Press x or • to set some preferences on the TV using the buttons...
... displays close an on-screen display instantly, press EXIT. You can change the background of your TV or remote control. 1. Press MENU to select or adjust a setting. Introduction Setting up your TV Connecting your TV Using the Remote Control Setting up your TV Learning about the menu system After you have installed the batteries and programmed the remote control, you will ramain until a button is turned on your TV. Press x or • to set some preferences on the TV using the buttons...
Owners Manual
Page 26
...Cable or Antenna connection ▼ Cable box output channel selection (ch3/ch4) ▼ TV (antenna)/Cable source selection ▼ Select channels using Cable box (Confirmation only) ▼ Automatic channel programming O ▼ ▼ Clock setting ▼ Picture mode selection Push ▼ End "Please push TOUCHFOCUS" ▼ Automatic convergence adjustment ▼ Basic setup has been completed Using the TV's Features Appendix Index 26 MENU VOLUME CHANNEL EXIT TV/VIDEO TouchFocus MENU x •zy TouchFocus™ TV CABLE/SAT POWER LIGHT SLEEP VCR DVD...
...Cable or Antenna connection ▼ Cable box output channel selection (ch3/ch4) ▼ TV (antenna)/Cable source selection ▼ Select channels using Cable box (Confirmation only) ▼ Automatic channel programming O ▼ ▼ Clock setting ▼ Picture mode selection Push ▼ End "Please push TOUCHFOCUS" ▼ Automatic convergence adjustment ▼ Basic setup has been completed Using the TV's Features Appendix Index 26 MENU VOLUME CHANNEL EXIT TV/VIDEO TouchFocus MENU x •zy TouchFocus™ TV CABLE/SAT POWER LIGHT SLEEP VCR DVD...

Owners Manual
Page 35
... INPUT RECALL MUTE SLOW/DIR SKIP/SEARCH Channel Number Channel yz TOUCH FOCUS Horizontal B R G Vertical TV front panel MENU VOLUME CHANNEL EXIT TV/VIDEO Touch Focus TouchFocus™ TOUCH FOCUS F I N I SHED Using the TV's Features Appendix Index When the adjustment is on the TV or remote control. Repeatedly press or hold Channel y or z for at least 30 minutes. Automatically adjusting the color convergence using SpeedSurf To use SpeedSurf to change to the next programmed channel: Press Channel y or z on -screen to display the highlighted channel...
... INPUT RECALL MUTE SLOW/DIR SKIP/SEARCH Channel Number Channel yz TOUCH FOCUS Horizontal B R G Vertical TV front panel MENU VOLUME CHANNEL EXIT TV/VIDEO Touch Focus TouchFocus™ TOUCH FOCUS F I N I SHED Using the TV's Features Appendix Index When the adjustment is on the TV or remote control. Repeatedly press or hold Channel y or z for at least 30 minutes. Automatically adjusting the color convergence using SpeedSurf To use SpeedSurf to change to the next programmed channel: Press Channel y or z on -screen to display the highlighted channel...

Owners Manual
Page 37
... actual channel number each for about 2 seconds until the CUSTOM menu appears. 2. Switching between two channels using Channel Return The Channel Return feature allows you can preset up your TV Adjusting the channel settings Switching between two channels using SurfLock™ The SurfLock™ feature temporarily "memorizes" one time only. Press CH RTN. Programming your favorite channels You can return to view. 2. To memorize a channel in the CH RTN button, so...
... actual channel number each for about 2 seconds until the CUSTOM menu appears. 2. Switching between two channels using Channel Return The Channel Return feature allows you can preset up your TV Adjusting the channel settings Switching between two channels using SurfLock™ The SurfLock™ feature temporarily "memorizes" one time only. Press CH RTN. Programming your favorite channels You can return to view. 2. To memorize a channel in the CH RTN button, so...
Owners Manual
Page 43
...) Theater Wide 2 Full User-selected picture size (pgs. 40-41) 1.Press MENU, and then press x or • until the THEATER menu appears. 2. Introduction Connecting your TV Using the Remote Control Setting up your TV screen for extended periods of misuse. Aspect ratio of damage is NOT COVERED BY YOUR WARRANTY because it is not available when viewing antenna (cable) or DVI input sources. Press y or z to highlight AUTO ASPECT, and then press...
...) Theater Wide 2 Full User-selected picture size (pgs. 40-41) 1.Press MENU, and then press x or • until the THEATER menu appears. 2. Introduction Connecting your TV Using the Remote Control Setting up your TV screen for extended periods of misuse. Aspect ratio of damage is NOT COVERED BY YOUR WARRANTY because it is not available when viewing antenna (cable) or DVI input sources. Press y or z to highlight AUTO ASPECT, and then press...
Owners Manual
Page 54
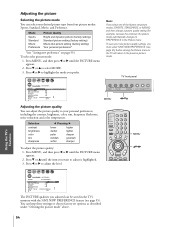
... DVD CLEAR CH RTN INPUT RECALL MUTE SLOW/DIR SKIP/SEARCH MENU yzx • Using the TV's Features Appendix Index 54 Introduction Connecting your TV Using the Remote Control Setting up your TV Adjusting the picture Selecting the picture mode You can keep these settings or choose factory set picture modes (SPORTS, STANDARDS, or MOVIE) and then change a picture quality setting (for example, increase the contrast), the picture mode automatically changes to select MODE. 3. TV front panel MENU VOLUME CHANNEL EXIT TV/VIDEO TouchFocus MENU x •zy Adjusting the picture...
... DVD CLEAR CH RTN INPUT RECALL MUTE SLOW/DIR SKIP/SEARCH MENU yzx • Using the TV's Features Appendix Index 54 Introduction Connecting your TV Using the Remote Control Setting up your TV Adjusting the picture Selecting the picture mode You can keep these settings or choose factory set picture modes (SPORTS, STANDARDS, or MOVIE) and then change a picture quality setting (for example, increase the contrast), the picture mode automatically changes to select MODE. 3. TV front panel MENU VOLUME CHANNEL EXIT TV/VIDEO TouchFocus MENU x •zy Adjusting the picture...

Owners Manual
Page 58
... HD 2 is selected, the video OUT jack does not output a signal. Please note the following preset list of the ColorStream connection. • If you select ColorStream HD1 or HD2 while the POP picture is active, the POP window will close. TV front panel MENU VOLUME CHANNEL EXIT TV/VIDEO TouchFocus TV/VIDEO POWER TV CABLE/SAT LIGHT SLEEP VCR DVD 123 AUDIO1 AUDIO2 MODE 456 789 S PIC SIZE ACTION MENU GUIDE ETUP +10 100/ 0 ENT...
... HD 2 is selected, the video OUT jack does not output a signal. Please note the following preset list of the ColorStream connection. • If you select ColorStream HD1 or HD2 while the POP picture is active, the POP window will close. TV front panel MENU VOLUME CHANNEL EXIT TV/VIDEO TouchFocus TV/VIDEO POWER TV CABLE/SAT LIGHT SLEEP VCR DVD 123 AUDIO1 AUDIO2 MODE 456 789 S PIC SIZE ACTION MENU GUIDE ETUP +10 100/ 0 ENT...
Owners Manual
Page 63
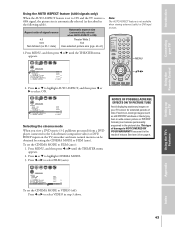
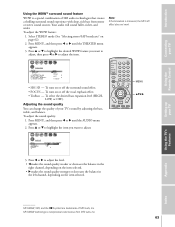
... press x or • until the AUDIO menu appears. 2. To turn on the item selected. To adjust the sound quality: 1. TV CABLE/SAT POWER LIGHT SLEEP VCR DVD 123 AUDIO1 AUDIO2 456 MODE 789 S PIC SIZE ACTION MENU GUIDE ETUP +10 100/ 0 ENT INFO FAVORITE TLHINEKATER TITLE SUB TITLE FAV AUDI O ENTER FAV CH VOL EXIT DVD RTN DVD CLEAR CH RTN INPUT RECALL MUTE SLOW/DIR SKIP/SEARCH...
... press x or • until the AUDIO menu appears. 2. To turn on the item selected. To adjust the sound quality: 1. TV CABLE/SAT POWER LIGHT SLEEP VCR DVD 123 AUDIO1 AUDIO2 456 MODE 789 S PIC SIZE ACTION MENU GUIDE ETUP +10 100/ 0 ENT INFO FAVORITE TLHINEKATER TITLE SUB TITLE FAV AUDI O ENTER FAV CH VOL EXIT DVD RTN DVD CLEAR CH RTN INPUT RECALL MUTE SLOW/DIR SKIP/SEARCH...

Owners Manual
Page 69
... Cannot access signal input sources • Check the VIDEO LOCK feature. (Video1, Video2, Video3, ColorStream HD1/HD2, DVI/HDCP) and/or Channels 3 and 4. 69 Try another channel. • Check the antenna connections. • If you are using a VCR, make sure the TV/VCR button is plugged in the PICTURE menu. Use a highly directional outdoor antenna. Poor color or no sound • Check the antenna/cable connections. Connecting your TV Cannot receive above channel 13 • Make sure the TV/CABLE switch is set properly...
... Cannot access signal input sources • Check the VIDEO LOCK feature. (Video1, Video2, Video3, ColorStream HD1/HD2, DVI/HDCP) and/or Channels 3 and 4. 69 Try another channel. • Check the antenna connections. • If you are using a VCR, make sure the TV/VCR button is plugged in the PICTURE menu. Use a highly directional outdoor antenna. Poor color or no sound • Check the antenna/cable connections. Connecting your TV Cannot receive above channel 13 • Make sure the TV/CABLE switch is set properly...

Owners Manual
Page 70
... All Larger Television Models Connecting your TV Using the Remote Control Setting up your rights under this manual and checking the "Troubleshooting" section, you find that service is needed: (1) To find the nearest TACP/THI Authorized Service Station: For televisions purchased in the United States, except Hawaii, visit TACP's web site at no cost to you. Owner's Manual and Product Registration Card Read this owner's manual thoroughly before operating this warranty...
... All Larger Television Models Connecting your TV Using the Remote Control Setting up your rights under this manual and checking the "Troubleshooting" section, you find that service is needed: (1) To find the nearest TACP/THI Authorized Service Station: For televisions purchased in the United States, except Hawaii, visit TACP's web site at no cost to you. Owner's Manual and Product Registration Card Read this owner's manual thoroughly before operating this warranty...

Owners Manual
Page 71
Introduction Connecting your TV Using the Remote Control Setting up your TV Limited Canada Warranty for 27'' FST PURE® and All Larger Television Models Toshiba of original retail purchase. AND USED IN CANADA ARE NOT COVERED BY THESE WARRANTIES. DURING THIS PERIOD, TCL WILL, AT TCL'S OPTION, REPAIR OR REPLACE A DEFECTIVE PART WITH A NEW OR REFURBISHED PART WITHOUT CHARGE TO YOU FOR PARTS OR LABOR. Limited Two...
Introduction Connecting your TV Using the Remote Control Setting up your TV Limited Canada Warranty for 27'' FST PURE® and All Larger Television Models Toshiba of original retail purchase. AND USED IN CANADA ARE NOT COVERED BY THESE WARRANTIES. DURING THIS PERIOD, TCL WILL, AT TCL'S OPTION, REPAIR OR REPLACE A DEFECTIVE PART WITH A NEW OR REFURBISHED PART WITHOUT CHARGE TO YOU FOR PARTS OR LABOR. Limited Two...
Owners Manual
Page 75
... Automatic programming 28 TV/CABLE selection 28 Cinema mode 43 Clock, setting 61 Closed caption 59 Color temperature 57 Component video cables 8 Convergence adjustment 35 D Demonstration mode 67 Display format 57 DNR (Digital Noise Reduction 56 Double-Window ("POP") feature 44 Double-Window, size adjustment 45 DTV receiver connection 12 DVD connection 10, 11 DVI/HDCP connection 14 F G I FAV yz buttons 38 FAVORITE button 47 Favorite channels 37 FOCUS feature 63 Front of the TV 7 Front panel lock 53 Game timer 53 INPUT button...
... Automatic programming 28 TV/CABLE selection 28 Cinema mode 43 Clock, setting 61 Closed caption 59 Color temperature 57 Component video cables 8 Convergence adjustment 35 D Demonstration mode 67 Display format 57 DNR (Digital Noise Reduction 56 Double-Window ("POP") feature 44 Double-Window, size adjustment 45 DTV receiver connection 12 DVD connection 10, 11 DVI/HDCP connection 14 F G I FAV yz buttons 38 FAVORITE button 47 Favorite channels 37 FOCUS feature 63 Front of the TV 7 Front panel lock 53 Game timer 53 INPUT button...


