
Resource Guide for Model Series L4300U TV's
Page 1
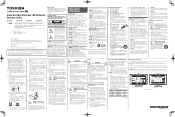
... accidentally touch overhead power lines. This will help maintain reliable operation of the TV. 30) Never allow removal of the pedestal stand. 3) Once you decide to wall mount this apparatus during lightning activity: a) an antenna system; Integrated High Definition LED Television Resource Guide 32L4300U 39L4300U 50L4300U 58L4300U NOTE Keep this Resource Guide in a convenient place to access important information about this Television. This document will...
... accidentally touch overhead power lines. This will help maintain reliable operation of the TV. 30) Never allow removal of the pedestal stand. 3) Once you decide to wall mount this apparatus during lightning activity: a) an antenna system; Integrated High Definition LED Television Resource Guide 32L4300U 39L4300U 50L4300U 58L4300U NOTE Keep this Resource Guide in a convenient place to access important information about this Television. This document will...
Resource Guide for Model Series L4300U TV's
Page 2
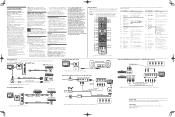
... Channel Number Directly tunes channels. Trademark Information • ColorStream is a registered trademark of the TV glows green. 2 INPUT button Selects the video input source. 3 SLEEP button Accesses the sleep timer. 4 TV button 5 Cable/Satellite button Sets the remote control mode to which can radiate radio frequency energy and, if not installed and used for TV, Cable/Sat, BD/DVD, DVR/VCR, Aux devices 31 PIC SIZE button Cycles through programmed channels. 16 MUTE button Reduces or turns off the sound. 17 MEDIA SHARE button Accesses...
... Channel Number Directly tunes channels. Trademark Information • ColorStream is a registered trademark of the TV glows green. 2 INPUT button Selects the video input source. 3 SLEEP button Accesses the sleep timer. 4 TV button 5 Cable/Satellite button Sets the remote control mode to which can radiate radio frequency energy and, if not installed and used for TV, Cable/Sat, BD/DVD, DVR/VCR, Aux devices 31 PIC SIZE button Cycles through programmed channels. 16 MUTE button Reduces or turns off the sound. 17 MEDIA SHARE button Accesses...
User's Guide for Model Series L4300U and L7300U TV
Page 3
... the TV does not operate normally, take the following precautions: • ALWAYS turn off the TV and unplug the power cord to qualified service personnel. See "To Display your new LED TV. Install in accordance with any way, such as radiators, heat registers, stoves, or other . NO USER-SERVICEABLE PARTS INSIDE. Important Safety Instructions 1) Read these instructions. 2) Keep these instructions. 3) Heed all warnings. 4) Follow...
... the TV does not operate normally, take the following precautions: • ALWAYS turn off the TV and unplug the power cord to qualified service personnel. See "To Display your new LED TV. Install in accordance with any way, such as radiators, heat registers, stoves, or other . NO USER-SERVICEABLE PARTS INSIDE. Important Safety Instructions 1) Read these instructions. 2) Keep these instructions. 3) Heed all warnings. 4) Follow...
User's Guide for Model Series L4300U and L7300U TV
Page 5
...power cord, and never place the TV where the power cord is subject to an antenna or phone system. Gently wipe the display panel surface (the TV screen) using the on or off. A hard cloth may damage the surface. When the TV is turned off switch, it is being turned on /off using... overhead power lines or other electrical circuits. • Never attempt to install any home theater component connected to wear or abuse. 31) Never overload wall outlets and extension cords. 32) Always operate this product can accidentally touch overhead power lines. Never strike the screen with ...
...power cord, and never place the TV where the power cord is subject to an antenna or phone system. Gently wipe the display panel surface (the TV screen) using the on or off. A hard cloth may damage the surface. When the TV is turned off switch, it is being turned on /off using... overhead power lines or other electrical circuits. • Never attempt to install any home theater component connected to wear or abuse. 31) Never overload wall outlets and extension cords. 32) Always operate this product can accidentally touch overhead power lines. Never strike the screen with ...
User's Guide for Model Series L4300U and L7300U TV
Page 6
... Display your wall bracket. Note: Extreme care should always be used when attaching the pedestal stand to avoid damage to the LCD panel. 2) Place the TV on a flat, cushioned surface such as described in safe operating condition. Note: Extreme care should always be used when removing the pedestal stand to avoid damage to the LCD panel. 2) Remove the screws shown in the below . 7) VESA Mounting Pattern TV Size Hole Pattern (HxV) Screw Size...
... Display your wall bracket. Note: Extreme care should always be used when attaching the pedestal stand to avoid damage to the LCD panel. 2) Place the TV on a flat, cushioned surface such as described in safe operating condition. Note: Extreme care should always be used when removing the pedestal stand to avoid damage to the LCD panel. 2) Remove the screws shown in the below . 7) VESA Mounting Pattern TV Size Hole Pattern (HxV) Screw Size...

User's Guide for Model Series L4300U and L7300U TV
Page 13
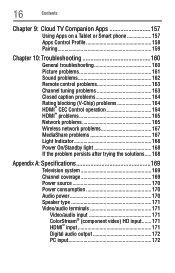
Contents 13 Displaying ratings 79 Unlocking programs 79 Locking specific channels 79 Locking video inputs 80 Setting a time limit for games 80 Locking the control panel 81 Using HDMI™ CEC Control 81 Controlling HDMI™ CEC playback devices 82 HDMI™ CEC Control input source selection........... 83 Adjusting the amplifier's audio 83 Other HDMI™ CEC Control functions 84 Viewing the HDMI™ signal information 84 Using your computer with the TV 85 Adjusting the image 85 Setting the computer audio 86 Setting the timer to turn on...
Contents 13 Displaying ratings 79 Unlocking programs 79 Locking specific channels 79 Locking video inputs 80 Setting a time limit for games 80 Locking the control panel 81 Using HDMI™ CEC Control 81 Controlling HDMI™ CEC playback devices 82 HDMI™ CEC Control input source selection........... 83 Adjusting the amplifier's audio 83 Other HDMI™ CEC Control functions 84 Viewing the HDMI™ signal information 84 Using your computer with the TV 85 Adjusting the image 85 Setting the computer audio 86 Setting the timer to turn on...
User's Guide for Model Series L4300U and L7300U TV
Page 16
...161 Sound problems 162 Remote control problems 163 Channel tuning problems 163 Closed caption problems 164 Rating blocking (V-Chip) problems 164 HDMI™ CEC Control operation 164 HDMI™ problems 165 Network problems 165 Wireless network problems 167 MediaShare problems 167 Light Indicator 168 Power On/Standby light 168 If the problem persists after trying the solutions..... 168 Appendix A: Specifications 169 Television system 169 Channel coverage 169 Power source 170 Power consumption 170 Audio power 170 Speaker type 171 Video/audio terminals 171 Video/audio input...
...161 Sound problems 162 Remote control problems 163 Channel tuning problems 163 Closed caption problems 164 Rating blocking (V-Chip) problems 164 HDMI™ CEC Control operation 164 HDMI™ problems 165 Network problems 165 Wireless network problems 167 MediaShare problems 167 Light Indicator 168 Power On/Standby light 168 If the problem persists after trying the solutions..... 168 Appendix A: Specifications 169 Television system 169 Channel coverage 169 Power source 170 Power consumption 170 Audio power 170 Speaker type 171 Video/audio terminals 171 Video/audio input...
User's Guide for Model Series L4300U and L7300U TV
Page 38
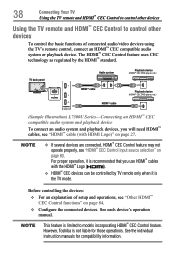
... operations, see "HDMI™ CEC Control input source selection" on page 27. Before controlling the devices: ❖❖ For an explanation of connected audio/video devices using the TV's remote control, connect an HDMI™ CEC compatible audio system or playback device. See the individual instruction manuals for those operations. TV back panel HDMI IN 4 Audio system HDMITM cable HDMI OUT HDMI IN Playback device (HDMI™ CEC DVD player, etc.) HDMI OUT Playback device (HDMI™ CEC DVD player, etc.) HDMITM cable HDMI...
... operations, see "HDMI™ CEC Control input source selection" on page 27. Before controlling the devices: ❖❖ For an explanation of connected audio/video devices using the TV's remote control, connect an HDMI™ CEC compatible audio system or playback device. See the individual instruction manuals for those operations. TV back panel HDMI IN 4 Audio system HDMITM cable HDMI OUT HDMI IN Playback device (HDMI™ CEC DVD player, etc.) HDMI OUT Playback device (HDMI™ CEC DVD player, etc.) HDMITM cable HDMI...

User's Guide for Model Series L4300U and L7300U TV
Page 51
... Cable/Sat, BD/ DVD, Aux devices 31 PIC SIZE button Cycles through programmed channels. 16 MUTE button Reduces or turns off the sound. 17 MEDIA SHARE Accesses the MediaShare button Service. 18 SEARCH button Accesses the SearchAll function. 19 HOME button Accesses the Cloud TV Portal Pages. 20 INTERNET button Launches the web browser on the TV front glows green. 2 INPUT button Selects the video input source. 3 SLEEP button Accesses the sleep timer. 4 TV button 5 Cable/Satellite button 6 BD/DVD button 7 DVR/VCR button 8 Audio button Sets the remote control mode to control...
... Cable/Sat, BD/ DVD, Aux devices 31 PIC SIZE button Cycles through programmed channels. 16 MUTE button Reduces or turns off the sound. 17 MEDIA SHARE Accesses the MediaShare button Service. 18 SEARCH button Accesses the SearchAll function. 19 HOME button Accesses the Cloud TV Portal Pages. 20 INTERNET button Launches the web browser on the TV front glows green. 2 INPUT button Selects the video input source. 3 SLEEP button Accesses the sleep timer. 4 TV button 5 Cable/Satellite button 6 BD/DVD button 7 DVR/VCR button 8 Audio button Sets the remote control mode to control...
User's Guide for Model Series L4300U and L7300U TV
Page 84
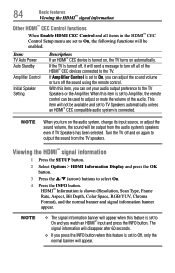
... > HDMI Information Display and press the OK button. 3 Press the p/q (arrow) buttons to the TV. NOTE v The signal information banner will be available and set to TV Speakers automatically unless an HDMI™ CEC compatible audio system is set your audio output preference to output the sound from the audio system's speakers even if TV Speakers has been selected. If Amplifier Control is shown (Resolution, Scan Type, Frame Rate, Aspect, Bit Depth, Color...
... > HDMI Information Display and press the OK button. 3 Press the p/q (arrow) buttons to the TV. NOTE v The signal information banner will be available and set to TV Speakers automatically unless an HDMI™ CEC compatible audio system is set your audio output preference to output the sound from the audio system's speakers even if TV Speakers has been selected. If Amplifier Control is shown (Resolution, Scan Type, Frame Rate, Aspect, Bit Depth, Color...

User's Guide for Model Series L4300U and L7300U TV
Page 87
... not operate the TV for 1 hour after a specific amount of time (maximum = 12 hours). To cancel the timer: 1 Press the SETUP button. 2 Select Timers > On Timer. 3 Press the OK button. 4 Press the p/q (arrow) buttons to select Enable On Timer and press the OK button. 5 Press the t/u (arrow) buttons to increase or decrease the time. Basic features Setting the sleep timer 87 Item: Description: Input Video input source Channel Channel to view Volume Volume level Time until Power On...
... not operate the TV for 1 hour after a specific amount of time (maximum = 12 hours). To cancel the timer: 1 Press the SETUP button. 2 Select Timers > On Timer. 3 Press the OK button. 4 Press the p/q (arrow) buttons to select Enable On Timer and press the OK button. 5 Press the t/u (arrow) buttons to increase or decrease the time. Basic features Setting the sleep timer 87 Item: Description: Input Video input source Channel Channel to view Volume Volume level Time until Power On...
User's Guide for Model Series L4300U and L7300U TV
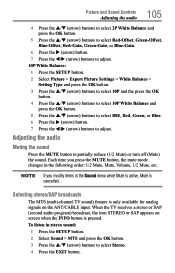
Page 105
... turn off (Mute) the sound. NOTE If you press the MUTE button, the mute mode changes in the following order: 1/2 Mute, Mute, Volume, 1/2 Mute, etc. To listen in the Sound menu while Mute is active, Mute is pressed. Selecting stereo/SAP broadcasts The MTS (multi-channel TV sound) feature is only available for analog signals on screen when the INFO button is cancelled. Adjusting the audio...
... turn off (Mute) the sound. NOTE If you press the MUTE button, the mute mode changes in the following order: 1/2 Mute, Mute, Volume, 1/2 Mute, etc. To listen in the Sound menu while Mute is active, Mute is pressed. Selecting stereo/SAP broadcasts The MTS (multi-channel TV sound) feature is only available for analog signals on screen when the INFO button is cancelled. Adjusting the audio...

User's Guide for Model Series L4300U and L7300U TV
Page 106
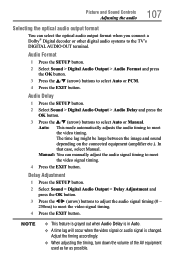
...) buttons to adjust the balance. 4 Press the EXIT button. 106 Picture and Sound Controls Adjusting the audio NOTE v You can typically leave the TV in Stereo mode because it outputs the type of the digital broadcast. 1 Press the SETUP button. 2 Select Sound > Primary Audio Language and press the OK button. 3 Press the p/q (arrow) buttons to select English, Français, or Español. 4 Press the EXIT button. Adjusting the audio...
...) buttons to adjust the balance. 4 Press the EXIT button. 106 Picture and Sound Controls Adjusting the audio NOTE v You can typically leave the TV in Stereo mode because it outputs the type of the digital broadcast. 1 Press the SETUP button. 2 Select Sound > Primary Audio Language and press the OK button. 3 Press the p/q (arrow) buttons to select English, Français, or Español. 4 Press the EXIT button. Adjusting the audio...
User's Guide for Model Series L4300U and L7300U TV
Page 107
... the video timing. Auto: This mode automatically adjusts the audio timing to meet the video signal timing. 4 Press the EXIT button. 107 Picture and Sound Controls Adjusting the audio Selecting the optical audio output format You can manually adjust the audio signal timing to the TV's DIGITAL AUDIO OUT terminal. Manual: You can select the optical audio output format when you connect a Dolby® Digital decoder or other digital audio systems to meet the video signal timing. 4 Press the EXIT button. Adjust the timing accordingly. ❖❖ When adjusting the timing, turn down...
... the video timing. Auto: This mode automatically adjusts the audio timing to meet the video signal timing. 4 Press the EXIT button. 107 Picture and Sound Controls Adjusting the audio Selecting the optical audio output format You can manually adjust the audio signal timing to the TV's DIGITAL AUDIO OUT terminal. Manual: You can select the optical audio output format when you connect a Dolby® Digital decoder or other digital audio systems to meet the video signal timing. 4 Press the EXIT button. Adjust the timing accordingly. ❖❖ When adjusting the timing, turn down...
User's Guide for Model Series L4300U and L7300U TV
Page 108
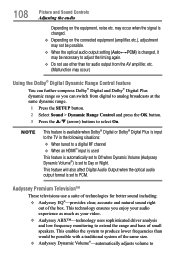
... technologies for audio output from digital to analog broadcasts at the same dynamic range. 1 Press the SETUP button. 2 Select Sound > Dynamic Range Control and press the OK button. 3 Press the p/q (arrow) buttons to Day or Night. 108 Picture and Sound Controls Adjusting the audio Depending on the connected equipment (amplifier, etc.), adjustment may not be possible. ❖❖ When the optical audio output setting (AutotPCM) is changed, it may occur) Using the Dolby...
... technologies for audio output from digital to analog broadcasts at the same dynamic range. 1 Press the SETUP button. 2 Select Sound > Dynamic Range Control and press the OK button. 3 Press the p/q (arrow) buttons to Day or Night. 108 Picture and Sound Controls Adjusting the audio Depending on the connected equipment (amplifier, etc.), adjustment may not be possible. ❖❖ When the optical audio output setting (AutotPCM) is changed, it may occur) Using the Dolby...

User's Guide for Model Series L4300U and L7300U TV
Page 109
... speakers. Audyssey ABX™ Audyssey ABX™ technology uses sophisticated driver analysis and low frequency monitoring to Off. ❖❖ This feature does not affect the audio signal output from the DIGITAL AUDIO OUT terminal. Using Audyssey EQ® for Wall Mounted or Table-top TVs This feature automatically keeps the volume at the perfect level for television mounted on a wall or located on a table-top. 1 Press the SETUP button. 2 Select Sound...
... speakers. Audyssey ABX™ Audyssey ABX™ technology uses sophisticated driver analysis and low frequency monitoring to Off. ❖❖ This feature does not affect the audio signal output from the DIGITAL AUDIO OUT terminal. Using Audyssey EQ® for Wall Mounted or Table-top TVs This feature automatically keeps the volume at the perfect level for television mounted on a wall or located on a table-top. 1 Press the SETUP button. 2 Select Sound...
User's Guide for Model Series L4300U and L7300U TV
Page 161
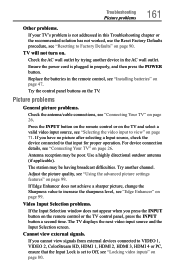
... another channel. Troubleshooting Picture problems 161 Other problems. If your TV's problem is not addressed in this Troubleshooting chapter or the recommended solution has not worked, use the Reset Factory Defaults procedure, see "Locking video inputs" on page 80. TV will not turn on the TV. Ensure the power cord is plugged in the AC wall outlet. Picture problems General picture problems. Check the antenna/cable connections, see "Selecting the video input to that the Input Lock is set to Off, see "Resetting...
... another channel. Troubleshooting Picture problems 161 Other problems. If your TV's problem is not addressed in this Troubleshooting chapter or the recommended solution has not worked, use the Reset Factory Defaults procedure, see "Locking video inputs" on page 80. TV will not turn on the TV. Ensure the power cord is plugged in the AC wall outlet. Picture problems General picture problems. Check the antenna/cable connections, see "Selecting the video input to that the Input Lock is set to Off, see "Resetting...
User's Guide for Model Series L4300U and L7300U TV
Page 167
... pressed, see "Wireless Setup" on page 114. Incorrect functionality may occur when using the computer's application software may be Off. Set the media sharing of the User Menu, see "MAC Address" on the media server, access may not play correctly. Refer to the media server instruction manual. Troubleshooting Wireless network problems 167 Wireless network problems Check that the router/AP (Access point) power is configured properly by performing the network connection test, see "Network Connection Test" on...
... pressed, see "Wireless Setup" on page 114. Incorrect functionality may occur when using the computer's application software may be Off. Set the media sharing of the User Menu, see "MAC Address" on the media server, access may not play correctly. Refer to the media server instruction manual. Troubleshooting Wireless network problems 167 Wireless network problems Check that the router/AP (Access point) power is configured properly by performing the network connection test, see "Network Connection Test" on...
User's Guide for Model Series L4300U and L7300U TV
Page 183
... labeling video inputs 69 locking specific channels 79 manual tuning 67 next programmed channel 70 skipping 67 skipping video inputs 68 specific channel 70 storing in memory 66 closed captions Analog CC mode 72 button 74 Digital CC settings 73 using 75 computer adjusting image 85 setting the audio 86 to the TV's HDMI™ 41 using with the TV 85 connecting a computer 40 audio system 35 cable TV 29 camcorder 29 computer to TV's PC IN 40 DVD player...
... labeling video inputs 69 locking specific channels 79 manual tuning 67 next programmed channel 70 skipping 67 skipping video inputs 68 specific channel 70 storing in memory 66 closed captions Analog CC mode 72 button 74 Digital CC settings 73 using 75 computer adjusting image 85 setting the audio 86 to the TV's HDMI™ 41 using with the TV 85 connecting a computer 40 audio system 35 cable TV 29 camcorder 29 computer to TV's PC IN 40 DVD player...
User's Guide for Model Series L4300U and L7300U TV
Page 185
... input 171 Digital audio output 172 ethernet 172 HDMI™ input 171 HDMI™ signal formats 176 mass (weight) 173 operating conditions 173 PC IN signal formats 175 PC input 172 power consumption 170 power source 170 remote, combination buttons 177 speaker type 171 supplied accessories 173 TV system 169 USB 172 video/audio terminals 171 wireless connection 172 support information show 90 T 185 Index time limit set for games 80 timer sleep timer 87 turn on TV 86 troubleshooting 160 channel tuning problems 163 closed caption problems 164 contact Toshiba 168 HDMI...
... input 171 Digital audio output 172 ethernet 172 HDMI™ input 171 HDMI™ signal formats 176 mass (weight) 173 operating conditions 173 PC IN signal formats 175 PC input 172 power consumption 170 power source 170 remote, combination buttons 177 speaker type 171 supplied accessories 173 TV system 169 USB 172 video/audio terminals 171 wireless connection 172 support information show 90 T 185 Index time limit set for games 80 timer sleep timer 87 turn on TV 86 troubleshooting 160 channel tuning problems 163 closed caption problems 164 contact Toshiba 168 HDMI...


