User Manual
Page 1
...www.tacp.toshiba.com/customersupport Model number: Serial number: TD/M VX1A00176200 Integrated High Definition LCD Television 46WX800U 55WX800U For an overview of your TV. Record these numbers whenever you communicate with your new TV, see page 12. Note: To display a High Definition picture, the ... Definition digital satellite program). For details, please contact your TV antenna installer, cable provider, or satellite provider. © 2010 TOSHIBA CORPORATION All Rights Reserved Owner's Record The model number and serial number are on the back and side of steps for...
...www.tacp.toshiba.com/customersupport Model number: Serial number: TD/M VX1A00176200 Integrated High Definition LCD Television 46WX800U 55WX800U For an overview of your TV. Record these numbers whenever you communicate with your new TV, see page 12. Note: To display a High Definition picture, the ... Definition digital satellite program). For details, please contact your TV antenna installer, cable provider, or satellite provider. © 2010 TOSHIBA CORPORATION All Rights Reserved Owner's Record The model number and serial number are on the back and side of steps for...
User Manual
Page 8
... STAR® User Information ENERGY STAR User Information Statement: the factory default settings of this TV is manufactured using an extremely high level of precision technology; Picture Settings, Auto Brightness Setting) may be used in the United States and Canada. • Netflix is... qualified TV. Environmental Protection Agency. Important notes about your LCD TV The following symptoms are technical limitations of Microsoft. therefore, Toshiba is a registered trademark of Audyssey Laboratories. • ® HDMI, the HDMI Logo, and High-Definition Multimedia Interface are...
... STAR® User Information ENERGY STAR User Information Statement: the factory default settings of this TV is manufactured using an extremely high level of precision technology; Picture Settings, Auto Brightness Setting) may be used in the United States and Canada. • Netflix is... qualified TV. Environmental Protection Agency. Important notes about your LCD TV The following symptoms are technical limitations of Microsoft. therefore, Toshiba is a registered trademark of Audyssey Laboratories. • ® HDMI, the HDMI Logo, and High-Definition Multimedia Interface are...
User Manual
Page 10
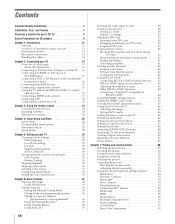
...selection 43 Adjusting the amplifier's audio 44 Other REGZA-LINK® functions 44 Connecting a Toshiba PC compatible to REGZA-LINK 44 Using the HDMI® settings feature 45 Setting the HDMI® audio mode 45 Viewing the HDMI® signal information 45 Using your ...Chapter 7: Picture and sound controls 50 Selecting the picture size 50 Scrolling the picture 52 Using the Auto Aspect feature 52 Using the 4:3 Stretch 52 Freezing the picture 52 Adjusting the picture 53 Selecting the picture mode 53 Adjusting the picture quality 53 Using the advanced picture settings features 54...
...selection 43 Adjusting the amplifier's audio 44 Other REGZA-LINK® functions 44 Connecting a Toshiba PC compatible to REGZA-LINK 44 Using the HDMI® settings feature 45 Setting the HDMI® audio mode 45 Viewing the HDMI® signal information 45 Using your ...Chapter 7: Picture and sound controls 50 Selecting the picture size 50 Scrolling the picture 52 Using the Auto Aspect feature 52 Using the 4:3 Stretch 52 Freezing the picture 52 Adjusting the picture 53 Selecting the picture mode 53 Adjusting the picture quality 53 Using the advanced picture settings features 54...
User Manual
Page 11
...TV Widgets 70 Setting up the Media ...92 Resetting to the factory default 57 Viewing the TV's brightness 57 Locking the picture settings 57 Adjusting the audio 58 Muting the sound 58 Selecting stereo/SAP broadcasts 58 ...59 Using surround sound 59 Chapter 8: Advanced features 60 Using your home network 60 Setting up the Network 61 Wireless Setup 61 Advanced Network Setup 63 Network Connection Test 64 ...67 YouTube 67 Yahoo! Color temperature 56 Resetting to the factory default 56 Expert Picture Settings 56 Test Pattern 56 RGB Filter 56 White Balance 56 Resetting to the factory ...
...TV Widgets 70 Setting up the Media ...92 Resetting to the factory default 57 Viewing the TV's brightness 57 Locking the picture settings 57 Adjusting the audio 58 Muting the sound 58 Selecting stereo/SAP broadcasts 58 ...59 Using surround sound 59 Chapter 8: Advanced features 60 Using your home network 60 Setting up the Network 61 Wireless Setup 61 Advanced Network Setup 63 Network Connection Test 64 ...67 YouTube 67 Yahoo! Color temperature 56 Resetting to the factory default 56 Expert Picture Settings 56 Test Pattern 56 RGB Filter 56 White Balance 56 Resetting to the factory ...
User Manual
Page 12
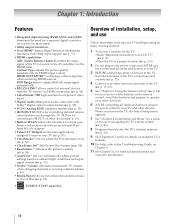
... anti-blur feature (-p. 54). •Resolution+™ enhances the picture's quality (- p. 13). 4 Connect your TV (- Chapter 1: Introduction Features •Integrated digital tuning (8VSB ATSC and QAM) eliminates the need for a separate digital converter set up your TV and begin using the TV's features. 10 For... input support (- HDMI INSTAPORT™ technology reduces lag time when switching HDMI sources. When you automatically adjust picture settings based on your other electronic device(s) to operate your TV and other device(s). 6 AFTER connecting all cables and devices to...
... anti-blur feature (-p. 54). •Resolution+™ enhances the picture's quality (- p. 13). 4 Connect your TV (- Chapter 1: Introduction Features •Integrated digital tuning (8VSB ATSC and QAM) eliminates the need for a separate digital converter set up your TV and begin using the TV's features. 10 For... input support (- HDMI INSTAPORT™ technology reduces lag time when switching HDMI sources. When you automatically adjust picture settings based on your other electronic device(s) to operate your TV and other device(s). 6 AFTER connecting all cables and devices to...
User Manual
Page 25
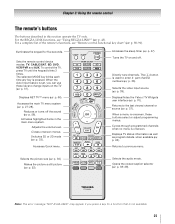
...Returns to enter 2- Chapter 3: Using the remote control The remote's buttons The buttons described in the main menu system. p. 38). Makes the picture a still picture (- p. 52). Note: The error message "NOT AVAILABLE" may appear if you can use these buttons select or adjust programming menus. For ... 70). Returns to change inputs on and off the sound (- For a complete list of the remote's functions, see "Using REGZA-LINK®" (- Sets the remote control device modes: TV, CABLE/SAT, BD, DVD, VCR/PVR and AUX. Accesses Quick menu. When a menu is used to the...
...Returns to enter 2- Chapter 3: Using the remote control The remote's buttons The buttons described in the main menu system. p. 38). Makes the picture a still picture (- p. 52). Note: The error message "NOT AVAILABLE" may appear if you can use these buttons select or adjust programming menus. For ... 70). Returns to change inputs on and off the sound (- For a complete list of the remote's functions, see "Using REGZA-LINK®" (- Sets the remote control device modes: TV, CABLE/SAT, BD, DVD, VCR/PVR and AUX. Accesses Quick menu. When a menu is used to the...

User Manual
Page 28
... press Y on the current mode. Icon Item Page PICTURE Picture Mode 53 Reset 53 Backlight 53 Contrast 53 Brightness 53 SOUND Color 53 Tint 53 Sharpness 53 Advanced Picture Settings 54 Expert Picture Settings 56 Control Visualization 57 TheaterLock 57 MTS 58 Balance 58... Advanced Sound Settings 59 Dolby Volume 59 Dynamic Range Control 59 APPLICATIONS Widgets NET TV...
... press Y on the current mode. Icon Item Page PICTURE Picture Mode 53 Reset 53 Backlight 53 Contrast 53 Brightness 53 SOUND Color 53 Tint 53 Sharpness 53 Advanced Picture Settings 54 Expert Picture Settings 56 Control Visualization 57 TheaterLock 57 MTS 58 Balance 58... Advanced Sound Settings 59 Dolby Volume 59 Dynamic Range Control 59 APPLICATIONS Widgets NET TV...

User Manual
Page 29
Press C or c to select a menu icon (PICTURE, SOUND, APPLICATIONS, PREFERENCES, SETUP) Press B or b to select Smart Sound Equalizer. OK 2 A confirmation message appears. p. 26). Press . OK 3 Select an option: • Time Zone • Daylight Saving Time 4 Press C or c to set your TV How to navigate the menu: Y ...or Wall. 4 If you to specify the correct time zone for your preferred language. Press . Press C or c to select Home. Local Time Setting This setting allows you want when you can select Home or Store for menus and messages 1 Y > SETUP > Menu Language. 2 Press C or c ...
Press C or c to select a menu icon (PICTURE, SOUND, APPLICATIONS, PREFERENCES, SETUP) Press B or b to select Smart Sound Equalizer. OK 2 A confirmation message appears. p. 26). Press . OK 3 Select an option: • Time Zone • Daylight Saving Time 4 Press C or c to set your TV How to navigate the menu: Y ...or Wall. 4 If you to specify the correct time zone for your preferred language. Press . Press C or c to select Home. Local Time Setting This setting allows you want when you can select Home or Store for menus and messages 1 Y > SETUP > Menu Language. 2 Press C or c ...
User Manual
Page 33
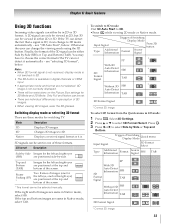
...digital channels or HDMI input. • If appropriate mode and format are not selected, 3D image is not correctly displayed. • There will be set. • There are positioned at the top and bottom of the screen. * This format cannot be selected manually. Trigger of Switching Display Mode ...3D 3D 3D D3 * D3 3D D 3 3D 3D 33 see "3D Auto Start", below . Only Full and Native can be restrictions on the Picture Size settings for the right eye) are positioned side-by-side. Switching display mode or selecting 3D format There are three modes for the left images are...
...digital channels or HDMI input. • If appropriate mode and format are not selected, 3D image is not correctly displayed. • There will be set. • There are positioned at the top and bottom of the screen. * This format cannot be selected manually. Trigger of Switching Display Mode ...3D 3D 3D D3 * D3 3D D 3 3D 3D 33 see "3D Auto Start", below . Only Full and Native can be restrictions on the Picture Size settings for the right eye) are positioned side-by-side. Switching display mode or selecting 3D format There are three modes for the left images are...

User Manual
Page 43
...YELLOW, BLUE Controls various operations Note: These functions depend on the connected devices. • The REGZA-LINK Player Control item is set the MODE SELECT switch on the remote control to Off. - Contents Accesses the contents list when you can control the connected REGZA-... allows you want to control and press . H B b C c Rewinds/reverses. A Pauses the picture during play or record mode. O Closes the menu. OK 3 Press B or b to select the item you to control Toshiba REGZA-LINK® compatible devices from the TV remote control via HDMI connection.
...YELLOW, BLUE Controls various operations Note: These functions depend on the connected devices. • The REGZA-LINK Player Control item is set the MODE SELECT switch on the remote control to Off. - Contents Accesses the contents list when you can control the connected REGZA-... allows you want to control and press . H B b C c Rewinds/reverses. A Pauses the picture during play or record mode. O Closes the menu. OK 3 Press B or b to select the item you to control Toshiba REGZA-LINK® compatible devices from the TV remote control via HDMI connection.

User Manual
Page 44
...TV will send a Auto Standby message to turn off and on again to a Toshiba PC compatible with REGZALINK®. Turn the TV off all items in the REGZA-LINK Setup menu are set the MODE SELECT switch on the remote control to adjust or mute the volume of ...: On/Off •Speaker Preference: TV Speakers/Amplifier Connecting a Toshiba PC compatible to select On. OK 2 Press B or b to highlight Enable REGZA-LINK. 3 Press C or c to REGZA-LINK® This feature automatically sets suitable widescreen formats and picture preferences when the TV is selected for the Amplifier input source.
...TV will send a Auto Standby message to turn off and on again to a Toshiba PC compatible with REGZALINK®. Turn the TV off all items in the REGZA-LINK Setup menu are set the MODE SELECT switch on the remote control to adjust or mute the volume of ...: On/Off •Speaker Preference: TV Speakers/Amplifier Connecting a Toshiba PC compatible to select On. OK 2 Press B or b to highlight Enable REGZA-LINK. 3 Press C or c to REGZA-LINK® This feature automatically sets suitable widescreen formats and picture preferences when the TV is selected for the Amplifier input source.
User Manual
Page 45
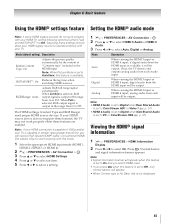
... Enable Content Type: On Adjusts the picture quality automatically by the content of refresh rates greater than 60 Hz, you press when this is set to Off, only normal banner will need proper HDMI source devices. When Full is selected, RGB output signal is output in the range from ...the HDMI input will be output. Conventional HDMI/ DVI cables may not work properly when these settings should allow your HDMI legacy source to select Auto, Digital or Analog. Digital When viewing the HDMI 3 input or HDMI 4 input, digital audio from 0...
... Enable Content Type: On Adjusts the picture quality automatically by the content of refresh rates greater than 60 Hz, you press when this is set to Off, only normal banner will need proper HDMI source devices. When Full is selected, RGB output signal is output in the range from ...the HDMI input will be output. Conventional HDMI/ DVI cables may not work properly when these settings should allow your HDMI legacy source to select Auto, Digital or Analog. Digital When viewing the HDMI 3 input or HDMI 4 input, digital audio from 0...

User Manual
Page 46
... on timer to turn on the screen. Off: Turns off . Channel Channel to reduce Clock Phase noise and sharpen the picture. To reset PC Settings: Select Reset. "LED indications" on by interference, readjust the Clock Phase and Sampling Clock. 1 Select PC input mode (- Note:...;10 from your preferences: Item Description On Timer LED A state of the picture are hidden, readjust the Horizontal Position and Vertical Position. Note: If the Enable On Timer is set the timer: 1 Y > APPLICATIONS > On Timer > . OK 2 Set these options to select PC. minimum= 00:10, maximum= 12:00 &#...
... on timer to turn on the screen. Off: Turns off . Channel Channel to reduce Clock Phase noise and sharpen the picture. To reset PC Settings: Select Reset. "LED indications" on by interference, readjust the Clock Phase and Sampling Clock. 1 Select PC input mode (- Note:...;10 from your preferences: Item Description On Timer LED A state of the picture are hidden, readjust the Horizontal Position and Vertical Position. Note: If the Enable On Timer is set the timer: 1 Y > APPLICATIONS > On Timer > . OK 2 Set these options to select PC. minimum= 00:10, maximum= 12:00 &#...
User Manual
Page 50
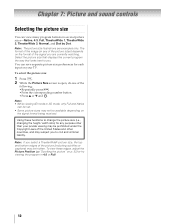
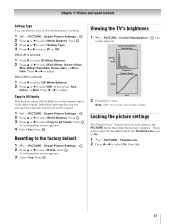
... of the following: • Repeatedly press I . 2 While the Picture Size screen is open, do one of the picture (including subtitles or captions) may be hidden. You can be set. • Some picture sizes may be available depending on p. 52) or try viewing the program in several picture sizes-Native, 4:3, Full, TheaterWide 1, TheaterWide 2, TheaterWide 3, Normal, and...
... of the following: • Repeatedly press I . 2 While the Picture Size screen is open, do one of the picture (including subtitles or captions) may be hidden. You can be set. • Some picture sizes may be available depending on p. 52) or try viewing the program in several picture sizes-Native, 4:3, Full, TheaterWide 1, TheaterWide 2, TheaterWide 3, Normal, and...
User Manual
Page 52
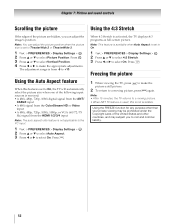
... or Video input •A 480i, 480p, 720p, 1080i, 1080p, or VGA (60/72/75 Hz) signal from -5 to TheaterWide 2 or TheaterWide 3. 1 Y > PREFERENCES > Display Settings > . Press O. Freezing the picture 1 When viewing the TV, press B to make the appropriate adjustments. Press O. Using the FREEZE function for any purpose other countries, and may be prohibited...
... or Video input •A 480i, 480p, 720p, 1080i, 1080p, or VGA (60/72/75 Hz) signal from -5 to TheaterWide 2 or TheaterWide 3. 1 Y > PREFERENCES > Display Settings > . Press O. Freezing the picture 1 When viewing the TV, press B to make the appropriate adjustments. Press O. Using the FREEZE function for any purpose other countries, and may be prohibited...
User Manual
Page 53
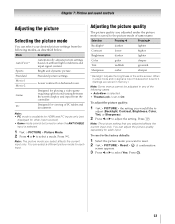
... or Sharpness). 2 Press C or c to reset. 2 Y > PICTURE > Reset > OK . Standard Standard picture settings. Note: • PC mode is set to select a mode. OK 53 You can adjust the picture quality separately for playing a video game requiring split-second timing between the screen...8226; TheaterLock is available for HDMI and PC inputs only (not displayed for each input. Note: The picture setting that you adjusted under the picture mode is selected. 1 Y > PICTURE > Picture Mode. 2 Press C or c to On. Press O. Selection Pressing C Pressing c Backlight* darker lighter...
... or Sharpness). 2 Press C or c to reset. 2 Y > PICTURE > Reset > OK . Standard Standard picture settings. Note: • PC mode is set to select a mode. OK 53 You can adjust the picture quality separately for playing a video game requiring split-second timing between the screen...8226; TheaterLock is available for HDMI and PC inputs only (not displayed for each input. Note: The picture setting that you adjusted under the picture mode is selected. 1 Y > PICTURE > Picture Mode. 2 Press C or c to On. Press O. Selection Pressing C Pressing c Backlight* darker lighter...

User Manual
Page 54
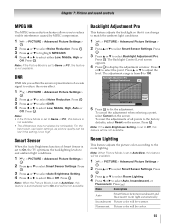
...or c to highlight Level. Dynamic Contrast Dynamic Contrast detects changes in picture quality that affect the appearance of darkness. 1 Y > PICTURE > Advanced Picture Settings > . Note: When the Picture Mode is set Resolution+: 1 Y > PICTURE > Advanced Picture Settings > . ClearFrame 240™ feature The ClearFrame 240 Hz anti-blur ...or Off. The adjustment range is from 60 frames per second to adjust the level. To adjust the static gamma settings: 1 Y > PICTURE > Advanced Picture Settings > . Press O. OK 2 Press B or b to select DynaLight. 3 Press C or c to select Resolution...
...or c to highlight Level. Dynamic Contrast Dynamic Contrast detects changes in picture quality that affect the appearance of darkness. 1 Y > PICTURE > Advanced Picture Settings > . Note: When the Picture Mode is set Resolution+: 1 Y > PICTURE > Advanced Picture Settings > . ClearFrame 240™ feature The ClearFrame 240 Hz anti-blur ...or Off. The adjustment range is from 60 frames per second to adjust the level. To adjust the static gamma settings: 1 Y > PICTURE > Advanced Picture Settings > . Press O. OK 2 Press B or b to select DynaLight. 3 Press C or c to select Resolution...
User Manual
Page 55
... C or c to 100. To reset the adjustments of all points to select Smart Sensor Settings. OK Note: If the Auto Brightness Setting is set to match the ambient light conditions. 1 Y > PICTURE > Advanced Picture Settings > . OK 2 Press B or b to the factory defaults, select Reset on the ... room lighting. For the best result, use lower settings, as picture quality can change to Game or PC, this feature will be available. 1 Y > PICTURE > Advanced Picture Settings > . Press . Room Lighting This feature adjusts the picture color according to select either Low, Middle, High or...
... C or c to 100. To reset the adjustments of all points to select Smart Sensor Settings. OK Note: If the Auto Brightness Setting is set to match the ambient light conditions. 1 Y > PICTURE > Advanced Picture Settings > . OK 2 Press B or b to the factory defaults, select Reset on the ... room lighting. For the best result, use lower settings, as picture quality can change to Game or PC, this feature will be available. 1 Y > PICTURE > Advanced Picture Settings > . Press . Room Lighting This feature adjusts the picture color according to select either Low, Middle, High or...
User Manual
Page 56
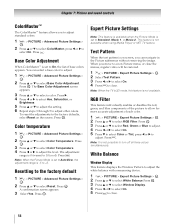
...OK 2 Press B or b to select Reset. Resetting to allow for more accurate adjustment of each color. 1 Y > PICTURE > Expert Picture Settings > . RGB Filter This feature individually enables or disables the red, green, and blue components of base colors appears. You can navigate ... Color Temperature. 4 Press C or c to select Base Color Adjustment. OK Expert Picture Settings Note: This feature is available when the Picture Mode is -5 to On, the list of the picture to the factory default 1 Y > PICTURE > Advanced Picture Settings > . OK 3 Press B or b to select Window Display. 4 Press C...
...OK 2 Press B or b to select Reset. Resetting to allow for more accurate adjustment of each color. 1 Y > PICTURE > Expert Picture Settings > . RGB Filter This feature individually enables or disables the red, green, and blue components of base colors appears. You can navigate ... Color Temperature. 4 Press C or c to select Base Color Adjustment. OK Expert Picture Settings Note: This feature is available when the Picture Mode is -5 to On, the list of the picture to the factory default 1 Y > PICTURE > Advanced Picture Settings > . OK 3 Press B or b to select Window Display. 4 Press C...
User Manual
Page 57
... 3 Press B or b to select Copy to all other inputs. OK Resetting to select White Balance. Press . These items cannot be copied. 1 Y > PICTURE > Expert Picture Settings > . OK 2 Press B or b to the factory default 1 Y > PICTURE > Expert Picture Settings > . Press . Press . The screen appears. When 2P is selected: 1 Press b to select 10P White Balance. 2 Press B or b to select IRE...
... 3 Press B or b to select Copy to all other inputs. OK Resetting to select White Balance. Press . These items cannot be copied. 1 Y > PICTURE > Expert Picture Settings > . OK 2 Press B or b to the factory default 1 Y > PICTURE > Expert Picture Settings > . Press . Press . The screen appears. When 2P is selected: 1 Press b to select 10P White Balance. 2 Press B or b to select IRE...


