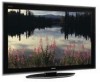
Owner's Manual - English
Page 3
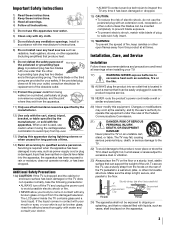
...other . When a cart is dropped and the cabinet or enclosure surface has been damaged or the TV does not operate normally, take the following precautions: • ALWAYS turn off the TV and unplug the power cord to avoid possible electric shock or fire. • NEVER allow your ...Safety Instructions 1) Read these instructions. 2) Keep these recommendations and precautions and heed all warnings when installing your TV: 17) WARNING: NEVER expose batteries to the floor. The LCD panel inside a wall or similar enclosed area. 20) Never modify this apparatus during lightning storms or when ...
...other . When a cart is dropped and the cabinet or enclosure surface has been damaged or the TV does not operate normally, take the following precautions: • ALWAYS turn off the TV and unplug the power cord to avoid possible electric shock or fire. • NEVER allow your ...Safety Instructions 1) Read these instructions. 2) Keep these recommendations and precautions and heed all warnings when installing your TV: 17) WARNING: NEVER expose batteries to the floor. The LCD panel inside a wall or similar enclosed area. 20) Never modify this apparatus during lightning storms or when ...
Owner's Manual - English
Page 4
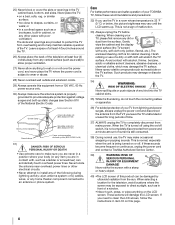
...or heavy object. 40) •The LCD screen of malfunction. 33) Always unplug the TV before cleaning. The enclosed cleaning cloth is not a sign of this equipment from overheating and to drapes, curtains, or walls; If you are never in a position where your TOSHIBA TV, follow the instructions in front of the... Never spray volatile compounds such as in item 33 on or roll over the power cord, and never place the TV where the power cord is being turned on the TV surface. This is normal, especially when the unit is subject to rest on this page. 4 Antenna lead-in ...
...or heavy object. 40) •The LCD screen of malfunction. 33) Always unplug the TV before cleaning. The enclosed cleaning cloth is not a sign of this equipment from overheating and to drapes, curtains, or walls; If you are never in a position where your TOSHIBA TV, follow the instructions in front of the... Never spray volatile compounds such as in item 33 on or roll over the power cord, and never place the TV where the power cord is being turned on the TV surface. This is normal, especially when the unit is subject to rest on this page. 4 Antenna lead-in ...

Owner's Manual - English
Page 9
...for installing, setting up your TV and begin using its many exciting features of your new Toshiba widescreen, integrated HD, LCD TV: •Integrated digital tuning (8VSB ATSC and QAM) eliminates the need for the TV: • Read "Important notes about your LCD TV" (- HDMI INSTAPORT™... Program channels into the TV's channel memory (- page 16). •HDMI capabilities Deep Color feature allows the HDMI source to accurately perform synchronization automatically. page 19). •FocaLight™ LED Backlight with 1080p input support (- Note: After you turn on the remote control,...
...for installing, setting up your TV and begin using its many exciting features of your new Toshiba widescreen, integrated HD, LCD TV: •Integrated digital tuning (8VSB ATSC and QAM) eliminates the need for the TV: • Read "Important notes about your LCD TV" (- HDMI INSTAPORT™... Program channels into the TV's channel memory (- page 16). •HDMI capabilities Deep Color feature allows the HDMI source to accurately perform synchronization automatically. page 19). •FocaLight™ LED Backlight with 1080p input support (- Note: After you turn on the remote control,...
Owner's Manual - English
Page 10
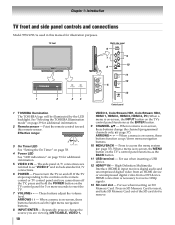
...buttons. 8 INPUT/ENTER - ARROWS I i - For use when inserting an SD Memory Card. See "Selecting the TOSHIBA Illumination mode" on page 73 for 5 or more seconds to reset the TV. 7 VOLUME+ - - Repeatedly press to change the channel (programmed channels only; - page 37). For use when... - When a menu is on the TV control panel for additional information. 5 VIDEO 2 IN - Press to turn off . HDMI connection is necessary to access the menu system (- Chapter 1: Introduction TV front and side panel controls and connections Model 55SV670U is used in SD Memory Card to ...
...buttons. 8 INPUT/ENTER - ARROWS I i - For use when inserting an SD Memory Card. See "Selecting the TOSHIBA Illumination mode" on page 73 for 5 or more seconds to reset the TV. 7 VOLUME+ - - Repeatedly press to change the channel (programmed channels only; - page 37). For use when... - When a menu is on the TV control panel for additional information. 5 VIDEO 2 IN - Press to turn off . HDMI connection is necessary to access the menu system (- Chapter 1: Introduction TV front and side panel controls and connections Model 55SV670U is used in SD Memory Card to ...
Owner's Manual - English
Page 13
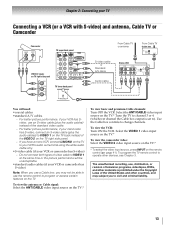
...) - Select the VIDEO 1 video input source on the TV.* To view the camcorder video: Select the VIDEO 2 video input source on the TV.* * To select the video input source, press INPUT on the TV.* To view basic and premium Cable channels: Turn OFF the VCR. The unauthorized recording, use, distribution, or...not connect both types of the United States and other devices, see Chapter 3. To view the VCR: Turn ON the VCR. Select the ANT/CABLE video input source on the TV.* Tune the TV to channel 3 or 4 (whichever channel the Cable box output is prohibited under the Copyright Laws of ...
...) - Select the VIDEO 1 video input source on the TV.* To view the camcorder video: Select the VIDEO 2 video input source on the TV.* * To select the video input source, press INPUT on the TV.* To view basic and premium Cable channels: Turn OFF the VCR. The unauthorized recording, use, distribution, or...not connect both types of the United States and other devices, see Chapter 3. To view the VCR: Turn ON the VCR. Select the ANT/CABLE video input source on the TV.* Tune the TV to channel 3 or 4 (whichever channel the Cable box output is prohibited under the Copyright Laws of ...
Owner's Manual - English
Page 14
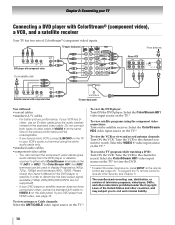
...Select the ColorStream HD1 video input source on the satellite receiver. Select the VIDEO 1 video input source on the TV.* To view the VCR or view and record antenna channels: Turn ON the VCR. page 41). You can be unacceptable. - Tune the VCR to the channel you to ... 720p, 1080p) and Interlaced (480i, 1080i). For better picture performance, if your VCR's audio out terminal using the component video connections: Turn on the TV.* To view satellite programs using the white audio cable only. •standard audio cables •component video cables - The ColorStream HD1 and ...
...Select the ColorStream HD1 video input source on the satellite receiver. Select the VIDEO 1 video input source on the TV.* To view the VCR or view and record antenna channels: Turn ON the VCR. page 41). You can be unacceptable. - Tune the VCR to the channel you to ... 720p, 1080p) and Interlaced (480i, 1080i). For better picture performance, if your VCR's audio out terminal using the component video connections: Turn on the TV.* To view satellite programs using the white audio cable only. •standard audio cables •component video cables - The ColorStream HD1 and ...
Owner's Manual - English
Page 15
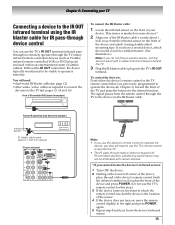
...infrared emitter) so it using the IR blaster cable for this step.) 3 If the device turns on, the point at which the remote control touched the device is marked on , move the remote control slightly to the TV (- If you have a second device, attach the second wand in a similar manner. ... the IR blaster cable's plug into the TV's IR OUT terminal. satisfactory performance may not be visible to operate the device; - page 12) •other audio/video cables as Toshiba infrared remote-controlled VCRs or DVD players) enclosed within an entertainment center or similar cabinet. Without the IR OUT ...
...infrared emitter) so it using the IR blaster cable for this step.) 3 If the device turns on, the point at which the remote control touched the device is marked on , move the remote control slightly to the TV (- If you have a second device, attach the second wand in a similar manner. ... the IR blaster cable's plug into the TV's IR OUT terminal. satisfactory performance may not be visible to operate the device; - page 12) •other audio/video cables as Toshiba infrared remote-controlled VCRs or DVD players) enclosed within an entertainment center or similar cabinet. Without the IR OUT ...
Owner's Manual - English
Page 16
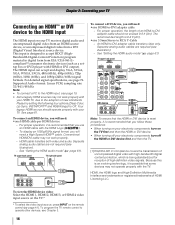
...1, HDMI 2, HDMI 3, or HDMI 4 video input source on the TV.* * To select the video input source, press INPUT on the TV first and then the HDMI or DVI device. • When turning off your electronic components, turn on the remote control (- Separate analog audio cables are not required ...IN DVI /HDCP OUT OUT L R Note: To ensure that you follow these procedures: • When turning on your electronic components, turn off the HDMI or DVI device first and then the TV. [1] EIA/CEA-861-D compliance covers the transmission of high-definition video signals. This input is recommended ...
...1, HDMI 2, HDMI 3, or HDMI 4 video input source on the TV.* * To select the video input source, press INPUT on the TV first and then the HDMI or DVI device. • When turning off your electronic components, turn on the remote control (- Separate analog audio cables are not required ...IN DVI /HDCP OUT OUT L R Note: To ensure that you follow these procedures: • When turning on your electronic components, turn off the HDMI or DVI device first and then the TV. [1] EIA/CEA-861-D compliance covers the transmission of high-definition video signals. This input is recommended ...
Owner's Manual - English
Page 18
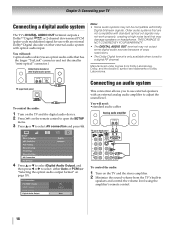
... to select either Auto or PCM (- You will need : •standard audio cables Analog audio amplifier LINE IN LR TV upper back panel To control the audio: 1 Turn on the remote control to open the SETUP menu. 3 Press B or b to select AV connection and press T. Older audio ...external Dolby® Digital decoder or other digital audio system LINE IN LR Optical Audio IN TV upper back panel To control the audio: 1 Turn on the TV and the digital audio device. 2 Press Y on the TV and the stereo amplifier. 2 Minimize the sound volume from Dolby Laboratories. Chapter 2: Connecting...
... to select either Auto or PCM (- You will need : •standard audio cables Analog audio amplifier LINE IN LR TV upper back panel To control the audio: 1 Turn on the remote control to open the SETUP menu. 3 Press B or b to select AV connection and press T. Older audio ...external Dolby® Digital decoder or other digital audio system LINE IN LR Optical Audio IN TV upper back panel To control the audio: 1 Turn on the TV and the digital audio device. 2 Press Y on the TV and the stereo amplifier. 2 Minimize the sound volume from Dolby Laboratories. Chapter 2: Connecting...
Owner's Manual - English
Page 21
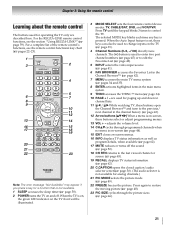
...adjusts the volume level. 14 CH Bb cycles through the picture sizes (- page 62). 17 MUTE reduces or turns off . Press again to control the TV. page 46). 21 page 59). Press TV until the keypad blinks 3 times to restore the moving picture (- page 42). 7 MENU accesses the main... For a complete list of the remote control's functions, see the section "Using REGZA-LINK®" (- page 58). 2 POWER turns the TV on -screen menus. 16 INFO displays TV status information as well as program details, when available (- pages 34 and 35). 8 ENTER activates highlighted items in the Channel Browser...
...adjusts the volume level. 14 CH Bb cycles through the picture sizes (- page 62). 17 MUTE reduces or turns off . Press again to control the TV. page 46). 21 page 59). Press TV until the keypad blinks 3 times to restore the moving picture (- page 42). 7 MENU accesses the main... For a complete list of the remote control's functions, see the section "Using REGZA-LINK®" (- page 58). 2 POWER turns the TV on -screen menus. 16 INFO displays TV status information as well as program details, when available (- pages 34 and 35). 8 ENTER activates highlighted items in the Channel Browser...

Owner's Manual - English
Page 36
...ol) for the ANT/CABLE input on the screen, press C or c to select Quick Setup and press T. 3 A confirmation message will appear on the TV. 6 If you select Antenna, the Channel Tuning Mode setup window will automatically restart after 120 seconds of menus and messages. 1 From the SETUP menu, ... window will appear. However if you do not finish the entire Initial Setup process, the Initial Setup window will appear every time you turn on or reset the TV, the Initial Setup window will appear. 1 In the Menu Language field, press C or c to select your preferred language. 2 Press B or b ...
...ol) for the ANT/CABLE input on the screen, press C or c to select Quick Setup and press T. 3 A confirmation message will appear on the TV. 6 If you select Antenna, the Channel Tuning Mode setup window will automatically restart after 120 seconds of menus and messages. 1 From the SETUP menu, ... window will appear. However if you do not finish the entire Initial Setup process, the Initial Setup window will appear every time you turn on or reset the TV, the Initial Setup window will appear. 1 In the Menu Language field, press C or c to select your preferred language. 2 Press B or b ...
Owner's Manual - English
Page 38
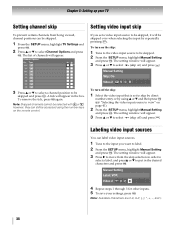
... and press T. If you want to be skipped, it will appear in the desired characters and press T. Manual Setting Skip: On Video 2 V C R To turn on the skip: 1 Tune to the video input source to veiw" on the remote control. The setting window will appear. 3 Press B or b to select... Channel Options and press T. Manual Setting Label: VCR Video 2 V C R 4 Repeat steps 1 through 3 for other inputs. 5 To save your TV Setting channel skip Setting video input skip To prevent certain channels from the skip selection in order to select a label, and pressB or b to select...
... and press T. If you want to be skipped, it will appear in the desired characters and press T. Manual Setting Skip: On Video 2 V C R To turn on the skip: 1 Tune to the video input source to veiw" on the remote control. The setting window will appear. 3 Press B or b to select... Channel Options and press T. Manual Setting Label: VCR Video 2 V C R 4 Repeat steps 1 through 3 for other inputs. 5 To save your TV Setting channel skip Setting video input skip To prevent certain channels from the skip selection in order to select a label, and pressB or b to select...
Owner's Manual - English
Page 39
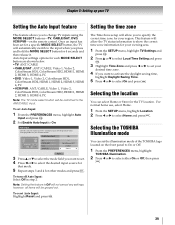
... feature when changing modes on the remote control. To turn off Auto Input: Select Off in step 2. Chapter 5: Setting up your TV Setting the Auto Input feature This feature allows you to change TV inputs using the MODE SELECT buttons-TV, CABLE/SAT, DVD, VCR/PVR-on your remote control.... Setting the time zone The Time Zone setup will automatically switch to On. Selecting the TOSHIBA Illumination mode You can select Home or Store ...
... feature when changing modes on the remote control. To turn off Auto Input: Select Off in step 2. Chapter 5: Setting up your TV Setting the Auto Input feature This feature allows you to change TV inputs using the MODE SELECT buttons-TV, CABLE/SAT, DVD, VCR/PVR-on your remote control.... Setting the time zone The Time Zone setup will automatically switch to On. Selecting the TOSHIBA Illumination mode You can select Home or Store ...
Owner's Manual - English
Page 40
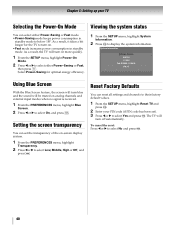
... C or c to select No and press T. 40 Setting the screen transparency You can select either Power-Saving or Fast, then press O. The TV will turn blue and the sound will turn on. •Fast mode increases power consumption in standby mode to select On, and press O. As a result, the...C or c to select either Power-Saving or Fast mode. •Power-Saving mode keeps power consumption in standby mode. Select Power-Saving for the TV to turn on analog channels and external input modes when no signal is received. 1 From the PREFERENCES menu, highlight Blue Screen. 2 Press C or c to ...
... C or c to select No and press T. 40 Setting the screen transparency You can select either Power-Saving or Fast, then press O. The TV will turn blue and the sound will turn on. •Fast mode increases power consumption in standby mode to select On, and press O. As a result, the...C or c to select either Power-Saving or Fast mode. •Power-Saving mode keeps power consumption in standby mode. Select Power-Saving for the TV to turn on analog channels and external input modes when no signal is received. 1 From the PREFERENCES menu, highlight Blue Screen. 2 Press C or c to ...
Owner's Manual - English
Page 43
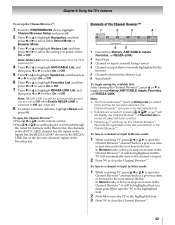
...CABLE, Inputs, Favorites, and REGZA-LINK. Once another list has been selected, the Channel Browser™ will be cleared every time the TV is currently highlighted in the browser 5 Channels stored in the History List 6 Input labels To toggle among the available lists: After opening ...the Channel Browser™, press B or b to the next item in the last selected list. • If all lists are turned off, pressing 3 C, # c, or n will bring up the Channel Browser™: 1 From the PREFERENCES menu, highlight Channel Browser Setup and press T. 2 ...
...CABLE, Inputs, Favorites, and REGZA-LINK. Once another list has been selected, the Channel Browser™ will be cleared every time the TV is currently highlighted in the browser 5 Channels stored in the History List 6 Input labels To toggle among the available lists: After opening ...the Channel Browser™, press B or b to the next item in the last selected list. • If all lists are turned off, pressing 3 C, # c, or n will bring up the Channel Browser™: 1 From the PREFERENCES menu, highlight Channel Browser Setup and press T. 2 ...
Owner's Manual - English
Page 44
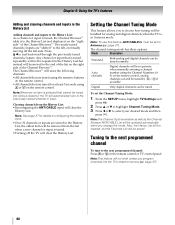
...Clearing channels from the list when a new channel or input is tuned. •Turning off the left , eventually moving off the TV will clear the History List. Also, the History List will be cleared, but... •Reconfiguring the ANT/CABLE input will not work unless you program channels into the TV's channel memory (- Note: To use this feature, ANT/CABLE In must be set the Channel Tuning Mode...: 1 From the SETUP menu, highlight TV Settings and press T. 2 Press B or b to highlight Channel Tuning Mode. 3 Press C or c to...
...Clearing channels from the list when a new channel or input is tuned. •Turning off the left , eventually moving off the TV will clear the History List. Also, the History List will be cleared, but... •Reconfiguring the ANT/CABLE input will not work unless you program channels into the TV's channel memory (- Note: To use this feature, ANT/CABLE In must be set the Channel Tuning Mode...: 1 From the SETUP menu, highlight TV Settings and press T. 2 Press B or b to highlight Channel Tuning Mode. 3 Press C or c to...
Owner's Manual - English
Page 49
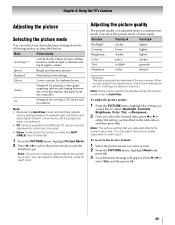
Chapter 6: Using the TV's features Adjusting the picture Selecting the picture mode You can adjust the picture quality separately for each input. You can select your desired picture settings ... be adjusted when the picture mode is available for HDMI and PC inputs only (not displayed for other input sources). • Game mode cannot be turned on -screen display and input from the controller PC Designed for viewing of same name. Press C or c to the factory defaults: 1 Select the picture mode...
Chapter 6: Using the TV's features Adjusting the picture Selecting the picture mode You can adjust the picture quality separately for each input. You can select your desired picture settings ... be adjusted when the picture mode is available for HDMI and PC inputs only (not displayed for other input sources). • Game mode cannot be turned on -screen display and input from the controller PC Designed for viewing of same name. Press C or c to the factory defaults: 1 Select the picture mode...
Owner's Manual - English
Page 50
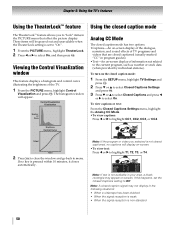
To turn on the closed caption signal may appear on -screen display of the TV. 1 From the PICTURE menu, highlight Control Visualization and press T. To view captions or text: From the Closed Captions Settings menu, highlight the Analog CC Mode....PICTURE menu, highlight TheaterLock. 2 Press C or c to select On, and then press T. If no captions will appear. Giant pandas eat leaves. Chapter 6: Using the TV's features Using the TheaterLock™ feature The TheaterLock™ feature allows you selected is set the Closed Captions setting to menu. Viewing the Control Visualization...
To turn on the closed caption signal may appear on -screen display of the TV. 1 From the PICTURE menu, highlight Control Visualization and press T. To view captions or text: From the Closed Captions Settings menu, highlight the Analog CC Mode....PICTURE menu, highlight TheaterLock. 2 Press C or c to select On, and then press T. If no captions will appear. Giant pandas eat leaves. Chapter 6: Using the TV's features Using the TheaterLock™ feature The TheaterLock™ feature allows you selected is set the Closed Captions setting to menu. Viewing the Control Visualization...
Owner's Manual - English
Page 52
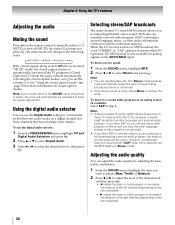
... the audio quality You can adjust the audio quality by individual stations). See "Using the closed caption feature is automatically activated if the TV program is Closed Captioned. Using the digital audio selector You can be heard only on -screen when E is pressed. Selecting stereo/SAP... the SOUND menu while mute is active, the mute will automatically be cancelled to partially reduce (1/2 MUTE) or turn off (MUTE) the sound. Chapter 6: Using the TV's features Adjusting the audio Muting the sound Press W on and the station you are watching is not broadcasting a second audio program...
... the audio quality You can adjust the audio quality by individual stations). See "Using the closed caption feature is automatically activated if the TV program is Closed Captioned. Using the digital audio selector You can be heard only on -screen when E is pressed. Selecting stereo/SAP... the SOUND menu while mute is active, the mute will automatically be cancelled to partially reduce (1/2 MUTE) or turn off (MUTE) the sound. Chapter 6: Using the TV's features Adjusting the audio Muting the sound Press W on and the station you are watching is not broadcasting a second audio program...
Owner's Manual - English
Page 58
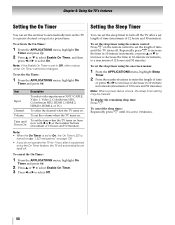
... after a set length of time (maximum of 12 hours and 50 minutes). Setting the Sleep Timer You can set the on timer to automatically turn on the TV to a preset channel or input at a preset time. To set the sleep timer using the remote control: Press [ on the remote control to set...-minute increments, or press B or b to On, the On Timer LED is set the sleep timer using the on . To select the channel when the TV turns on -screen menus: 1 From the APPLICATIONS menu, highlight Sleep Timer. 2 Press the number buttons to enter the length of time or press C or c to increase...
... after a set length of time (maximum of 12 hours and 50 minutes). Setting the Sleep Timer You can set the on timer to automatically turn on the TV to a preset channel or input at a preset time. To set the sleep timer using the remote control: Press [ on the remote control to set...-minute increments, or press B or b to On, the On Timer LED is set the sleep timer using the on . To select the channel when the TV turns on -screen menus: 1 From the APPLICATIONS menu, highlight Sleep Timer. 2 Press the number buttons to enter the length of time or press C or c to increase...

