
Owners Manual
Page 2
... cable entry as thinner or benzine which provides guidelines for proper grounding, and, in particular, specifies that the floor is not damaged by your TV screen for reflections on the lenses resulting in the USA This reminder is very dirty, use your TV • Clean the TV with a dry cloth. ...the floor or on the TV. • Do not put any reflections while viewing. Avoid dusty areas too. • Damage may occur on the screen. Do not tamper with the plug or try turning it into a non-standard outlet. The mounting surface should be replaced by a picture-in the ...
... cable entry as thinner or benzine which provides guidelines for proper grounding, and, in particular, specifies that the floor is not damaged by your TV screen for reflections on the lenses resulting in the USA This reminder is very dirty, use your TV • Clean the TV with a dry cloth. ...the floor or on the TV. • Do not put any reflections while viewing. Avoid dusty areas too. • Damage may occur on the screen. Do not tamper with the plug or try turning it into a non-standard outlet. The mounting surface should be replaced by a picture-in the ...
Owners Manual
Page 3
Introduction 4 Welcome to Toshiba 4 Exploring your new TV 4 Connecting your TV 5 Connecting a VCR 5 Connecting a cable converter box 6 Connecting a cable ... remote control 15 Setting up your TV 16 Learning about the menu system 16 Changing the on-screen display language 17 Selecting the antenna input 17 Using the TV/VIDEO button on the TV 17 Adding...speakers 40 Selecting the Audio OUT sound 41 Selecting the background of the menu display 41 Displaying on-screen information 41 Viewing the demonstration mode 42 Understanding the auto power off feature 42 Understanding the last mode...
Introduction 4 Welcome to Toshiba 4 Exploring your new TV 4 Connecting your TV 5 Connecting a VCR 5 Connecting a cable converter box 6 Connecting a cable ... remote control 15 Setting up your TV 16 Learning about the menu system 16 Changing the on-screen display language 17 Selecting the antenna input 17 Using the TV/VIDEO button on the TV 17 Adding...speakers 40 Selecting the Audio OUT sound 41 Selecting the background of the menu display 41 Displaying on-screen information 41 Viewing the demonstration mode 42 Understanding the auto power off feature 42 Understanding the last mode...
Owners Manual
Page 4
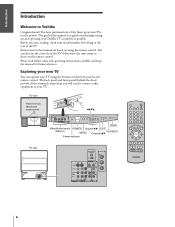
...of the finest projection TVs on the market. Before you will need to connect other equipment to your TV. TV front Remote sensor (Behind the screen panel) x •zy CH MENU VOL VOL TV/ DEMO EXIT VIDEO LIFT CH DEMO Video/Audio inputs POWER Volume x • EXIT (Video...Control Introduction Welcome to guide you through setting up your TV Using the TV's Features Appendix Index 4 Instructions in this manual is to Toshiba Congratulations! The back panel and front panel (behind the door) provide all the safety and operating instructions carefully, and keep the manual for...
...of the finest projection TVs on the market. Before you will need to connect other equipment to your TV. TV front Remote sensor (Behind the screen panel) x •zy CH MENU VOL VOL TV/ DEMO EXIT VIDEO LIFT CH DEMO Video/Audio inputs POWER Volume x • EXIT (Video...Control Introduction Welcome to guide you through setting up your TV Using the TV's Features Appendix Index 4 Instructions in this manual is to Toshiba Congratulations! The back panel and front panel (behind the door) provide all the safety and operating instructions carefully, and keep the manual for...

Owners Manual
Page 15
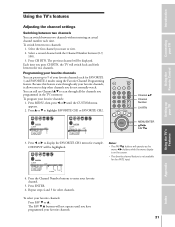
... channels (page 19) CH yz cycles through favorite channels (page 21) ADV MUTE RECALL TV/VIDEO SURROUND MUTE mutes the sound (page 37) RECALL displays screen information (page 41) TV/VIDEO selects video input source (page 34) STOP SOURCE PLAY PIP REC TV/VCR REW FF SURROUND turns the surround sound...
... channels (page 19) CH yz cycles through favorite channels (page 21) ADV MUTE RECALL TV/VIDEO SURROUND MUTE mutes the sound (page 37) RECALL displays screen information (page 41) TV/VIDEO selects video input source (page 34) STOP SOURCE PLAY PIP REC TV/VCR REW FF SURROUND turns the surround sound...
Owners Manual
Page 16
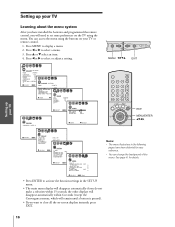
... you do not make a selection within 6 seconds (except the Convergence menus, which will need to set some preferences on the TV using the buttons on -screen displays instantly, press EXIT. 16 Appendix Index
... you do not make a selection within 6 seconds (except the Convergence menus, which will need to set some preferences on the TV using the buttons on -screen displays instantly, press EXIT. 16 Appendix Index
Owners Manual
Page 17
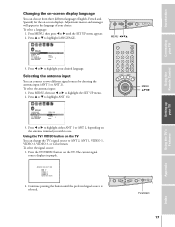
.... The current signal source displays in the language of your choice. Press x or • to highlight either ANT 1 or ANT 2, depending on -screen displays. To select the signal source: 1. To select the antenna input: 1. CH MENU VOL CH VOL TV/ DEMO EXIT VIDEO MENU x •.../VIDEO Using the TV's Features Appendix Index 17 Introduction Connecting your TV Using the Remote Control Setting up your TV Changing the on-screen display language You can choose from three different languages (English, French and Spanish) for the on the antenna terminal you wish to ...
.... The current signal source displays in the language of your choice. Press x or • to highlight either ANT 1 or ANT 2, depending on -screen displays. To select the signal source: 1. To select the antenna input: 1. CH MENU VOL CH VOL TV/ DEMO EXIT VIDEO MENU x •.../VIDEO Using the TV's Features Appendix Index 17 Introduction Connecting your TV Using the Remote Control Setting up your TV Changing the on-screen display language You can choose from three different languages (English, French and Spanish) for the on the antenna terminal you wish to ...
Owners Manual
Page 19
... add or erase specific channels. If your TV Adding and erasing channels manually After you have programmed the channels automatically, you are projected onto the screen where they converge to highlight CONVERGENCE. 1 2 3 4 5 6 7 8 9 10 11 12 13 14 15 16 17 18 19 20 21 22 23 24 25 26 27 28...
... add or erase specific channels. If your TV Adding and erasing channels manually After you have programmed the channels automatically, you are projected onto the screen where they converge to highlight CONVERGENCE. 1 2 3 4 5 6 7 8 9 10 11 12 13 14 15 16 17 18 19 20 21 22 23 24 25 26 27 28...
Owners Manual
Page 20
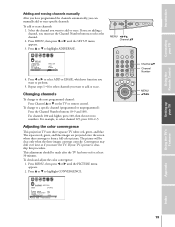
..., depending on which color needs adjusting. Press ENTER to adjust, then repeat steps 7-9. 11. Press the corresponding Number button (1-9) to select the area of the screen you will need to perform steps 4 and 5 two times. 5. POWER MTS TIMER TV CABLE VCR 1 23 CH 456 789 CH RTN VOL 100 0 ENT C.CAPT...
..., depending on which color needs adjusting. Press ENTER to adjust, then repeat steps 7-9. 11. Press the corresponding Number button (1-9) to select the area of the screen you will need to perform steps 4 and 5 two times. 5. POWER MTS TIMER TV CABLE VCR 1 23 CH 456 789 CH RTN VOL 100 0 ENT C.CAPT...
Owners Manual
Page 21
... Programming feature. Each time you do not normally watch. CH INPUT will operate as the menu x • buttons while the menu display is on the screen. • The favorite channel feature is not available for example. POWER MTS TIMER TV CABLE VCR 1 23 CH 456 789 CH RTN VOL 100 0 ENT...
... Programming feature. Each time you do not normally watch. CH INPUT will operate as the menu x • buttons while the menu display is on the screen. • The favorite channel feature is not available for example. POWER MTS TIMER TV CABLE VCR 1 23 CH 456 789 CH RTN VOL 100 0 ENT...
Owners Manual
Page 23
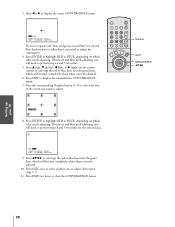
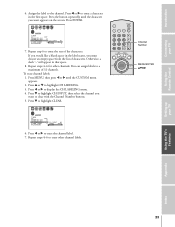
... want to clear with the Channel Number buttons. 5. You can assign labels to highlight CH INPUT, then select the channel you want appears on the screen. Assign the label to erase the channel label. 7. Press the button repeatedly until the CUSTOM menu appears. 2. Press y or z to enter a character in that space...
... want to clear with the Channel Number buttons. 5. You can assign labels to highlight CH INPUT, then select the channel you want appears on the screen. Assign the label to erase the channel label. 7. Press the button repeatedly until the CUSTOM menu appears. 2. Press y or z to enter a character in that space...
Owners Manual
Page 24
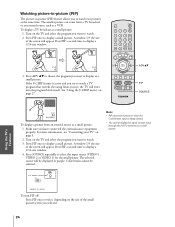
... : TO SELECT To turn PIP off: Press PIP once or twice, depending on the size of the small picture screen you have connected the external source equipment properly. A window 1/9 the size of the screen will appear. Press PIP once to select the input source (VIDEO 1, VIDEO 2 or VIDEO 3) for the small picture... the program you want to watch a TV program that exceeds the rating limits you try to display a 1/16-size window. 4. A window 1/9 the size of the screen will appear. Introduction Connecting your TV" on page 5. 2. Press PIP a second time to watch . 2.
... : TO SELECT To turn PIP off: Press PIP once or twice, depending on the size of the small picture screen you have connected the external source equipment properly. A window 1/9 the size of the screen will appear. Press PIP once to select the input source (VIDEO 1, VIDEO 2 or VIDEO 3) for the small picture... the program you want to watch a TV program that exceeds the rating limits you try to display a 1/16-size window. 4. A window 1/9 the size of the screen will appear. Introduction Connecting your TV" on page 5. 2. Press PIP a second time to watch . 2.

Owners Manual
Page 34
... highlight CUSTOM MENU, then press x or •. Select VIDEO 1, VIDEO 2, VIDEO 3, or ColorStream, depending on which input jacks are used instead of the following on-screen display appears if you press the TV/VIDEO button on the remote control, but if you press the TV/VIDEO button on the... screen. To receive a color video OUT signal, a video or S-video IN jack must be used for connecting the devices. (See "Connecting your TV with one of ...
... highlight CUSTOM MENU, then press x or •. Select VIDEO 1, VIDEO 2, VIDEO 3, or ColorStream, depending on which input jacks are used instead of the following on-screen display appears if you press the TV/VIDEO button on the remote control, but if you press the TV/VIDEO button on the... screen. To receive a color video OUT signal, a video or S-video IN jack must be used for connecting the devices. (See "Connecting your TV with one of ...
Owners Manual
Page 35
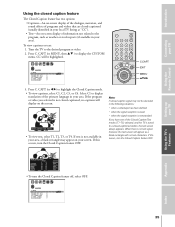
... program or video you have one of the Closed Caption/Text modes (T1-T4) selected, and the TV is no text signal, however, the text screen will appear as a black rectangle with no captions will be decoded in the following situations: • when a videotape has been dubbed • when ...captioned, no text characters. Tune the TV to display the CUSTOM menu. CAPT (or x •) to the program, such as "CC"). • Text-An on-screen display of information not related to highlight the Closed Caption mode. • To view captions, select C1, C2, C3, or C4. If this occurs, turn...
... program or video you have one of the Closed Caption/Text modes (T1-T4) selected, and the TV is no text signal, however, the text screen will appear as a black rectangle with no captions will be decoded in the following situations: • when a videotape has been dubbed • when ...captioned, no text characters. Tune the TV to display the CUSTOM menu. CAPT (or x •) to the program, such as "CC"). • Text-An on-screen display of information not related to highlight the Closed Caption mode. • To view captions, select C1, C2, C3, or C4. If this occurs, turn...
Owners Manual
Page 36
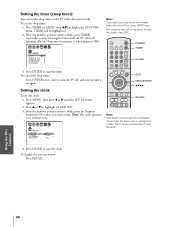
... 23 24 25 26 27 28 29 30 31 32 33 34 35 3. Press ENTER to display the CUSTOM menu. To display the time on-screen: Press RECALL. Note : If you will have to enter the correct time. The remaining time will be displayed. Press y or z to see how much time...
... 23 24 25 26 27 28 29 30 31 32 33 34 35 3. Press ENTER to display the CUSTOM menu. To display the time on-screen: Press RECALL. Note : If you will have to enter the correct time. The remaining time will be displayed. Press y or z to see how much time...

Owners Manual
Page 37
... Introduction Adjusting the sound Connecting your TV Using the Remote Control Setting up your TV Muting the sound Press MUTE to temporarily turn off , the screen will be able to see the picture but not hear any audio on page 34 for more information. When you are watching also has SAP... For example, a station might broadcast the news as their SAP, you to listen to display the AUDIO menu. While the sound is turned on the screen but is pressed. See "Using the closed caption mode is automatically activated. Press MTS (or MENU then yz) to high-fidelity stereo sound while watching...
... Introduction Adjusting the sound Connecting your TV Using the Remote Control Setting up your TV Muting the sound Press MUTE to temporarily turn off , the screen will be able to see the picture but not hear any audio on page 34 for more information. When you are watching also has SAP... For example, a station might broadcast the news as their SAP, you to listen to display the AUDIO menu. While the sound is turned on the screen but is pressed. See "Using the closed caption mode is automatically activated. Press MTS (or MENU then yz) to high-fidelity stereo sound while watching...
Owners Manual
Page 41
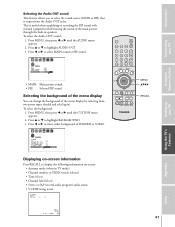
... your TV Using the Remote Control Setting up your TV Selecting the Audio OUT sound This feature allows you to display the following information on -screen information Press RECALL to select the sound source (MAIN or PIP) that is useful when amplifying or recording the PIP sound with external equipment while... 13 14 15 16 17 18 19 20 21 22 23 24 25 26 27 28 29 30 31 32 33 34 35 Displaying on -screen: • Antenna mode (when in speakers. PG L V POWER MTS TIMER TV CABLE VCR 1 23 CH 456 789 CH RTN VOL 100 0 ENT C.CAPT RESET EXIT...
... your TV Using the Remote Control Setting up your TV Selecting the Audio OUT sound This feature allows you to display the following information on -screen information Press RECALL to select the sound source (MAIN or PIP) that is useful when amplifying or recording the PIP sound with external equipment while... 13 14 15 16 17 18 19 20 21 22 23 24 25 26 27 28 29 30 31 32 33 34 35 Displaying on -screen: • Antenna mode (when in speakers. PG L V POWER MTS TIMER TV CABLE VCR 1 23 CH 456 789 CH RTN VOL 100 0 ENT C.CAPT RESET EXIT...
Owners Manual
Page 42
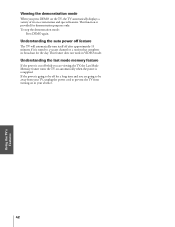
... off feature The TV will automatically turn itself off for demonstration purposes only. If the power is tuned to prevent the TV from turning on -screen menus and special features. Introduction Connecting your TV Using the Remote Control Setting up your absence. 42 Using the TV's Features Appendix Index To stop...
... off feature The TV will automatically turn itself off for demonstration purposes only. If the power is tuned to prevent the TV from turning on -screen menus and special features. Introduction Connecting your TV Using the Remote Control Setting up your absence. 42 Using the TV's Features Appendix Index To stop...
Owners Manual
Page 44
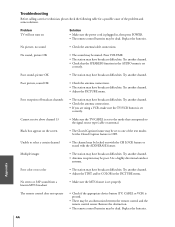
Problem TV will not turn on the screen • The Closed Caption feature may be set to one of the text modes. Replace the batteries. No picture, no color • The station may ...
Problem TV will not turn on the screen • The Closed Caption feature may be set to one of the text modes. Replace the batteries. No picture, no color • The station may ...


