
Owner's Manual - English
Page 8
Chapter 7: Using the TV's advanced features 55 Using the advanced picture settings features 55 Using dynamic contrast 55 Using the static gamma feature 55 Selecting the color temperature 56 Using CableClear® digital noise reduction 56 Using MPEG noise reduction 56 Using ... troubleshooting 59 LED indications 61 Chapter 9: Appendix 62 Specifications 62 Acceptable signal formats for PC IN and HDMI terminals 63 Limited United States Warranty for LCD Televisions 26" and Larger 64 Limited Canadian Warranty for Toshiba Brand Flat Panel Televisions 65 Index 68 8
Chapter 7: Using the TV's advanced features 55 Using the advanced picture settings features 55 Using dynamic contrast 55 Using the static gamma feature 55 Selecting the color temperature 56 Using CableClear® digital noise reduction 56 Using MPEG noise reduction 56 Using ... troubleshooting 59 LED indications 61 Chapter 9: Appendix 62 Specifications 62 Acceptable signal formats for PC IN and HDMI terminals 63 Limited United States Warranty for LCD Televisions 26" and Larger 64 Limited Canadian Warranty for Toshiba Brand Flat Panel Televisions 65 Index 68 8

Owner's Manual - English
Page 9
... contrast while you 're watching (- page 14). • Digital Audio Out optical audio connection with 1080p input support (- page 6). • Place the TV in most cases). • 1080p ...put the Call Letters (e.g. Overview of ColorStream® HD high-resolution component video inputs (- pages 10-11). 4 Connect your new Toshiba widescreen, integrated HD, LCD TV: • Integrated digital tuning (8VSB ATSC ... not plug in the power cords for an overview of the buttons on 46" and 52" models) • REGZA-LINK allows control of your other device(s). 6 AFTER connecting...
... contrast while you 're watching (- page 14). • Digital Audio Out optical audio connection with 1080p input support (- page 6). • Place the TV in most cases). • 1080p ...put the Call Letters (e.g. Overview of ColorStream® HD high-resolution component video inputs (- pages 10-11). 4 Connect your new Toshiba widescreen, integrated HD, LCD TV: • Integrated digital tuning (8VSB ATSC ... not plug in the power cords for an overview of the buttons on 46" and 52" models) • REGZA-LINK allows control of your other device(s). 6 AFTER connecting...
Owner's Manual - English
Page 42
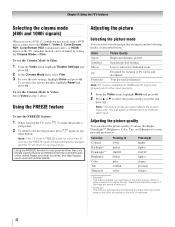
..., highlight Mode and press T. 2 Press B or b to the factory defaults, highlight Reset and press T. Selection Pressing C Pressing c Contrast lower higher Backlight* darker lighter DynaLight** Brightness Color On/Off darker paler On/Off lighter deeper Tint reddish greenish Sharpness softer sharper * Backlight ...Mode Sports Standard Movie PC Preference Picture Quality Bright and dynamic picture Standard picture settings Lower contrast for darkened room Designed for viewing of darkness. 42 Adjusting the picture Selecting the picture mode You can adjust the ...
..., highlight Mode and press T. 2 Press B or b to the factory defaults, highlight Reset and press T. Selection Pressing C Pressing c Contrast lower higher Backlight* darker lighter DynaLight** Brightness Color On/Off darker paler On/Off lighter deeper Tint reddish greenish Sharpness softer sharper * Backlight ...Mode Sports Standard Movie PC Preference Picture Quality Bright and dynamic picture Standard picture settings Lower contrast for darkened room Designed for viewing of darkness. 42 Adjusting the picture Selecting the picture mode You can adjust the ...
Owner's Manual - English
Page 43
... To adjust the picture quality: 1 From the Video menu, highlight Picture Settings and press T. 2 Press B or b to select the picture quality you want to adjust (Contrast, Backlight, DynaLight, Brightness, Color, Tint, or Sharpness), and then press C or c to "On". Note: A closed captioned (usually marked "CC" in the following situations: • When...
... To adjust the picture quality: 1 From the Video menu, highlight Picture Settings and press T. 2 Press B or b to select the picture quality you want to adjust (Contrast, Backlight, DynaLight, Brightness, Color, Tint, or Sharpness), and then press C or c to "On". Note: A closed captioned (usually marked "CC" in the following situations: • When...
Owner's Manual - English
Page 55
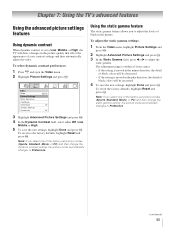
...revert the factory defaults, highlight Reset and press T. Note: If you to the factory defaults, highlight Reset and press T. To select dynamic contrast preferences: 1 Press Y and open the Video menu. 2 Highlight Picture Settings and press T. To revert to adjust the levels of black in...Mode Picture Settings Noise Reduction ColorMaster Game Mode Theater Settings TheaterLock Sports Off Off 3 Highlight Advanced Picture Settings and press T. 4 In the Dynamic Contrast field, select either Off, Low, Middle or High. 5 To save the new settings, highlight Done and press T. Chapter 7: Using the ...
...revert the factory defaults, highlight Reset and press T. Note: If you to the factory defaults, highlight Reset and press T. To select dynamic contrast preferences: 1 Press Y and open the Video menu. 2 Highlight Picture Settings and press T. To revert to adjust the levels of black in...Mode Picture Settings Noise Reduction ColorMaster Game Mode Theater Settings TheaterLock Sports Off Off 3 Highlight Advanced Picture Settings and press T. 4 In the Dynamic Contrast field, select either Off, Low, Middle or High. 5 To save the new settings, highlight Done and press T. Chapter 7: Using the ...
Owner's Manual - English
Page 68
... meter 33 Dolby Digital 18 Dolby Digital Dynamic Range Control 46 DVD player connection 14 DVI connection 16 DynaLight 42 Dynamic Bass Boost 58 Dynamic contrast 55 F FREEZE 42 G Game Mode feature 57 GameTimer 49 H HDMI audio mode 32 HDMI settings Deep Color 53 Lip-Sync Latency 53 HDMI™ connection...
... meter 33 Dolby Digital 18 Dolby Digital Dynamic Range Control 46 DVD player connection 14 DVI connection 16 DynaLight 42 Dynamic Bass Boost 58 Dynamic contrast 55 F FREEZE 42 G Game Mode feature 57 GameTimer 49 H HDMI audio mode 32 HDMI settings Deep Color 53 Lip-Sync Latency 53 HDMI™ connection...


