Owner's Manual - English
Page 6
... disappear in a short period of time. 2) The LCD panel contained in accordance with Part 15 of the FCC rules. FCC Declaration of Conformity Compliance Statement (Part 15): The Toshiba 42LX177, 46LX177, 52LX177, and 57LX177 Televisions comply with the instructions, may cause.... therefore, Toshiba is : Toshiba America Consumer Products, L.L.C. 82 Totowa Rd. Such pixels are not an indication of Dolby Laboratories. • HDMI, the HDMI logo and High-Definition Multimedia Interface are incorporated under license from SRS Labs, Inc. • Manufactured under your LCD TV The following...
... disappear in a short period of time. 2) The LCD panel contained in accordance with Part 15 of the FCC rules. FCC Declaration of Conformity Compliance Statement (Part 15): The Toshiba 42LX177, 46LX177, 52LX177, and 57LX177 Televisions comply with the instructions, may cause.... therefore, Toshiba is : Toshiba America Consumer Products, L.L.C. 82 Totowa Rd. Such pixels are not an indication of Dolby Laboratories. • HDMI, the HDMI logo and High-Definition Multimedia Interface are incorporated under license from SRS Labs, Inc. • Manufactured under your LCD TV The following...
Owner's Manual - English
Page 7
... to Toshiba 9 Features of your new TV 9 Overview of steps for installing, setting up, and using your new TV 10 TV front and side panel controls and connections 11 TV back panel connections 12 Chapter 2: Connecting your TV 14 ...the channel memory 45 Setting the Auto Input feature 46 Labeling channels 47 Setting the HDMI™ audio mode 48 Viewing the digital signal meter 49 Viewing the system status... Demo Mode 50 Chapter 6: Using the TV's features 51 Selecting the video input source to view 51 Labeling the video input sources 52 Tuning channels 53 Tuning channels using the ...
... to Toshiba 9 Features of your new TV 9 Overview of steps for installing, setting up, and using your new TV 10 TV front and side panel controls and connections 11 TV back panel connections 12 Chapter 2: Connecting your TV 14 ...the channel memory 45 Setting the Auto Input feature 46 Labeling channels 47 Setting the HDMI™ audio mode 48 Viewing the digital signal meter 49 Viewing the system status... Demo Mode 50 Chapter 6: Using the TV's features 51 Selecting the video input source to view 51 Labeling the video input sources 52 Tuning channels 53 Tuning channels using the ...
Owner's Manual - English
Page 9
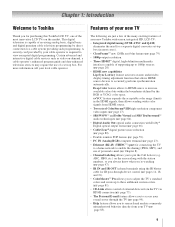
... the many exciting features of your new Toshiba widescreen, integrated HD, LCD TV: • Integrated digital tuning (8VSB ATSC and QAM) eliminates the need for a separate digital converter set -top box. Deep Color feature allows to HDMI source to increase available colors bits within... 1: Introduction Welcome to Toshiba Thank you for purchasing this Toshiba LCD TV, one of the most cases). • ClearFrame™ new 120Hz anti-blur feature (- For more information call your TV (page 85). 9 page 79) • 1080p output resolution. • Three HDMI™ digital, high-...
... the many exciting features of your new Toshiba widescreen, integrated HD, LCD TV: • Integrated digital tuning (8VSB ATSC and QAM) eliminates the need for a separate digital converter set -top box. Deep Color feature allows to HDMI source to increase available colors bits within... 1: Introduction Welcome to Toshiba Thank you for purchasing this Toshiba LCD TV, one of the most cases). • ClearFrame™ new 120Hz anti-blur feature (- For more information call your TV (page 85). 9 page 79) • 1080p output resolution. • Three HDMI™ digital, high-...

Owner's Manual - English
Page 11
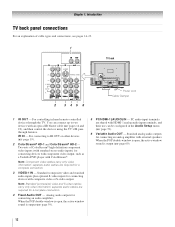
...the Power-On Mode" on page 50) See "LED indications" on the TV's control panel functions as the ENTER button. 7 EXIT - The side panel A/V connections are viewing (ANT, VIDEO 1, VIDEO 2, ColorStream HD1, ColorStream HD2, HDMI 1, HDMI 2, HDMI 3, PC) (- Press to change the channel (programmed channels only; - When... a menu is on-screen, the MENU button on page 108 for 5 or more seconds to turn off the TV, press and hold the POWER button on and ...
...the Power-On Mode" on page 50) See "LED indications" on the TV's control panel functions as the ENTER button. 7 EXIT - The side panel A/V connections are viewing (ANT, VIDEO 1, VIDEO 2, ColorStream HD1, ColorStream HD2, HDMI 1, HDMI 2, HDMI 3, PC) (- Press to change the channel (programmed channels only; - When... a menu is on-screen, the MENU button on page 108 for 5 or more seconds to turn off the TV, press and hold the POWER button on and ...
Owner's Manual - English
Page 12
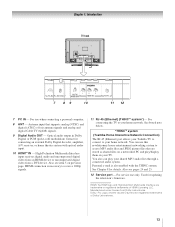
...inputs (with standard stereo audio inputs) for connecting devices with component video output, such as a Toshiba DVD player with ColorStream®. For controlling infrared remote-controlled devices through the TV. page 19). 2 ColorStream® HD-1 and ColorStream® HD-2 - Note: Standard (...TV back 2 3 45 6 Power cord Cable Clamper 1 IR OUT - Analog audio outputs for a complete connection. 3 VIDEO-1 IN - Note: Component video cables carry only video information; PC audio input terminals are shared with an optical IR blaster cable (- For connecting to two devices with HDMI...
...inputs (with standard stereo audio inputs) for connecting devices with component video output, such as a Toshiba DVD player with ColorStream®. For controlling infrared remote-controlled devices through the TV. page 19). 2 ColorStream® HD-1 and ColorStream® HD-2 - Note: Standard (...TV back 2 3 45 6 Power cord Cable Clamper 1 IR OUT - Analog audio outputs for a complete connection. 3 VIDEO-1 IN - Note: Component video cables carry only video information; PC audio input terminals are shared with an optical IR blaster cable (- For connecting to two devices with HDMI...
Owner's Manual - English
Page 13
...-Definition Multimedia Interface are registered trademarks of HDMI Licensing LLC. Dolby, Pro Logic, and the double-D symbol are trademarks or registered trademarks of Dolby Laboratories. 13 See boxed note below. *THINC™ system (Toshiba Home Interactive Network Connection) The RJ-45 (Ethernet) port allows your Toshiba TV to connect to your home network. You...
...-Definition Multimedia Interface are registered trademarks of HDMI Licensing LLC. Dolby, Pro Logic, and the double-D symbol are trademarks or registered trademarks of Dolby Laboratories. 13 See boxed note below. *THINC™ system (Toshiba Home Interactive Network Connection) The RJ-45 (Ethernet) port allows your Toshiba TV to connect to your home network. You...
Owner's Manual - English
Page 14
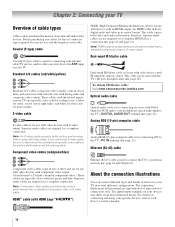
... 8). About the connection illustrations You can connect different types and brands of devices to your TV in sets of three and are required for use with video devices with HDMI Logo " ") HDMI (High-Definition Multimedia Interface) cable is used for stereo left (or mono) audio. If...specific devices, refer to disconnect the standard (composite) video cable or the picture performance will be unacceptable. S-video cable S-video cable is Toshiba's brand of three, and are typically color-coded red, green, and blue. Component video cables (red/green/blue) Component video cables...
... 8). About the connection illustrations You can connect different types and brands of devices to your TV in sets of three and are required for use with video devices with HDMI Logo " ") HDMI (High-Definition Multimedia Interface) cable is used for stereo left (or mono) audio. If...specific devices, refer to disconnect the standard (composite) video cable or the picture performance will be unacceptable. S-video cable S-video cable is Toshiba's brand of three, and are typically color-coded red, green, and blue. Component video cables (red/green/blue) Component video cables...
Owner's Manual - English
Page 17
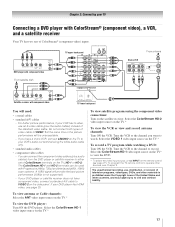
...antenna Stereo VCR VIDEO AUDIO L R IN CH 3 CH 4 OUT L R IN from the DVD player or satellite receiver to your DVD player has HDMI video, see Chapter 3. Do not connect both types of the United States and other materials is not supported). - The unauthorized recording, use an S-... use , distribution, or revision of television programs, videotapes, DVDs, and other countries, and may subject you want to VIDEO 2 on the TV.* To record a TV program while watching a DVD: Turn ON the VCR. For better picture performance, if your DVD player or satellite receiver does not have a mono...
...antenna Stereo VCR VIDEO AUDIO L R IN CH 3 CH 4 OUT L R IN from the DVD player or satellite receiver to your DVD player has HDMI video, see Chapter 3. Do not connect both types of the United States and other materials is not supported). - The unauthorized recording, use an S-... use , distribution, or revision of television programs, videotapes, DVDs, and other countries, and may subject you want to VIDEO 2 on the TV.* To record a TV program while watching a DVD: Turn ON the VCR. For better picture performance, if your DVD player or satellite receiver does not have a mono...

Owner's Manual - English
Page 20
... not exceed 9.8 ft (3m). Conventional HDMI/DVI cable may not operate properly with the HDMI Logo ( ). - See "Setting the HDMI™ audio mode" (- page 48). TV lower back panel HDMI device VIDEO AUDIO L R IN IN OUT L R HDMI OUT To view the HDMI device video: Select the HDMI 1, HDMI 2, or HDMI 3 video input source on the TV.* * To select the video input...
... not exceed 9.8 ft (3m). Conventional HDMI/DVI cable may not operate properly with the HDMI Logo ( ). - See "Setting the HDMI™ audio mode" (- page 48). TV lower back panel HDMI device VIDEO AUDIO L R IN IN OUT L R HDMI OUT To view the HDMI device video: Select the HDMI 1, HDMI 2, or HDMI 3 video input source on the TV.* * To select the video input...

Owner's Manual - English
Page 21
... HD DVD player,etc.) VIDEO AUDIO L R HDMI OUT IN OUT L R To connect an Audio Receiver and Playback Device, you connect a CE-Link compatible audio receiver or playback device. However, Toshiba is not liable for compatibility information. 21 Refer to models incorporating Toshiba's CE-Link. Chapter 2: Connecting your TV CE-Link connection You can control...
... HD DVD player,etc.) VIDEO AUDIO L R HDMI OUT IN OUT L R To connect an Audio Receiver and Playback Device, you connect a CE-Link compatible audio receiver or playback device. However, Toshiba is not liable for compatibility information. 21 Refer to models incorporating Toshiba's CE-Link. Chapter 2: Connecting your TV CE-Link connection You can control...

Owner's Manual - English
Page 22
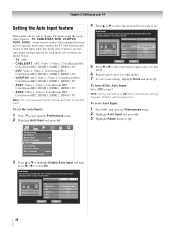
...2 Turn off the TV's built-in speakers (- LINE IN LR TV upper back panel Audio Digital Audio Selector Audio Settings Advanced Audio Settings Audio Setup 4 In the Optical Output Format field, select either Dolby Digital or PCM, depending on page 66). Audio Setup PC Audio HDMI 1 Audio MTS Language... Speakers Optical Output Format Dolby Digital Dynamic Range Control Reset No Auto Stereo English On Dolby Digital Compressed Done To control the audio: 1 Turn on the TV's remote control and open the Audio menu. 3 ...
...2 Turn off the TV's built-in speakers (- LINE IN LR TV upper back panel Audio Digital Audio Selector Audio Settings Advanced Audio Settings Audio Setup 4 In the Optical Output Format field, select either Dolby Digital or PCM, depending on page 66). Audio Setup PC Audio HDMI 1 Audio MTS Language... Speakers Optical Output Format Dolby Digital Dynamic Range Control Reset No Auto Stereo English On Dolby Digital Compressed Done To control the audio: 1 Turn on the TV's remote control and open the Audio menu. 3 ...
Owner's Manual - English
Page 23
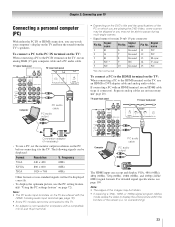
... the PC on which you are playing the DVD-Video, some scenes may be skipped or you can watch your TV Connecting a personal computer (PC) With either the PC IN or HDMI connection, you may not be displayed: Format Resolution V. Note: • The edges of the images may be ...) computer cable and a PC audio cable. Separate analog cables are shared with the HDMI-1 analog audio input terminals (- no overscanning). 23 Chapter 2: Connecting your computer's display on the TV and hear the sound from the TV's speakers. Signal name Pin No. The following signals can accept and display VGA, ...
... the PC on which you are playing the DVD-Video, some scenes may be skipped or you can watch your TV Connecting a personal computer (PC) With either the PC IN or HDMI connection, you may not be displayed: Format Resolution V. Note: • The edges of the images may be ...) computer cable and a PC audio cable. Separate analog cables are shared with the HDMI-1 analog audio input terminals (- no overscanning). 23 Chapter 2: Connecting your computer's display on the TV and hear the sound from the TV's speakers. Signal name Pin No. The following signals can accept and display VGA, ...
Owner's Manual - English
Page 40
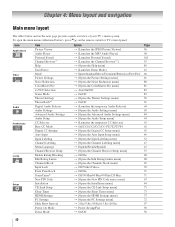
...Main menu layout The tables below ), press Y on the next page provide a quick overview of your TV's menu system. Icon Applications Video Audio Preferences Locks Setup Item Picture Viewer Audio Player Personal E-mail Channel ... Rating Limits Channels Block Input Lock Front Panel Lock GameTimer® New PIN Code Installation CE-Link Setup Sleep Timer HDMI Settings PC Settings Slide Show Interval Power-On Mode Demo Mode Option S [Launches the JPEG Picture Viewer] S [Launches... 85 43 60 61 80 81 83 83 56 61 64 65 84 64 63 62 63 46 52 47 43 53 68 68 69 70 71 71 67 44 75 73 75 72 97 50 50 40...
...Main menu layout The tables below ), press Y on the next page provide a quick overview of your TV's menu system. Icon Applications Video Audio Preferences Locks Setup Item Picture Viewer Audio Player Personal E-mail Channel ... Rating Limits Channels Block Input Lock Front Panel Lock GameTimer® New PIN Code Installation CE-Link Setup Sleep Timer HDMI Settings PC Settings Slide Show Interval Power-On Mode Demo Mode Option S [Launches the JPEG Picture Viewer] S [Launches... 85 43 60 61 80 81 83 83 56 61 64 65 84 64 63 62 63 46 52 47 43 53 68 68 69 70 71 71 67 44 75 73 75 72 97 50 50 40...
Owner's Manual - English
Page 44
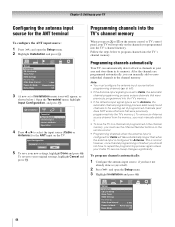
Programming channels into the TV's channel memory. This is configured for Antenna. Setup Installation CE-Link Setup Sleep Timer HDMI Settings PC Settings Slide Show Interval 2 Sec Power-On Mode Power-Saving Demo Mode Off 44 Installation Terrestrial Input ... into the TV's memory.) To remove an Antenna source channel from the memory, you must configure the antenna input source before programming channels (- Follow the steps below .) Open the Terrestrial menu, highlight Input Configuration, and press T. Setup Installation CE-Link Setup Sleep Timer HDMI Settings PC ...
Programming channels into the TV's channel memory. This is configured for Antenna. Setup Installation CE-Link Setup Sleep Timer HDMI Settings PC Settings Slide Show Interval 2 Sec Power-On Mode Power-Saving Demo Mode Off 44 Installation Terrestrial Input ... into the TV's memory.) To remove an Antenna source channel from the memory, you must configure the antenna input source before programming channels (- Follow the steps below .) Open the Terrestrial menu, highlight Input Configuration, and press T. Setup Installation CE-Link Setup Sleep Timer HDMI Settings PC ...
Owner's Manual - English
Page 46
... 2, ColorStream HD1, ColorStream HD2, HDMI 1, HDMI 2, HDMI 3, PC • DVD: Video 1, Video 2, ColorStream HD1, ColorStream HD2, HDMI 1, HDMI 2, HDMI 3, PC • VCR/PVR: ANT, Video 1, Video 2, ColorStream HD1, ColorStream HD2, HDMI 1, HDMI 2, HDMI 3, PC • AUX1: Video 1, Video 2, ColorStream HD1, ColorStream HD2, HDMI 1, HDMI 2, HDMI 3, PC • AUX2: Video 1, Video 2, ColorStream HD1, ColorStream HD2, HDMI 1, HDMI 2, HDMI 3, PC Note: The TV mode select button will be...
... 2, ColorStream HD1, ColorStream HD2, HDMI 1, HDMI 2, HDMI 3, PC • DVD: Video 1, Video 2, ColorStream HD1, ColorStream HD2, HDMI 1, HDMI 2, HDMI 3, PC • VCR/PVR: ANT, Video 1, Video 2, ColorStream HD1, ColorStream HD2, HDMI 1, HDMI 2, HDMI 3, PC • AUX1: Video 1, Video 2, ColorStream HD1, ColorStream HD2, HDMI 1, HDMI 2, HDMI 3, PC • AUX2: Video 1, Video 2, ColorStream HD1, ColorStream HD2, HDMI 1, HDMI 2, HDMI 3, PC Note: The TV mode select button will be...
Owner's Manual - English
Page 48
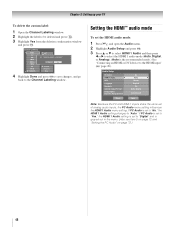
... TV To delete the custom label: 1 Open the Channel Labeling window. 2 Highlight the label to "Digital" and is grayed out in the menu. (Also see item 5 on page 12 and "Setting the PC Audio" on page 72.) 48 If PC Audio is set to "Yes," the HDMI 1 Audio setting is set the HDMI... mode (Auto, Digital, or Analog). (Auto is set of analog audio inputs, the PC Audio menu setting influences the HDMI 1 Audio menu setting. Press CH UP/DOWN to the HDMI input" (- Setting the HDMI™ audio mode To set to be deleted and press =. 3 Highlight Yes from the deletion confirmation window and press...
... TV To delete the custom label: 1 Open the Channel Labeling window. 2 Highlight the label to "Digital" and is grayed out in the menu. (Also see item 5 on page 12 and "Setting the PC Audio" on page 72.) 48 If PC Audio is set to "Yes," the HDMI 1 Audio setting is set the HDMI... mode (Auto, Digital, or Analog). (Auto is set of analog audio inputs, the PC Audio menu setting influences the HDMI 1 Audio menu setting. Press CH UP/DOWN to the HDMI input" (- Setting the HDMI™ audio mode To set to be deleted and press =. 3 Highlight Yes from the deletion confirmation window and press...
Owner's Manual - English
Page 50
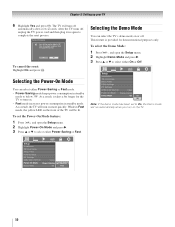
...longer for demonstrational purposes only. As a result, the TV will turn on. • Fast mode increases power consumption in Fast mode, the yellow LED on or off automatically after a few seconds. Setup Installation CE-Link Setup Sleep Timer HDMI Settings PC Settings Slide Show Interval 2 Sec Power-On... when you turn off . This feature is provided for the TV to On, the Demo mode will be lit. As a result, it back in standby mode to confirm. Setup Installation CE-Link Setup Sleep Timer HDMI Settings PC Settings Slide Show Interval 2 Sec Power-On Mode ...
...longer for demonstrational purposes only. As a result, the TV will turn on. • Fast mode increases power consumption in Fast mode, the yellow LED on or off automatically after a few seconds. Setup Installation CE-Link Setup Sleep Timer HDMI Settings PC Settings Slide Show Interval 2 Sec Power-On... when you turn off . This feature is provided for the TV to On, the Demo mode will be lit. As a result, it back in standby mode to confirm. Setup Installation CE-Link Setup Sleep Timer HDMI Settings PC Settings Slide Show Interval 2 Sec Power-On Mode ...
Owner's Manual - English
Page 51
... 0 ANT 1 Video 1 2 Video 2 3 ColorStream HD1 4 ColorStream HD2 5 HDMI 1 CE-Link 6 HDMI 2 7 HDMI 3 8 PC ANT HDMI 1-1 HDMI 1-2 HDMI 1-3 Audio Receiver Player Recorder 0 - 8 / INPUT to Select Navigate Press + repeatedly to the HDMI input: Press + on the remote control or TV control panel. 2 And then either: a) Press 0-8; "Labeling the video input sources...input source to view To select the video input source to view: 1 Press + on the remote or TV control panel repeatedly to highlight HDMI 1, HDMI 2. or b) Repeatedly press Bb on the next page). • Sources can label the video input ...
... 0 ANT 1 Video 1 2 Video 2 3 ColorStream HD1 4 ColorStream HD2 5 HDMI 1 CE-Link 6 HDMI 2 7 HDMI 3 8 PC ANT HDMI 1-1 HDMI 1-2 HDMI 1-3 Audio Receiver Player Recorder 0 - 8 / INPUT to Select Navigate Press + repeatedly to the HDMI input: Press + on the remote control or TV control panel. 2 And then either: a) Press 0-8; "Labeling the video input sources...input source to view To select the video input source to view: 1 Press + on the remote or TV control panel repeatedly to highlight HDMI 1, HDMI 2. or b) Repeatedly press Bb on the next page). • Sources can label the video input ...
Owner's Manual - English
Page 52
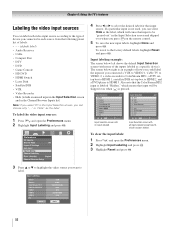
...how you could label the inputs if you connected a VCR to VIDEO 1, Cable TV to VIDEO 2, a video recorder to ColorStream HD1, a DTV settop box to HDMI 1, a satellite/DSS set-top box to HDMI 2, and a DVD player to HDMI 3. Done 4 Press C or c to select the desired label for that input... T. To label the video input sources: 1 Press Y and open the Preferences menu. 2 Highlight Input Labeling and press T. 3 Highlight Reset and press T. 52 To clear the input labels: 1 Press Y and open the Preferences menu. 2 Highlight Input Labeling and press T. To revert to label. Input labeling example: The...
...how you could label the inputs if you connected a VCR to VIDEO 1, Cable TV to VIDEO 2, a video recorder to ColorStream HD1, a DTV settop box to HDMI 1, a satellite/DSS set-top box to HDMI 2, and a DVD player to HDMI 3. Done 4 Press C or c to select the desired label for that input... T. To label the video input sources: 1 Press Y and open the Preferences menu. 2 Highlight Input Labeling and press T. 3 Highlight Reset and press T. 52 To clear the input labels: 1 Press Y and open the Preferences menu. 2 Highlight Input Labeling and press T. To revert to label. Input labeling example: The...
Owner's Manual - English
Page 57
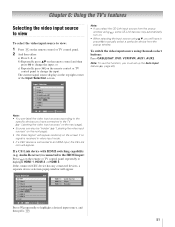
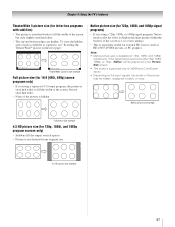
...(for 720p, 1080i, and 1080p program sources only) • Sidebars fill the empty vertical spaces. • Picture is supported only for HDMI and ColorStream inputs. • Depending on the input signals, the border of the picture is especially useful for external HD sources such as subtitles...To view the hidden areas (such as HD-DVD, DVHS movies, or PC graphics. no overscanning). • This is hidden. Chapter 6: Using the TV's features TheaterWide 3 picture size (for letter box programs with subtitles) • The picture is available for 720p, 1080i, and 1080p signals only. Note:...
...(for 720p, 1080i, and 1080p program sources only) • Sidebars fill the empty vertical spaces. • Picture is supported only for HDMI and ColorStream inputs. • Depending on the input signals, the border of the picture is especially useful for external HD sources such as subtitles...To view the hidden areas (such as HD-DVD, DVHS movies, or PC graphics. no overscanning). • This is hidden. Chapter 6: Using the TV's features TheaterWide 3 picture size (for letter box programs with subtitles) • The picture is available for 720p, 1080i, and 1080p signals only. Note:...


