
Owners Manual
Page 2
... support the weight of the home with the Toshiba stand listed below. Television Stand Model 52HM85 62HM85 ST5284, ST5294 ST6284, ST6294 In Canada, please contact your authorized Toshiba dealer or visit the Toshiba Canada web site at which time you that important operating and maintenance instructions follow this hidden hazard of your TV (and other carts or stands is designed so broken lamp glass remains securely inside this Toshiba TV. Use...
... support the weight of the home with the Toshiba stand listed below. Television Stand Model 52HM85 62HM85 ST5284, ST5294 ST6284, ST6294 In Canada, please contact your authorized Toshiba dealer or visit the Toshiba Canada web site at which time you that important operating and maintenance instructions follow this hidden hazard of your TV (and other carts or stands is designed so broken lamp glass remains securely inside this Toshiba TV. Use...

Owners Manual
Page 4
... picture appear distorted or the color appear faded. Never locate the antenna near overhead power lines or other hazards. If these sounds become frequent or continuous, unplug the power cord and contact a Toshiba Authorized Service Center. 35) Special care for reflections on or off to environmental considerations. Disposal of mercury may be regulated due to check for DLPTM (digital light processing) units: • Lamp-The lamp...
... picture appear distorted or the color appear faded. Never locate the antenna near overhead power lines or other hazards. If these sounds become frequent or continuous, unplug the power cord and contact a Toshiba Authorized Service Center. 35) Special care for reflections on or off to environmental considerations. Disposal of mercury may be regulated due to check for DLPTM (digital light processing) units: • Lamp-The lamp...
Owners Manual
Page 6
... Remote control codes 18 Using the remote control to operate a cable converter box, satellite receiver, VCR, DVD player, or HTIB (home theater in a box 20 Learning about the remote control 22 Setting up your TV 23 Learning about the menu system 23 Changing the on-screen display language 24 Selecting the antenna input 24 Adding channels to the TV's memory 25 Programming channels automatically 25 Adding and erasing channels manually 26 Changing channels 26 Selecting the Quick Restart 26 Using the TV's features 27 Adjusting...
... Remote control codes 18 Using the remote control to operate a cable converter box, satellite receiver, VCR, DVD player, or HTIB (home theater in a box 20 Learning about the remote control 22 Setting up your TV 23 Learning about the menu system 23 Changing the on-screen display language 24 Selecting the antenna input 24 Adding channels to the TV's memory 25 Programming channels automatically 25 Adding and erasing channels manually 26 Changing channels 26 Selecting the Quick Restart 26 Using the TV's features 27 Adjusting...

Owners Manual
Page 11
... channel. S-VIDEO VIDEO OUT OUT From Satellite Dish IN from a DVD player or satellite receiver without component video or HDMI, use an S-video cable. (If your DVD player has component video, see page 15.) Do not connect both an S-video cable and a standard video cable between the TV and DVD player/satellite receiver at the same time or the picture performance will be unacceptable. Do not connect the DVD player/satellite receiver and VCR to the same set of standard audio cables...
... channel. S-VIDEO VIDEO OUT OUT From Satellite Dish IN from a DVD player or satellite receiver without component video or HDMI, use an S-video cable. (If your DVD player has component video, see page 15.) Do not connect both an S-video cable and a standard video cable between the TV and DVD player/satellite receiver at the same time or the picture performance will be unacceptable. Do not connect the DVD player/satellite receiver and VCR to the same set of standard audio cables...

Owners Manual
Page 12
... Connecting your TV Connecting a DVD player with component video, HDMI, or DVI, use the S-video connections (plus the standard audio connections) instead (see page 11). To record a TV program while watching a DVD, tune the VCR to the channel to record, and select ColorStream HD1 on the TV (see page 15. For HDMI or DVI connection, see "Selecting the antenna input" on the TV (HD1 or HD2). however, a 1080i signal will need: • two coaxial cables • one set...
... Connecting your TV Connecting a DVD player with component video, HDMI, or DVI, use the S-video connections (plus the standard audio connections) instead (see page 11). To record a TV program while watching a DVD, tune the VCR to the channel to record, and select ColorStream HD1 on the TV (see page 15. For HDMI or DVI connection, see "Selecting the antenna input" on the TV (HD1 or HD2). however, a 1080i signal will need: • two coaxial cables • one set...

Owners Manual
Page 13
... connect the component video cables to either set of component video cables From Antenna Note: For the highest possible picture quality, use , distribution, or revision of television programs, videotapes, DVDs, and other materials is not compatible with component video or HDMI, use the S-video connections (plus the standard audio connections) instead (see page 11). To record and watch the same TV program, tune the VCR to the channel to watch . however, a 1080i signal...
... connect the component video cables to either set of component video cables From Antenna Note: For the highest possible picture quality, use , distribution, or revision of television programs, videotapes, DVDs, and other materials is not compatible with component video or HDMI, use the S-video connections (plus the standard audio connections) instead (see page 11). To record and watch the same TV program, tune the VCR to the channel to watch . however, a 1080i signal...

Owners Manual
Page 15
... 16.4ft (5m). DVI device VIDEO AUDIO LR IN DVI OUT OUT TV TV Setting up your TV Using the TV's Features Appendix Index HDMI, the HDMI logo, and High-Definition Multimedia Interface are required (see illustration below ). To connect an HDMI device, you may not output digital audio signals. Some CDVs (Video CDs) may hear sound by connecting analog audio cables. In that you will not receive the HDMI digital audio signal and you use an HDMI cable that is recommended...
... 16.4ft (5m). DVI device VIDEO AUDIO LR IN DVI OUT OUT TV TV Setting up your TV Using the TV's Features Appendix Index HDMI, the HDMI logo, and High-Definition Multimedia Interface are required (see illustration below ). To connect an HDMI device, you may not output digital audio signals. Some CDVs (Video CDs) may hear sound by connecting analog audio cables. In that you will not receive the HDMI digital audio signal and you use an HDMI cable that is recommended...

Owners Manual
Page 18
... a cable converter box or satellite receiver), VCR (for a VCR or TV/VCR combo), or DVD (for a DVD player or HTIB [home theater in a box) Your Toshiba TV remote control is not preprogrammed to operate - See note at it is preprogrammed to control the TV. 6. For future reference, write down RECALL, press the Channel Number buttons to another code (if other codes are listed for your VCR brand, set the Device Switch back to TV to operate most Toshiba...
... a cable converter box or satellite receiver), VCR (for a VCR or TV/VCR combo), or DVD (for a DVD player or HTIB [home theater in a box) Your Toshiba TV remote control is not preprogrammed to operate - See note at it is preprogrammed to control the TV. 6. For future reference, write down RECALL, press the Channel Number buttons to another code (if other codes are listed for your VCR brand, set the Device Switch back to TV to operate most Toshiba...
Owners Manual
Page 22
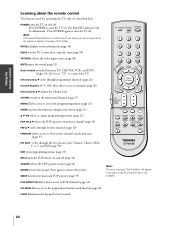
RECALL displays screen information (page 56) SLEEP sets the TV to turn the TV off. Introduction Connecting your TV Learning about the remote control The buttons used for details. Press POWER to control the TV. See page 26 for operating the TV only are described here. Press POWER again to turn off at a specific time (page 50) TV/VIDEO selects the video input source (page 48) MUTE mutes the sound (page 52) Device Switch switches between TV, CBL/SAT, VCR, and...
RECALL displays screen information (page 56) SLEEP sets the TV to turn the TV off. Introduction Connecting your TV Learning about the remote control The buttons used for details. Press POWER to control the TV. See page 26 for operating the TV only are described here. Press POWER again to turn off at a specific time (page 50) TV/VIDEO selects the video input source (page 48) MUTE mutes the sound (page 52) Device Switch switches between TV, CBL/SAT, VCR, and...
Owners Manual
Page 23
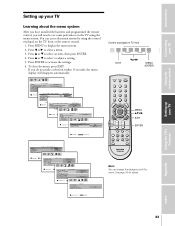
... automatically. Introduction Connecting your TV Using the remote control Setting up your TV Setting up your TV Learning about the menu system After you have installed the batteries and programmed the remote control, you do not make a selection within 15 seconds, the menu display will need to set some preferences on the TV using the control touchpad on TV front TV/VIDEO EXIT CHANNEL VOLUME MENU PO EXIT zyx • MENU (ENTER) FAVOTRIOTPE E PIC SIZE ENTEERNT TV/VIDEO RECALL POWER INFO 123 456...
... automatically. Introduction Connecting your TV Using the remote control Setting up your TV Setting up your TV Learning about the menu system After you have installed the batteries and programmed the remote control, you do not make a selection within 15 seconds, the menu display will need to set some preferences on the TV using the control touchpad on TV front TV/VIDEO EXIT CHANNEL VOLUME MENU PO EXIT zyx • MENU (ENTER) FAVOTRIOTPE E PIC SIZE ENTEERNT TV/VIDEO RECALL POWER INFO 123 456...

Owners Manual
Page 24
... Spanish) for the on TV front TV/VIDEO EXIT CHANNEL VOLUME MENU x •zy MENU (ENTER) Connecting your TV Using the Remote Control Setting up your desired language. To select the antenna input using the TV/VIDEO button: 1. The current signal source displays in purple. 2. To select a language: 1. Press y or z to highlight LANGUAGE, and then press ENTER to two different antenna input sources (ANT 1 or ANT 2). Control touchpad on -screen display of adjustment menus and messages. Press...
... Spanish) for the on TV front TV/VIDEO EXIT CHANNEL VOLUME MENU x •zy MENU (ENTER) Connecting your TV Using the Remote Control Setting up your desired language. To select the antenna input using the TV/VIDEO button: 1. The current signal source displays in purple. 2. To select a language: 1. Press y or z to highlight LANGUAGE, and then press ENTER to two different antenna input sources (ANT 1 or ANT 2). Control touchpad on -screen display of adjustment menus and messages. Press...

Owners Manual
Page 43
... video input sources. From the LOCKS menu, press y or z to enter a 4-digit code. Changing the PIN code 1. To set up your TV Using the remote control Setting up the video lock: 1. This option should be able to select the input sources with the TV/VIDEO button or Channel buttons unless you want (Video, Video+, or Off ), as follows: VIDEO : Locks Video 1, Video 2, Video 3, ColorStream HD1/HD2, and HDMI. Press the Number buttons (0-9) to highlight NEW PIN CODE. 2. FAVOTRIOTPE FAVOTRIOTPE E PIC SIZE ENTEERNT E PIC SIZE ENTEERNT TV/VIDEO RECALL POWER...
... video input sources. From the LOCKS menu, press y or z to enter a 4-digit code. Changing the PIN code 1. To set up your TV Using the remote control Setting up the video lock: 1. This option should be able to select the input sources with the TV/VIDEO button or Channel buttons unless you want (Video, Video+, or Off ), as follows: VIDEO : Locks Video 1, Video 2, Video 3, ColorStream HD1/HD2, and HDMI. Press the Number buttons (0-9) to highlight NEW PIN CODE. 2. FAVOTRIOTPE FAVOTRIOTPE E PIC SIZE ENTEERNT E PIC SIZE ENTEERNT TV/VIDEO RECALL POWER...
Owners Manual
Page 44
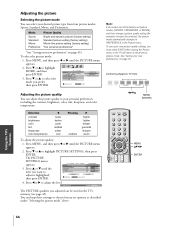
... MODE LAMP MODE P I CTURE S I ZE AUTO ASPECT P I CTURE SCROLL RESET SPORTS STANDARD MOV I NGS ANTENNA PREFERENCE 100 50 50 0 50 adjust is highlighted, then press ENTER. The PICTURE SETTINGS menu appears. 3. Press z or y to highlight PICTURE SETTINGS, then press ENTER. Press z or y to highlight MODE, and then press ENTER. 3. Press x or • to the previous picture mode. Control touchpad on TV front TV/VIDEO EXIT CHANNEL VOLUME MENU Adjusting the picture quality You can adjust the picture...
... MODE LAMP MODE P I CTURE S I ZE AUTO ASPECT P I CTURE SCROLL RESET SPORTS STANDARD MOV I NGS ANTENNA PREFERENCE 100 50 50 0 50 adjust is highlighted, then press ENTER. The PICTURE SETTINGS menu appears. 3. Press z or y to highlight PICTURE SETTINGS, then press ENTER. Press z or y to highlight MODE, and then press ENTER. 3. Press x or • to the previous picture mode. Control touchpad on TV front TV/VIDEO EXIT CHANNEL VOLUME MENU Adjusting the picture quality You can adjust the picture...

Owners Manual
Page 57
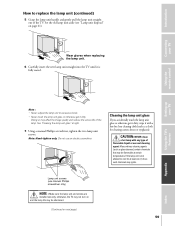
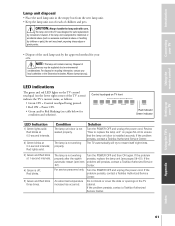
... time. Note : The lamp is a mercury lamp with all projection TVs that increases during use and user settings. Introduction Connecting your TV Using the remote control Setting up your web browser to replace the lamp unit You should replace the lamp unit: • if the picture darkens and/or colors fade; • if the screen (lamp) does not light (LED Indication 3); As is generally the case with internal atmospheric pressure that use the lamp beyond its service...
... time. Note : The lamp is a mercury lamp with all projection TVs that increases during use and user settings. Introduction Connecting your TV Using the remote control Setting up your web browser to replace the lamp unit You should replace the lamp unit: • if the picture darkens and/or colors fade; • if the screen (lamp) does not light (LED Indication 3); As is generally the case with internal atmospheric pressure that use the lamp beyond its service...
Owners Manual
Page 59
... Connecting your TV Using the TV's Features Appendix Note : • Never subject the lamp unit to replace the lamp unit (continued) 5. Do not use manual Phillips screwdriver only) NOTE : Make sure the lamp unit and screws are installed securely; Carefully insert the new lamp unit straight into the TV until it is not allowed to cool for cleaning camera lenses or eyeglasses). Using the remote control Setting up your TV...
... Connecting your TV Using the TV's Features Appendix Note : • Never subject the lamp unit to replace the lamp unit (continued) 5. Do not use manual Phillips screwdriver only) NOTE : Make sure the lamp unit and screws are installed securely; Carefully insert the new lamp unit straight into the TV until it is not allowed to cool for cleaning camera lenses or eyeglasses). Using the remote control Setting up your TV...
Owners Manual
Page 60
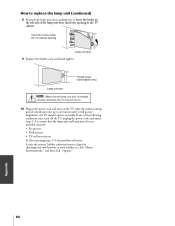
... 1-9, the problem still exists: Locate the nearest Toshiba authorized service depot by directing your web browser to replace the lamp unit (continued) 8. If any of the lamp unit door inside the TV cabinet opening in the power cord and turn on the TV. Thumb screw (hand-tighten only) Lamp unit door NOTE : Make sure the lamp unit door is installed securely; Introduction Connecting your TV Using the Remote Control Setting up to...
... 1-9, the problem still exists: Locate the nearest Toshiba authorized service depot by directing your web browser to replace the lamp unit (continued) 8. If any of the lamp unit door inside the TV cabinet opening in the power cord and turn on the TV. Thumb screw (hand-tighten only) Lamp unit door NOTE : Make sure the lamp unit door is installed securely; Introduction Connecting your TV Using the Remote Control Setting up to...
Owners Manual
Page 61
...). Using the TV's Features Appendix Index 61 If the problem persists, contact a Toshiba Authorized Service Center. For service personnel only. Do not block or cover the slots or openings in this TV was designed for your area. Red lights solid. The lamp is not working properly. Review "How to replace the lamp unit" on TV front TV/VIDEO EXIT CHANNEL VOLUME MENU POWER Red indicator Green indicator LED Indication 1) Green lights solid; Turn the POWER OFF and unplug the power cord...
...). Using the TV's Features Appendix Index 61 If the problem persists, contact a Toshiba Authorized Service Center. For service personnel only. Do not block or cover the slots or openings in this TV was designed for your area. Red lights solid. The lamp is not working properly. Review "How to replace the lamp unit" on TV front TV/VIDEO EXIT CHANNEL VOLUME MENU POWER Red indicator Green indicator LED Indication 1) Green lights solid; Turn the POWER OFF and unplug the power cord...

Owners Manual
Page 63
... sound may need to select a certain channel • The channel may be dead. do not prefer this. Symptom TV will not turn on the screen • The closed captioning OFF. Try another channel. • Adjust the TINT and/or COLOR in ON mode. Use a highly directional outdoor antenna. The screen lights dimly and the fan • The Quick Restart feature may have broadcast difficulties. Try another channel. • Adjust the PICTURE menu. Introduction Connecting...
... sound may need to select a certain channel • The channel may be dead. do not prefer this. Symptom TV will not turn on the screen • The closed captioning OFF. Try another channel. • Adjust the TINT and/or COLOR in ON mode. Use a highly directional outdoor antenna. The screen lights dimly and the fan • The Quick Restart feature may have broadcast difficulties. Try another channel. • Adjust the PICTURE menu. Introduction Connecting...
Owners Manual
Page 64
... YOU SPECIFIC LEGAL RIGHTS, AND YOU MAY ALSO HAVE OTHER RIGHTS, WHICH MAY VARY FROM PROVINCE TO PROVINCE IN CANADA. Introduction Limited Canada Warranty for DLP Television Models Connecting your TV Using the Remote Control Setting up your TV Toshiba of Canada Limited ("TCL") makes the following all parts are warranted against defects in Canada. (4) Labor charges for installation, setup, adjustment of customer controls, and installation or repair of antenna...
... YOU SPECIFIC LEGAL RIGHTS, AND YOU MAY ALSO HAVE OTHER RIGHTS, WHICH MAY VARY FROM PROVINCE TO PROVINCE IN CANADA. Introduction Limited Canada Warranty for DLP Television Models Connecting your TV Using the Remote Control Setting up your TV Toshiba of Canada Limited ("TCL") makes the following all parts are warranted against defects in Canada. (4) Labor charges for installation, setup, adjustment of customer controls, and installation or repair of antenna...

Owners Manual
Page 65
... 34 POWER button 22 Q R Quick restart 26 RECALL button 56 Remote control Battery installation 17 Learning about the buttons 22 Programming 18 RESET 46, 54 S SAP sound 52 Satellite receiver connection 11 Scrolling the Theater Wide picture 32 Set-top box 13 Sleep timer 50 Sound quality adjustments 53 SPEAKERS on/off 55 Specifications 62 SRS 3D surround 53 StableSound 54 Stereo sound 52 SurfLock 27 S-video cables 8 T Theater wide picture 31 Troubleshooting 63 TV/VIDEO button 27, 48 V V-CHIP...
... 34 POWER button 22 Q R Quick restart 26 RECALL button 56 Remote control Battery installation 17 Learning about the buttons 22 Programming 18 RESET 46, 54 S SAP sound 52 Satellite receiver connection 11 Scrolling the Theater Wide picture 32 Set-top box 13 Sleep timer 50 Sound quality adjustments 53 SPEAKERS on/off 55 Specifications 62 SRS 3D surround 53 StableSound 54 Stereo sound 52 SurfLock 27 S-video cables 8 T Theater wide picture 31 Troubleshooting 63 TV/VIDEO button 27, 48 V V-CHIP...


