
User Guide
Page 10
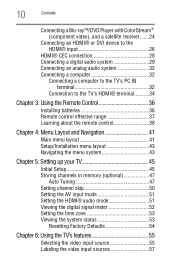
... Connecting a computer to the TV's PC IN terminal 32 Connection to the TV's HDMI® terminal...........34 Chapter 3: Using the Remote Control 36 Installing batteries 36 Remote control effective range 37 Learning about the remote control 38 Chapter 4: Menu Layout and Navigation 41 Main menu layout 41 Setup/Installation menu layout 43 Navigating the menu system...
... Connecting a computer to the TV's PC IN terminal 32 Connection to the TV's HDMI® terminal...........34 Chapter 3: Using the Remote Control 36 Installing batteries 36 Remote control effective range 37 Learning about the remote control 38 Chapter 4: Menu Layout and Navigation 41 Main menu layout 41 Setup/Installation menu layout 43 Navigating the menu system...
User Guide
Page 13
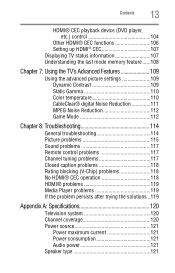
Contents 13 HDMI® CEC playback device (DVD player, etc.) control 104 Other HDMI® CEC functions 106 Setting up HDMI® CEC 107 Displaying TV status information 107 Understanding the last mode memory feature ...CableClear® digital Noise Reduction 111 MPEG Noise Reduction 112 Game Mode 112 Chapter 8: Troubleshooting 114 General troubleshooting 114 Picture problems 115 Sound problems 117 Remote control problems 117 Channel tuning problems 117 Closed caption problems 118 Rating blocking (V-Chip) problems 118 No HDMI® CEC operation 118 HDMI® problems ...
Contents 13 HDMI® CEC playback device (DVD player, etc.) control 104 Other HDMI® CEC functions 106 Setting up HDMI® CEC 107 Displaying TV status information 107 Understanding the last mode memory feature ...CableClear® digital Noise Reduction 111 MPEG Noise Reduction 112 Game Mode 112 Chapter 8: Troubleshooting 114 General troubleshooting 114 Picture problems 115 Sound problems 117 Remote control problems 117 Channel tuning problems 117 Closed caption problems 118 Rating blocking (V-Chip) problems 118 No HDMI® CEC operation 118 HDMI® problems ...
User Guide
Page 17
... information. Keep this manual for future reference. 2 To choose a location for the TV: ❖ Read "Important notes about the remote control" on the TV. THIS TYPE OF DAMAGE IS NOT COVERED UNDER THE TOSHIBA WARRANTY. 3 Do not plug in the power cords for an overview of the unit. Then press the POWER button... on the TV control panel or remote control to turn the TV off or on, unplug the power cords for a few seconds and...
... information. Keep this manual for future reference. 2 To choose a location for the TV: ❖ Read "Important notes about the remote control" on the TV. THIS TYPE OF DAMAGE IS NOT COVERED UNDER THE TOSHIBA WARRANTY. 3 Do not plug in the power cords for an overview of the unit. Then press the POWER button... on the TV control panel or remote control to turn the TV off or on, unplug the power cords for a few seconds and...

User Guide
Page 18
... TV front TV Top 10 1 2 (Sample Illustration) Front and side panel controls and connections 1 Power On/Standby LED-Power indicator light, (glows green when the TV power is On). 2 Remote sensor (embedded)-Point the remote control toward this button also functions as the ENTER button. 7 INPUT-Changes the source ...-When no menu is onscreen, these buttons change from one source to the buttons on the remote control or TV control panel and you are viewing. When a menu is displayed, this remote sensor. 3 POWER-Turns the TV On/Off. Press repeatedly to change the channel (programmed ...
... TV front TV Top 10 1 2 (Sample Illustration) Front and side panel controls and connections 1 Power On/Standby LED-Power indicator light, (glows green when the TV power is On). 2 Remote sensor (embedded)-Point the remote control toward this button also functions as the ENTER button. 7 INPUT-Changes the source ...-When no menu is onscreen, these buttons change from one source to the buttons on the remote control or TV control panel and you are viewing. When a menu is displayed, this remote sensor. 3 POWER-Turns the TV On/Off. Press repeatedly to change the channel (programmed ...

User Guide
Page 23
Use the cable box controls to program or access certain features on the TV. Connecting Your TV 23 Connecting a VCR, antenna, cable TV, or camcorder Connecting a VCR, antenna, cable TV, ... to your VCR's audio out terminal using the white audio cable only. ❖ Standard audio cables NOTE When you use a cable box, you use the remote control to change channels. Select the ANT/CABLE video input source on the TV.* To view basic and premium cable channels: Turn Off the VCR. To...
Use the cable box controls to program or access certain features on the TV. Connecting Your TV 23 Connecting a VCR, antenna, cable TV, or camcorder Connecting a VCR, antenna, cable TV, ... to your VCR's audio out terminal using the white audio cable only. ❖ Standard audio cables NOTE When you use a cable box, you use the remote control to change channels. Select the ANT/CABLE video input source on the TV.* To view basic and premium cable channels: Turn Off the VCR. To...

User Guide
Page 24
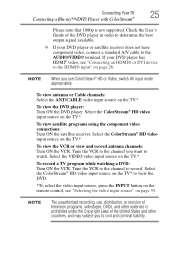
...) Connecting a Blu-ray™/DVD Player, Satellite receiver, or VCR with ColorStream® *To select the video input source, press the INPUT button on the remote control, see "Selecting the video input source" on the TV to your VCR's audio out terminal using the white audio cable only. ❖ Standard audio cables...
...) Connecting a Blu-ray™/DVD Player, Satellite receiver, or VCR with ColorStream® *To select the video input source, press the INPUT button on the remote control, see "Selecting the video input source" on the TV to your VCR's audio out terminal using the white audio cable only. ❖ Standard audio cables...
User Guide
Page 25
..., videotapes, DVDs, and other countries, and may subject you to view the DVD. *To select the video input source, press the INPUT button on the remote control, see "Connecting an HDMI® or DVI device to watch. If your DVD player or satellite receiver does not have component video, connect a standard A/V cable...
..., videotapes, DVDs, and other countries, and may subject you to view the DVD. *To select the video input source, press the INPUT button on the remote control, see "Connecting an HDMI® or DVI device to watch. If your DVD player or satellite receiver does not have component video, connect a standard A/V cable...

User Guide
Page 27
..., the length of an HDMI® to DVI adapter cable transfers video only. For more information, see "Setting the HDMI® audio mode" on the remote control.
..., the length of an HDMI® to DVI adapter cable transfers video only. For more information, see "Setting the HDMI® audio mode" on the remote control.
User Guide
Page 28
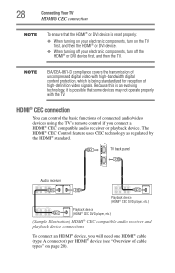
...® or DVI device is being standardized for reception of high-definition video signals. HDMI® CEC connection You can control the basic functions of connected audio/video devices using the TV's remote control if you will need one HDMI® cable (type A connector) per HDMI® device (see "Overview of cable types...
...® or DVI device is being standardized for reception of high-definition video signals. HDMI® CEC connection You can control the basic functions of connected audio/video devices using the TV's remote control if you will need one HDMI® cable (type A connector) per HDMI® device (see "Overview of cable types...
User Guide
Page 30
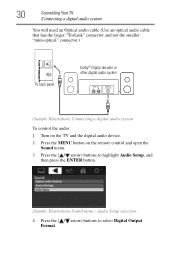
....) TV back panel Dolby® Digital decoder or other digital audio system (Sample Illustration) Connecting a digital audio system To control the audio: 1 Turn on the TV and the digital audio device. 2 Press the MENU button on the remote control and open the Sound menu. 3 Press the ( / arrow) buttons to select Digital Output Format.
....) TV back panel Dolby® Digital decoder or other digital audio system (Sample Illustration) Connecting a digital audio system To control the audio: 1 Turn on the TV and the digital audio device. 2 Press the MENU button on the remote control and open the Sound menu. 3 Press the ( / arrow) buttons to select Digital Output Format.

User Guide
Page 36
Chapter 3 Using the Remote Control Installing batteries To install batteries: 1 Remove the battery cover from the back of the remote control. Do not expose batteries to the (+) and (-) markings on the battery compartment. (Sample Illustration) Installing the batteries 3 Replace the battery cover. Squeeze tab and lift cover (Sample Illustration) Removing the remote back cover 2 Insert two AAA batteries, corresponding to excessive heat such as sunshine, fire, etc. 36
Chapter 3 Using the Remote Control Installing batteries To install batteries: 1 Remove the battery cover from the back of the remote control. Do not expose batteries to the (+) and (-) markings on the battery compartment. (Sample Illustration) Installing the batteries 3 Replace the battery cover. Squeeze tab and lift cover (Sample Illustration) Removing the remote back cover 2 Insert two AAA batteries, corresponding to excessive heat such as sunshine, fire, etc. 36

User Guide
Page 37
... batteries from leaking into the battery compartment Remote control effective range For optimum performance, aim the remote control directly at the TV and make sure there is no obstruction between the remote control and the TV. 16.4 ft (5m) (Sample Illustration) Remote control effective range This prevents battery acid from the remote if they are dead or if the...
... batteries from leaking into the battery compartment Remote control effective range For optimum performance, aim the remote control directly at the TV and make sure there is no obstruction between the remote control and the TV. 16.4 ft (5m) (Sample Illustration) Remote control effective range This prevents battery acid from the remote if they are dead or if the...
User Guide
Page 38
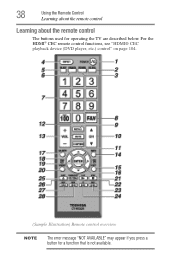
For the HDMI® CEC remote control functions, see "HDMI® CEC playback device (DVD player, etc.) control" on page 104. (Sample Illustration) Remote control overview NOTE The error message "NOT AVAILABLE" may appear if you press a button for operating the TV are described below. 38 Using the Remote Control Learning about the remote control Learning about the remote control The buttons used for a function that is not available.
For the HDMI® CEC remote control functions, see "HDMI® CEC playback device (DVD player, etc.) control" on page 104. (Sample Illustration) Remote control overview NOTE The error message "NOT AVAILABLE" may appear if you press a button for operating the TV are described below. 38 Using the Remote Control Learning about the remote control Learning about the remote control The buttons used for a function that is not available.

User Guide
Page 39
... to restore the moving picture, see "Setting the sleep timer" on page 72. 7 The Channel Number buttons (0-9, and Dash 100) directly tune channels. Using the Remote Control 39 Learning about the remote control 1 The POWER button turns the TV On/Off.
... to restore the moving picture, see "Setting the sleep timer" on page 72. 7 The Channel Number buttons (0-9, and Dash 100) directly tune channels. Using the Remote Control 39 Learning about the remote control 1 The POWER button turns the TV On/Off.

User Guide
Page 40
...the picture moving rapidly forward.) 25 The EJECT button ejects the DVD or tape. 26 The PAUSE/STEP button suspends play mode to control Toshiba HDMI® CEC compatible devices via HDMI® connection. Press during play or record temporarily. See "Navigating the menu system" on... See "Using HDMI® CEC" on page 43 The following key functions allow you to view the picture moving rapidly backward.). 40 Using the Remote Control Learning about the remote control 18 The Arrow buttons ( / / / ) select or adjust programming menus when a menu is on-screen. 19 The Arrow buttons ( /...
...the picture moving rapidly forward.) 25 The EJECT button ejects the DVD or tape. 26 The PAUSE/STEP button suspends play mode to control Toshiba HDMI® CEC compatible devices via HDMI® connection. Press during play or record temporarily. See "Navigating the menu system" on... See "Using HDMI® CEC" on page 43 The following key functions allow you to view the picture moving rapidly backward.). 40 Using the Remote Control Learning about the remote control 18 The Arrow buttons ( / / / ) select or adjust programming menus when a menu is on-screen. 19 The Arrow buttons ( /...
User Guide
Page 41
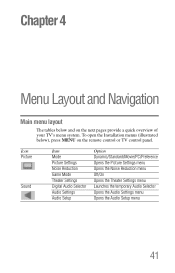
To open the Installation menus (illustrated below and on the remote control or TV control panel. Chapter 4 Menu Layout and Navigation Main menu layout The tables below ), press MENU on the next pages provide a quick overview of your TV's menu ...
To open the Installation menus (illustrated below and on the remote control or TV control panel. Chapter 4 Menu Layout and Navigation Main menu layout The tables below ), press MENU on the next pages provide a quick overview of your TV's menu ...

User Guide
Page 43
...) Navigating the menu system 2 When a menu is open, use the ( / / / arrow) buttons on the remote control or the arrow) buttons on the remote control or TV control panel, open the Installation menu, press the MENU button on the TV control panel to move in the corresponding direction in the menu. To open the Setup menu...Alaska/Pacific/Mountain/Central Opens the Signal Meter menu Opens the System Information screen Navigating the menu system You can use the buttons on the remote control or TV control panel to access and navigate your menu settings or select a highlighted item.
...) Navigating the menu system 2 When a menu is open, use the ( / / / arrow) buttons on the remote control or the arrow) buttons on the remote control or TV control panel, open the Installation menu, press the MENU button on the TV control panel to move in the corresponding direction in the menu. To open the Setup menu...Alaska/Pacific/Mountain/Central Opens the Signal Meter menu Opens the System Information screen Navigating the menu system You can use the buttons on the remote control or TV control panel to access and navigate your menu settings or select a highlighted item.

User Guide
Page 47
..., and then press the ENTER button. (Sample Illustration) Terrestrial menu - Storing channels in memory (optional) To make sure your TV stops only on the remote control or the control panel, store those channels in the TV's memory. Auto Tuning You can manually add or erase individual channels from memory. Input Configuration selection 4 Highlight...
..., and then press the ENTER button. (Sample Illustration) Terrestrial menu - Storing channels in memory (optional) To make sure your TV stops only on the remote control or the control panel, store those channels in the TV's memory. Auto Tuning You can manually add or erase individual channels from memory. Input Configuration selection 4 Highlight...

User Guide
Page 48
... the antenna input is normal; however, once channel programming is finished, you should not have not already done so, see "ANT/CABLE IN" on the remote control. ❖ Programming channels when the ANT/CABLE input is configured for Antenna.
... the antenna input is normal; however, once channel programming is finished, you should not have not already done so, see "ANT/CABLE IN" on the remote control. ❖ Programming channels when the ANT/CABLE input is configured for Antenna.

User Guide
Page 49
... programming, press the EXIT button on -screen display, and then press the ENTER button. Setting up your TV 49 Storing channels in the on the remote control or highlight Cancel in memory (optional) A new set of Installation menu icons appears. 4 Open the Terrestrial menu, highlight Channel Program to open the Start Scan...
... programming, press the EXIT button on -screen display, and then press the ENTER button. Setting up your TV 49 Storing channels in the on the remote control or highlight Cancel in memory (optional) A new set of Installation menu icons appears. 4 Open the Terrestrial menu, highlight Channel Program to open the Start Scan...


